
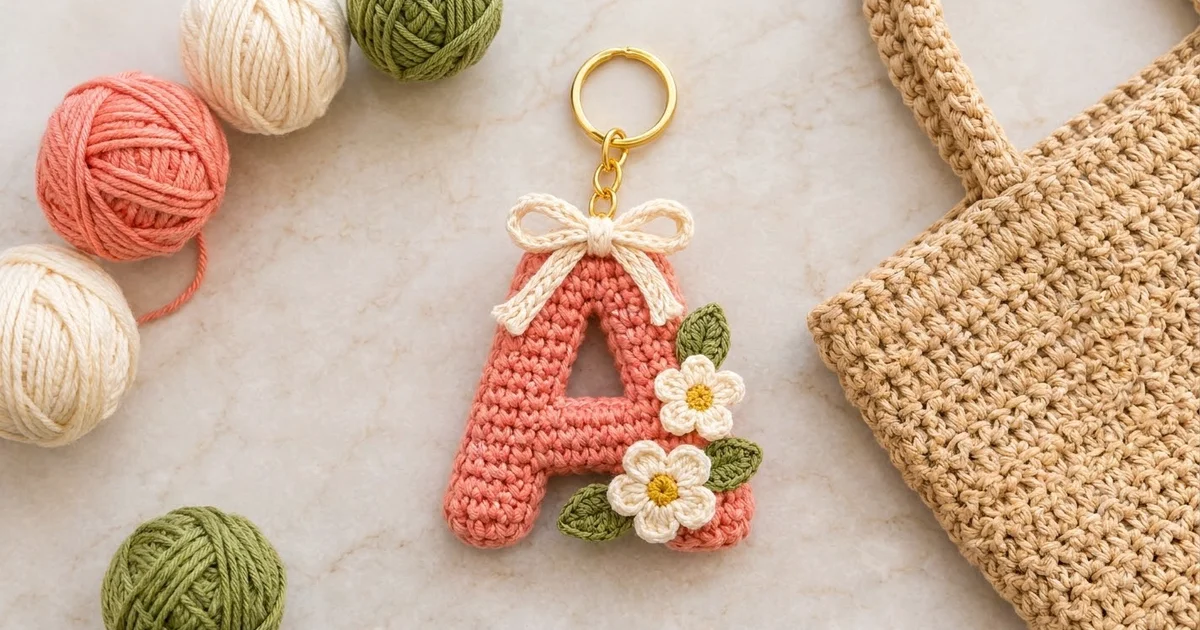
This little letter A is a soft, puffy keychain charm with a cottage-garden feel. The coral letter is trimmed with a cream bow at the top, two cream daisies with sunny yellow centers, and three olive-green leaves. A gold keyring and short chain make it ready to clip onto a tote, backpack, or set of keys.
The color palette is warm and fresh: coral for the letter, cream for the bow and petals, yellow for the flower centers, and olive green for the leaves. The dense single crochet fabric gives clean edges and a toy-like finish that holds its shape.
The pattern uses US crochet terms. The finished charm measures about 3.25 in (8.3 cm) wide and 3.75 in (9.5 cm) tall, not counting the hardware.
You crochet two identical flat letter layers in rows. Each layer starts with two separate legs, which are bridged with a chain to form the crossbar, split again around the small opening, and joined at the apex. Then you hold the layers together, stuff them lightly, and close them with one round of single crochet. Last, you make and sew on the bow, flowers, and leaves, and attach the keyring.
Finished Size and Construction
- Finished size: 3.25 in (8.3 cm) wide x 3.75 in (9.5 cm) tall
- Skill level: Easy (rows, simple shaping, sewing)
- Terminology: US crochet terms
- Yarn weight: DK / light worsted (#3) cotton
- Hook: 2.75 mm (US C/2)
- Number of pieces: 1 letter charm (2 layers joined into one body), plus 1 bow, 2 flowers and 3 leaves sewn on
- Layout: Single standing letter; the appliqués cluster at the apex and the lower right leg
- Layer size: 3 in (7.6 cm) wide x 3.5 in (8.9 cm) tall
- Size before border: 3 in (7.6 cm) x 3.5 in (8.9 cm)
- Border depth: about 1/8 in (0.3 cm) per edge
Materials
Use a smooth, tightly plied cotton or cotton blend. It shows the stitches crisply and holds up well on a keychain. Avoid fuzzy yarns, because they blur the letter’s outline.
- Coral: 10 g (22 m), for the letter layers and the joining border
- Cream: 5 g (11 m), for the bow and petals
- Olive green: 2 g (5 m), for the leaves
- Yellow: 1 g (2 m), for the flower centers
All quantities include a small margin for swatching and sewing tails.
Tools:
– 2.75 mm (US C/2) crochet hook
– Tapestry needle
– Small amount of polyester fiberfill
– 1 gold split keyring, 1 in (2.5 cm), with a 1.25 in (3.2 cm) chain
– 1 gold jump ring, plus 2 pairs of flat-nose pliers
– 2 removable stitch markers
– Scissors and a ruler
Abbreviations (US Terms)
- ch: chain
- sl st: slip stitch
- sc: single crochet
- hdc: half double crochet
- dc: double crochet
- sc2tog: single crochet 2 together
- MR: magic ring
- st(s): stitch(es)
- RS / WS: right side / wrong side
Special stitch: Shift row. Use this on 4-stitch leg sections to move the leg 1 stitch toward the center without changing the count. Ch 1. Work sc2tog over the 2 sts at the outer edge, sc in the next st, and work 2 sc in the st at the inner edge. If the inner edge comes first in your row, work the same stitches in reverse order: 2 sc in the first st, sc 1, sc2tog. Count: 1 + 1 + 2 = 4 sts.
Gauge and Checkpoints
Gauge: 12 sc and 12 rows = 2 in (5.1 cm) in sc worked in rows.
This square gauge matters. The border uses 1 sc per row end, which only lies flat when stitches and rows are the same size.
Before making both layers, crochet one full layer and measure it:
- After Row 8 (legs): the legs are 1 1/3 in (3.4 cm) tall, and each leg is about 2/3 in (1.7 cm) wide.
- After Row 9 (crossbar): the row is 14 sts, about 2.33 in (5.9 cm) wide.
- After Row 11: the layer is 1.83 in (4.7 cm) tall, and the top row is 12 sts, 2 in (5.1 cm) wide.
- After Row 16 (apex join): the layer is 2.67 in (6.8 cm) tall.
- After Row 21: the layer is 3.5 in (8.9 cm) tall and 3 in (7.6 cm) wide at the base.
If the layer is too big, go down to a 2.5 mm hook. If it is too small, go up to 3.0 mm. If your stitch width matches but your height does not, adjust your tension rather than the row count, so the border math stays intact.

Letter Layers (Make 2, Coral)
Right Leg
Ch 5.
Row 1: Sc in the 2nd ch from the hook and in each ch across, turn. (4 sc)
Rows 2–3: Ch 1, sc in each st across, turn. (4 sc)
Row 4: Work a Shift row, turn. (4 sc)
Rows 5–6: Ch 1, sc in each st across, turn. (4 sc)
Row 7: Work a Shift row, turn. (4 sc)
Row 8: Ch 1, sc in each st across. (4 sc)
Fasten off. The outer edge is the edge that will face right when the letter is finished.
Left Leg
Repeat Rows 1–8 of the Right Leg, mirroring the Shift rows so the leg leans toward the right. Do not fasten off. Place a marker in the live loop if you set the work down.
Lay both legs side by side with their bases level and the leans pointing toward each other. The gap between them is 10 sts (1.67 in / 4.2 cm) at Row 1 and 6 sts (1 in / 2.5 cm) at Row 8.
Crossbar and Upper Body
Row 9 (joining row): Ch 1, sc in each of the 4 sts of the Left Leg, ch 6, then sc in each of the 4 sts of the Right Leg, starting at its inner edge. Turn. (8 sc + 6 ch = 14 sts)
Row 10: Ch 1, sc in each sc and in each ch across, turn. (14 sc)
Row 11: Ch 1, sc2tog, sc in the next 10 sts, sc2tog, turn. (12 sc)
Upper Legs (Above the Crossbar)
Left upper leg, Row 12: Ch 1, sc in the first 4 sts, turn. Leave the remaining 8 sts unworked. (4 sc)
Row 13: Work a Shift row, with the increase toward the center, turn. (4 sc)
Row 14: Ch 1, sc in each st across, turn. (4 sc)
Row 15: Work a Shift row, turn. (4 sc)
Do not fasten off. Place a marker in the live loop.
Right upper leg, Row 12: Skip the next 4 unworked sts of Row 11; these form the base of the small opening. Join coral in the next st, ch 1, and sc in the same st and the next 3 sts, turn. (4 sc)
Rows 13–15: Work as for the left upper leg, mirroring the Shift rows. (4 sc each row)
Fasten off.
The opening is now closed at the top: it measures 4 sts at its base and 0 sts after Row 15.
Apex
Pick up the live loop of the left upper leg.
Row 16: Ch 1, sc in each of the 4 sts of the left upper leg, then sc in each of the 4 sts of the right upper leg, turn. (8 sc)
Row 17: Ch 1, sc2tog, sc in the next 4 sts, sc2tog, turn. (6 sc)
Row 18: Ch 1, sc in each st across, turn. (6 sc)
Row 19: Ch 1, sc2tog, sc in the next 2 sts, sc2tog, turn. (4 sc)
Row 20: Ch 1, sc in each st across, turn. (4 sc)
Row 21: Ch 1, sc2tog twice. (2 sc)
Fasten off and weave in all tails on the side you choose as the WS.
Layer total: 21 rows, 3.5 in (8.9 cm) tall, 3 in (7.6 cm) wide at Row 1.
Border (Joining Round)
The border joins the two layers and gives the letter its rounded, padded edge.
Border gauge: 1 sc per row end and 1 sc per stitch. Because the gauge is square (6 sts and 6 rows per inch / 2.5 cm), this keeps the edge flat with no ruffling or cupping.
Place the layers WS together with the edges matched. Work every stitch through both layers.
Inner Opening (Work First)
Join coral at the base of the opening, in the first of the 4 skipped Row 11 sts.
Opening round: Sc in each of the 4 base sts, sc in each of the 4 row ends up one side of the opening (Rows 12–15), and sc in each of the 4 row ends down the other side. Sl st to the first sc. (12 sc)
Fasten off.
Outer Edge
Join coral at the bottom outer corner of the left leg. Work counterclockwise:
- Left leg bottom: Sc in each of the 4 foundation loops, working 2 sc in the first and last loops. (6 sc)
- Left leg inner edge: Sc in each row end of Rows 1–8. (8 sc)
- Underside of the crossbar: Sc in each of the 6 ch loops. (6 sc)
- Right leg inner edge: Sc in each row end of Rows 8–1. (8 sc)
- Right leg bottom: Work as for the left leg bottom. (6 sc)
- Right outer edge: Sc in each row end of Rows 1–21. Stop when about 2 in (5.1 cm) of edge remains open, stuff the lower half lightly, then continue. (21 sc)
- Top: Work 2 sc in each of the 2 sts of Row 21. (4 sc)
- Left outer edge: Sc in each row end of Rows 21–1. Before closing the last 1 in (2.5 cm), add fiberfill so the letter is about 1/2 in (1.3 cm) thick. (21 sc)
Sl st to the first sc. Total: 6 + 8 + 6 + 8 + 6 + 21 + 4 + 21 = 80 sc.
Why the math works: Every row end gets exactly 1 sc, which matches the square gauge. The only extra stitches are the 4 corner increases at the leg bottoms and the 2 at the top. These turn the corners without pulling them, and the counts per side already include them. The single round adds about 1/8 in (0.3 cm) to each edge. That gives 3 + 0.25 = 3.25 in (8.3 cm) wide and 3.5 + 0.25 = 3.75 in (9.5 cm) tall.
Flowers (Make 2)
Center (yellow), Round 1: Make a MR, ch 1, and work 5 sc in the ring. Pull the ring closed and sl st to the first sc. (5 sc)
Fasten off yellow. Join cream in any st.
Round 2 (petals): In each of the 5 sts work (sl st, ch 2, 2 dc, ch 2, sl st). (5 petals)
Fasten off, leaving a 6 in (15.2 cm) tail for sewing. Each flower measures about 1 in (2.5 cm) across.
Leaves (Make 3, Olive Green)
Ch 7.
Starting in the 2nd ch from the hook, work sl st, sc, hdc, dc, hdc, sc. That is 6 sts along the first side.
Ch 1 for the tip, rotate the work, and along the other side of the chain work sc, hdc, dc, hdc, sc, sl st. That is 6 more sts.
Fasten off, leaving a sewing tail. Each leaf is about 1 in (2.5 cm) long, with a pointed tip.
Bow (Cream)
Ch 71. Sl st in the back bump of the 2nd ch from the hook and in each back bump across. (70 sl st)
The cord should measure about 10 in (25.4 cm). Fasten off and weave in both ends along the cord.
Tie the cord into a bow with two loops of about 3/4 in (1.9 cm) each and tails of about 1.5 in (3.8 cm). The finished bow is about 2 in (5.1 cm) wide. Snug the knot so it sits round and centered.
Assembly
- Sew the bow knot to the apex, just below the top edge. Tack each tail down the left and right outer edges so they drape like the photo.
- Sew one flower at the right edge of the crossbar and the second flower lower, on the right leg near the bottom, so they slightly overlap.
- Tuck the leaves under the petal edges and sew them on: one above the upper flower, one on the right between the two flowers, and one at the lower left of the bottom flower.
- Open the jump ring with pliers. Pass it through 2 border stitches at the apex, behind the bow, and through the last link of the keyring chain. Close it tightly.
Final Blocking
- Mist the letter lightly with water. Cotton does not need soaking.
- With your fingers, roll the outer border slightly toward the front to round the padded edge.
- Ease the legs straight so both bases sit level, 3.25 in (8.3 cm) across.
- Pinch the small opening into a neat triangle.
- Flatten the petals and leaves, and pin the leaf tips to a foam board.
- Let everything dry fully, 2–4 hours, before using the keychain.
Final Quality-Control Checklist
- The letter measures 3.25 in (8.3 cm) x 3.75 in (9.5 cm).
- Both layers line up, with no exposed layer edge.
- The outer border has 80 sc, and the opening round has 12 sc.
- The stuffing is even, about 1/2 in (1.3 cm) thick, and no fiber shows between stitches.
- Both legs lean evenly, and the crossbar is level.
- The bow is centered at the apex and the tails are tacked down.
- Both flowers and all 3 leaves are sewn securely, with no loose petals.
- The jump ring is fully closed and passes through both layers.
Troubleshooting
- The legs lean unevenly. One Shift row was probably worked in the wrong direction. The increase must always fall on the inner edge.
- Row 9 won’t line up. Check that both legs have 8 rows before you bridge them with the 6-ch crossbar.
- The border ruffles. You worked extra sc at the row ends. Stick to 1 per row end.
- The border cups or puckers. You skipped row ends, or your border tension is tight. Go up half a hook size for the border only.
- The stuffing shows through. Use less fiberfill, or go down a hook size for both layers.
- The petals flop. Work the 2 dc more tightly, and block the flowers flat.
- The opening has closed up. Make sure you skipped exactly 4 sts on Row 11 before the right upper leg.
Care
Spot clean with mild soap and cool water, then reshape and air dry flat. Don’t machine wash, because the stuffing and metal hardware can be damaged.

Final Notes
The measurement chain is simple: 6 sts and 6 rows per inch (2.5 cm) gives each layer 21 rows and 18 sts at the base, so the layer measures 3.5 in (8.9 cm) x 3 in (7.6 cm). The 80-stitch joining border adds 1/8 in (0.3 cm) per edge, which makes the finished charm 3.25 in (8.3 cm) x 3.75 in (9.5 cm). Check your gauge once, keep the 1 sc per row end rule, and the letter will come out right. Swap the colors to match a favorite bag, or tuck one more flower into the cluster.
Happy crocheting!