

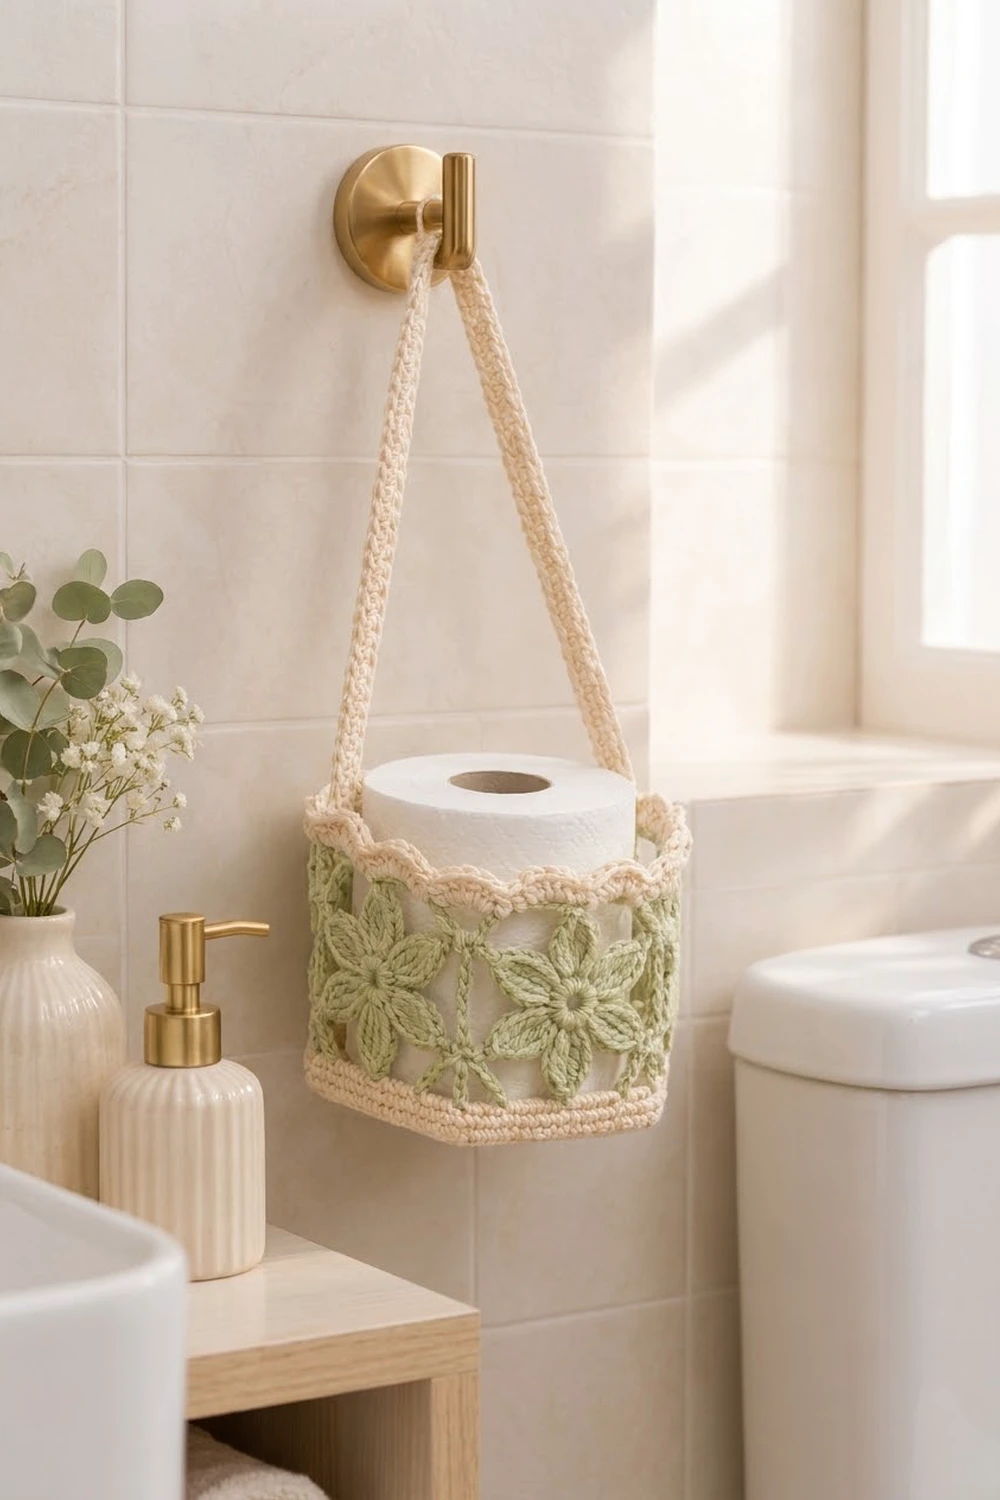
The Sage Blossom Hanging Basket is a small six-sided basket that hangs from a hook and holds a spare toilet roll. Each wall is a sage-green hexagon with a six-petal flower inside an open mesh frame. A solid cream base, cream seams and a scalloped cream rim hold the shape together.
The palette is two soft colors: sage green for the flowers and natural cream for the structure. It looks calm and a little vintage, and it suits a bathroom, nursery or laundry room.
This pattern uses US crochet terms. The finished basket is 6.9 in (17.5 cm) across from flat side to flat side, 8 in (20.3 cm) from corner to corner, and 5.75 in (14.6 cm) tall including the scalloped rim. The strap adds a hanging loop of about 7 in (17.8 cm).
Construction overview: you make six flower motifs and join them into a ring. Leveling rounds turn the zigzag top and bottom edges into straight edges. Then you crochet a hexagon base onto the bottom, work the scalloped border on top, and sew on the strap.
Finished Size and Construction
- Finished size: 6.9 in (17.5 cm) flat side to flat side, 8 in (20.3 cm) corner to corner, 5.75 in (14.6 cm) tall
- Skill level: Intermediate
- Terminology: US
- Yarn weight: DK (3), cotton
- Hook: 3.5 mm (E-4)
- Number of pieces: 6 motifs, 1 base, 1 strap
- Layout: 6 motifs in a ring, point up, with the base attached underneath
- Motif size: 2.3 in (5.8 cm) per side, 4 in (10.2 cm) flat to flat, 4.6 in (11.7 cm) point to point
- Size before border: 6.9 in (17.5 cm) across, 5 in (12.7 cm) tall
- Border depth: 0.75 in (1.9 cm)
Materials
Use a smooth mercerized or combed cotton in DK weight, about 115 m per 50 g. Cotton holds its shape, takes steam well and doesn’t stretch much under the weight of a roll.
- Color A, sage green: 35 g, about 80 m
- Color B, cream: 60 g, about 138 m
- 3.5 mm (E-4) crochet hook
- 4 locking stitch markers
- Tapestry needle
- Scissors
- Pins and a blocking mat
These quantities include a margin of about 15% for your gauge swatch and tails.
Abbreviations (US Terms)
- ch – chain
- sl st – slip stitch
- sc – single crochet
- hdc – half double crochet
- dc – double crochet
- tr – treble crochet (yarn over twice)
- dtr – double treble (yarn over 3 times)
- sp – space
- sk – skip
- MR – magic ring
- RS / WS – right side / wrong side
Special stitch – trtr (triple treble): Yarn over 4 times and insert the hook in the stitch. Yarn over and pull up a loop. Then (yarn over, pull through 2 loops) 5 times.
Gauge and Checkpoints
Gauge: 20 sc and 23 rounds = 4 in (10.2 cm) in sc worked in the round.
Make one complete motif and one test base round before anything else. They show your gauge better than any flat swatch can.
- Motif after Rnd 3: the flower measures about 3 in (7.6 cm) from petal tip to petal tip.
- Finished motif: 4 in (10.2 cm) flat to flat.
- Base after Rnd 10: 3.5 in (8.9 cm) flat to flat.
- Base after Rnd 20: 6.9 in (17.5 cm) flat to flat, 4 in (10.2 cm) per side.
If your pieces are too big, go down 0.25 mm in hook size. If they’re too small, go up 0.25 mm. The base and the joined ring both need exactly 120 stitches around, so matching the motif to the base matters more than matching the stated inches.
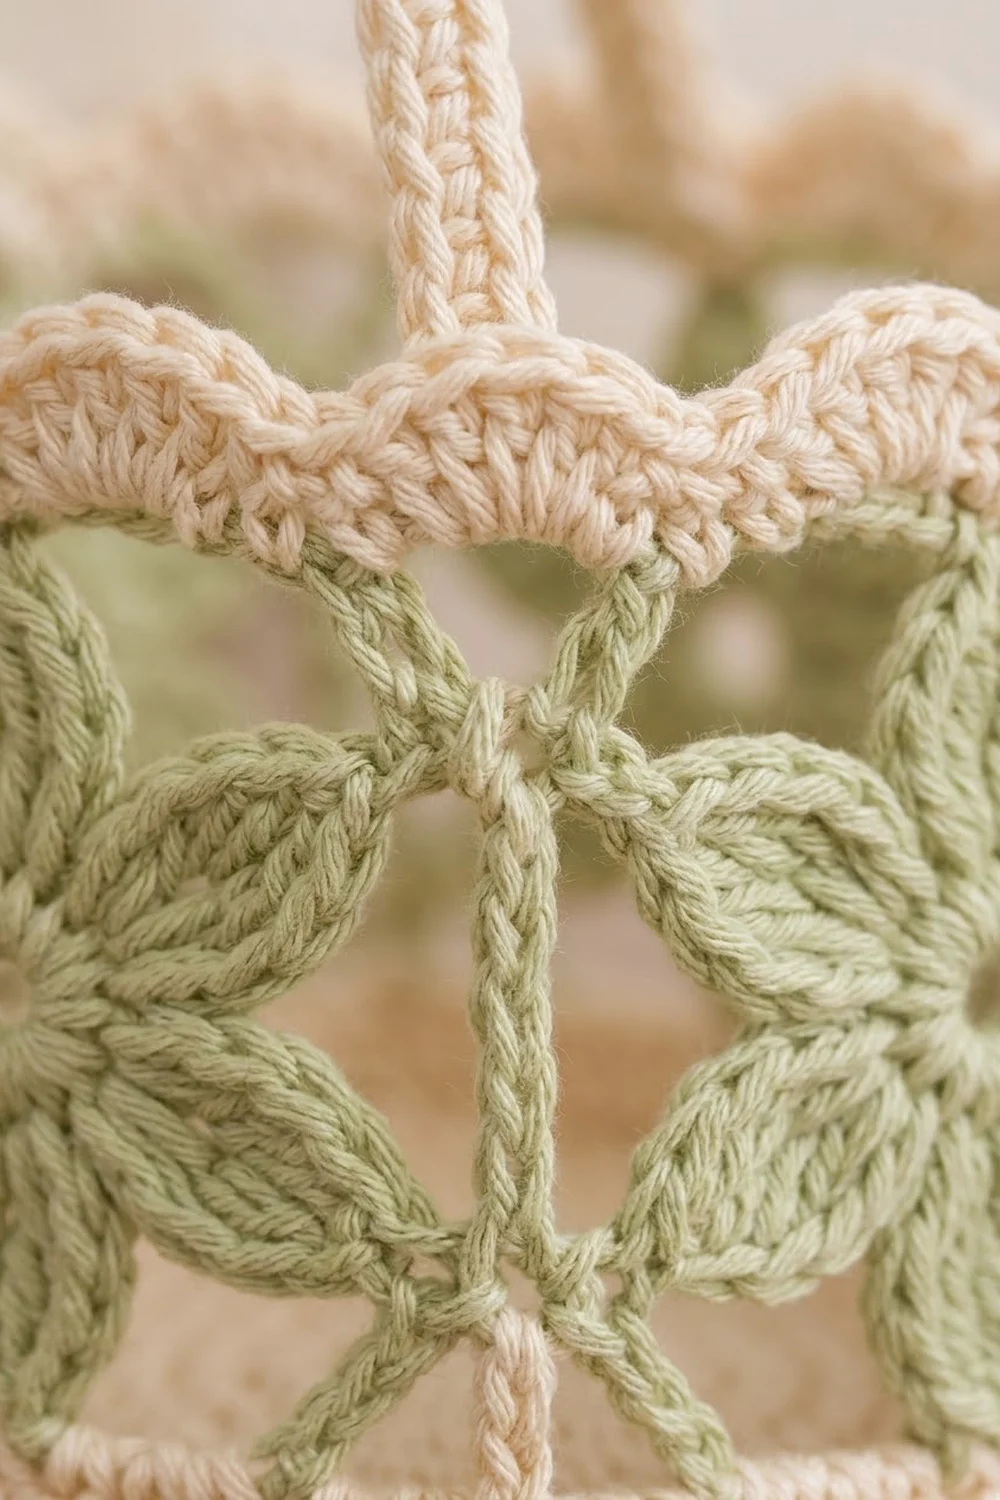
Flower Motif (Make 6, Color A)
Each motif is worked in joined rounds with the RS facing.
Rnd 1: In the MR, ch 1 and work 12 sc. Join with a sl st to the first sc. (12 sc)
Rnd 2: Ch 1. Work sc in the first st, ch 4, sk 1. Sc in the next st, ch 4, sk 1. Repeat from * 4 more times. Join to the first sc. (6 sc, 6 ch-4 sps)
Rnd 3 (petals): Sl st into the first ch-4 sp. In each ch-4 sp, work (sc, hdc, 2 dc, tr, 2 dc, hdc, sc). Join to the first sc. (6 petals of 9 sts = 54 sts)
The tr at the center of each petal is the petal tip. Each tip forms one corner of the hexagon.
Rnd 4 (mesh frame): Sl st across to the tr of the first petal. Ch 1 and sc in that tr. Ch 3, then work 1 tr around the Rnd 2 sc between this petal and the next, keeping the petals in front. Ch 3, sc in the next petal tip tr. Repeat from * around, leaving out the last sc. Join to the first sc. (6 sc, 6 tr, 12 ch-3 sps)
Rnd 5: Ch 1. Work (sc, ch 2, sc) in the corner sc. Work 3 sc in the ch-3 sp, sc in the tr, 3 sc in the next ch-3 sp. Repeat from * 5 more times. Join and fasten off.
Stitch count: 54 sc and 6 corner ch-2 sps.
Per-side definition: each side has 9 sc between two corner ch-2 sps (1 + 3 + 1 + 3 + 1). The corner ch-2 sps are not part of this count.
Weave in the ends and lightly steam each motif flat to 4 in (10.2 cm) flat to flat.
Base (Make 1, Color B)
The base is a solid hexagon. Work in joined rounds and join each round with a sl st to the first sc. Stacking the increases at the same 6 points creates the corners.
Rnd 1: In the MR, ch 1 and work 6 sc. (6 sc)
Rnd 2: Ch 1. Work 2 sc in each st. (12 sc)
Rnd 3: Ch 1. Sc in the next st, 2 sc in the next st. Repeat 6 times. (18 sc)
Rnds 4–20: Ch 1. Sc in the next (round number − 2) sts, 2 sc in the next st. Repeat 6 times.
- Rnd 4 = 24 sc
- Rnd 10 = 60 sc
- Rnd 15 = 90 sc
- Rnd 20 = 120 sc
Each round’s total is 6 × the round number.
After Rnd 20 there are 20 sc per side, counting each corner increase pair as the end of a side. Put a marker in the second st of each of 4 increase pairs to help with alignment, and move markers as needed. Fasten off with a long tail.
Strap (Make 1, Color B)
Row 1: Ch 81. Sc in the 2nd ch from the hook and in each ch across. (80 sc)
Rows 2–3: Ch 1 and turn. Work sc in each st across. (80 sc)
Fasten off with long tails. The strap measures 16 in (40.6 cm) long and 0.5 in (1.3 cm) wide.
Make All Pieces
- Color A: 6 flower motifs
- Color B: 1 base and 1 strap
Lay the motifs point up in a row. The ring closes when M6 joins back to M1:
 /\    /\    /\    /\    /\    /\
|M1|--|M2|--|M3|--|M4|--|M5|--|M6|--(back to M1)
 \/    \/    \/    \/    \/    \/
  [ hexagon base attached below ]
Joining
Method: sc seam in Color B with the WS of the motifs held together. This makes the raised cream ridges that run up the outside of the basket.
Stitch-to-stitch logic: Hold the right vertical side of M1 against the left vertical side of M2. Work 1 sc through both corner ch-2 sps. Work 9 sc through matching st pairs. Work 1 sc through the next pair of corner ch-2 sps. Each seam has 11 sc and joins 9 sts to 9 sts.
Repeat for M2–M3, M3–M4, M4–M5 and M5–M6. Then join M6 to M1 to close the ring.
Tension: Work the seam at the same tension as your motif rounds. A tight seam will make the walls bow inward, and a loose seam will gape.
Top Leveling Round (Color B)
This is a conversion round. The top edge is a zigzag: a point at the top of each motif, with a V dip about 1.1 in (2.8 cm) deep at each seam. Graded stitch heights fill the dips.
Join B in the top point ch-2 sp of M1. Ch 1 and sc in that sp. Then work the following sequence:
- Down the upper-right side of the motif, work 1 st in each of the 9 sc: sc, hdc, hdc, dc, dc, tr, tr, dtr, dtr.
- Work 1 trtr in the top sc of the seam (the V).
- Up the upper-left side of the next motif, work 1 st in each of the 9 sc: dtr, dtr, tr, tr, dc, dc, hdc, hdc, sc.
- Work 1 sc in the top point ch-2 sp.
Repeat this sequence around, leaving out the final sc. Join to the first sc.
Count per motif: 18 sts worked one per existing sc on the two upper sides, plus 2 extra sts (the point sc and the V trtr) = 20.
Round total: 108 + 12 = 120 sts.
Bottom Leveling Rounds (Color B)
Turn the ring upside down and work the same leveling round into the bottom points and lower sides. (120 sts)
Next round: ch 1 and work sc in each st. Join. (120 sc, 20 per wall face)
Size checkpoint: the ring should measure 24 in (61.0 cm) around both leveled edges, which is 4 in (10.2 cm) per wall face. That matches the 4 in (10.2 cm) base side.
Attaching the Base
Hold the base inside the bottom edge with the WS of both pieces together. Line up each base corner increase pair with a seam.
With B, work sc through both layers all the way around: 20 sts per side, 120 sc in total. This makes the cream ridge around the bottom. Join and fasten off.
The basket now measures 6.9 in (17.5 cm) across and 5 in (12.7 cm) tall.
Border
The border runs along the top leveled edge only. Border gauge: 5 sc per inch, so 120 sc = 24 in (61.0 cm).
The border starts with 6 wall faces × 20 sts per face = 120 sts. No stitches are added at the seams because the V trtr is already included in each face’s 20.
Border Rnd 1: Join B in any point sc. Ch 1 and work sc in each st around. Join. (120 sc, 20 per side)
Border Rnd 2 (scallops): Ch 1 and sl st in the first st. Sk 1, 5 dc in the next st, sk 1, sl st in the next st. Repeat around, ending with sk 1, 5 dc in the next st, sk 1, then join to the first sl st. (30 scallops, 5 per side)
Why the math works: each scallop repeat uses 4 sts, and 20 ÷ 4 = 5 scallops per side. Around the basket, 120 ÷ 4 = 30 scallops. Because the repeat divides evenly, the pattern meets cleanly at the join and every face looks the same. The border adds 0.75 in (1.9 cm), bringing the total height to 5.75 in (14.6 cm).
Attach the strap: Choose two opposite seams. These are 8 in (20.3 cm) apart, corner to corner. Place 0.75 in (1.9 cm) of each strap end against the inside of the wall, just below Border Rnd 1, and whipstitch it firmly through the seam ridge. Check that the strap isn’t twisted.
Final Blocking
- Fill the basket snugly with a towel rolled to about 6.9 in (17.5 cm) across.
- Pin the six seams straight and vertical.
- Ease the scallops so they stand evenly upright.
- Steam lightly from about 1 in (2.5 cm) away. Don’t press the iron onto the flowers.
- Let the basket dry completely with the towel inside.
- Lay the strap flat, steam it, and let it dry.
Final Quality-Control Checklist
- All 6 motifs measure 4 in (10.2 cm) flat to flat.
- Each seam has 11 sc.
- Both leveling rounds have 120 sts.
- The base has 120 sts with 20 per side, and its corners line up with the seams.
- There are 30 scallops, 5 per face.
- The basket measures 6.9 in (17.5 cm) across and 5.75 in (14.6 cm) tall.
- The strap is 16 in (40.6 cm) long and securely attached at opposite seams.
- All ends are woven in.
Troubleshooting
- The top edge dips at the seams: your trtr is too short. Pull up the first loop a little taller, or replace the dtr next to the V with a trtr.
- The top edge humps at the points: use sl st instead of the first hdc on each side of the point.
- The base is larger than the ring: go down 0.25 mm for the base, or check that you have exactly 120 sts.
- The walls lean outward: the base join is too loose. Rework it with a smaller hook.
- The petals curl: work Rnd 3 more loosely, or steam and pin each petal flat.
- The strap stretches: add a 4th row of sc, or use a firmer cotton.
Care
Hand wash in cool water, press out the excess water in a towel, and reshape the basket over a rolled towel to dry flat. Steam lightly to refresh the shape.
Final Notes
The measurement chain is simple:
- Each motif side has 9 sc, and the motif is 4 in (10.2 cm) flat to flat.
- The leveling round gives 18 + 2 = 20 sts per face, so the ring is 120 sts around.
- The base is 6 sides × 20 sts = 120 sts, so it matches the ring exactly.
- The border starts with 120 sc and divides evenly into 30 scallops.
Check your gauge on the first motif and the base, and everything after that will fit. Happy crocheting!