

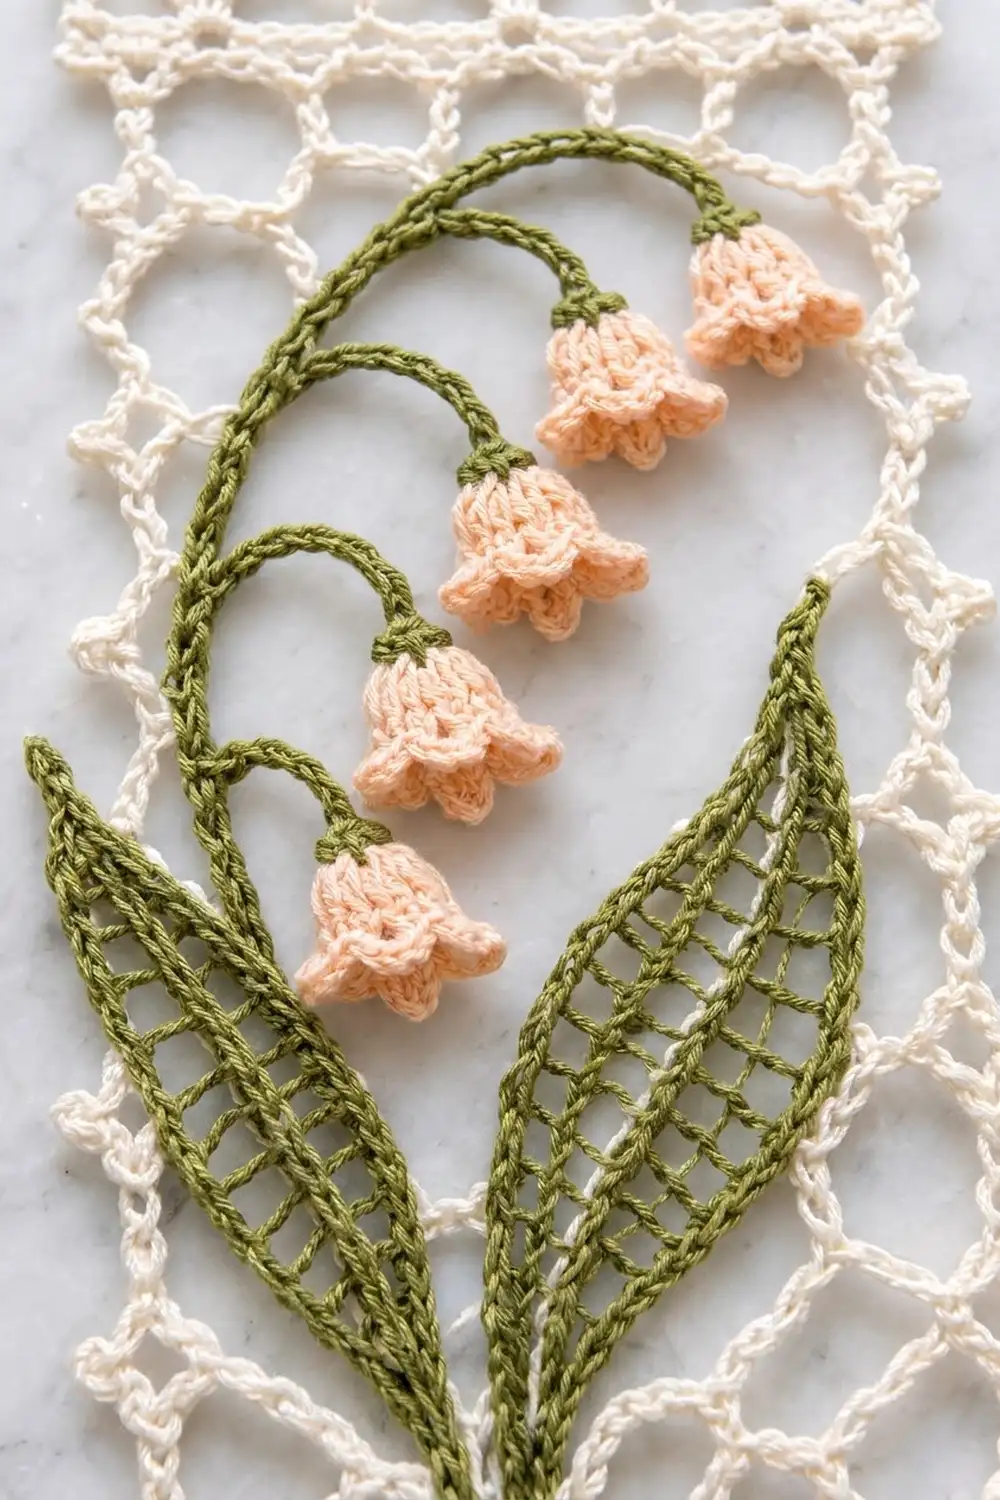
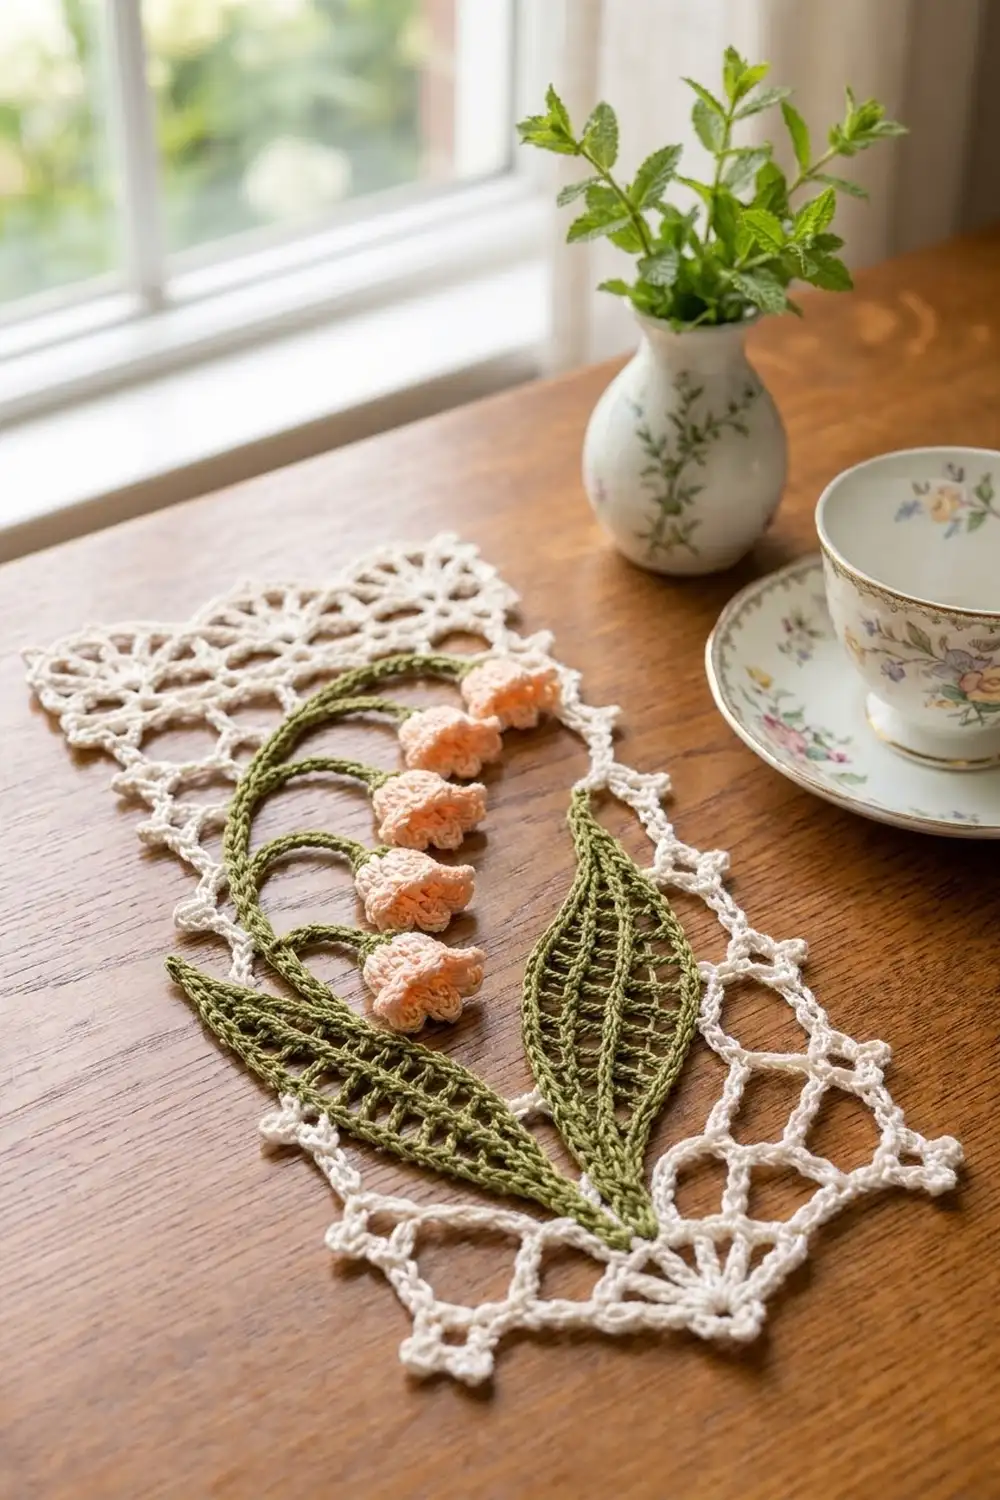
This lace panel shows a lily of the valley stem on an open cream mesh. A slender green stem rises from a small fan at the bottom and arches gracefully over the top. Six peach bells hang from it, and two lacy green leaves frame the stem. A border of picot loops finishes the rectangle neatly.
The palette is cream, olive green, and soft peach. It has a calm vintage, cottage-style look. You can frame it, hang it from a dowel, or sew it onto linen as an insert. Because the background is open mesh, light passes through, so it also looks lovely in a window.
This pattern uses US crochet terms. The finished panel measures 6 × 9 in (15.2 × 22.9 cm) after blocking.
You work the cream chain-loop mesh first, flat in rows. Next you crochet the small appliqués separately: a fan base, a branched stem, two leaves, and six bells. You sew them onto the mesh, add a two-round picot border, and block the whole panel.
Finished Size and Construction
- Finished size: 6 × 9 in (15.2 × 22.9 cm)
- Skill level: Intermediate
- Terminology: US crochet terms
- Yarn weight: Super Fine (#1), fingering-weight mercerized cotton
- Hook: 2.5 mm
- Number of pieces: 1 finished panel (a mesh ground plus 10 small sewn-on appliqués)
- Layout: one portrait rectangle
- Mesh size before border: 5 × 8 in (12.7 × 20.3 cm)
- Border depth: 0.5 in (1.3 cm) on every side
Materials
Use a smooth, mercerized cotton in fingering weight, around 170 m per 50 g. The sheen shows off every chain, and the cotton blocks crisply and holds the shape of the open loops. Avoid fuzzy, brushed, or very stretchy yarns. They blur the mesh and let the panel sag over time.
- Cream (A): 15 g (51 m) for the mesh, border, and fan
- Olive green (B): 8 g (27 m) for the stem, leaves, and bell caps
- Peach (C): 5 g (17 m) for the bells
These amounts include a small safety margin, so you won’t run short if you need to redo a row or block a test piece.
Tools:
- 2.5 mm crochet hook
- Tapestry needle
- Sewing needle and matching cotton thread (optional, for nearly invisible appliqué stitching)
- Rust-proof pins
- Blocking mat
- Spray bottle
- Ruler or tape measure
- Stitch markers
Abbreviations (US Terms)
- ch: chain
- sl st: slip stitch
- sc: single crochet
- hdc: half double crochet
- dc: double crochet
- tr: treble crochet
- sk: skip
- sp: space
- MR: magic ring
- st(s): stitch(es)
Picot: ch 3, then sl st in the 3rd ch from the hook.
Corner group: 3 sc in one stitch. The middle sc of the group is the corner st.
Gauge and Checkpoints
Before you start the full panel, make one leaf as a test piece. After a light press it should measure about 4.5 × 1.25 in (11.4 × 3.2 cm). If it does, your hook and tension suit the mesh too, and you can keep the leaf for the panel.
Mesh gauge: 8 ch-5 loops = 5 in (12.7 cm) wide. Rows 2–17 each add about 0.5 in (1.3 cm), so 2 rows = 1 in (2.5 cm). Measure with the mesh lightly stretched, because chain mesh stays relaxed and slightly short until it is blocked.
Border gauge: 34 sc = 5 in (12.7 cm).
Checkpoints:
- Foundation chain: about 5 in (12.7 cm) long
- After Row 9: about 4 in (10.2 cm) tall
- After Row 17: 5 × 8 in (12.7 × 20.3 cm)
- After the border: 6 × 9 in (15.2 × 22.9 cm)
If your mesh comes out too big, go down to a 2.25 mm hook. If it is too small, go up to a 2.75 mm hook. Don’t add or remove loops or rows, because the border counts depend on exactly 8 loops and 17 rows.
Mesh Ground
Use cream (A).
Foundation: Ch 34.
Row 1: Sc in 2nd ch from hook, ch 5, sk 3 ch, sc in next ch 8 times. Turn. (9 sc, 8 ch-5 loops)
Row 2: Ch 5 (counts as dc + ch 2), sc in first ch-5 loop, ch 5, sc in next ch-5 loop 7 times, ch 2, dc in last sc. Turn. (8 sc, 7 ch-5 loops, 2 half loops)
Row 3: Ch 1, sc in first dc, ch 5, sc in next ch-5 loop 7 times, ch 5, sc in 3rd ch of turning ch. Turn. (9 sc, 8 ch-5 loops)
Rows 4–17: Repeat Rows 2 and 3 seven more times. End after Row 17, which is a full-loop row. Don’t fasten off. Put the working loop on a stitch marker so it can’t unravel.
Checkpoint: The mesh has 17 rows. Odd rows have 8 full loops, and even rows have 7 full loops plus 2 half loops. The half loops keep both side edges straight. Pin the mesh lightly to 5 × 8 in (12.7 × 20.3 cm) so you have a flat, square base for sewing.
Fan Base
Use cream (A).
Row 1: Ch 4, 7 dc in 4th ch from hook. Turn. (8 dc, counting the skipped ch as 1 dc)
Row 2: Ch 4 (counts as dc + ch 1), dc in next dc, ch 1 6 times, dc in top of turning ch. Turn. (8 dc, 7 ch-1 sps)
Row 3: Ch 1, sc in first dc, ch 3, sc in next dc 7 times. (8 sc, 7 ch-3 loops)
Fasten off. Work one picot at the point of the fan and secure it with a sl st. The fan measures about 1.5 in (3.8 cm) wide and 0.9 in (2.3 cm) tall.
Bells (Make 6)
Use peach (C).
Rnd 1: 5 sc in MR. Join with a sl st to the first sc. (5)
Rnd 2: Ch 1, 2 sc in each st, join. (10)
Rnd 3: Ch 1, sc in the back loop of each st, join. (10) The back-loop round makes a small ridge at the bell’s shoulder.
Rnd 4: Ch 1, sc in next st, 2 sc in next st 5 times, join. (15)
Rnd 5: Ch 1, sc in next st, (hdc, dc, hdc) in next st, sc in next st 5 times, join. (25 sts, 5 points)
Fasten off and pull the magic ring closed tightly. Each bell measures about 0.6 in (1.5 cm) long and 0.6 in (1.5 cm) wide.
Cap: Use green (B). Work 5 surface sl sts around Rnd 1 to make a small green cap. Leave an 8 in (20.3 cm) tail for sewing.
Stem with Pedicels
Use green (B). The stem is a chain cord, finished with slip stitches worked into the back bumps. Working into the back bumps gives a neat, rounded cord.
Ch 51. Starting in the 2nd ch from the hook, work in the back bumps as follows:
- Sl st in the next 5 sts.
- Make a pedicel: ch 7, sl st in 2nd ch from hook and in each ch back to the stem (6 sl sts).
- Sl st in the next 5 stem sts, make a pedicel 4 more times.
- Sl st in each of the remaining 25 stem sts.
Count: 50 stem sl sts and 5 pedicels of 6 sl sts each. The tip of the stem holds the 6th bell.
Fasten off and leave a long tail. The stem measures about 7.75 in (19.7 cm), and each pedicel is about 1 in (2.5 cm).
Leaves (Make 2)
Use green (B). The foundation chain becomes the center vein.
Foundation: Ch 30.
Rnd 1, side A: Sc in 2nd ch from hook, hdc in next ch, [ch 1, sk 1, dc in next] 3 times, [ch 1, sk 1, tr in next] 7 times, [ch 1, sk 1, dc in next] 2 times, ch 1, sk 1, hdc in next, 3 sc in last ch.
Rnd 1, side B: Rotate and work along the opposite side of the foundation. Ch 1, sk 1, hdc in next, [ch 1, sk 1, dc in next] 2 times, [ch 1, sk 1, tr in next] 7 times, [ch 1, sk 1, dc in next] 3 times, hdc in next, 2 sc in the tip ch. Join with a sl st to the first sc. (34 sts, 26 ch-1 sps)
The trebles open the leaf in the middle, and the shorter stitches taper it at both ends. The ch-1 spaces form the ladder-like openwork.
Rnd 2: Ch 1, sc in each st and each ch-1 sp around. Work 3 sc in the center sc at the tip and 3 sc in the center sc at the base. Join. (64 sc)
Fasten off. Each leaf measures about 4.5 × 1.25 in (11.4 × 3.2 cm).
Assembly
Lay the pinned mesh flat with Row 1 at the bottom. Arrange all the pieces before you sew anything.
- Center the fan about 0.25 in (0.6 cm) above the bottom edge, with the point down. Sew around its edge.
- Pin the base of the stem to the top center of the fan. Curve the stem up the left of center, then arch it over to the right. The tip should sit about 1 in (2.5 cm) below the top edge and 0.75 in (1.9 cm) from the right edge. Let the pedicels hang downward.
- Sew a bell to the stem tip and one to the end of each pedicel, using the green tails. Leave the lower points of each bell loose so they cast small shadows.
- Place one leaf on each side of the stem, with both bases touching the fan. Tilt the left leaf up and out and place it higher than the right one. Tilt the right leaf toward the lower right.
- Sew the stem and the leaf outlines down with small stitches through the sc only, so the mesh stays open behind them.
Border
Pick up the cream working loop at the top-right corner of the mesh. Border gauge: 34 sc = 5 in (12.7 cm).
Round 1: Ch 1.
- Top: Work a corner group in the last sc of Row 17. Work 4 sc in each of the 8 loops (32 sc). Work a corner group in the first sc of Row 17.
- Left side: Working down the 16 row-ends of Rows 17 through 2, 3 sc in each of the next 3 row-ends, 4 sc in the next row-end 4 times (52 sc).
- Bottom: Working in the free loops of the 33 foundation ch, work a corner group in the first ch. Sc in each of the next 15 ch, 2 sc in the next ch (the 17th), sc in each of the next 15 ch (32 sc). Work a corner group in the last ch.
- Right side: Repeat the left-side sequence (52 sc).
- Join with a sl st to the first sc.
Counts: Top and bottom have 36 sts each, including both corner sts. Each side has 56 sts, including both corner sts. Total: 180 sts.
Round 2: Ch 1. Sc in the top-right corner st, ch 5, sc in the same st.
- Top: [ch 2, picot, ch 2, sk 4 sts, sc in next st] 7 times. The 7th sc lands in the corner st. Ch 5, sc in the same st.
- Side: Work the same bracket 11 times, then ch 5, sc in the same corner st.
- Bottom: Work the bracket 7 times, then ch 5, sc in the same corner st.
- Last side: Work the bracket 10 times, then ch 2, picot, ch 2, sk 4, and join with a sl st to the first sc.
Counts: 36 picot loops (7 + 11 + 7 + 11) and 4 corner ch-5 loops. Fasten off.
Why the math works: On the top and bottom, the 36 sts from one corner st to the next give 35 gaps, and 35 ÷ 5 = 7 loops. On each side, 56 sts give 55 gaps, and 55 ÷ 5 = 11 loops. Every loop ends exactly in a corner st, so you never have to fudge a stitch. Round 1 is about 0.15 in (0.4 cm) deep and Round 2 adds about 0.35 in (0.9 cm), for a 0.5 in (1.3 cm) border. That takes the 5 × 8 in (12.7 × 20.3 cm) mesh to 6 × 9 in (15.2 × 22.9 cm).
Final Blocking
- Weave in all ends, hiding the green tails inside the stem and leaves.
- Soak the panel in cool water for 10 minutes, then roll it gently in a towel to remove the water.
- Pin it face up to 6 × 9 in (15.2 × 22.9 cm), starting with the four corners.
- Pin each picot loop and each corner loop outward so the border sits evenly.
- Open the mesh loops evenly and shape the leaf tips into points.
- Mist the bells and shape their scalloped edges with your fingers.
- Let the panel dry completely before you unpin it.
Final Quality-Control Checklist
- The mesh has 17 rows with straight side edges.
- There are 6 bells, each with 5 points and a green cap.
- The stem has 5 pedicels plus a bell at the tip.
- Both leaves have 64 sc in their outline round.
- Border Round 1 has 180 sts and Round 2 has 40 loops.
- The panel measures 6 × 9 in (15.2 × 22.9 cm).
- No sewing stitches show through the open mesh.
Troubleshooting
- The mesh slants: Check that the even rows end with a dc and the odd rows end in the turning ch.
- The side edges ripple: Work 3 sc in every row-end (48 sc per side instead of 52). On Round 2, work 10 side brackets in place of 11, and skip 3 sts instead of 4 in two brackets. Count again before you continue.
- The side edges pull in: Your Round 1 tension is too tight. Try going up one hook size for the border only.
- The leaves curl: Rnd 2 is too tight. Block the leaves flat before you sew them on.
- The bells flare too much: Work Rnd 5 with sc in place of the hdc.
- The stem twists: Work only into the back bumps, and pin the stem to shape while you sew.
- The appliqués pucker the mesh: You’re pulling the sewing stitches too tight. Pin the mesh to size first and sew with relaxed stitches.
Care
Hand wash in cool water with a mild detergent and gently press the water out. Re-block the panel flat to dry, and steam it lightly if needed.
Final Notes
The measurement chain is short and reliable. Eight loops make 5 in (12.7 cm) of width and 17 rows make 8 in (20.3 cm) of height. The border’s 34 sc match that 5 in (12.7 cm) width, and the 0.5 in (1.3 cm) border brings the panel to 6 × 9 in (15.2 × 22.9 cm). Check each stage before you move on, and the leaves, bells, and border loops will all land where they should.
Happy crocheting!