
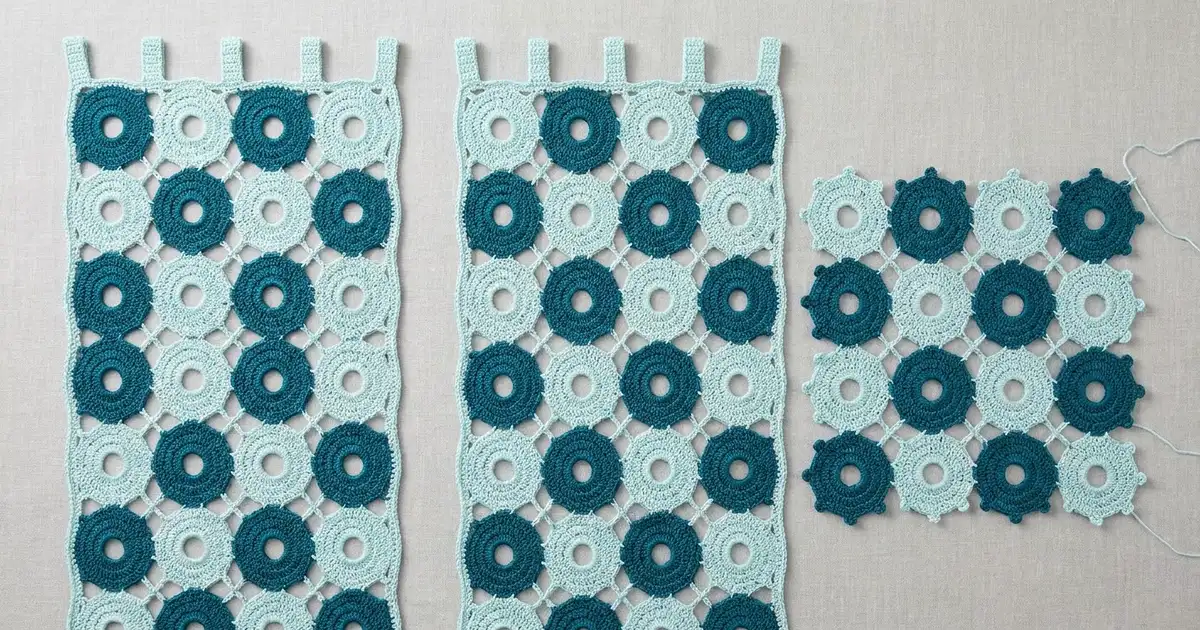
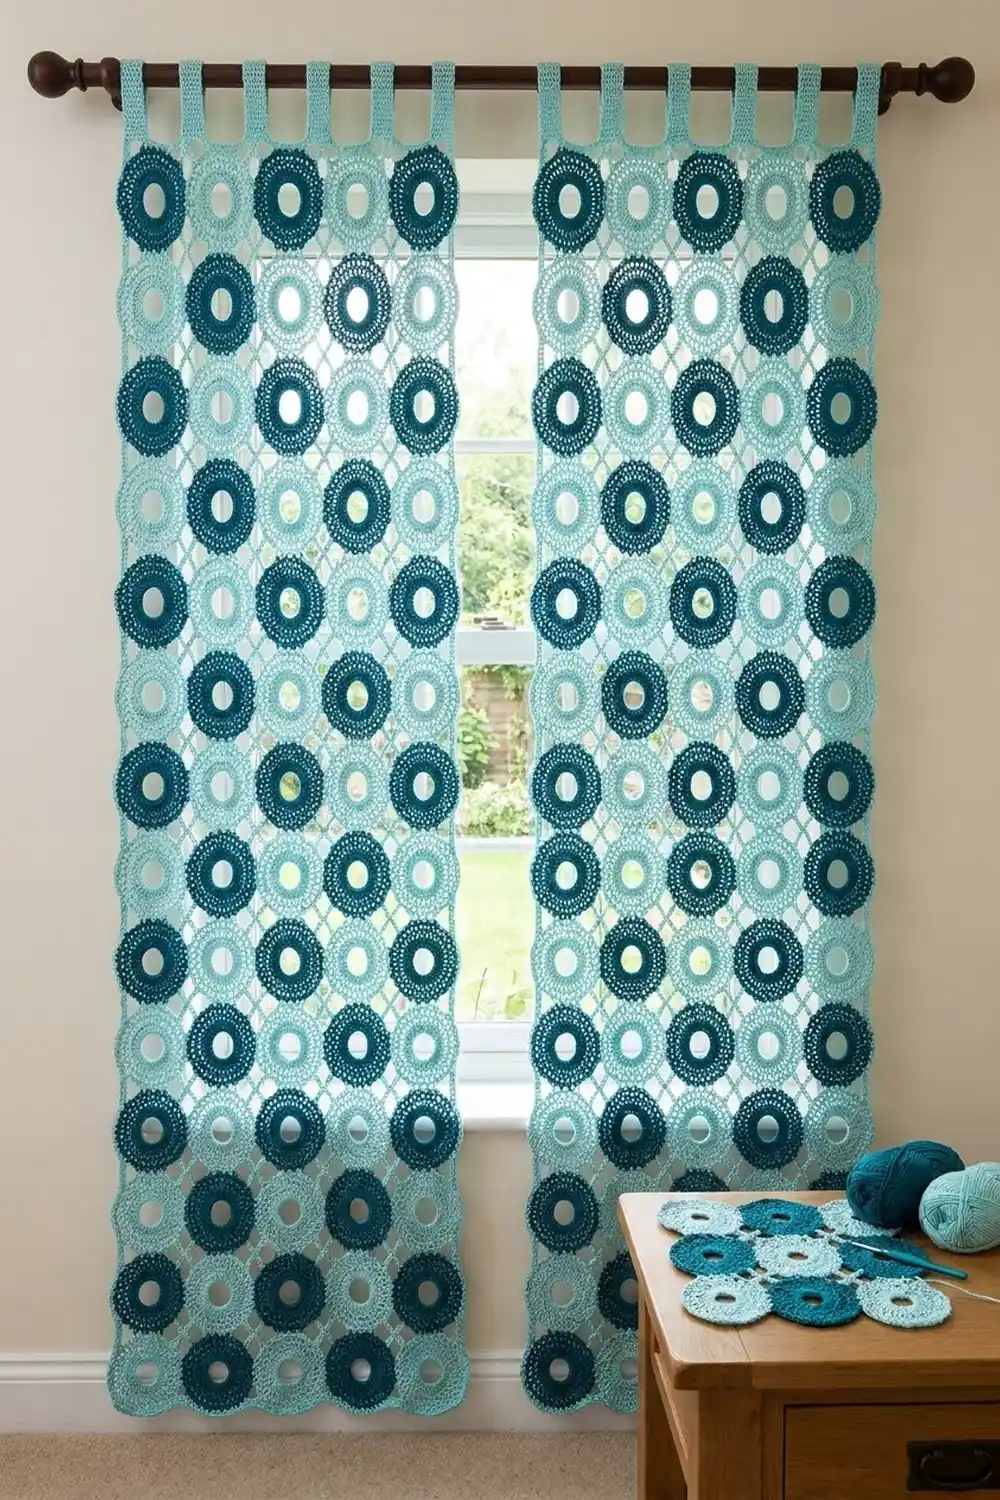
The Seaglass Rings Lace Curtain is an airy panel of small round motifs that lets light through every opening. Each ring is a thick band of stitches around an open center, ringed with eight soft picot loops, and the rings sit in a neat grid.
Deep teal and pale aqua rings alternate in a checkerboard. Pale aqua chain crosses fill the diamond-shaped gaps between rings, so the panel reads as columns of rings with small X’s between them. The style is coastal and calm, and it suits a bright window.
This pattern uses US crochet terms. One finished panel measures 29 in × 81 in (73.7 cm × 205.7 cm) including the border, with tab loops that rise about 2 in (5.1 cm) above the top edge. The window shown uses two panels, so make two for a matching pair.
Construction is join-as-you-go. You work 140 ring motifs per panel and join each new ring to its neighbors in its last round. Next you add the chain X fillers, work a two-round border, and attach seven tabs along the top.
Finished Size and Construction
- Finished panel size: 29 in × 81 in (73.7 cm × 205.7 cm), not including tabs
- Skill level: Intermediate
- Terminology: US
- Yarn weight: DK (#3) cotton or cotton blend
- Hook: 4.0 mm (G-6)
- Number of pieces: 140 ring motifs per panel, plus 114 X fillers and 7 tabs
- Layout: 7 motifs wide × 20 motifs tall
- Motif size: 4 in (10.2 cm) from picot tip to picot tip
- Size before border: 28 in × 80 in (71.1 cm × 203.2 cm)
- Border depth: 0.5 in (1.3 cm) on each side
Materials
Choose a smooth, mercerized or combed DK cotton. Cotton gives crisp rings and doesn’t sag much on a long hanging panel. Avoid fuzzy yarns, because they blur the open centers.
Yarn, per panel:
- Color A, deep teal: 250 g / about 550 m (601 yd), for 70 motifs
- Color B, pale aqua: 350 g / about 770 m (842 yd), for 70 motifs, the X fillers, the border, and the tabs
For a pair of panels, double these amounts. All quantities include a margin of roughly 15–20% for gauge swatches and differences between yarns.
Tools:
- 4.0 mm (G-6) crochet hook
- Tapestry needle
- Stitch markers
- Measuring tape
- Rust-proof pins and blocking mats, or a clean sheet on a carpeted floor
- Spray bottle
- Scissors
Abbreviations (US Terms)
- ch – chain
- sl st – slip stitch
- sc – single crochet
- dc – double crochet
- st(s) – stitch(es)
- sp – space
- RS – right side
- rep – repeat
Special stitches:
- Picot: ch 5, then sl st in the sc you just made. This makes a rounded loop.
- Join-picot: ch 2, sl st in the matching picot loop of the finished neighbor motif, ch 2, then sl st in the sc you just made.
Gauge and Checkpoints
Make one complete motif before anything else, and block it lightly. Every later measurement depends on this one ring.
Motif checkpoints:
- After Rnd 1: outer edge 1.75 in (4.4 cm) across, center hole about 1.25 in (3.2 cm)
- After Rnd 2: 2.5 in (6.4 cm) across
- After Rnd 3: ring body 3 in (7.6 cm) across, 4 in (10.2 cm) from picot tip to opposite picot tip
Border gauge: 14 sc = 3 in (7.6 cm), worked along the border.
If your motif is too big, go down half a hook size. If it is too small, go up half a hook size. Small errors add up quickly. If each motif is just 0.125 in (0.3 cm) off, the panel ends up 0.875 in (2.2 cm) off in width and 2.5 in (6.4 cm) off in length.
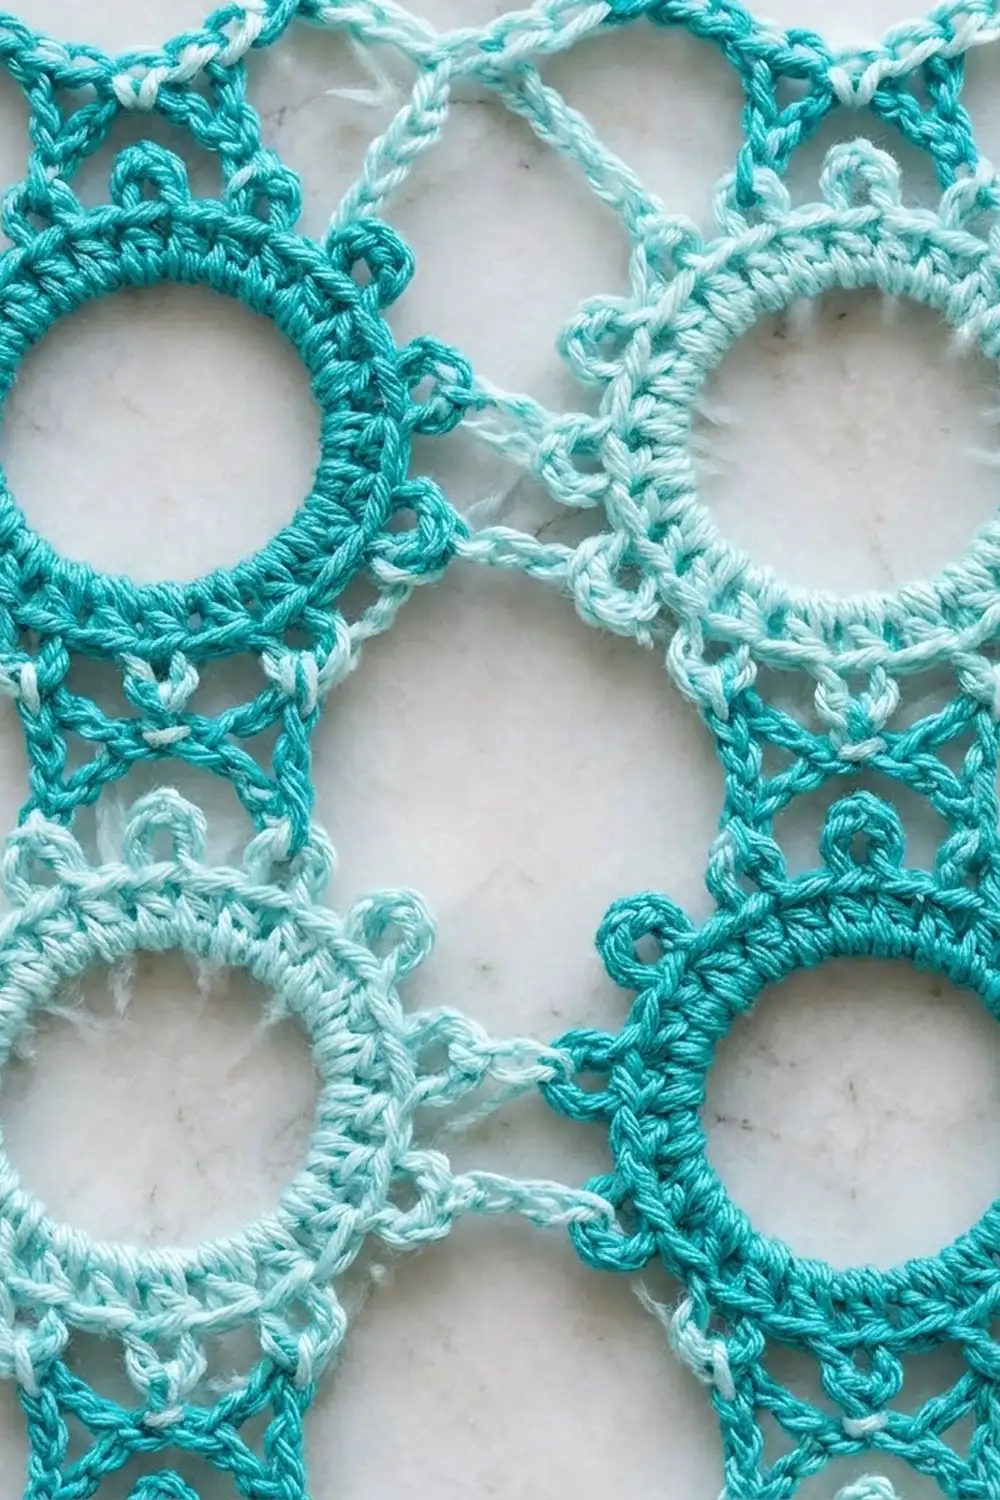
Ring Motif
Each motif has 8 picots in working order: P1 = top (N), P2 = NW, P3 = left (W), P4 = SW, P5 = bottom (S), P6 = SE, P7 = right (E), P8 = NE. Keep the RS facing as you work, so the picots fall in these positions when you join.
Foundation: With the motif color, ch 16, then sl st in the first ch to form a ring.
Rnd 1: Ch 1, then work 24 sc into the ring. Sl st in the first sc to join. (24 sts)
The stitches pack tightly around the ring and leave an open center.
Rnd 2: Ch 3 (counts as dc), dc in the next st, 2 dc in the next st. Dc in each of the next 2 sts, 2 dc in the next st; rep from * 6 more times. Sl st in the top of the beginning ch-3. (32 sts)*
This is a growth round. Each of the 8 repeats turns 3 sts into 4.
Rnd 3, first motif only: Ch 1. Sc in each of the next 3 sts, then (sc, picot) in the next st; rep from * 7 more times. Sl st in the first sc. Fasten off. (32 sc and 8 picots)*
Weave in the tails along the back of the band so they stay hidden in the dense stitches.
Joining As You Go
From the second motif on, work Rnds 1–2 as written. In Rnd 3, swap a normal picot for a join-picot wherever the new motif touches a finished one.
- Top row of the panel: join P3 (W) to P7 (E) of the motif on the left.
- First motif of each later row: join P1 (N) to P5 (S) of the motif above.
- All other motifs: join P1 to P5 of the motif above, and P3 to P7 of the motif on the left.
The diagonal picots (P2, P4, P6, P8) are never joined between motifs. They stay free for the X fillers and the border.
Tension advice: Keep the ch-2 on each side of a join just as loose as a normal ch-5 picot. If the joins are tight, the grid puckers and the X fillers won’t lie flat.
Make All Pieces
Each panel has 140 motifs:
- Color A (teal): 70 motifs
- Color B (aqua): 70 motifs
Layout grid (A = teal, B = aqua):
Row 1:  A B A B A B A
Row 2:  B A B A B A B
Row 3:  A B A B A B A
Row 4:  B A B A B A B
...repeat Rows 1-2 until you have 20 rows
Odd rows have 4 A and 3 B motifs. Even rows have 3 A and 4 B. Ten of each row type gives 70 A and 70 B.
Size checkpoint: Once Row 1 is done, it should measure 28 in (71.1 cm) from the outer picot tip at one end to the outer picot tip at the other. After 5 rows, the panel should be 20 in (50.8 cm) tall. After 10 rows, it should be 40 in (101.6 cm) tall.
X Fillers
An X filler goes into every diamond opening surrounded by four motifs. In a 7 × 20 grid there are 6 × 19 = 114 fillers.
With Color B and the RS facing:
- Join with a sl st in P6 (SE) of the upper-left motif.
- Ch 8, then sl st in P2 (NW) of the lower-right motif. This makes the first diagonal.
- Sl st in each of the 4 ch nearest you, so you are back at the center.
- Ch 4, sl st in P8 (NE) of the lower-left motif, then sl st in each of the 4 ch back to the center.
- Ch 4, then sl st in P4 (SW) of the upper-right motif. Fasten off.
Per filler: 16 ch and 8 sl st along the chains, plus the 4 picot joins.
The gap between diagonal picot tips is about 1.6 in (4.1 cm). An 8-ch diagonal spans this without stretching. If your Xs bow outward, use ch 7 and ch 3 arms. If they pull the motifs out of shape, use ch 9 and ch 5 arms. Keep the 2-to-1 ratio so the arms meet at the center.
Size checkpoint: The filled panel should measure 28 in × 80 in (71.1 cm × 203.2 cm) when laid flat without stretching.
Border
Border gauge: 14 sc = 3 in (7.6 cm), or about 4.7 sts per inch.
Every motif on an outer edge has 3 outward-facing picots on that side. For example, top-edge motifs use P2, P1, and P8. The corner picot of a corner motif counts on both sides it touches. So each side’s count includes its 2 corner sc.
Rnd 1: With Color B, join with a sl st in P2 of the top-left corner motif. Ch 1, then sc in the same picot (this is the corner sc).
Along each side, work this sequence for every motif: sc in the first picot, ch 6, sc in the middle picot, ch 6, sc in the last picot. Between neighboring motifs on the same side, ch 4 to bridge the gap. At a corner, the last picot of one side is the first picot of the next, so it gets only 1 sc. Sl st in the first sc to join.
- Top and bottom: 7 motifs × 3 sc = 21 sc each, with 14 ch-6 sps and 6 ch-4 sps
- Left and right: 20 motifs × 3 sc = 60 sc each, with 40 ch-6 sps and 19 ch-4 sps
- Total sc: 21 + 21 + 60 + 60 − 4 shared corners = 158 sc
- Round total: 158 sc + (108 × 6) ch + (50 × 4) ch = 158 + 648 + 200 = 1,006 sts
Rnd 2: Ch 1. Sc in each sc, 6 sc in each ch-6 sp, 4 sc in each ch-4 sp, and 3 sc in each of the 4 corner sc. Sl st in the first sc. Fasten off.
- Round total: 1,006 worked 1-per-existing-st + 8 extra (2 at each corner) = 1,014 sts
- Top and bottom: 21 + 84 + 24 = 129 sts each, counting each corner group’s center sc
- Left and right: 60 + 240 + 76 = 376 sts each, counting each corner group’s center sc
- Check: 129 + 129 + 376 + 376 − 4 shared corner centers + 8 corner extras = 1,014 ✓
Why the math works: Each edge motif adds 3 sc + 12 ch to a side, which is 15 sts, plus 4 sts for each bridge. That is about 18.5 sts per 4 in (10.2 cm) motif, or about 4.6–4.7 sts per inch. This matches the border gauge. The top’s 129 sts cover 28 in (71.1 cm), and each long side’s 376 sts cover 80 in (203.2 cm). The edge lies flat instead of ruffling or cupping.
Tabs
There are 7 tabs, one centered above each top-row motif. In Rnd 2, the sc worked into each P1 (top picot) is the tab’s center stitch.
Row 1: With the RS facing, join Color B in the 3rd st to the right of a center sc. Ch 1, then sc in the same st and the next 6 sts. Turn. (7 sc)
Rows 2–16: Ch 1, sc in each st across, turn. (7 sc)
Fasten off and leave a 12 in (30.5 cm) tail. Fold the tab to the wrong side and whipstitch the last row to the back of Rnd 2, right behind Row 1. Each tab is 1.5 in (3.8 cm) wide and about 4 in (10.2 cm) long, which folds into a loop about 2 in (5.1 cm) tall.
Final Blocking
- Weave in all remaining ends, keeping them inside the teal and aqua bands.
- Soak the panel in cool water for 15 minutes, then gently press the water out. Don’t wring it.
- Roll the panel in towels to take out more water.
- Lay it flat on mats or on a sheet over carpet, and pin each corner first.
- Pin each long side to 81 in (205.7 cm) and each short side to 29 in (73.7 cm). Measure the diagonals so the panel is square.
- Pin the picot joins along the vertical and horizontal lines so the columns stay straight.
- Open each center hole with your fingertip and leave it to dry completely.
Final Quality-Control Checklist
- 140 motifs: 70 teal and 70 aqua, in a correct checkerboard
- Each motif has 32 sc and 8 picots in Rnd 3
- 114 X fillers, all with 4 arms reaching the diagonal picots
- Border Rnd 1 has 158 sc and 1,006 sts in total
- Border Rnd 2 has 1,014 sts, with 3 sc in each corner
- 7 tabs, each 7 sts wide and 16 rows long, centered on the top-row motifs
- Blocked size is 29 in × 81 in (73.7 cm × 205.7 cm)
Troubleshooting
- Rings cup or ruffle: Check Rnd 2 for exactly 32 dc. If it’s correct, adjust the hook size.
- Center hole closes up: The foundation ring is too tight. Chain more loosely, or use ch 18 and keep 24 sc.
- Columns drift sideways: A P3/P7 join is on the wrong picot. Recount the picots from P1.
- Border waves: Reduce each ch-6 sp to 5 sc in Rnd 2.
- Border pulls in: Use 7 sc in each ch-6 sp along the long sides.
- Panel stretches long after hanging: Re-block, and hang from the tabs without extra weight.
Care
Hand wash in cool water with a mild detergent, then lay flat to dry and reshape. Don’t put the panel in a dryer.
Final Notes
The measurement chain is simple. A 4 in (10.2 cm) motif makes a 28 in × 80 in (71.1 cm × 203.2 cm) grid. A 0.5 in (1.3 cm) border takes it to 29 in × 81 in (73.7 cm × 205.7 cm), and the tabs add a 2 in (5.1 cm) hanging loop. Check the first motif carefully, and the rest of the panel will follow.
Happy crocheting!