

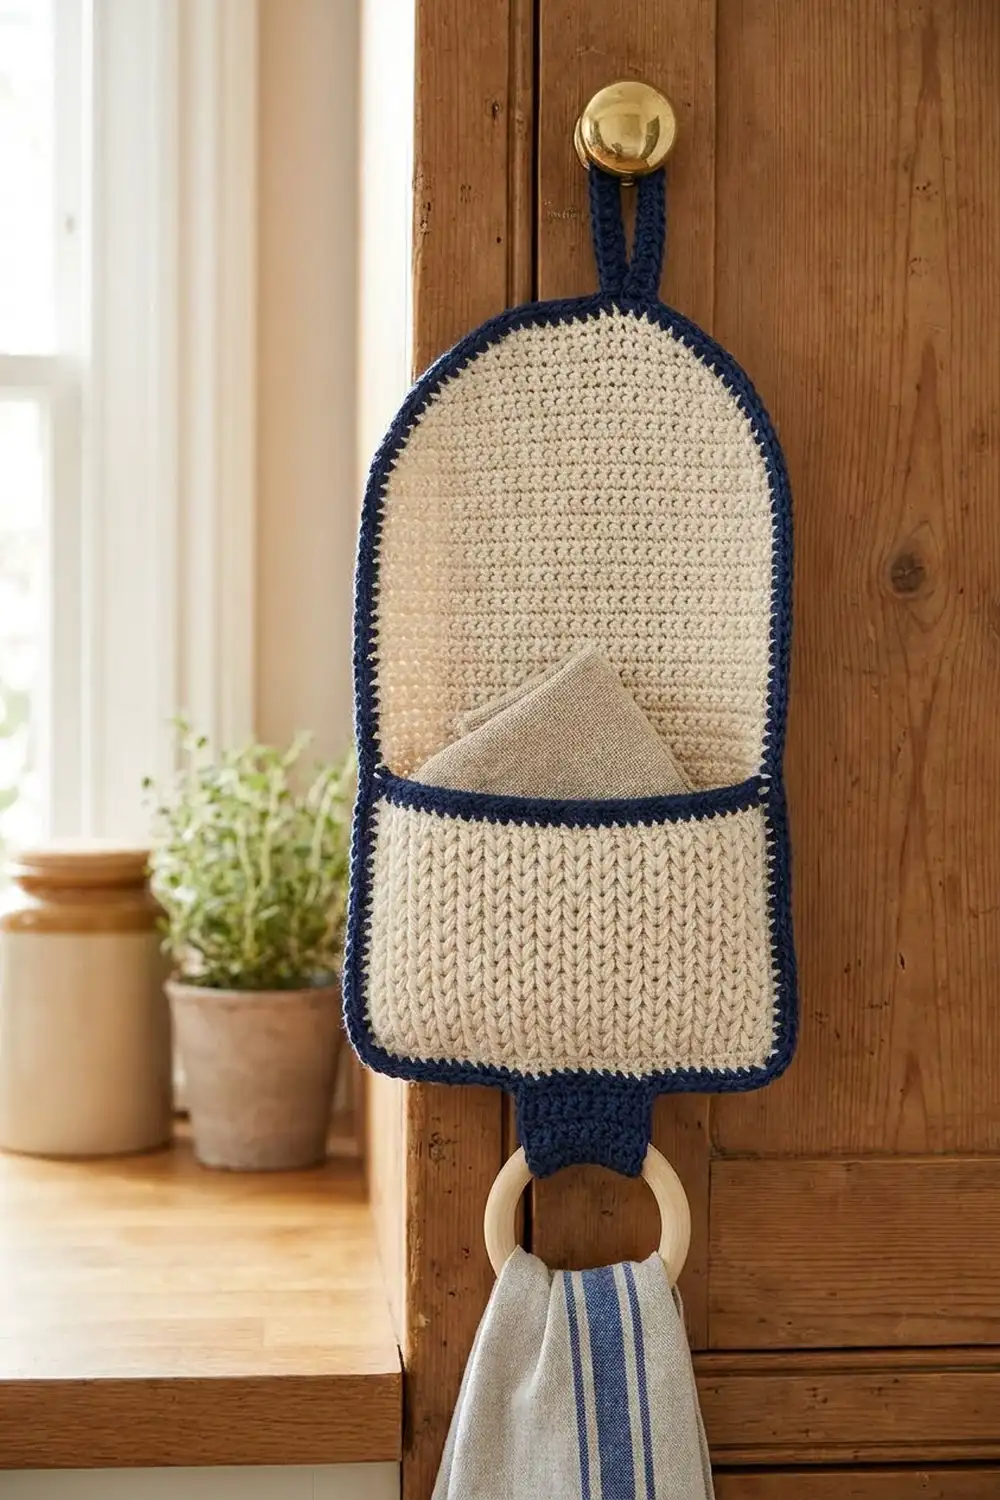
The Harbor Arch Towel Ring Holder is a small hanging organizer for a kitchen or bathroom. It has an arched back panel, a deep knit-look pocket for a dishcloth, a hanging loop at the top and a wooden ring at the bottom for a hand towel.
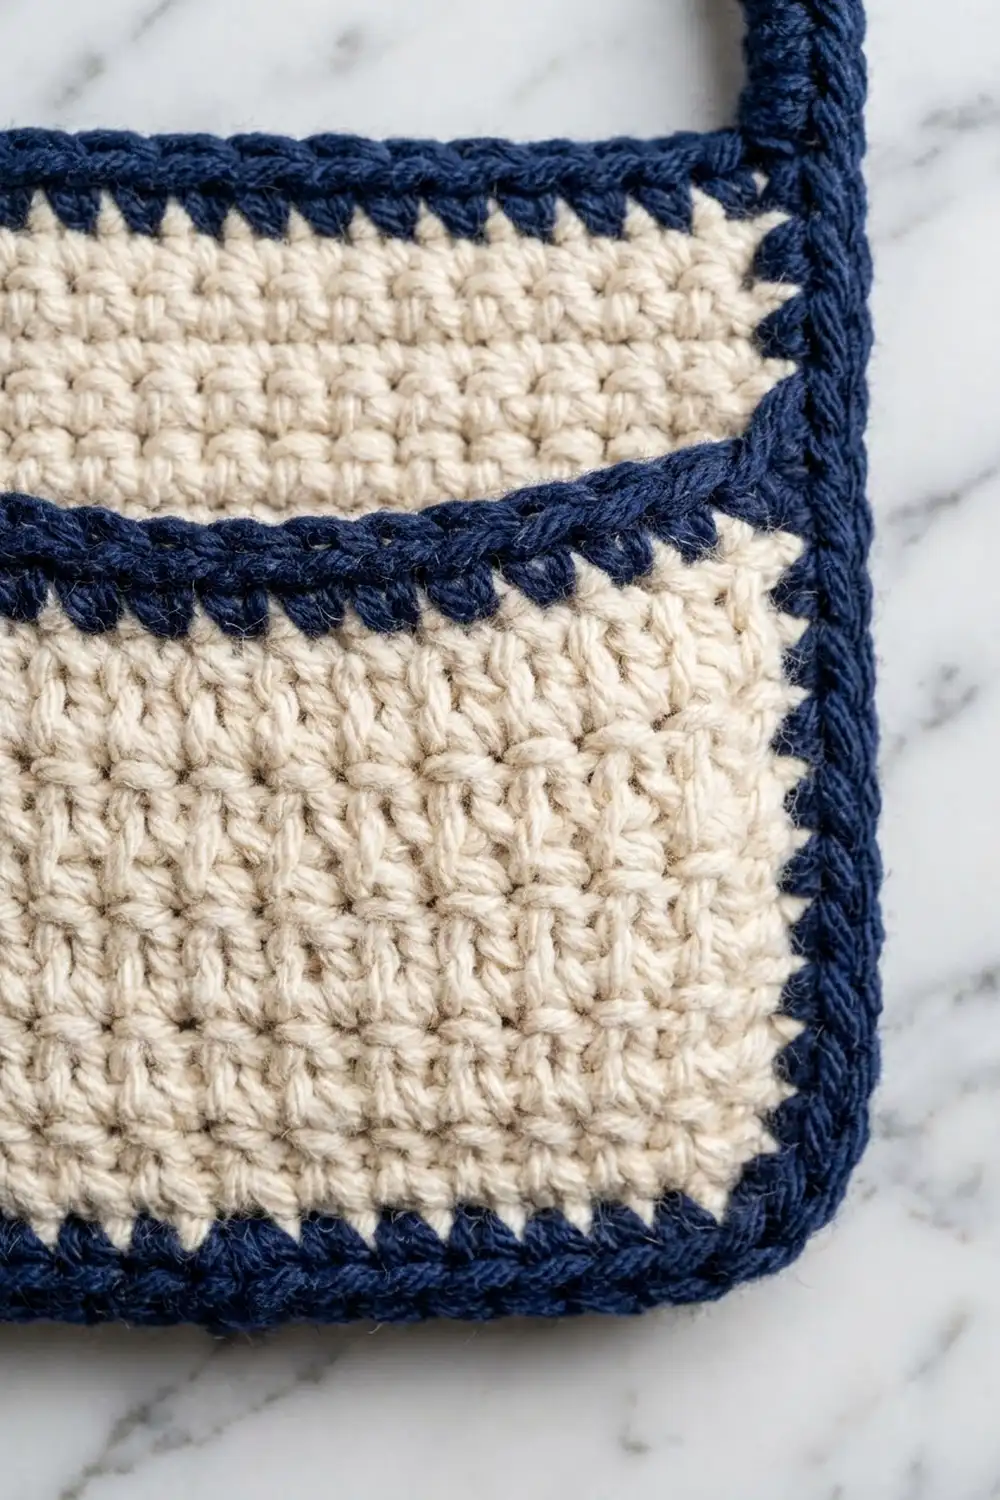
The main fabric is cream, and every edge is trimmed in navy with corded reverse single crochet. The panel is plain single crochet. The pocket is waistcoat stitch, which makes columns of chunky V’s that look like knitting.
This pattern uses US crochet terms. The finished panel is 7 x 10 in (17.8 x 25.4 cm), not counting the loop and ring. The pocket front is 7 x 5 in (17.8 x 12.7 cm) and the pocket is 1 in (2.5 cm) deep.
You work the panel bottom-up in rows and shape the arch with decreases. You work the pocket as a tube in the round, close the bottom and box the corners. Then you add the loop, tab and border, and sew everything together.
Finished Size and Construction
- Finished panel size: 7 x 10 in (17.8 x 25.4 cm)
- Skill level: Intermediate
- Terminology: US crochet terms
- Yarn weight: Worsted (#4); cotton is recommended
- Hooks: 5.0 mm (H-8) for the panel, borders, loop and tab; 5.5 mm (I-9) for the pocket
- Number of pieces: 4 crocheted pieces (panel, pocket, hanging loop, ring tab) plus 1 wooden ring
- Layout: Loop at top center, pocket across the lower middle, ring tab at bottom center
- Panel size before border: 6 x 9 in (15.2 x 22.9 cm)
- Border depth: 0.5 in (1.3 cm) on each side
- Pocket size before boxing: 8 x 5.5 in (20.3 x 14.0 cm), laid flat
Materials
Choose a smooth worsted-weight cotton or cotton blend. Cotton holds its shape and stands up to frequent washing. These amounts assume yarn with about 170 m per 100 g.
- Cream (main color): 60 g, about 102 m
- Navy (contrast color): 25 g, about 42 m
These amounts include about 20% extra for a gauge swatch and for differences in tension.
Tools:
- 5.0 mm (H-8) crochet hook
- 5.5 mm (I-9) crochet hook
- One wooden ring, 4 in (10.2 cm) outer diameter
- Tapestry needle
- 4 locking stitch markers
- Straight pins
- Scissors
- Tape measure
Abbreviations (US Terms)
- ch – chain
- sl st – slip stitch
- sc – single crochet
- sc2tog – single crochet 2 together (decrease)
- rev sc – reverse single crochet (crab stitch)
- wsc – waistcoat single crochet
- st(s) – stitch(es)
- rnd – round
- RS – right side
Waistcoat single crochet (wsc): Each sc has a V on top and two vertical legs below it. Insert the hook through the center of the stitch, between the two legs, and out the back. Then yarn over, pull up a loop, yarn over, and pull through both loops on the hook. When you stack rounds of wsc, they form vertical columns of V’s.
Reverse single crochet (rev sc): Work from left to right. Insert the hook into the next stitch to the right, yarn over, pull up a loop, yarn over, and pull through both loops.
Gauge and Checkpoints
Panel gauge (5.0 mm hook): 16 sc x 18 rows = 4 in (10.2 cm).
Pocket gauge (5.5 mm hook): 16 wsc x 16 rnds = 4 in (10.2 cm).
Waistcoat stitch works up tighter than plain sc. The larger hook makes its stitches the same width as the panel’s.
Make the panel first, since it sets the size for everything else. Check your work at these points:
- After Row 12: 6 in (15.2 cm) wide
- After Row 32: 6 x 7 in (15.2 x 17.8 cm)
- After Row 41: 6 x 9 in (15.2 x 22.9 cm)
- After the border: 7 x 10 in (17.8 x 25.4 cm)
- Pocket after Rnd 8: 8 in (20.3 cm) wide laid flat
- Pocket after Rnd 22: 8 x 5.5 in (20.3 x 14.0 cm) laid flat
If your piece is too big, use a hook one size smaller. If it is too small, use a hook one size larger. Check the width first, because it decides whether the pocket fits the panel.
Back Panel
Use cream and the 5.0 mm hook. Work in rows from the bottom up.
Foundation: Ch 25.
Row 1 (RS): Sc in the 2nd ch from the hook and in each ch across. Turn. (24 sc)
Rows 2–32: Ch 1 (does not count as a st), sc in each st across. Turn. (24 sc)
Checkpoint: 6 x 7 in (15.2 x 17.8 cm).
Arch Shaping
The decreases are spaced unevenly. This gives a rounded arch with a short flat top instead of a point.
Row 33: Ch 1, sc2tog, sc in the next 20 sts, sc2tog. Turn. (22 sc)
Row 34: Ch 1, sc in each st across. Turn. (22 sc)
Row 35: Ch 1, sc2tog, sc in the next 18 sts, sc2tog. Turn. (20 sc)
Row 36: Ch 1, sc in each st across. Turn. (20 sc)
Row 37: Ch 1, sc2tog, sc in the next 16 sts, sc2tog. Turn. (18 sc)
Row 38: Ch 1, sc2tog, sc in the next 14 sts, sc2tog. Turn. (16 sc)
Row 39: Ch 1, sc2tog, sc in the next 12 sts, sc2tog. Turn. (14 sc)
Row 40: Ch 1, [sc2tog] twice, sc in the next 6 sts, [sc2tog] twice. Turn. (10 sc)
Row 41: Ch 1, sc2tog, sc in the next 6 sts, sc2tog. (8 sc)
Fasten off and weave in the end.
Checkpoint: 6 x 9 in (15.2 x 22.9 cm). The flat top is 8 sts, or 2 in (5.1 cm), wide.
Use cream and the 5.5 mm hook. Work the pocket as a tube in continuous rounds so the V columns stay straight.
Foundation: Ch 64. Sl st in the first ch to form a ring, making sure the chain is not twisted.
Rnd 1: Ch 1, sc in each ch around. Do not join. Place a marker in the first st and move it up each round. (64 sc)
Rnds 2–20: Wsc in each st around. (64 wsc)
Checkpoint: Laid flat, the tube is 8 x 5 in (20.3 x 12.7 cm), with 32 sts on each side.
Sl st in the next st to smooth out the step where the spiral ends. Fasten off the cream.
Top Rim
Switch to navy and the 5.0 mm hook.
Rnd 21: Join navy in any st. Ch 1, sc in each st around. Join with a sl st to the first sc. (64 sc)
Rnd 22: Ch 1, rev sc in each st around. Join with a sl st. (64 rev sc)
Fasten off. Checkpoint: 8 x 5.5 in (20.3 x 14.0 cm) laid flat.
Bottom Seam
Flatten the tube so the spiral step sits on one of the side folds. Join navy at one bottom corner.
Seam row: Ch 1, then sc 32 across. For each sc, insert the hook through one front ch and the ch directly behind it. (32 sc)
Fasten off. This row closes the bottom and adds a navy line along the base.
Box the Corners
- Turn the pocket inside out.
- Flatten one bottom corner so the bottom seam lines up with the side fold. This makes a small triangle.
- Measure 0.5 in (1.3 cm) down from the tip and sew straight across with cream. The stitched line is 1 in (2.5 cm) long.
- Repeat on the other corner, tack both tips flat to the base, and turn the pocket right side out.
The pocket now has a base 1 in (2.5 cm) deep. Each face is 7 in (17.8 cm) wide, and the pocket is 5 in (12.7 cm) tall.
Hanging Loop
Use navy and the 5.0 mm hook.
Foundation: Ch 37.
Row 1: Sc in the 2nd ch from the hook and in each ch across. Turn. (36 sc)
Row 2: Ch 1, sc in each st across. (36 sc)
Fasten off, leaving a 12 in (30.5 cm) tail for sewing. The strip is 9 in (22.9 cm) long.
Ring Tab
Use navy and the 5.0 mm hook.
Foundation: Ch 6.
Row 1: Sc in the 2nd ch from the hook and in each ch across. Turn. (5 sc)
Rows 2–18: Ch 1, sc in each st across. Turn. (5 sc)
Fasten off, leaving a 12 in (30.5 cm) tail. The tab is 1.25 x 4 in (3.2 x 10.2 cm).
Make All Pieces
Make sure you have every piece before you start assembling.
Cream:
– 1 back panel
– 1 pocket (with its navy rim and bottom seam already added)
Navy:
– 1 hanging loop
– 1 ring tab
– Panel border (worked in the next section)
Assembly layout (front view):
+--------[ LOOP ]--------+
|        ARCH TOP        |
|------------------------|
|   POCKET 7 x 5 in      |
|------------------------|
|      1.5 in gap        |
+--------[ TAB ]---------+
         ( RING )
Border
Border gauge: 4 sc per inch. Along the row ends, work 7 sc for every 8 rows. The panel has 4.5 rows per inch, so this keeps the edge at about 4 sts per inch and it lies flat.
Use navy and the 5.0 mm hook. With the RS facing you, join navy in the bottom-left corner (the first foundation ch on the left).
Rnd 1: Ch 1, then work around the panel:
- Bottom edge: 3 sc in the first ch, sc in the next 22 ch, 3 sc in the last ch. (28 sc: 1 sc in each of the 24 sts + 4 extra corner sts)
- Right side, Rows 1–32: Sc in the row ends, skipping every 8th row end. (28 sc)
- Right arch, Rows 33–41: 1 sc in each row end. (9 sc)
- Top edge: 2 sc in the first st, sc in the next 6 sts, 2 sc in the last st. (10 sc: 1 sc in each of the 8 sts + 2 extra)
- Left arch, Rows 41–33: 1 sc in each row end. (9 sc)
- Left side, Rows 32–1: Sc in the row ends, skipping every 8th row end. (28 sc)
Join with a sl st to the first sc. (112 sc)
Rnd 2: Ch 1, rev sc in each st around. Join with a sl st. (112 rev sc)
Fasten off and weave in the ends.
Why the math works: The bottom edge has 24 sts, or 6 in (15.2 cm), plus 4 extra stitches so the corners can turn. The straight sides are 32 rows, or about 7 in (17.8 cm). At 4 sts per inch, 28 sc is also 7 in, so the sides stay flat. The 2 extra stitches at the top help the curve lie smoothly. Total: 28 + 28 + 9 + 10 + 9 + 28 = 112. The two rounds add 0.5 in (1.3 cm) on each side, so the panel grows from 6 x 9 in to 7 x 10 in (17.8 x 25.4 cm).
Joining
Sew all pieces with a tapestry needle and whipstitch. Line up each stitch on one piece with the fabric directly behind it.
Pocket to Panel
- Lay the panel flat, RS up.
- Place the pocket on top with its back face against the panel. The bottom of the pocket sits 1.5 in (3.8 cm) above the bottom edge of the panel, and the top rim sits 6.5 in (16.5 cm) above it.
- Line up the pocket’s side folds with the side edges of the panel. Both are 7 in (17.8 cm) wide.
- Pin along the back edge of the base and up both side folds.
- With cream, whipstitch the back face of the pocket to the panel. Along the base, make 1 stitch per pocket stitch (28 sts between the boxed corners). Up each side fold, make 1 stitch per round until you reach the navy rim.
- Tack each end of the rim down with 2 small navy stitches.
Leave the front of the pocket unsewn so it can open.
Tension advice: Sew firmly, but don’t pull the yarn tight. If the panel puckers behind the pocket, loosen your stitches.
Hanging Loop
Fold the strip in half so the ends meet. Lay the ends on the back of the panel at the top center, overlapping the panel by 1.5 in (3.8 cm), and whipstitch them in place. The loop sticks up 3 in (7.6 cm) above the arch.
Ring Tab
Pass the tab through the ring and fold it in half. Place one end on the front of the panel and the other on the back, both at the bottom center. Each end overlaps the panel by 1.25 in (3.2 cm). Sew through all layers along the edges of the tab.
Size checkpoint: The panel is still 7 x 10 in (17.8 x 25.4 cm), and the pocket rim is 6.5 in (16.5 cm) above the bottom edge.
Final Blocking
- Mist the panel and pocket with water until they are damp.
- Pin the panel flat to 7 x 10 in (17.8 x 25.4 cm).
- Shape the arch into a smooth, even curve.
- Put a folded cloth in the pocket so it keeps its 1 in (2.5 cm) depth.
- Let it dry completely, which takes 12 to 24 hours.
- Remove the pins and the cloth.
Final Quality-Control Checklist
- The panel measures 7 x 10 in (17.8 x 25.4 cm).
- Both sides of the arch match.
- The navy border lies flat with no ripples.
- The V columns on the pocket run straight up.
- The pocket opens and holds a folded dishcloth.
- The loop is centered and firmly attached.
- The tab holds the ring securely.
- All ends are woven in.
Troubleshooting
The waistcoat columns slant. Put the hook between the two legs of the stitch, not under the V, and don’t turn your work.
The pocket is too narrow. Waistcoat stitch tends to tighten. Use a hook one size larger.
The border ripples. There are too many stitches. Skip one more row end on each side.
The border cups. There are too few stitches. Add 1 or 2 sc on each side.
The arch looks pointed. Make sure you work Rows 34 and 36 without decreases, as written.
The panel sags under the pocket. Sew the base of the pocket more firmly.
Care
Hand wash, or machine wash on a gentle cycle in cool water. Lay flat to dry and reshape the pocket while it is still damp.
Final Notes
The panel starts at 24 sts, or 6 in (15.2 cm) wide. It is 9 in (22.9 cm) tall after the arch and 7 x 10 in (17.8 x 25.4 cm) after the border. The pocket tube has 64 sts, 32 on each side, so it is 8 in (20.3 cm) wide laid flat. Boxing the corners takes up 1 in (2.5 cm), so each face ends up 7 in (17.8 cm) wide and matches the panel exactly. Check each measurement as you go and the pieces will fit together easily.
Happy crocheting!