

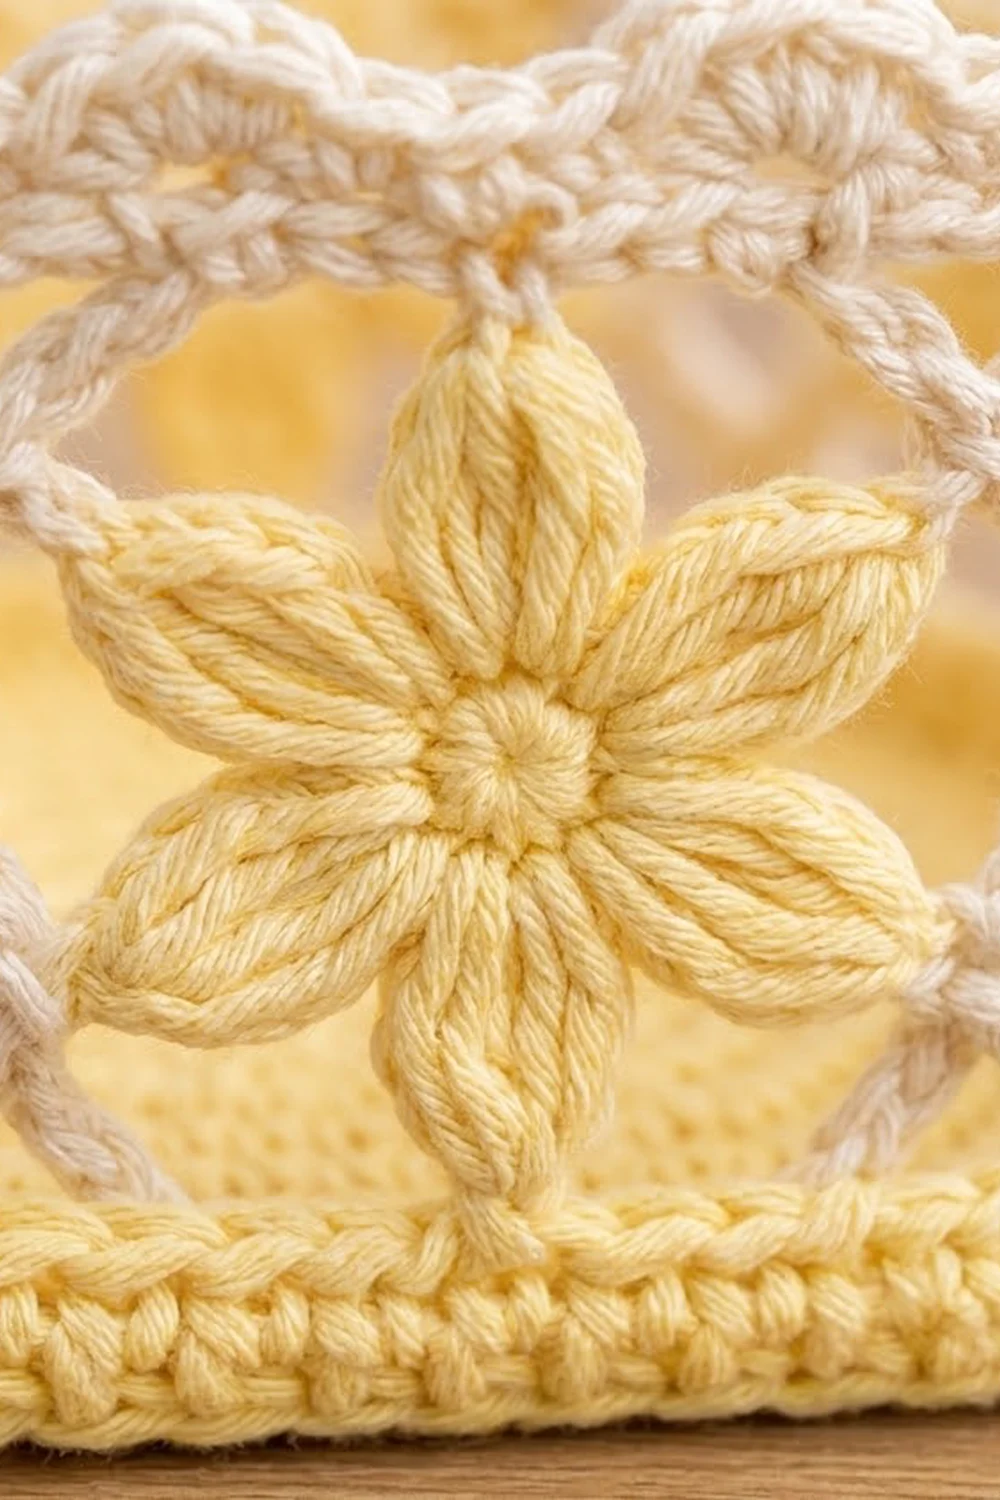
The Buttercup Lattice Hanging Basket is a two-tier holder for toilet paper and small bathroom items. Each tier is a hexagonal basket with a solid butter-yellow base, an airy cream chain-mesh wall, and six yellow flowers, one centered on each side. Two cream cords stack the baskets one above the other and loop over a wooden ring for hanging.
The colors are soft and bright: pale butter yellow for the bases and flowers, and warm cream for the mesh, rims, and cords. The style is light, cottage-inspired, and practical. You can see the roll through the open lattice, and the solid base keeps it from sagging.
This pattern uses US crochet terms. Each basket measures 6 in (15.2 cm) corner to corner, 5.2 in (13.2 cm) flat side to flat side, and 3.5 in (8.9 cm) tall. The hanging unit is about 17 in (43.2 cm) long from the top of the ring to the bottom of the lower basket.
Here is how it goes together. Work each base in the round as a flat single crochet hexagon, then turn up two short wall rounds. Switch to cream for four rounds of chain mesh and a scalloped rim. Make the flowers separately and sew them on. Finally, sew two cords to opposite corners of both baskets and loop them over the ring.
Finished Size and Construction
- Finished size (each basket): 6 in (15.2 cm) corner to corner, 5.2 in (13.2 cm) flat to flat, 3.5 in (8.9 cm) tall
- Overall hanging length: about 17 in (43.2 cm)
- Skill level: Intermediate
- Terminology: US
- Yarn weight: Worsted (#4) cotton
- Hook: 4.0 mm (G-6)
- Number of pieces: 2 baskets, 12 flowers, 2 cords, and 1 wooden ring
- Layout: 2 baskets stacked vertically and joined by 2 cords
- Piece size: base side 3 in (7.6 cm)
- Size before border: wall 2.8 in (7.1 cm) tall
- Border depth: 0.7 in (1.8 cm) scalloped rim
Materials
Use a smooth 100% cotton or cotton-blend worsted yarn with about 85 yd (78 m) per 50 g. Cotton keeps the base firm and holds up to bathroom humidity. Don’t use acrylic, because the walls will slump.
- Color A, Butter Yellow: 100 g, about 156 m (bases and flowers)
- Color B, Cream: 75 g, about 117 m (mesh, rims, and cords)
Tools:
- 4.0 mm (G-6) crochet hook
- Wooden ring, 2.75 in (7.0 cm) outside diameter
- Tapestry needle
- 6 locking stitch markers
- Scissors and a measuring tape
- Rust-proof pins and a blocking mat
These quantities include about 25% extra to cover your gauge check and the seaming.
Abbreviations (US Terms)
- ch – chain
- sl st – slip stitch
- sc – single crochet
- dc – double crochet
- tr – treble crochet
- BLO – back loop only
- sp – space
- st(s) – stitch(es)
- rep – repeat
Special stitch – Petal: Work (ch 3, 2 tr, ch 2, 2 tr, ch 3, sl st) all in the same stitch. The ch-2 makes the pointed tip and the groove down the middle of the petal.
Gauge and Checkpoints
Gauge: 16 sc and 18 rounds = 4 in (10.2 cm), worked in sc in the round with Color A.
Make one complete base before you start anything else. It is your real gauge swatch. Check it at these points:
- After Rnd 6: 3 in (7.6 cm) corner to corner
- After Rnd 12: 6 in (15.2 cm) corner to corner and 3 in (7.6 cm) per side
- After the wall rounds: side height of 0.4 in (1.0 cm)
- After the mesh: 2.8 in (7.1 cm) from the base to the top of the mesh
- Finished flower: 2.2 in (5.6 cm) across
If your base is more than 0.25 in (0.6 cm) too big, go down one hook size. If it is too small, go up one size. A standard roll is about 4.5 in (11.4 cm) wide, so a base under 5 in (12.7 cm) flat to flat will be too tight.
Base (Make 2)
Use Color A and work in continuous rounds. Mark the first stitch of each round and move the marker up as you go. The increases stack at six points, which makes a flat hexagon.
Rnd 1: Make a magic ring, ch 1, 6 sc in ring. (6 sts)
Rnd 2: 2 sc in each st around. (12 sts)
Rnd 3: *2 sc in next st, sc in next st; rep from * 5 more times. (18 sts)
Rnd 4: *2 sc in next st, sc in next 2 sts; rep from * 5 more times. (24 sts)
Rnds 5–12: Keep going the same way. In each round, work 2 sc in the first stitch of each repeat, then sc in one more stitch per repeat than in the round before.
Each round’s total:
- Rnd 5: 30 sts
- Rnd 6: 36 sts
- Rnd 7: 42 sts
- Rnd 8: 48 sts
- Rnd 9: 54 sts
- Rnd 10: 60 sts
- Rnd 11: 66 sts
- Rnd 12: *2 sc in next st, sc in next 10 sts; rep from * 5 more times. (72 sts, 12 per side)
Begin each new repeat in the first sc of the previous increase pair. This keeps the six corners in straight lines. When Rnd 12 is done, put a locking marker at each of the six corners.
Rnd 13 (wall turn): Sc in BLO of each st around. (72 sts: 72 worked 1 per existing stitch + 0 added)
Rnd 14: Sc in each st around. (72 sts)
Sl st in the next st and fasten off Color A. The front loops left unworked in Rnd 13 form a crisp ridge. The base now stands like a shallow tray with a 0.4 in (1.0 cm) side.
Mesh Wall (Each Basket)
With Color B, join with a sl st in a corner stitch, at one of your markers.
Mesh Rnd 1 (conversion round): Ch 1, sc in same st, *ch 5, sk 2 sts, sc in next st; rep from * 22 more times, ch 5, sk last 2 sts, sl st in first sc. You now have 24 sc + 24 ch-5 sps (4 sps per side). All 72 base stitches are used, 3 for each loop.
Mesh Rnd 2: Sl st in each of the first 3 ch of the next ch-5 sp, ch 1, sc in same sp, *ch 5, sc in next ch-5 sp; rep from * 22 more times, ch 5, sl st in first sc. (24 ch-5 sps)
Mesh Rnds 3–4: Rep Mesh Rnd 2. (24 ch-5 sps in each round)
Each round sits half a loop over from the one below it, so the openings form diamonds and the wall looks like a lattice. The wall is now 2.8 in (7.1 cm) tall. Don’t fasten off; go straight on to the rim in the Border section.
Flowers (Make 12)
With Color A:
Rnd 1: Magic ring, ch 1, 6 sc in ring, sl st in first sc. (6 sts)
Rnd 2: *Petal in next st; rep from * 5 more times. (6 petals)
Fasten off and leave a 12 in (30.5 cm) tail for sewing. Pull the ring tight before you weave in the starting tail. The center is about 0.5 in (1.3 cm) across, and the whole flower is 2.2 in (5.6 cm) wide.
Make All Pieces
- Color A: 2 bases (with wall rounds) and 12 flowers
- Color B: 2 mesh walls with rims and 2 cords
Layout (front view, hanging):
         ( ring )
          /    \
       cord    cord
       |  BASKET 1  |   upper tier, 6 flowers
       |            |   3 in (7.6 cm) gap
       |  BASKET 2  |   lower tier, 6 flowers
Cord (Make 2): With Color B, ch 73. Sc in the back bump of the 2nd ch from the hook and in each ch across (72 sc). Turn the cord around and sl st in each free loop of the foundation chain along the other side (72 sl st). Fasten off and leave a 12 in (30.5 cm) tail. The cord is 18 in (45.7 cm) long and about 0.4 in (1.0 cm) wide, with a braided look on both edges.
Mark the cord stitches as follows:
- Sts 1–8: ring loop, 2 in (5.1 cm)
- Sts 9–32: ring to upper rim, 6 in (15.2 cm)
- Sts 33–46: along the Basket 1 wall, 3.5 in (8.9 cm)
- Sts 47–58: gap, 3 in (7.6 cm)
- Sts 59–72: along the Basket 2 wall, 3.5 in (8.9 cm)
Check: 8 + 24 + 14 + 12 + 14 = 72 sts.
Joining
Finish both rims (see Border) before you join anything.
Flowers to mesh: Center one flower on each side of each basket, over Mesh Rnds 1–3, lined up between the 2nd and 3rd loops on that side. Use the tail to tack each petal tip to the nearest mesh sc or loop with 2 small stitches. Then tack the flower center to the loop behind it. Keep the petals flat and don’t pull the mesh in. Each side should still measure 3 in (7.6 cm).
Cords to baskets: Choose two opposite corners (corners 1 and 4) on each basket. With the right side facing out, lay cord sts 33–46 straight up corner 1 of Basket 1, with st 33 at the top of the rim and st 46 at the base ridge. Whipstitch through both edges of the cord and the corner, matching:
- Cord sts 33–36 to the rim
- Cord sts 37–42 to the mesh sc points on the corner (Mesh Rnds 4 down to 1)
- Cord sts 43–46 to the base wall rounds and ridge
Leave sts 47–58 free for the 3 in (7.6 cm) gap. Sew sts 59–72 to corner 1 of Basket 2 the same way. Repeat with the second cord on corner 4 of both baskets.
Pass sts 1–8 of each cord over the ring and fold them down onto sts 9–16 of the same cord. Whipstitch the fold closed.
Tension: Sew firmly but keep the stitches flat. If the cord puckers, you’re pulling too hard.
Size checkpoint: Hang the unit. There should be a 3 in (7.6 cm) gap between the baskets, each cord should run 6 in (15.2 cm) from the ring to the rim, and both baskets should hang level.
Border (Scalloped Rim)
Border gauge: 3 sc per ch-5 sp, so 12 sc = 3 in (7.6 cm), the same as the base.
Keep working with Color B from the last mesh round.
Rim Rnd 1: Sl st in each of the first 3 ch of the next ch-5 sp, ch 1, 3 sc in the same sp, then 3 sc in each ch-5 sp around. Sl st in first sc. (72 sc: 24 sps × 3, so 12 sc per side)
Rim Rnd 2: Ch 1, sl st in first sc, *sk next sc, 5 dc in next sc, sk next sc, sl st in next sc; rep from * around, working the last sl st into the beginning sl st. (18 scallops, 3 per side: 90 dc + 18 sl st)
Fasten off and weave in the ends.
Why the math works: Each side has 4 loops × 3 sc = 12 sts, which matches the 12 sts per side of the base. The rim has 72 sts, exactly like the base, so the wall goes straight up instead of flaring out or pulling in. Each scallop uses 4 sts: 72 ÷ 4 = 18 scallops, and 12 ÷ 4 = 3 scallops per side. You don’t add any corner stitches, because the per-side count already covers the whole side.
Final Blocking
- Weave in all the ends before blocking.
- Soak the finished unit in cool water for 10 minutes. Roll it in a towel and press out the water; don’t wring it.
- Stuff each basket firmly with a dry towel so it holds a 5.2 in (13.2 cm) flat-to-flat hexagon.
- Pin each scallop up so the rim is 0.7 in (1.8 cm) deep.
- Press the flower petals flat with your fingers so the tips point outward.
- Lay the cords straight next to the baskets.
- Let everything dry completely, about 24 hours, before you hang it.
Final Quality-Control Checklist
- [ ] Each base is 6 in (15.2 cm) corner to corner and lies flat
- [ ] The base wall ridge is even all the way around
- [ ] Each mesh wall has 24 loops in every round
- [ ] Each rim has 72 sc and 18 scallops
- [ ] Each basket is 3.5 in (8.9 cm) tall
- [ ] Each basket has 6 centered flowers with every petal tip tacked
- [ ] Cords measured 18 in (45.7 cm) before sewing and are attached at opposite corners
- [ ] The gap between baskets is 3 in (7.6 cm)
- [ ] All ends are hidden
- [ ] A roll fits easily in each basket
Troubleshooting
- Base cups or ruffles: Count each round against the totals above. If the counts are right, cupping means you’re working too tight and ruffling means you’re working too loose.
- Base swirls instead of forming corners: Start each repeat in the first sc of the previous increase pair.
- Wall flares at the top: Rim Rnd 1 has more than 3 sc per loop. Redo it with exactly 3.
- Mesh leans: Always sl st over to the 3rd ch, the center of the loop, before you start a round.
- Baskets tilt: The cords aren’t on true opposite corners. Re-sew them on corners 1 and 4.
- Flowers droop: Tack down the center as well as the petal tips.
Care
Hand wash in cool water with mild soap, then reshape and dry flat. Hang it away from direct shower spray so the cotton stays firm.

Final Notes
Here is how the measurements connect. A gauge of 16 sc = 4 in (10.2 cm) gives a 72-stitch base that is 6 in (15.2 cm) corner to corner, with 12 stitches per side. Those 72 stitches become 24 mesh loops, which become 72 rim stitches again, so the 3.5 in (8.9 cm) walls stay straight. Two 72-stitch cords, each 18 in (45.7 cm) long, hang both tiers from the 2.75 in (7.0 cm) ring with a 3 in (7.6 cm) gap between the baskets. If your first base matches its checkpoints, everything else will fit.
Happy crocheting!