

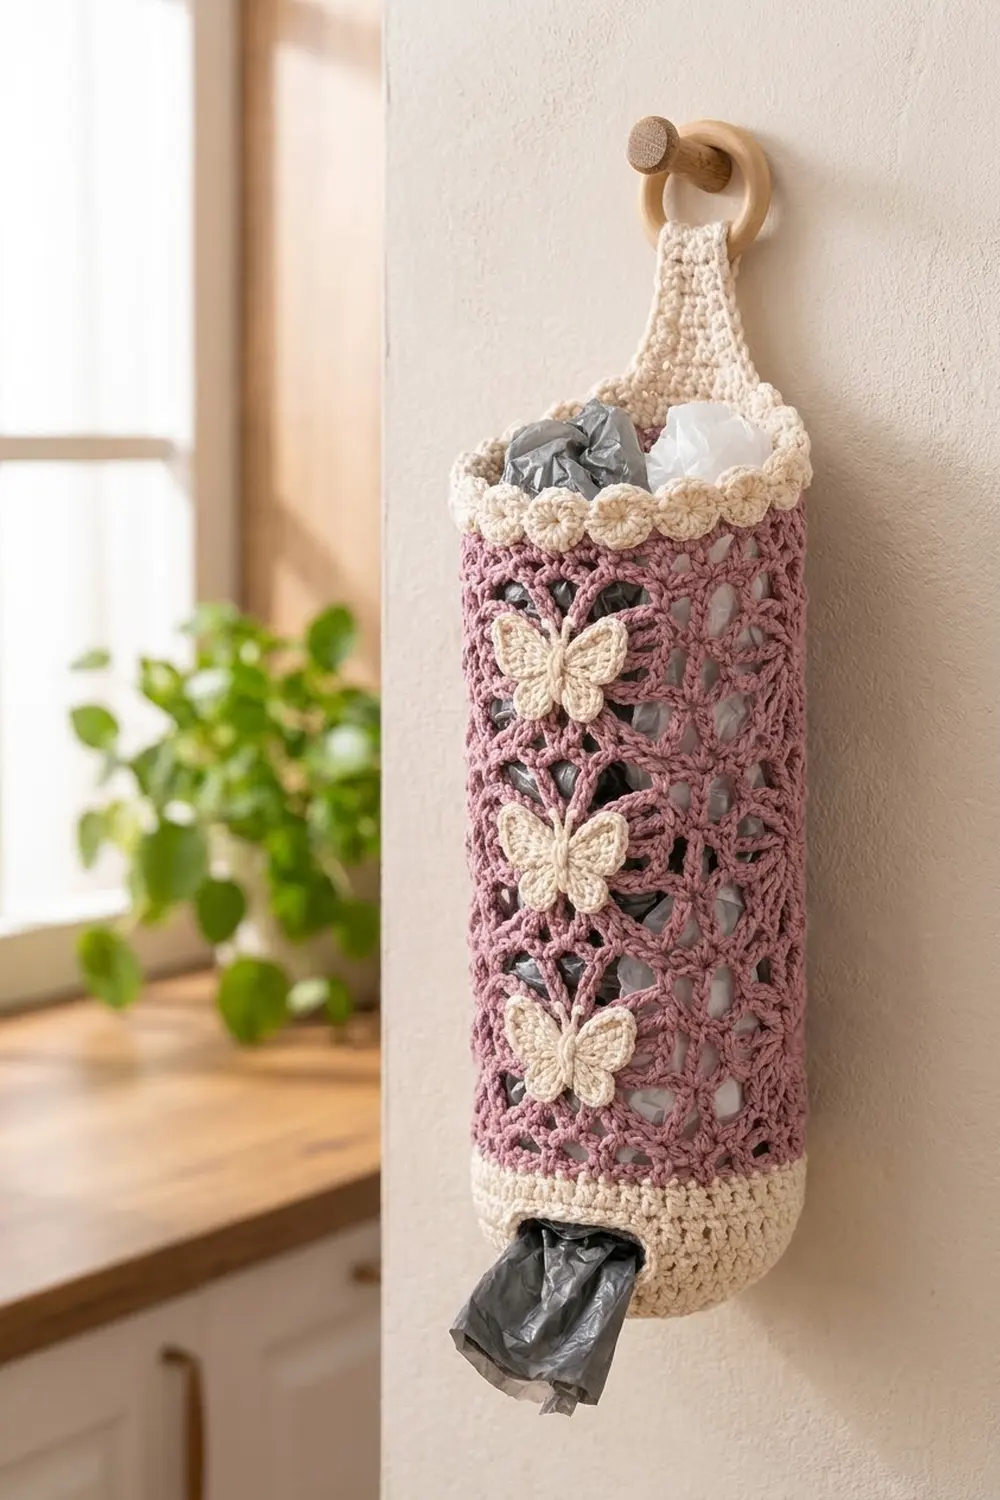
This hanging plastic bag holder pairs a lacy dusty-mauve trellis with crisp cream accents. It has a solid cream base with a dispensing slot, an open diamond mesh body, a scalloped cream rim, and three small cream butterflies stacked down the front. It hangs from a natural wooden ring on a tapered cream strap.
The look is soft and cottage-style, but the piece is built to work. You push bags in through the top and pull them out through the slot near the bottom. The mesh shows the bags inside without looking messy, and the solid base keeps them from sliding out.
This pattern uses US crochet terms. The finished holder measures about 4.75 in (12.1 cm) across, 15 in (38.1 cm) around, and 13 in (33.0 cm) tall from base to rim. With the strap it is about 17 in (43.2 cm) long, not counting the ring.
You work the holder in one piece from the bottom up: a flat single crochet circle, solid cream walls with a slot, 20 rounds of mauve trellis, a three-round cream border, and a strap worked straight off the back of the rim. Last, you crochet three butterflies and sew them on.
Finished Size and Construction
- Finished size: 4.75 in (12.1 cm) diameter x 13 in (33.0 cm) tall; about 17 in (43.2 cm) including the strap
- Skill level: Easy-intermediate
- Terminology: US
- Yarn weight: Worsted (#4) cotton
- Hook: 4.5 mm (US 7)
- Number of pieces: 1 main piece (base, walls, mesh, border and strap worked continuously) plus 3 butterfly appliqués
- Layout: Butterflies stacked vertically at the center front, 3 in (7.6 cm) apart, above the slot
- Piece size: 60 stitches around = 15 in (38.1 cm) circumference
- Size before border: 12 in (30.5 cm) tall
- Border depth: 1 in (2.5 cm), plus the strap
Materials
Choose a smooth worsted-weight cotton or cotton blend. Cotton holds its shape when stuffed with bags and shows the trellis clearly. Avoid fuzzy or very stretchy yarns, which blur the mesh and let the tube sag.
- Color A, dusty mauve: 70 g, about 110 m (120 yd)
- Color B, cream: 70 g, about 110 m (120 yd)
These quantities include a margin of about 15 percent for gauge swatching and tails.
Tools:
- 4.5 mm (US 7) crochet hook
- Wooden ring, 2 in (5.1 cm) diameter
- 4 stitch markers
- Tapestry needle
- Scissors
- Rustproof pins and a spray bottle for blocking
Abbreviations (US Terms)
- ch – chain
- sl st – slip stitch
- sc – single crochet
- dc – double crochet
- tr – treble crochet
- BLO – back loop only
- sc2tog – single crochet 2 together
- sk – skip
- st(s) – stitch(es)
- sp(s) – space(s)
- RS / WS – right side / wrong side
Special stitches:
- V-stitch (V): (dc, ch 2, dc) in the same space.
- Shell: 5 dc in the same stitch.
Gauge and Checkpoints
Single crochet gauge: 16 sc and 16 rounds = 4 in (10.2 cm), worked in rounds.
Mesh gauge: 1 trellis repeat (one ch-5 loop) = 1 in (2.5 cm) wide; 2 mesh rounds = 1 in (2.5 cm) tall.
Make the base circle first. It works as your gauge swatch, and you can check it before you commit to the rest.
- After Base Rnd 10: the circle lies flat and measures 4.75–5 in (12.1–12.7 cm) across.
- After Wall Rnd 18: the cream walls stand 2 in (5.1 cm) tall above the base crease.
- After Mesh Rnd 10: the mesh measures 5 in (12.7 cm) tall, lightly stretched.
- After Mesh Rnd 20: the mesh measures 10 in (25.4 cm); total height is 12 in (30.5 cm).
- After the border: total height is 13 in (33.0 cm).
Too big? Go down one hook size, to 4.0 mm (US G-6). Too small? Go up to 5.0 mm (US H-8). If only the mesh is off, tighten or relax your chains rather than changing hooks, so the base still fits.
Pattern
Base (Color B, cream)
Work in continuous joined rounds. Join each round with a sl st to the first sc. The ch 1 at the start of a round does not count as a stitch.
Rnd 1: Magic ring, ch 1, 6 sc in ring, join. (6 sts)
Rnd 2: Ch 1, 2 sc in each st around, join. (12 sts)
Rnd 3: Ch 1, sc in next st, 2 sc in next st; repeat from * around, join. (18 sts)
Rnd 4: Ch 1, sc in next 2 sts, 2 sc in next st; repeat around, join. (24 sts)
Rnds 5–10: Keep increasing 6 sts evenly per round, with one more sc between increases each round. Rnd 5 has 30 sts, Rnd 6 has 36, Rnd 7 has 42, Rnd 8 has 48, Rnd 9 has 54, and Rnd 10 has 60.
Check: the circle is 4.75–5 in (12.1–12.7 cm) across and lies flat.
Walls and Slot (Color B, cream)
Rnd 11: Ch 1, sc in BLO of each st around, join. (60 sts) This forms the crisp fold at the bottom edge.
Rnds 12–13: Ch 1, sc in each st around, join. (60 sts)
Rnd 14 (slot): Ch 1, sc in next 26 sts, ch 8, sk 8 sts, sc in last 26 sts, join. (52 sc + one ch-8 sp)
Rnd 15: Ch 1, sc in next 26 sts, sc in each of 8 ch, sc in last 26 sts, join. (52 sc worked one per sc + 8 sc worked into the chains = 60 sts)
Rnds 16–18: Ch 1, sc in each st around, join. (60 sts) Fasten off cream.
The slot is about 2 in (5.1 cm) wide. Its center marks the front of the holder. Put a marker there.
Check: the walls measure 2 in (5.1 cm) tall above the crease.
Trellis Body (Color A, mauve)
Mesh Rnd 1 (set-up): Join mauve in any st at the back. Ch 1, sc in same st, ch 5, sk 3, sc in next st; repeat from * 13 more times, ch 5, sk 3, sl st to first sc. (15 ch-5 loops: 15 sc x 4 sts each = 60 base sts used)
Mesh Rnd 2 (V round): Sl st into next ch-5 loop. Ch 5 (counts as dc + ch 2), dc in same loop, ch 1, V in next ch-5 loop, ch 1; repeat from * 13 more times, sl st to 3rd ch of beginning ch-5. (15 V-sts, 15 ch-1 sps)
Mesh Rnd 3 (loop round): Sl st into first ch-2 sp. Ch 1, sc in same sp, ch 5, sc in ch-2 sp of next V; repeat from * 13 more times, ch 5, sl st to first sc. (15 ch-5 loops)
Each loop arches over the ch-1 gap below, and the next row of V-sts sits in the loop centers. Together they make the open diamond trellis.
Mesh Rnds 4–19: Repeat Rnds 2–3 eight more times.
Mesh Rnd 20: Repeat Rnd 2. (15 V-sts, 15 ch-1 sps) Fasten off mauve.
You now have 10 V rounds and 10 loop rounds. Check: the mesh measures 10 in (25.4 cm) and the total height is 12 in (30.5 cm).
Border
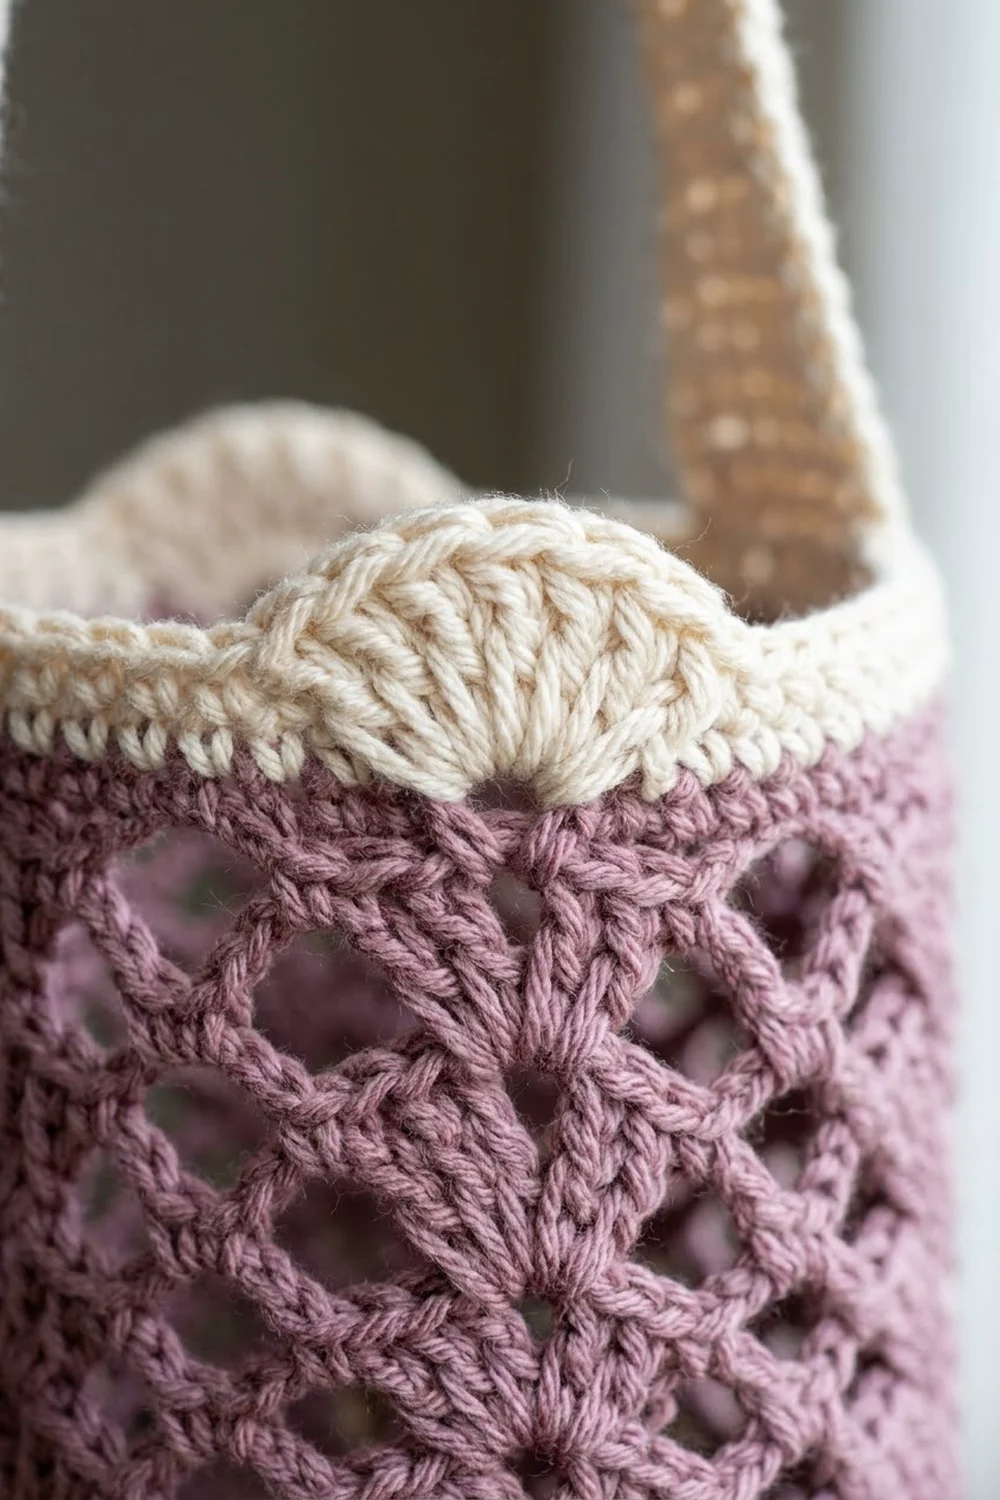
The border is three cream rounds that turn the open mesh back into a solid 60-stitch edge. Then a scallop round sits across the front, and the strap grows from the back.
Border gauge: Same as the base, 16 sc = 4 in (10.2 cm). That makes 60 sc = 15 in (38.1 cm), which matches the walls exactly.
Border Rnd 1 (conversion): Join cream in any ch-2 sp. Ch 1, 3 sc in each ch-2 sp and 1 sc in each ch-1 sp around, join. (15 ch-2 sps x 3 sc = 45, plus 15 ch-1 sps x 1 sc = 15, for 60 sts)
Border Rnd 2: Ch 1, sc in each st around, join. (60 sts: 30 across the front half and 30 across the back half)
Flatten the holder with the slot centered at the front. Find the back center and mark the 12 sts centered there, 6 on each side, with a marker on the first and last of them. Fasten off.
Border Rnd 3 (scallops): Join cream in the first front st after the marked back block, moving in your working direction. Ch 1, sc in same st, sk 1, shell in next st, sk 1, sc in next st, sk 1, shell in next st, sk 1; repeat from * 10 more times. Then sc in each of the 12 marked back sts, and sl st to the first sc. (12 shells over 48 front sts, plus 12 back sc)
Final Border Rnd 3 count: 12 sc between shells + 60 dc in shells + 12 back sc = 84 sts.
Why the math works: each shell repeat uses exactly 4 base sts (sc, skip, shell, skip). 12 repeats x 4 = 48 sts, and 48 + 12 back sts = 60, the full round. The shells take up 12 in (30.5 cm) of the rim, and the 3 in (7.6 cm) back block is the strap base, so nothing is stretched or bunched.
Strap
Don’t fasten off. Work in rows over the 12 back sc of Border Rnd 3.
Row 1: Ch 1, turn, sc in each of the 12 back sc. (12 sts)
Row 2: Ch 1, turn, sc in each st. (12 sts)
Row 3: Ch 1, turn, sc2tog, sc in next 8 sts, sc2tog. (10 sts)
Row 4: Ch 1, turn, sc in each st. (10 sts)
Row 5: Ch 1, turn, sc2tog, sc in next 6 sts, sc2tog. (8 sts)
Row 6: Ch 1, turn, sc in each st. (8 sts)
Row 7: Ch 1, turn, sc2tog, sc in next 4 sts, sc2tog. (6 sts)
Row 8: Ch 1, turn, sc in each st. (6 sts)
Row 9: Ch 1, turn, sc2tog, sc in next 2 sts, sc2tog. (4 sts)
Rows 10–20: Ch 1, turn, sc in each st. (4 sts)
Fasten off and leave a 12 in (30.5 cm) tail. The strap is 5 in (12.7 cm) long and tapers from 3 in (7.6 cm) to 1 in (2.5 cm) wide.
Pass Rows 17–20 through the wooden ring and fold them to the WS. Whipstitch Row 20 to Row 15. The visible strap is now about 4 in (10.2 cm) long.
Butterflies (make 3, Color B, cream)
Rnd 1: Magic ring, ch 1. Into the ring work:
- Upper wing: (ch 3, 3 tr, ch 3, sl st)
- Lower wing: (ch 2, 3 dc, ch 2, sl st)
- Lower wing: (ch 2, 3 dc, ch 2, sl st)
- Upper wing: (ch 3, 3 tr, ch 3, sl st)
Pull the ring tight. (2 upper wings, 2 lower wings)
Rnd 2 (edging): Work around each wing in turn:
- Upper wing: 3 sc in ch-3 sp, 2 sc in each tr, 3 sc in ch-3 sp, sl st at the ring. (12 sc)
- Lower wing: 2 sc in ch-2 sp, 2 sc in each dc, 2 sc in ch-2 sp, sl st at the ring. (10 sc)
That gives 12 + 10 + 10 + 12 = 44 sc. Fasten off and leave a 16 in (40.6 cm) tail.
Body: Wrap the tail vertically around the center 3 times, pulling it snug to pinch the wings. Embroider two straight-stitch antennae, each 0.25 in (0.6 cm) long. Keep the rest of the tail for sewing.
Each butterfly measures about 1.75 in (4.4 cm) wide x 1.5 in (3.8 cm) tall.
Placement: Center the butterflies above the slot. Their centers sit 2 in (5.1 cm), 5 in (12.7 cm) and 8 in (20.3 cm) above the top of the cream walls. Pin them in place, then sew around each body and the wing edges onto the mesh bars. Don’t pull so tight that the trellis puckers.
Final Blocking
- Weave in all ends along solid sc rows, not through the mesh.
- Wet the holder in cool water, gently squeeze it out, and roll it in a towel.
- Slide it over a cylinder about 4.75 in (12.1 cm) across, such as a rolled towel or a bottle.
- Ease the mesh to 10 in (25.4 cm) tall and open each diamond evenly.
- Pin the scallops so they curve outward evenly and the strap so it lies flat.
- Pin the butterflies’ wings open, or block them flat before sewing them on.
- Let everything dry completely before hanging.
Final Quality-Control Checklist
- The base lies flat with a clean BLO fold.
- The slot is 2 in (5.1 cm) wide and centered at the front.
- Each mesh round has exactly 15 loops or 15 V-sts.
- Border Rnds 1–2 each have 60 sts.
- There are 12 even shells across the front and 12 sc at the back.
- The strap tapers from 12 to 4 sts and is securely sewn around the ring.
- The 3 butterflies are aligned vertically and spaced 3 in (7.6 cm) apart.
- The holder is 13 in (33.0 cm) tall, and about 17 in (43.2 cm) with the strap.
Troubleshooting
- The base ruffles: Your stitches are loose for the hook. Go down a hook size, or skip one increase round and rework.
- The base cups: Go up a hook size, or check that you made 6 increases in every round.
- The mesh is too long: Work tighter chains, or leave out one pair of mesh rounds (Rnds 2–3).
- The tube twists: Join every round exactly, and don’t let the sl st into the loop drift to the next loop.
- The slot gapes: Work one round of sc around the slot opening to firm it up.
- The strap stretches: Fold it over the ring with a longer overlap, or line it with a strip of felt.
Care
Hand wash in cool water and lay flat or reshape over a cylinder to dry. Don’t tumble dry, since the cotton mesh can lengthen.
Final Notes
The whole holder follows one measurement chain. 16 sc = 4 in (10.2 cm) gives a 60-stitch circle about 4.75 in (12.1 cm) across. Those 60 sts become 15 trellis repeats, 15 V-sts become 60 sc again in the border, and 48 + 12 sts split the rim into scallops and strap. If you check the base, the walls and the mesh at each checkpoint, the finished holder comes out at 13 in (33.0 cm) tall with room for plenty of bags.
Happy crocheting!