

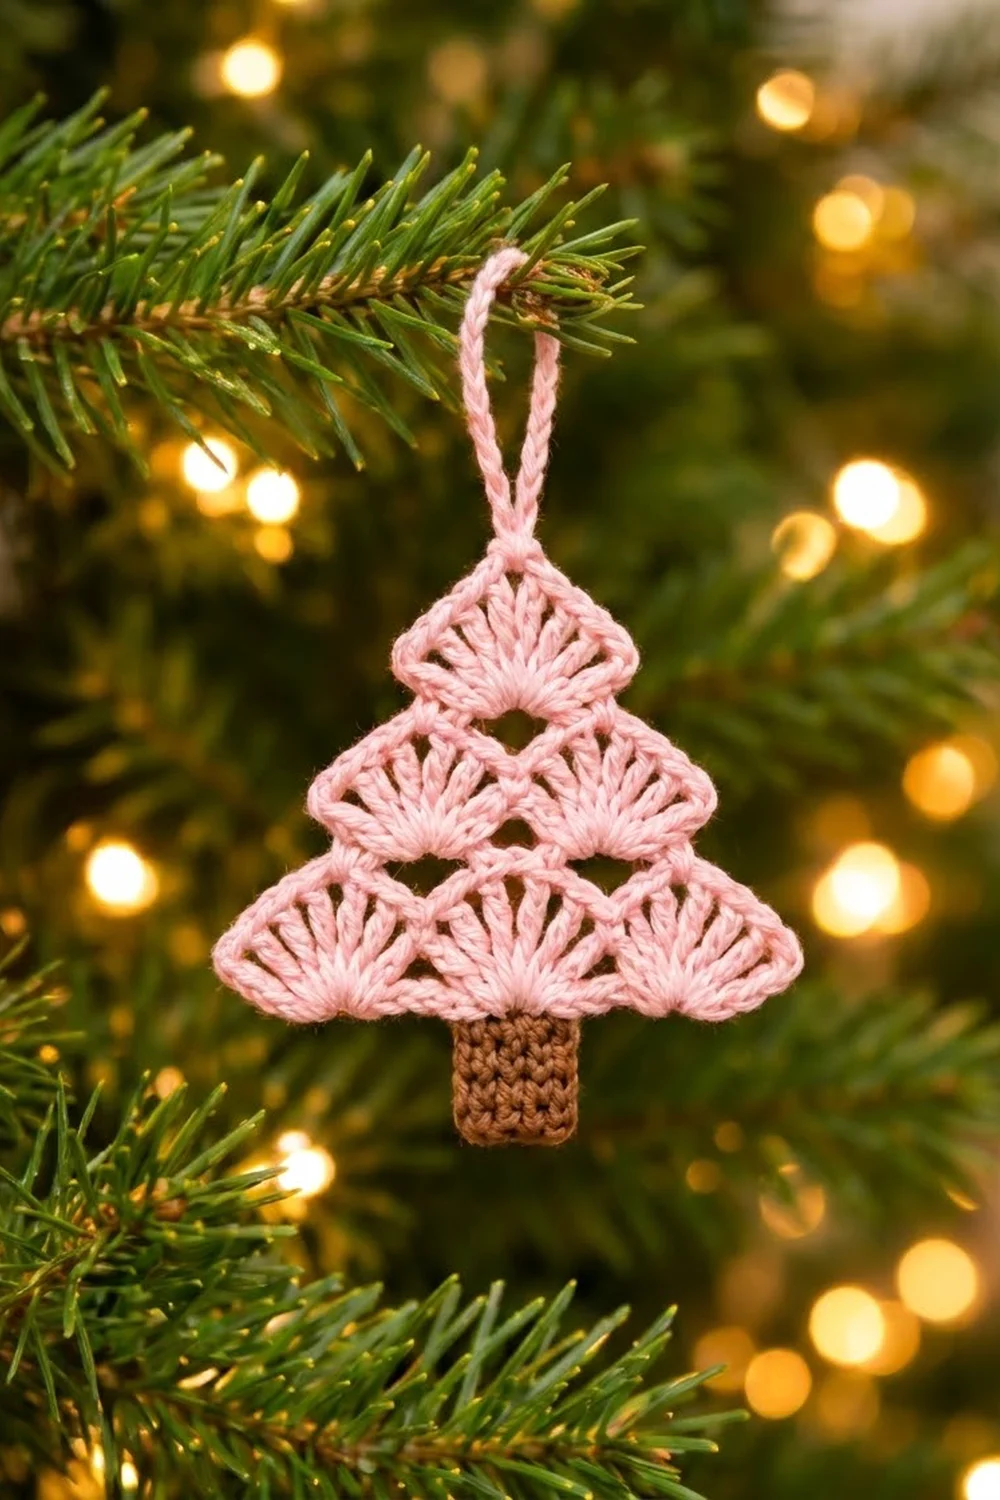
This little tree is made from stacked shell fans that open like petals. Three fans sit on the bottom tier, two in the middle, and one at the top, so the outline forms a soft, scalloped triangle. A solid brown trunk sits at the base, and a slim chain loop at the top lets it hang from a branch.
The colors are simple: a light, powdery pink for the canopy and a warm chocolate brown for the trunk. The pink gives the ornament a gentle, modern look that suits pastel or vintage trees, but any two colors will work.
The pattern uses US crochet terms. The finished ornament measures about 4 in (10.2 cm) wide and 4.4 in (11.2 cm) tall, plus a hanging loop of about 2 in (5.1 cm), for an overall length of about 6.4 in (16.3 cm).
It’s quick to make. You work a foundation row of chain loops, add three tiers of fans in turned rows, and finish with one edging round that also makes the hanging loop. Then you work the trunk down from the foundation chain. It’s all one piece, with just two ends to weave in per color.
Finished Size and Construction
- Finished size: 4 in (10.2 cm) wide x 4.4 in (11.2 cm) tall, plus 2 in (5.1 cm) loop
- Skill level: Easy
- Terminology: US terms
- Yarn weight: DK (#3), cotton or cotton blend
- Hook: 3.5 mm (E-4)
- Number of pieces: 1
- Layout: 3 tiers of fans (3, 2, 1) above a centered trunk
- Fan size: about 1.25 in (3.2 cm) wide each
- Canopy size before edging: 3.75 in (9.5 cm) wide x 2.75 in (7.0 cm) tall
- Edging depth: about 1/8 in (0.3 cm) on every edge
- Trunk: 1.4 in (3.6 cm) wide x 1.4 in (3.6 cm) tall
Materials
Choose a smooth DK cotton, either mercerized or matte. Cotton shows the fan spokes clearly and blocks crisply. Fuzzy acrylics will blur the open spaces, and the fans will lose their definition.
- Color A, light pink: 12 g, about 28 m
- Color B, brown: 3 g, about 7 m
These amounts include about 20 percent extra for testing your gauge and for yarn tails. One 50 g ball of each color is enough for several ornaments.
Tools:
- 3.5 mm (E-4) crochet hook
- Tapestry needle
- Scissors
- Stitch markers (2)
- Ruler or tape measure
- Blocking mat, rust-proof pins, and a spray bottle
Abbreviations (US Terms)
- ch – chain
- sl st – slip stitch
- sc – single crochet
- dc – double crochet
- sp(s) – space(s)
- st(s) – stitch(es)
- RS – right side
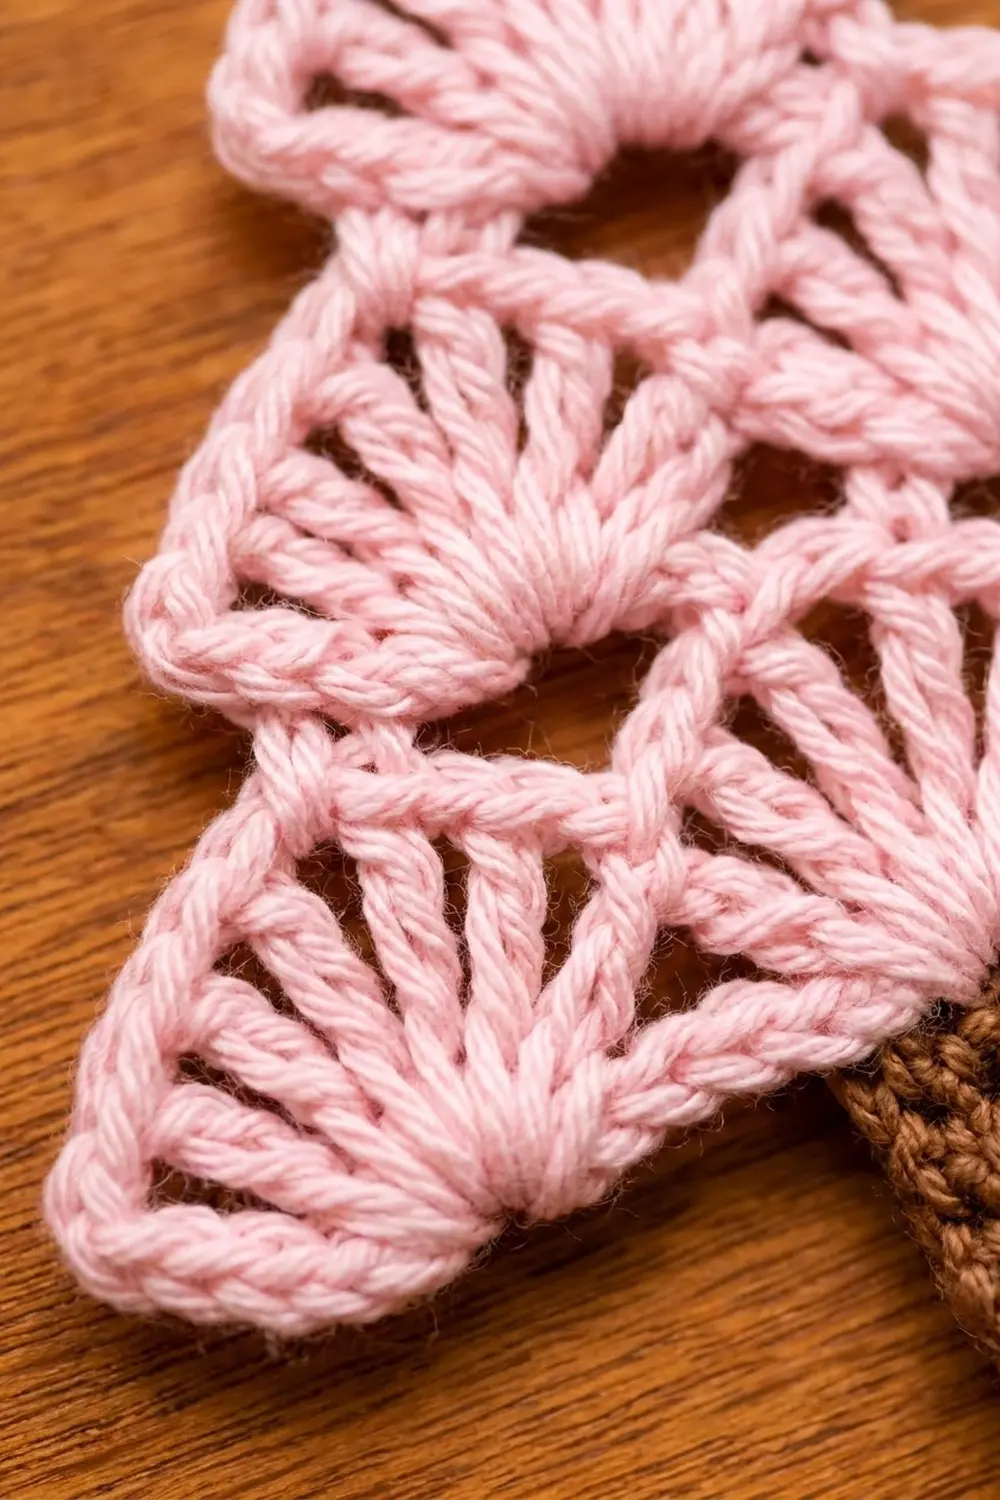
Special stitch – Fan: Work [dc, (ch 2, dc) 5 times] in the space given. One fan = 6 dc and 5 ch-2 sps. The 3rd ch-2 sp is the fan’s center sp.
Gauge and Checkpoints
Gauge: 20 sc and 20 rows = 4 in (10.2 cm) in sc with a 3.5 mm hook. The trunk works as your gauge swatch: 7 sc x 7 rows should measure 1.4 in (3.6 cm) square.
If you plan to make several, finish one complete ornament first and check it at each stage:
- After Row 1: foundation strip about 3.75 in (9.5 cm) long.
- After Row 2: canopy 3.75 in (9.5 cm) wide x 1.1 in (2.8 cm) tall.
- After Row 4: canopy 1.9 in (4.8 cm) tall.
- After Row 6: canopy 3.75 in (9.5 cm) wide x 2.75 in (7.0 cm) tall.
- After edging: 4 in (10.2 cm) wide x 3 in (7.6 cm) tall.
- After trunk: total body height 4.4 in (11.2 cm).
If your piece is more than 1/4 in (0.6 cm) too big, go down one hook size. If it is too small, go up one size. Fans that cup or ruffle usually mean the ch-2 spaces are too tight or too loose, so adjust those chains before you change hooks.
Canopy
Work in Color A. The canopy is worked flat in turned rows, starting from the bottom tier.
Foundation: Ch 20.
Row 1: Sc in 2nd ch from hook, ch 5, sk next 5 ch, sc in next ch; rep from * 2 more times, turn. (4 sc, 3 ch-5 loops)*
The chain math: 1 turning ch + 1 sc + 3 x (5 skipped ch + 1 sc) = 20 chains. Counting chains from the hook end, the sc sit in ch 2, 8, 14, and 20. Place a marker in the free loop of ch 8 and ch 14. You will work the trunk into ch 8 through ch 14 later.
Row 2 (bottom tier): Ch 1, sc in first sc, Fan in next ch-5 loop, sc in next sc; rep from * 2 more times, turn. (4 sc, 3 fans = 18 dc and 15 ch-2 sps)*
Each fan opens upward from its loop like a half-circle. Space the dc evenly across the loop so the spokes spread out from one point.
Row 3: Do not ch. Sl st in next dc, (sl st in next ch-2 sp, sl st in next dc) twice, sl st in next ch-2 sp. You are now in the center sp of the first fan. Ch 1, sc in same sp, ch 7, sc in center sp of next fan, ch 7, sc in center sp of last fan, turn. (3 sc, 2 ch-7 loops)
Keep the slip stitches snug but not tight. They travel across the fan without adding height, so the next tier starts right at the fan’s center.
Row 4 (middle tier): Ch 1, sc in first sc, Fan in next ch-7 loop, sc in next sc; rep from * once more, turn. (3 sc, 2 fans = 12 dc and 10 ch-2 sps)*
Each middle fan sits between two bottom fans. The gap underneath it, framed by the ch-7 loop, forms one of the small holes between tiers.
Row 5: Do not ch. Sl st in next dc, (sl st in next ch-2 sp, sl st in next dc) twice, sl st in next ch-2 sp. Ch 1, sc in same sp, ch 7, sc in center sp of next fan, turn. (2 sc, 1 ch-7 loop)
Row 6 (top tier): Ch 1, sc in first sc, Fan in ch-7 loop, sc in last sc. (2 sc, 1 fan = 6 dc and 5 ch-2 sps) Fasten off.
Check the canopy now: it should be 3.75 in (9.5 cm) wide x 2.75 in (7.0 cm) tall.
Border (Edging Round and Hanging Loop)
The edging is one round of sc in Color A around the whole canopy. It firms up the fan arcs and makes the hanging loop at the same time.
Border gauge: Working 2 sc in each ch-2 sp and 1 sc in each dc keeps the arcs flat. Each visible half-fan (3 dc + 2 ch-2 sps) takes exactly 3 + 4 = 7 sc.
Where slip stitches from Rows 3 and 5 sit on top of a dc or space, work through the slip stitch and the stitch underneath it together.
Edging Round: With RS facing, join Color A in the center sp of the top fan.
- Apex: Ch 1, (sc, ch 20, sc) in the same sp. (2 sc, 1 ch-20 loop)
- Right slope: Working down the right side: [sc in next dc, 2 sc in next ch-2 sp] twice, sc in next dc (7 sc, top fan). Sc in the end sc of Row 6 (1 sc). Work the right half of the middle fan the same way (7 sc). Sc in the end sc of Row 4 (1 sc). Work the right half of the bottom fan (7 sc). Sc in the end sc of Row 2 (1 sc). (24 sc)
- Bottom right: Working in the free loops of the foundation chain: sc in ch 20, then sc in each of ch 19 to ch 15. (6 sc)
- Trunk gap: Skip ch 14 to ch 8. Leave these loops free for the trunk.
- Bottom left: Sc in each of ch 7 to ch 2. (6 sc)
- Left slope: Sc in the end sc of Row 2 (1 sc), left half of the bottom fan (7 sc), sc in the end sc of Row 4 (1 sc), left half of the middle fan (7 sc), sc in the end sc of Row 6 (1 sc), left half of the top fan (7 sc). (24 sc)
Join with sl st to the first sc. Fasten off. (62 sc total: 2 + 24 + 6 + 6 + 24, plus the ch-20 loop)
Why the math works: Each slope covers three half-fans (3 x 7 = 21 sc) and three row-end joins (3 x 1 = 3 sc), for 24 sc. The bottom edge has 19 working chains after the turning chain (ch 2 to ch 20). Seven of them (ch 8 to ch 14) belong to the trunk, which leaves 12, split evenly as 6 per side. Both slopes match, both bottom sections match, and the apex adds 2, so the outline stays even and flat.
Trunk
Work in Color B, in the 7 marked free loops from ch 8 through ch 14.
Row 1: With RS facing and the canopy upside down, join Color B in the free loop of ch 14. Ch 1, sc in the same loop and in each loop through ch 8, turn. (7 sc)
Rows 2–7: Ch 1, sc in each st across, turn. (7 sc in each row)
Fasten off. The trunk measures 1.4 in (3.6 cm) wide x 1.4 in (3.6 cm) tall. That gives a total body height of 3 in (7.6 cm) + 1.4 in (3.6 cm) = 4.4 in (11.2 cm).
Weave in all ends along the trunk edges and inside the edging so they stay hidden.
Final Blocking
- Spray the ornament lightly until it is damp but not dripping.
- Lay it RS up on the blocking mat.
- Pin the trunk into a square 1.4 in (3.6 cm) on each side.
- Pin the two bottom corners 4 in (10.2 cm) apart.
- Pin the apex so the canopy is 3 in (7.6 cm) tall.
- Open each fan by pinning the tip of its center sp outward so the spokes spread evenly.
- Open the holes between tiers with a pin.
- Straighten the hanging loop so it lies 2 in (5.1 cm) long.
- Let it dry completely, about 2–4 hours.
- For a stiffer ornament, brush on a light fabric stiffener before it dries.
Final Quality-Control Checklist
- Row 1 has 4 sc and 3 ch-5 loops.
- The tiers have 3, 2, and 1 fans, each with 6 dc and 5 ch-2 sps.
- Each slope has 24 edging sc, and each bottom section has 6.
- The edging totals 62 sc plus the ch-20 loop.
- The trunk is 7 sc wide and 7 rows tall, centered under the middle fan.
- The ornament measures 4 in (10.2 cm) wide x 4.4 in (11.2 cm) tall.
- All ends are hidden and secure.
Troubleshooting
Fans cup upward: The ch-2 spaces are too short or too tight. Work them a little looser, or use ch 3 for only the two outer spaces.
Fans ruffle: The chains are too loose. Tighten the ch-2 spaces or go down a hook size.
Tiers don’t line up: Recount the slip stitches in Rows 3 and 5. You must end up in the 3rd ch-2 sp, which is the center of the fan.
Trunk is off-center: Check the markers. The trunk must use exactly ch 8 through ch 14, with 6 free loops on each side for the edging.
Edging pulls the slopes in: You may have worked only 1 sc in a ch-2 sp. Use 2 sc in every ch-2 sp.
Hanging loop twists: Untwist the chain and pin it flat before blocking.
Care
Hand wash in cool water with mild soap, press out the water in a towel, and dry flat with the fans pinned open. Store it flat or hanging so the fans keep their shape.
Final Notes
Every measurement in this ornament builds on the one before. A 20-chain foundation makes 3 loops and 3 fans, about 3.75 in (9.5 cm) wide. Two more fans and then one bring the canopy to 2.75 in (7.0 cm) tall. One 62-sc edging round adds 1/8 in (0.3 cm) all around, for a canopy of 4 in (10.2 cm) x 3 in (7.6 cm). The 7 x 7 trunk adds 1.4 in (3.6 cm), for a body of 4.4 in (11.2 cm), and the ch-20 loop adds another 2 in (5.1 cm).
Make one, check it against these numbers, then make a whole forest in any colors you like.
Happy crocheting!