

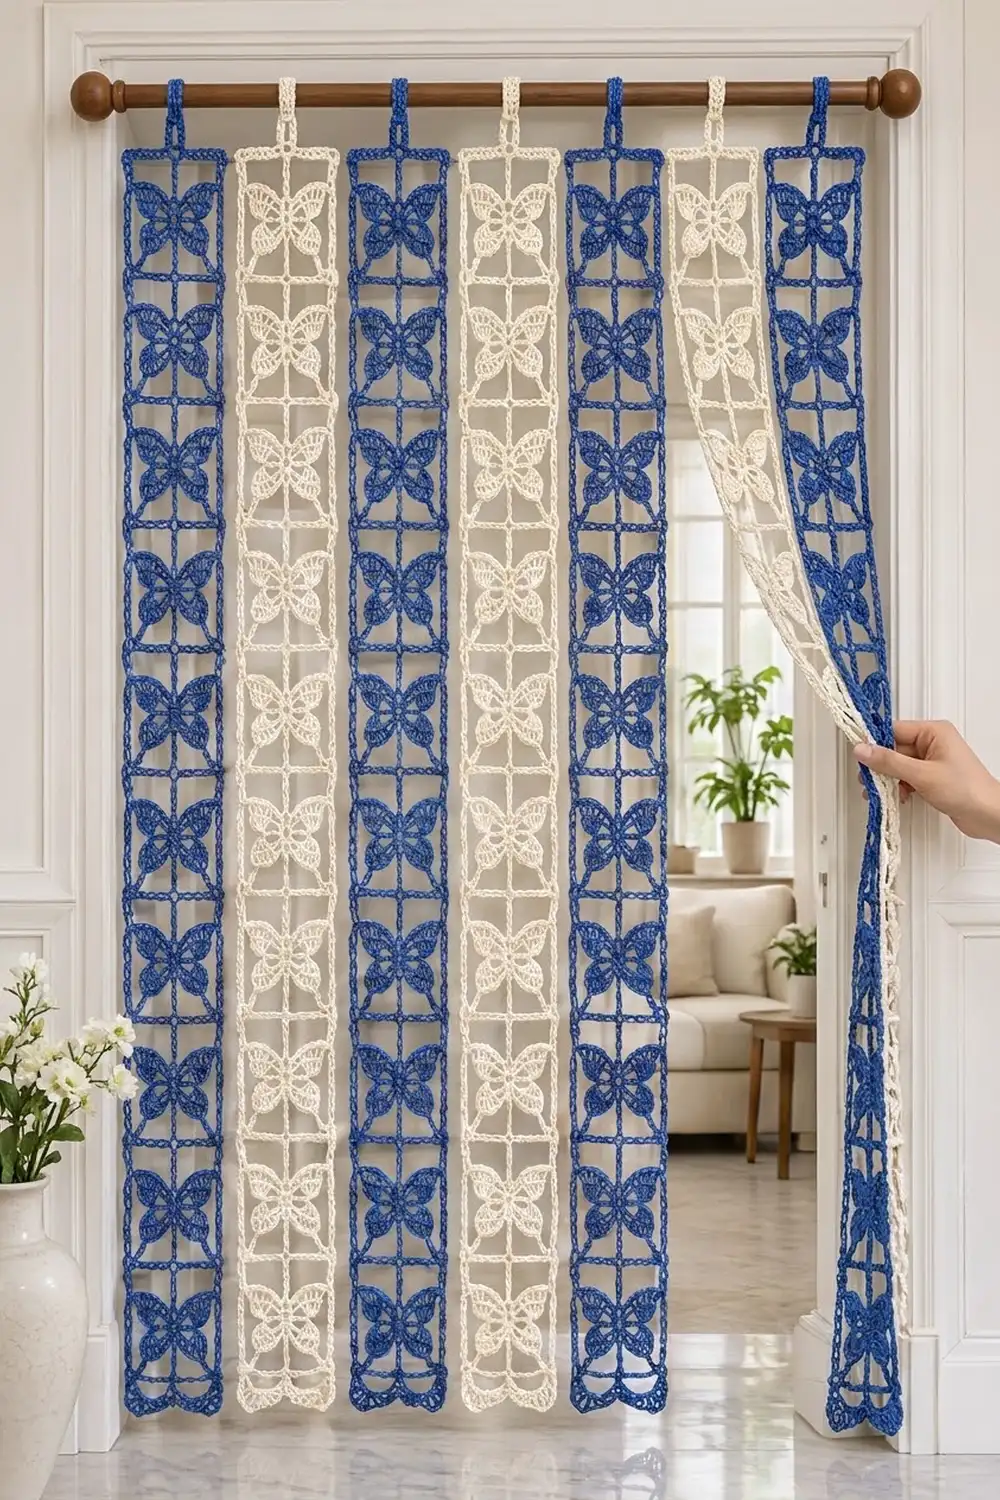
This curtain is made of seven separate lace strips. Each strip is a column of square butterfly motifs, and the strips hang side by side from a rod in alternating cobalt blue and cream. Light passes through the open frames, and the strips move apart when you walk through the doorway.
Each motif has a small center ring and four fanned wings that point to the corners. Chain spokes connect the ring to the middle of each side of the frame. The colors give it a blue-and-white tile look that suits a cottage, coastal or Mediterranean room. The pattern uses US crochet terms throughout.
Each finished strip measures 5.5 in (14.0 cm) wide and 73 in (185.4 cm) long, plus a 2 in (5.1 cm) hanging loop. That makes the total hanging length 75 in (190.5 cm). Seven strips cover about 38.5 in (97.8 cm) of rod.
Construction overview:
1. Work every butterfly motif in the round.
2. Join 16 motifs into a column with slip stitches.
3. Work a two-round border around the column.
4. Add a hanging loop to the top.
5. Repeat for all seven strips.
Finished Size and Construction
- Finished strip size: 5.5 in × 73 in (14.0 cm × 185.4 cm), plus a 2 in (5.1 cm) loop
- Skill level: Intermediate
- Terminology: US
- Yarn weight: Worsted (#4) cotton
- Hook: 5.0 mm (H-8)
- Number of pieces: 112 motifs (64 blue, 48 cream), made into 7 strips
- Layout: 7 strips side by side, each 1 motif wide × 16 motifs tall
- Motif size: 4.5 in (11.4 cm) square
- Strip size before border: 4.5 in × 72 in (11.4 cm × 182.9 cm)
- Border depth: 0.5 in (1.3 cm) per side
Materials
Choose a smooth, mercerized or combed worsted cotton, about 160 m per 100 g. Cotton holds the wing fans crisply and hangs straight. Avoid fuzzy or very stretchy yarns, because a 73 in (185.4 cm) strip will stretch under its own weight.
- Cobalt blue: 450 g (about 720 m) for 4 strips, 64 motifs
- Cream: 350 g (about 560 m) for 3 strips, 48 motifs
Each motif uses about 5 g (8 m). The border and loop use about 20 g per strip. These quantities include a margin of about 12–17%.
Tools:
– 5.0 mm (H-8) crochet hook
– Tapestry needle
– Scissors
– Stitch markers
– Rustproof pins and a blocking surface at least 6 ft (182.9 cm) long, or a clean floor with towels
– Tape measure
– Curtain rod, at least 42 in (106.7 cm) long
Abbreviations (US Terms)
- ch – chain
- sl st – slip stitch
- sc – single crochet
- dc – double crochet
- sk – skip
- sp(s) – space(s)
- RS / WS – right side / wrong side
- rep – repeat
Special stitch: Spoke. Ch 6, sl st in the indicated stitch, then sl st in each of the 6 ch to return to the frame. This makes a single, firm chain bar.
Gauge and Checkpoints
Gauge: 15 sc = 4 in (10.2 cm). One finished motif (Rnds 1–5) = 4.5 in (11.4 cm) square.
Make and lightly steam one test motif before starting the strips. With 112 motifs, a difference of 0.25 in (0.6 cm) per motif adds up to 4 in (10.2 cm) over one strip.
Checkpoints:
– After Rnd 1: the ring measures about 1.25 in (3.2 cm) across.
– After Rnd 3: the motif measures about 3.5 in (8.9 cm) from wing tip to wing tip.
– After Rnd 4: the chain frame measures about 4.25 in (10.8 cm) across.
– After Rnd 5: the motif measures 4.5 in (11.4 cm) square.
If your motif is too large, go down to a 4.5 mm hook. If it is too small, go up to a 5.5 mm hook. Stitch counts never change. Only the hook does.
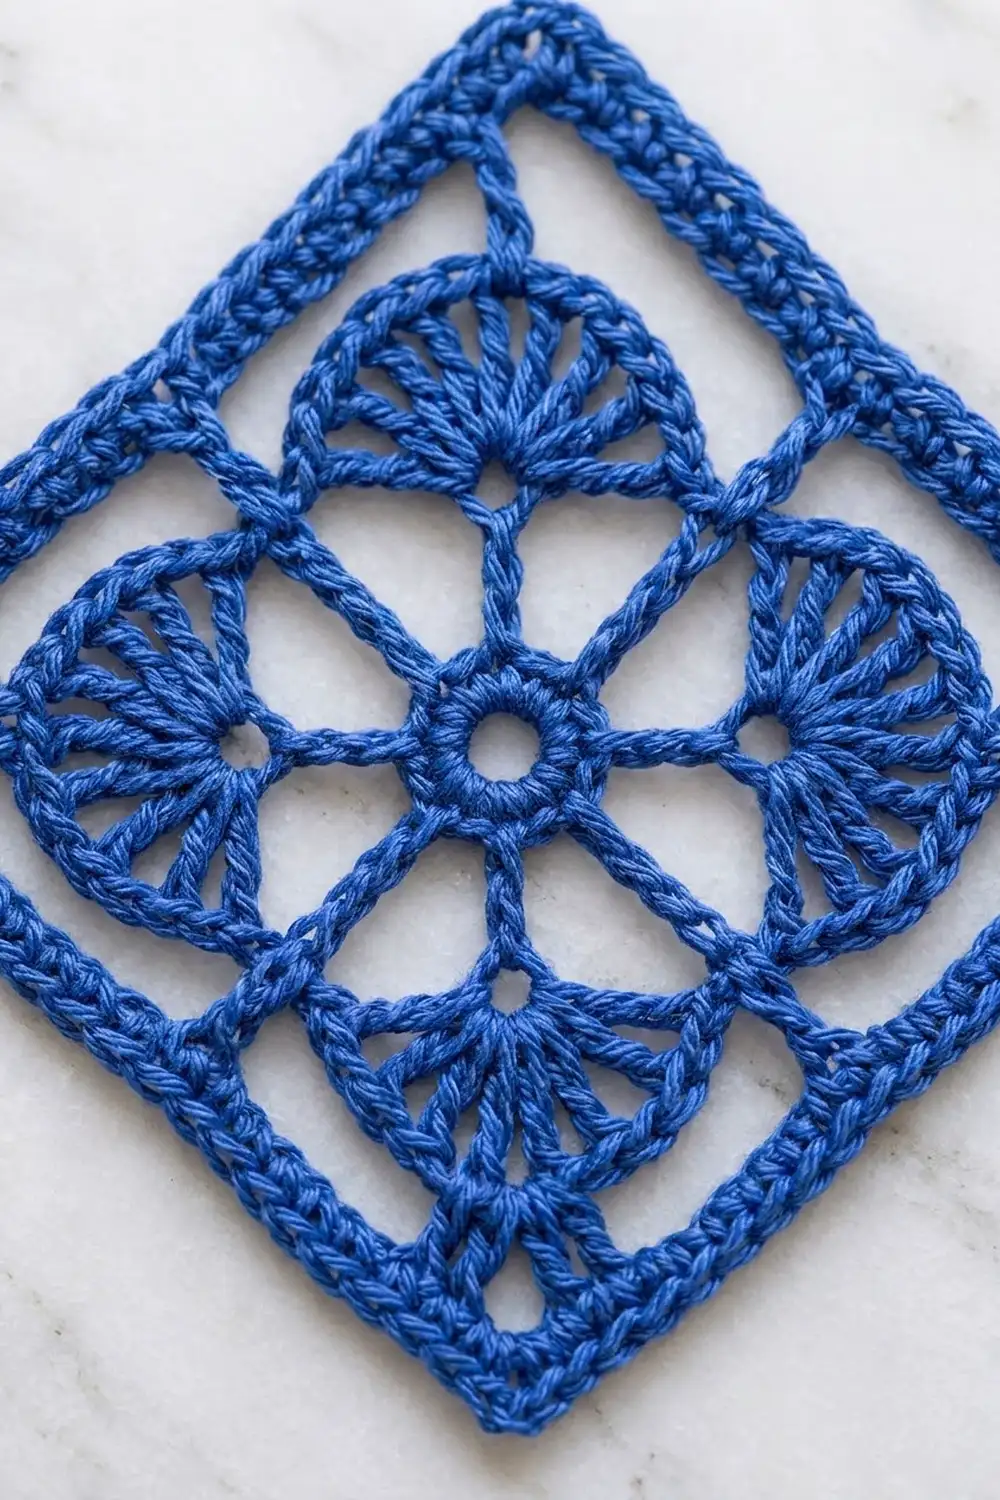
Butterfly Motif
Make 64 in blue and 48 in cream.
Rnd 1: Ch 6, sl st in first ch to form a ring. Ch 1, work 16 sc in the ring, then sl st in the first sc. (16 sc)
Rnd 2: Ch 1, sc in the same st, ch 7, sk 1 sc, sc in the next sc, ch 3, sk 1 sc. Sc in the next sc, ch 7, sk 1 sc, sc in the next sc, ch 3, sk 1 sc. Rep from * 2 more times. Sl st in the first sc. (8 sc, 4 ch-7 loops, 4 ch-3 sps)*
The ch-7 loops are the wing bases. The ch-3 spaces sit between the wings.
Rnd 3 (wings): Sl st in the first ch-7 loop. Ch 4 (counts as dc + ch 1). Work (dc, ch 1) 5 times in the same loop, then dc in the loop. Sc in the next ch-3 sp. *In the next ch-7 loop, work (dc, ch 1) 6 times, then dc. Sc in the next ch-3 sp. Rep from * 2 more times. Sl st in the 3rd ch of the beginning ch-4.
(4 fans of 7 dc and 6 ch-1 sps each, plus 4 sc: 32 sts and 24 ch-1 sps in total)
Rnd 4 (frame): Sl st in the next ch-1 sp. (Sl st in the next dc, sl st in the next ch-1 sp) 2 times, then sl st in the next dc. You are now in the 4th (center) dc of the fan. Ch 1, then work (sc, ch 3, sc) in the same dc. Ch 11. *Work (sc, ch 3, sc) in the 4th dc of the next fan, then ch 11. Rep from * 2 more times. Sl st in the first sc.
(8 sc, 4 ch-3 corner sps, 4 ch-11 sides)
Each wing tip is now attached to a corner. The fan edges float freely inside the frame.
Rnd 5 (straighten frame and add spokes): Sl st in the first ch-3 sp, then ch 1.
- *Work (2 sc, ch 2, 2 sc) in the corner ch-3 sp.
- In the next ch-11 sp, work 7 sc.
- Make a Spoke: ch 6, sl st in the Rnd 3 sc between the two fans below, then sl st in each of the 6 ch to return to the frame.
- Work 6 more sc in the same ch-11 sp.
Rep from * 3 more times. Sl st in the first sc and fasten off. Leave a 6 in (15.2 cm) tail for weaving in.
Count for Rnd 5: Each side has 17 sc between its corner ch-2 sps: 2 + 13 + 2 = 17. The 13 sc in the middle are the stitches worked into the ch-11 sp. The motif has 68 sc and 4 ch-2 corner sps in total. Sl sts on the spokes are not counted.
Check that the spoke sits exactly at the 7th of the 13 middle sc, so it lands at the midpoint of the side. Weave in tails now, before the motifs are joined.
Make All Pieces
- Blue: 64 motifs, enough for 4 strips of 16
- Cream: 48 motifs, enough for 3 strips of 16
Bag the motifs in groups of 16 so each strip has a set ready.
Layout (front view of the rod, 7 strips × 16 motifs):
Strip:   1  2  3  4  5  6  7
Row 1:   B  C  B  C  B  C  B
Row 2:   B  C  B  C  B  C  B
  ...    (same for all rows)
Row 16:  B  C  B  C  B  C  B
B = blue and C = cream. The strips hang separately and are never joined to each other.
Joining
Join the motifs into vertical strips of 16 with a slip-stitch seam on the right side. This makes the raised bar you see between motifs.
- Hold two motifs with their WS together, matching the bottom edge of the upper motif to the top edge of the lower motif.
- Insert the hook through both corner ch-2 sps and sl st.
- Sl st through each matching pair of sc, working through both loops of both pieces: 17 sl st.
- Sl st through the next pair of corner ch-2 sps and fasten off.
Stitch-to-stitch logic: Each side has 17 sc, so the stitches match one to one. The spokes on the two motifs line up across the seam and form one continuous vertical line.
Tension: Keep the sl sts as loose as the sc beneath them. If the seam puckers, go up one hook size for joining only.
Size checkpoint:
– 4 joined motifs should measure 18 in (45.7 cm) long.
– 8 joined motifs should measure 36 in (91.4 cm) long.
– A full strip of 16 should measure 72 in (182.9 cm) long and 4.5 in (11.4 cm) wide.
Border
Work the border separately around each strip, in that strip’s own color.
Border gauge: Work 1 sc into each sc of the motif edges, so the border matches the motif gauge exactly.
Rnd 1: Join the yarn in any outer corner ch-2 sp of the strip. Ch 1.
– At each of the 4 outer corners, work (sc, ch 2, sc) in the corner ch-2 sp.
– Along the edges, sc in each sc.
– At each seam, work nothing into the joined corner sps. Go straight from the last sc of one motif to the first sc of the next.
Sl st in the first sc.
Counts per side for Rnd 1 (each side’s count includes its own corner sc):
– Long sides: (16 motifs × 17 sc) + 2 corner sc = 272 + 2 = 274 sc
– Short sides: (1 motif × 17 sc) + 2 corner sc = 19 sc
– Total: 586 sc and 4 corner ch-2 sps
Rnd 2 (chain arches): Join the yarn in the first sc of a long side, the corner sc just after a ch-2.
1. Ch 1, sc in the same st.
2. Ch 4, sk 2 sc, sc in the next sc. Rep from * 90 more times, for 91 arches. The last sc lands on the 274th st.
3. Ch 4 for the corner arch, skipping the corner ch-2 sp. Sc in the first sc of the short side.
4. Work (ch 4, sk 2 sc, sc in the next sc) 6 times. The last sc lands on the 19th st.
5. Ch 4 for the next corner arch.
Rep steps 2–5 for the other long and short sides. On the second short side, end with the final corner ch 4 and sl st in the first sc. Fasten off.
Rnd 2 count:
– Long sides: 92 sc and 91 arches each
– Short sides: 7 sc and 6 arches each
– Corner arches: 4
– Total: 198 sc and 198 arches
Why the math works: The repeat is 3 stitches (sk 2, sc 1), plus 1 starting sc. That pattern only fits a side whose count is a multiple of 3 plus 1. The long side has 274 = (3 × 91) + 1, and the short side has 19 = (3 × 6) + 1. Both sides start and end on a sc, so every corner is symmetrical.
Hanging loop: On one short side, which becomes the top, join the yarn in the 4th of the 7 Rnd 2 sc. This sc sits on Rnd 1 stitch 10, the center of 19. Ch 20, then sl st in the same sc. Ch 1 and work 24 sc into the loop. Sl st in the first sc and fasten off. Weave the tail through the base of the loop twice for strength.
The loop lies about 2 in (5.1 cm) long and fits a rod up to 1.25 in (3.2 cm) thick.
Final Blocking
- Soak the strip in cool water for 10 minutes, then press out the water. Do not wring it.
- Roll it in towels to remove the excess water.
- Lay it flat and pin it to 5.5 in × 73 in (14.0 cm × 185.4 cm).
- Pin each motif’s corners square. Make sure every spoke lies straight and every seam bar is horizontal.
- Shape each wing fan by pinning out the middle dc toward its corner.
- Pin open each border arch along the long edges.
- Let it dry completely. Then hang it for 24 hours before the final measurement, because cotton relaxes slightly.
Final Quality-Control Checklist
- [ ] All 112 motifs measure 4.5 in (11.4 cm) square
- [ ] Every motif side has 17 sc, with spokes centered
- [ ] Each strip has 16 motifs and 15 seams, with all seam bars on the RS
- [ ] Border Rnd 1 has 274 sc on each long side and 19 sc on each short side
- [ ] Border Rnd 2 has 198 arches
- [ ] Hanging loops are centered and secure
- [ ] Each strip measures 5.5 in × 73 in (14.0 cm × 185.4 cm)
- [ ] Strips hang in the order B, C, B, C, B, C, B
- [ ] All tails are woven in and hidden
Troubleshooting
- Frame bows inward: The Rnd 4 ch-11 is too tight. Chain more loosely or go up a hook size for that round.
- Wings cup: Your dc are too short for the ch-7 loop. Pull up each dc loop a little taller.
- Spoke sags: Your chain is too loose. Ch 5 instead of 6, but do it on every motif.
- Seams ripple: Your joining sl sts are too tight. Loosen them or use a larger hook.
- Strip twists when hung: The seams were joined from mixed sides. Make sure every seam is worked WS together.
- Arches don’t land on the corner sc: Recount Rnd 1. It must have 274 and 19 sc per side.
Care
Hand wash cool and dry flat, re-pinning the corners as needed. Shake the strips out gently before rehanging, and never tumble dry.
Final Notes
The measurement chain is:
– 15 sc = 4 in (10.2 cm), which gives a 4.5 in (11.4 cm) motif.
– 16 motifs joined make a 72 in (182.9 cm) strip.
– A 0.5 in (1.3 cm) border brings each strip to 5.5 in × 73 in (14.0 cm × 185.4 cm).
– Seven strips cover 38.5 in (97.8 cm) of rod.
If the first motif measures correctly, every later stage will too. Take your time with the test motif and the strips will all hang evenly.
Happy crocheting!