
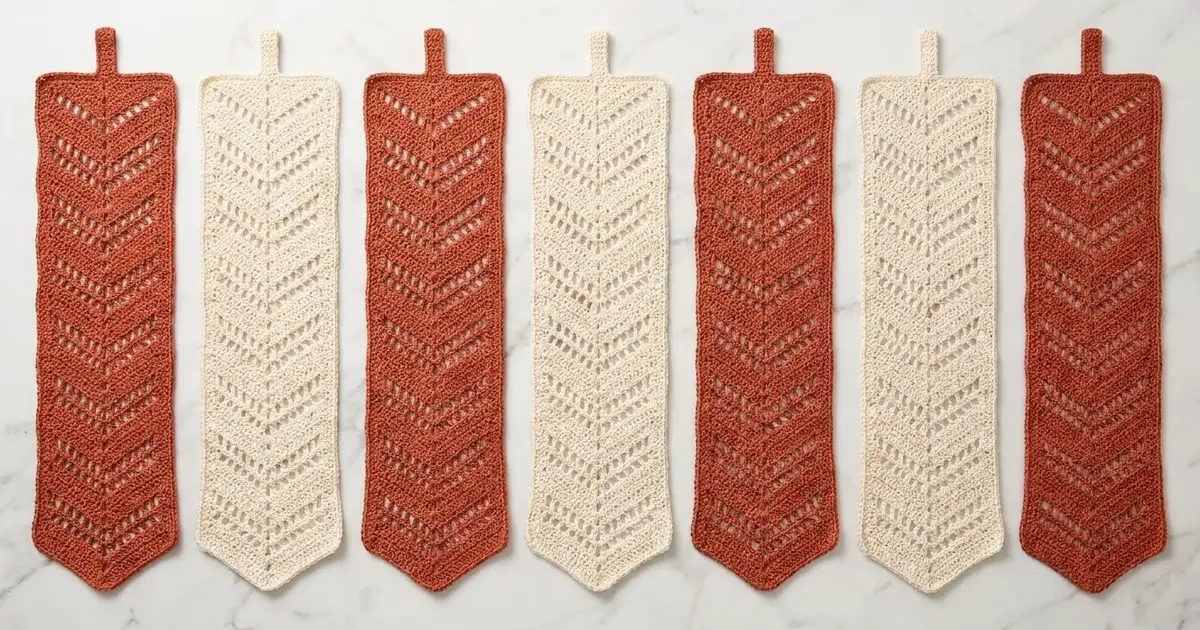
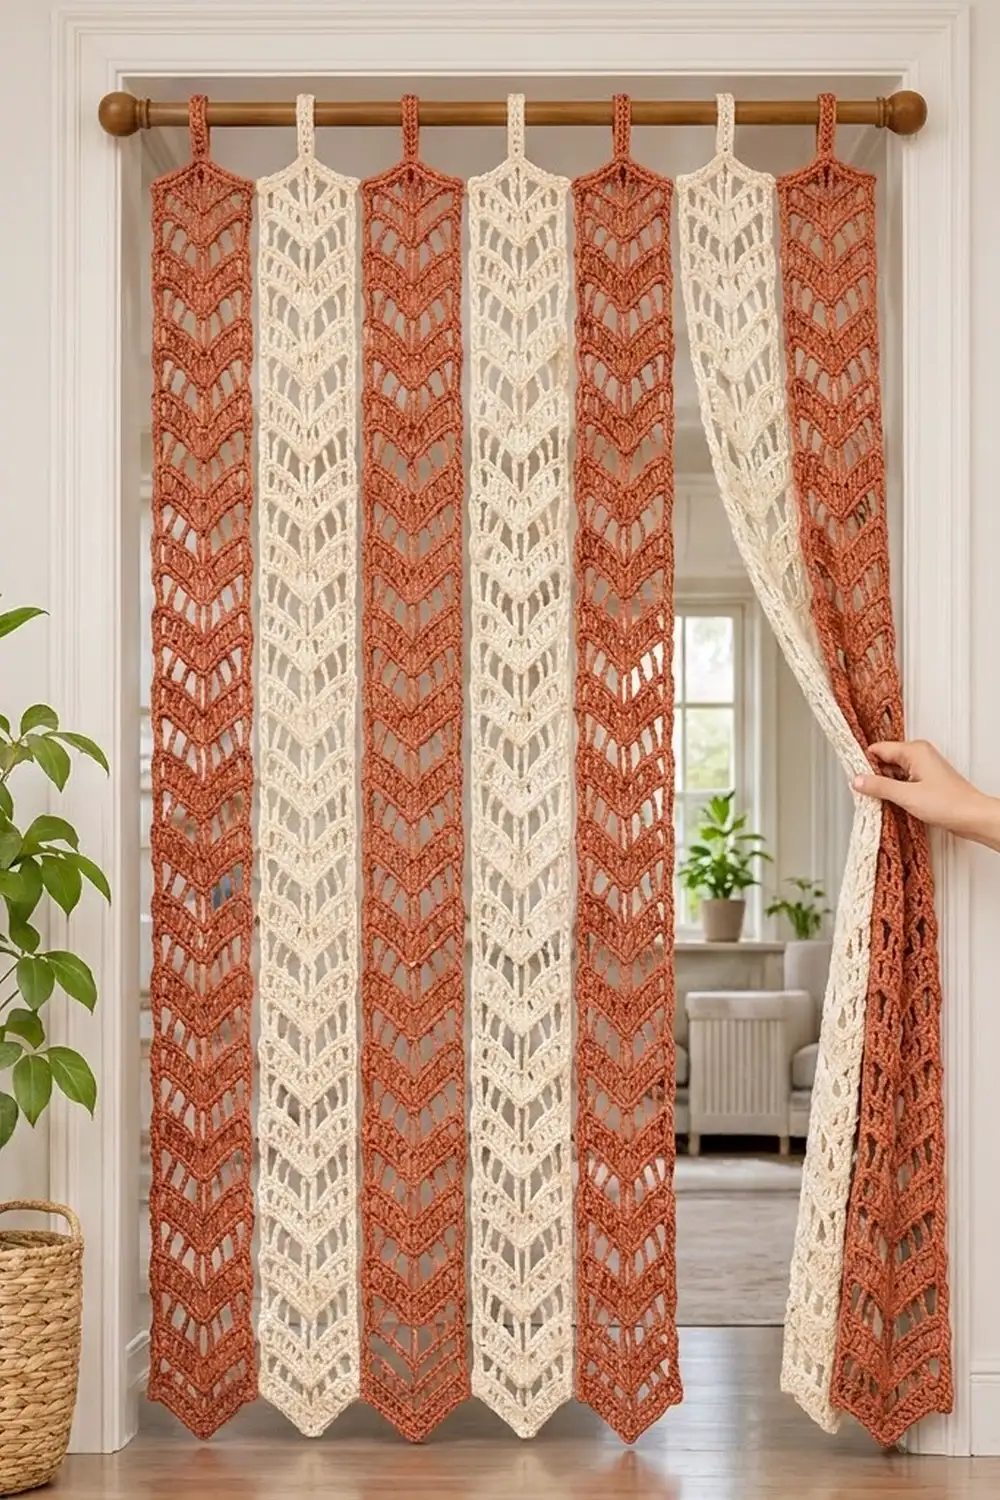
The Terracotta Arrow Door Curtain is a set of seven slim chevron-lace strips that hang side by side in a doorway. Each strip has a column of downward-pointing arrows made from solid double crochet bands, with open ladder rows between them, so light and air pass through but the doorway still feels screened.
The palette alternates warm terracotta with soft cream: four terracotta strips and three cream strips, with terracotta on both outer edges. The look is relaxed boho, and it works well in a pantry door, a closet opening or a hallway.
This pattern uses US crochet terms. Each finished strip measures 5½ in (14.0 cm) wide and 77½ in (196.9 cm) long at the center point. The tab loop adds about 2 in (5.1 cm) above that.
Each strip is worked flat in rows from the pointed bottom edge upward. Next come three shaping rows that flatten the top, then one round of single crochet edging, then a hanging tab. The strips are never sewn together; they slide onto the rod separately.
Finished Size and Construction
- Finished strip size: 5½ in (14.0 cm) wide × 77½ in (196.9 cm) long at center point
- Skill level: Easy–Intermediate
- Terminology: US
- Yarn weight: Worsted (#4) cotton or cotton blend
- Hook: 5.0 mm (H-8)
- Number of pieces: 7 separate strips
- Layout: 7 strips in one row, alternating colors, hung edge to edge with small gaps
- Strip size before edging: 5 in (12.7 cm) wide × 76 in (193.0 cm) along the side edge
- Edging depth: ¼ in (0.6 cm) on every side
- Hanging length (rod to point): about 79½ in (201.9 cm)
Materials
Choose a smooth, mercerized or matte cotton in worsted weight. Cotton hangs straight, holds the chevron shape and doesn’t stretch much over time. Avoid fuzzy acrylics because they blur the lace.
Yarn (approx. 180 m per 100 g):
– Terracotta (Color A): 750 g / 1,350 m (4 strips)
– Cream (Color B): 560 g / 1,008 m (3 strips)
One strip uses about 170 g (306 m). The quantities above include a margin of roughly 10% for your gauge swatch and small differences in tension.
Tools:
– 5.0 mm (H-8) crochet hook
– Tapestry needle
– Scissors
– Measuring tape
– Rust-proof pins and a long blocking surface (towels on the floor work)
– Spray bottle
– Curtain rod with a diameter up to 1¼ in (3.2 cm)
Abbreviations (US Terms)
- ch – chain
- sl st – slip stitch
- sc – single crochet
- hdc – half double crochet
- dc – double crochet
- tr – treble crochet
- sk – skip
- st(s) – stitch(es)
- sp – space
- RS / WS – right side / wrong side
Special stitches:
– dc3tog (double crochet 3 together): [Yarn over, insert hook in next st, pull up a loop, yarn over, pull through 2 loops] 3 times, yarn over, pull through all 4 loops on hook.
– tr3tog (treble crochet 3 together): [Yarn over twice, insert hook in next st, pull up a loop, (yarn over, pull through 2 loops) twice] 3 times, yarn over, pull through all 4 loops on hook.
Stitch-count notes: The turning chain counts as a stitch in Rows 1–100. Each ch-1 counts as 1 stitch. In Rows 101–103 the ch-1 does not count.
Gauge and Checkpoints
Base gauge: 15 dc = 4 in (10.2 cm) worked flat.
Pattern gauge: Rows 1–8 of the strip (21 sts) = 5 in (12.7 cm) wide × 6 in (15.2 cm) tall, measured along the side edge. One two-row repeat (Row A + Row B) = 1½ in (3.8 cm).
Test one piece first: work Rows 1–8, block lightly and measure. The chevron pulls the fabric in, so a strip that’s 5.6 in wide when flat settles to 5 in once it’s in pattern.
Checkpoints (side edge, unblocked but laid flat):
– After Row 8: 6 in (15.2 cm)
– After Row 40: 30 in (76.2 cm)
– After Row 60: 45 in (114.3 cm)
– After Row 80: 60 in (152.4 cm)
– After Row 100: 75 in (190.5 cm)
Too big? Go down to a 4.5 mm hook. Too small? Go up to a 5.5 mm hook. If the width is right but the strip is getting long too quickly, your trebles are loose. Pull each loop snug before starting the next stitch, rather than changing hooks.
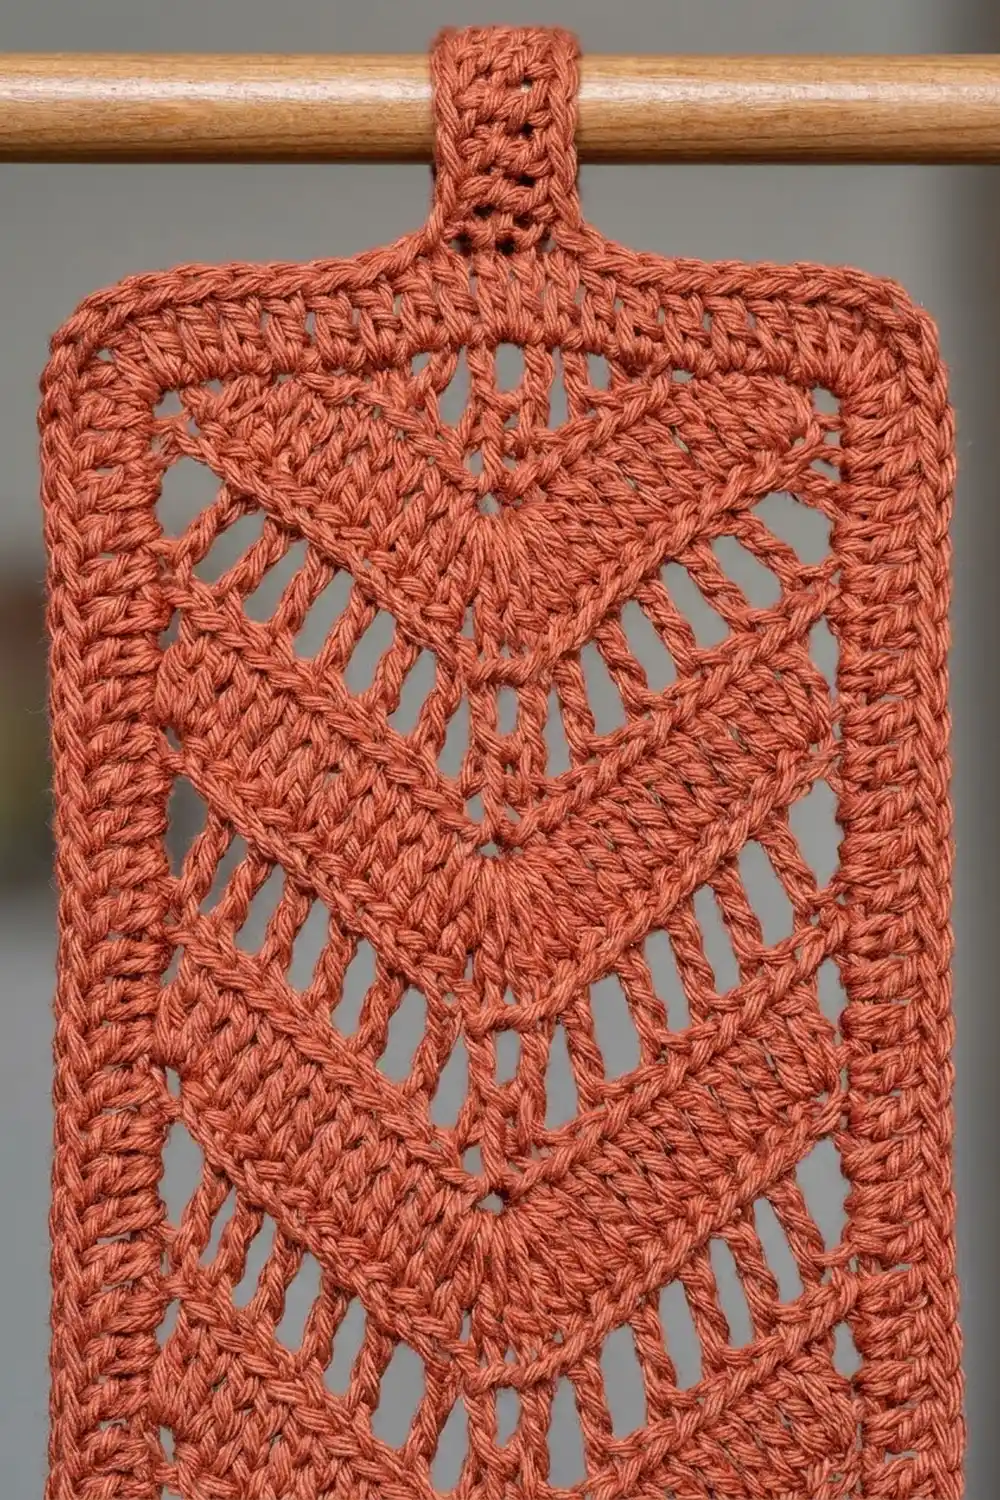
Strip Pattern
Make 7 strips: 4 in Color A and 3 in Color B. The instructions are the same for every strip.
Foundation and Row 1 (Row A)
Ch 24.
Row 1 (RS): Dc in 4th ch from hook. The 3 skipped ch count as the first dc, so this pair is the edge increase. Dc in next 8 ch, dc3tog over next 3 ch, dc in next 8 ch, 2 dc in last ch. Turn. (21 sts)
Check: 2 + 8 + 1 + 8 + 2 = 21. The chain gives 21 base stitches plus 3 turning chains.
Row 2 (Row B, Ladder Row)
Row 2 (WS): Ch 4 (counts as tr), tr in first st, [ch 1, sk next st, tr in next st] 4 times, tr3tog over next 3 sts, [tr in next st, ch 1, sk next st] 4 times, 2 tr in last st (top of turning ch). Turn. (21 sts)
Check: 2 + 8 + 1 + 8 + 2 = 21. This row works into 1 + 8 + 3 + 8 + 1 = 21 stitches. The tr3tog is centered over the dc3tog from the row below, which keeps the center column straight.
Row 3 (Row A)
Row 3 (RS): Ch 3 (counts as dc), dc in first st, dc in next 8 sts (working into each tr and each ch-1 sp), dc3tog over next 3 sts, dc in next 8 sts, 2 dc in last st. Turn. (21 sts)
Rows 4–100: Repeat Rows 2 and 3 alternately, ending with a Row B (Row 100). (21 sts in every row)
Every odd row is a solid dc band (Row A) worked on the RS. Every even row is an open ladder row (Row B) worked on the WS. The increase at each edge and the decrease at the center cancel out, so the count stays at 21. The rows bend into a V with its point at the bottom, which gives the arrows and the pointed bottom edge.
Top Shaping
The top of Row 100 dips in the center. These three rows fill the dip and square off the top.
Row 101 (RS): Ch 1 (does not count), sc in first 3 sts, hdc in next 3 sts, dc in next 3 sts, tr in next 3 sts, dc in next 3 sts, hdc in next 3 sts, sc in last 3 sts. Turn. (21 sts: 3 sc + 3 hdc + 3 dc + 3 tr + 3 dc + 3 hdc + 3 sc)
Row 102 (WS): Ch 1, sc in first 6 sts, hdc in next 3 sts, dc in next 3 sts, hdc in next 3 sts, sc in last 6 sts. Turn. (21 sts: 6 sc + 3 hdc + 3 dc + 3 hdc + 6 sc)
Row 103 (RS): Ch 1, sc in each st across. (21 sc) Do not turn or fasten off.
Checkpoint: Rows 101–103 add about 1 in (2.5 cm) at the side edges. The top edge should now be straight and the strip should measure 76 in (193.0 cm) along the side.
Make All Pieces
- Color A (terracotta): 4 strips
- Color B (cream): 3 strips
Layout (rod seen from the front, left to right):
| A | B | A | B | A | B | A |
  1   2   3   4   5   6   7
Weave in the starting tail on each strip now. Leave the working yarn attached for the edging.
Joining and Hanging
The strips are not seamed together. Each one hangs from its own tab loop, so it can be moved aside on its own, as shown when the curtain is drawn back.
Spacing: Space the tabs so there is a ½ in (1.3 cm) gap between neighboring strips. Seven strips at 5½ in (14.0 cm) each = 38½ in (97.8 cm). Six gaps of ½ in (1.3 cm) = 3 in (7.6 cm). Total curtain width = 41½ in (105.4 cm). That covers a standard doorway with the rod mounted on the trim.
Tension advice: Each strip carries only its own weight, so tab tension matters more than seams would. Keep the tab rows firm so the loop doesn’t stretch and make one strip longer than the others.
Size checkpoint: Before hanging, lay all seven strips side by side. Their points should line up within ½ in (1.3 cm). If a strip is longer, re-block it and check its tab.
Border (Edging and Tab)
Edging Gauge
On the side edges, 2 sc fit along each dc row-end and 3 sc fit along each tr row-end. Over one repeat that’s 5 sc per 1½ in (3.8 cm), which matches the row heights so the edge lies flat without rippling or pulling.
Edging Round
Continue from the end of Row 103 with RS facing. Ch 1 and turn the work to go down the long side.
- Side 1: Sc 1 in the row-end of Row 102 and 1 in Row 101. Then, from Row 100 down to Row 1, work 3 sc in each tr row-end (50 rows) and 2 sc in each dc row-end (50 rows). (2 + 150 + 100 = 252 sc)
- Bottom: Working into the free loops of the foundation chain: 3 sc in first ch (corner), sc in next 9 ch, 3 sc in center ch (the base of the dc3tog, which is the point), sc in next 9 ch, 3 sc in last ch (corner). (3 + 9 + 3 + 9 + 3 = 27 sc)
- Side 2: Same as Side 1, worked upward. (252 sc)
- Top: 3 sc in first st of Row 103 (corner), sc in next 19 sts, 3 sc in last st (corner, the st at the base of the starting ch-1). (3 + 19 + 3 = 25 sc)
Sl st to first sc to join. Round total: 252 + 27 + 252 + 25 = 554 sc.
Why the math works: The bottom edge has 21 foundation chains. Three corner/point chains get 3 sc each and the other 18 get 1 sc each, so 9 + 18 = 27. The 3 sc at the center point keeps the V sharp. The top edge has 21 stitches: the two corners get 3 sc each and the 19 between them get 1 sc each, so 6 + 19 = 25. Each corner group is counted once only, under the side it sits on. The edging adds ¼ in (0.6 cm) on every side, so the width goes from 5 in (12.7 cm) to 5½ in (14.0 cm). The side length goes from 76 in (193.0 cm) to 76½ in (194.3 cm), and the center point hangs 1 in (2.5 cm) lower, at 77½ in (196.9 cm).
Hanging Tab
The top segment of the edging has 25 sc. Count in from the right corner and attach the tab to the center 7 sts (sts 10–16).
Tab Row 1 (RS): Sl st across to st 10, ch 1, sc in sts 10–16, turn. (7 sc)
Tab Rows 2–16: Ch 1, sc in each st across, turn. (7 sc)
The tab measures about 4 in (10.2 cm). Fasten off and leave a 12 in (30.5 cm) tail. Fold the tab to the WS and whipstitch its last row to the WS along Row 102. You now have a 2 in (5.1 cm) loop that fits rods up to 1¼ in (3.2 cm) in diameter.
Final Blocking
- Weave in all tails along the edging, never across the open ladder rows.
- Lay each strip on towels with RS up.
- Spray it evenly until damp, not soaked.
- Pat the strip to 5½ in (14.0 cm) wide along its whole length.
- Pin the bottom point so it sits 1 in (2.5 cm) below the corners.
- Ease the side edge to 76½ in (196.9 cm) at the point, 76½ in (194.3 cm) at the sides. Don’t stretch it longer; cotton grows when it hangs.
- Open each ch-1 space in the ladder rows with your fingertip.
- Let it dry completely before you unpin it.
Final Quality-Control Checklist
- Every row has 21 sts and Rows 1–103 are all there
- The center decrease column runs straight from the point to the top
- The top edge is flat after Rows 101–103
- The edging round has 554 sc and the corners lie flat
- Each tab is 7 sc wide, centered and securely sewn
- All strips measure 5½ in (14.0 cm) × 77½ in (196.9 cm) at the point
- The colors alternate A-B-A-B-A-B-A
Troubleshooting
The center column wanders sideways: You worked the decrease one stitch off. Count 9 stitches in from each edge before every dc3tog or tr3tog.
The edges curl inward: Your edge increases are tight. Work the 2 sts in the first and last stitch loosely.
The strip ripples along the side edging: You worked too many sc per row-end. Stick to exactly 2 per dc row and 3 per tr row.
The top edge dips in the middle: Your trebles in Row 101 are short. Pull up a taller first loop.
One strip hangs longer than the others: Its tab has stretched or its tension was looser. Re-block it, or redo the tab one row shorter.
The point is blunt: Make sure you worked 3 sc into the center foundation chain.
Care
Hand wash or machine wash cold on a gentle cycle in a mesh bag, then lay flat to dry and re-block to size. Don’t hang the strips while they’re wet, because they will stretch.
Final Notes
Here is the measurement chain to check against. Rows 1–8 measure 5 in × 6 in (12.7 × 15.2 cm). Rows 1–100 measure 75 in (190.5 cm). The top shaping brings the side edge to 76 in (193.0 cm). The edging finishes each strip at 5½ in (14.0 cm) wide and 77½ in (196.9 cm) at the point. Seven strips with ½ in (1.3 cm) gaps cover 41½ in (105.4 cm). If your stitch counts and checkpoints match at each stage, your curtain will hang straight.
Happy crocheting!