

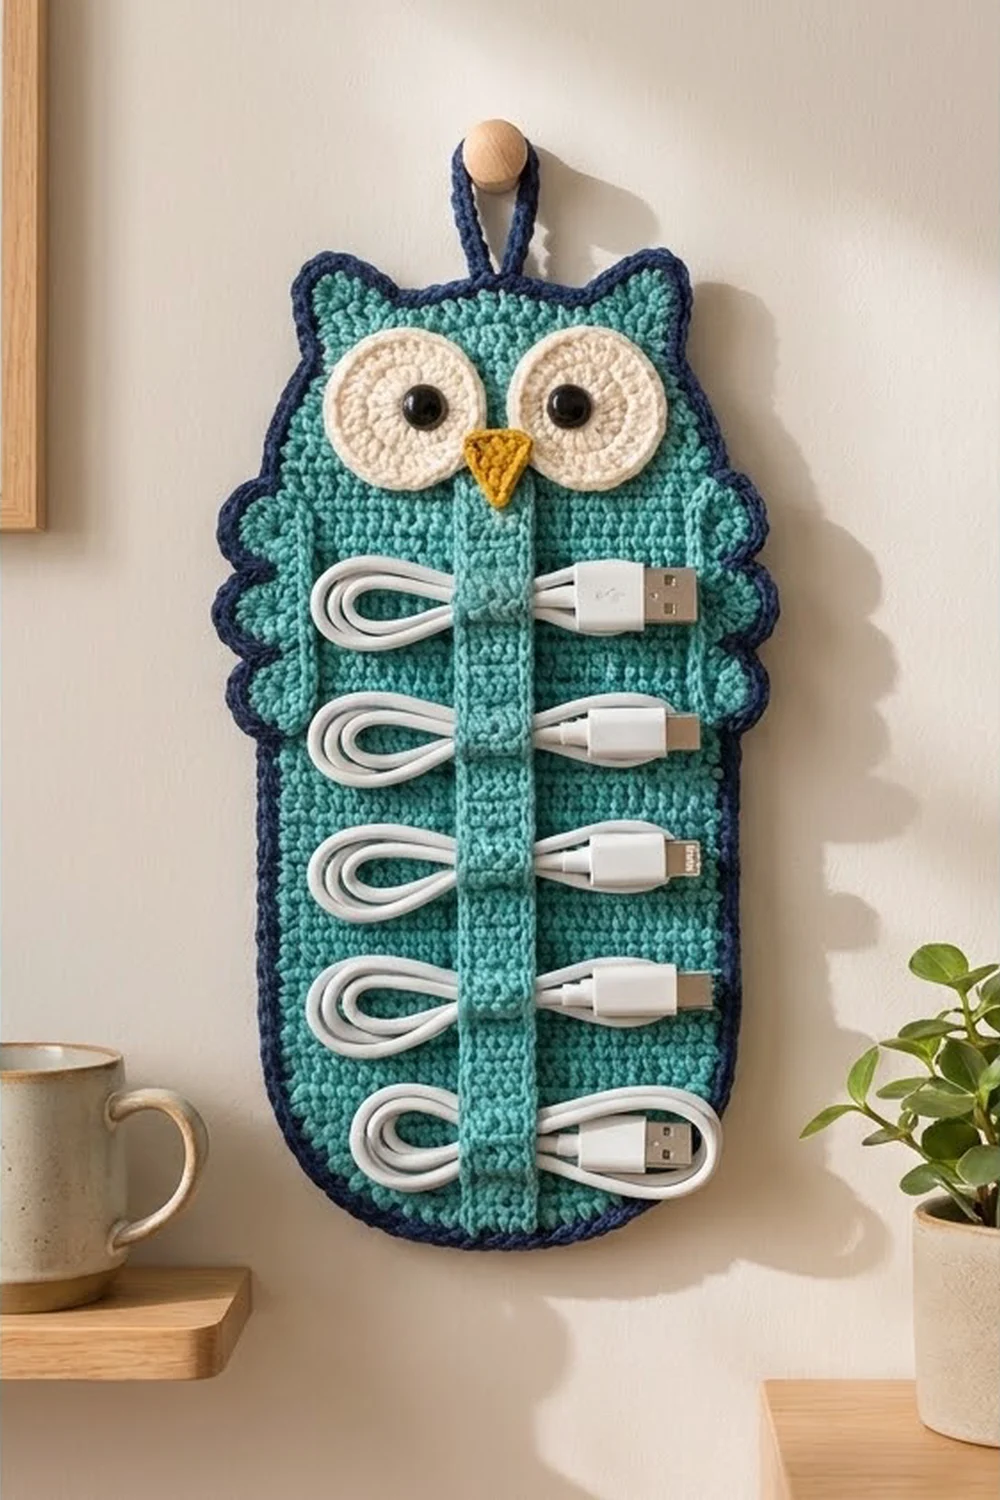
The Hoot Keeper is a flat crochet owl that hangs on the wall and holds your charging cables. It has a teal body, round cream eyes, a small mustard beak and two scalloped wings. A strap down the front is tacked at six points, which makes five loops for coiled cords.
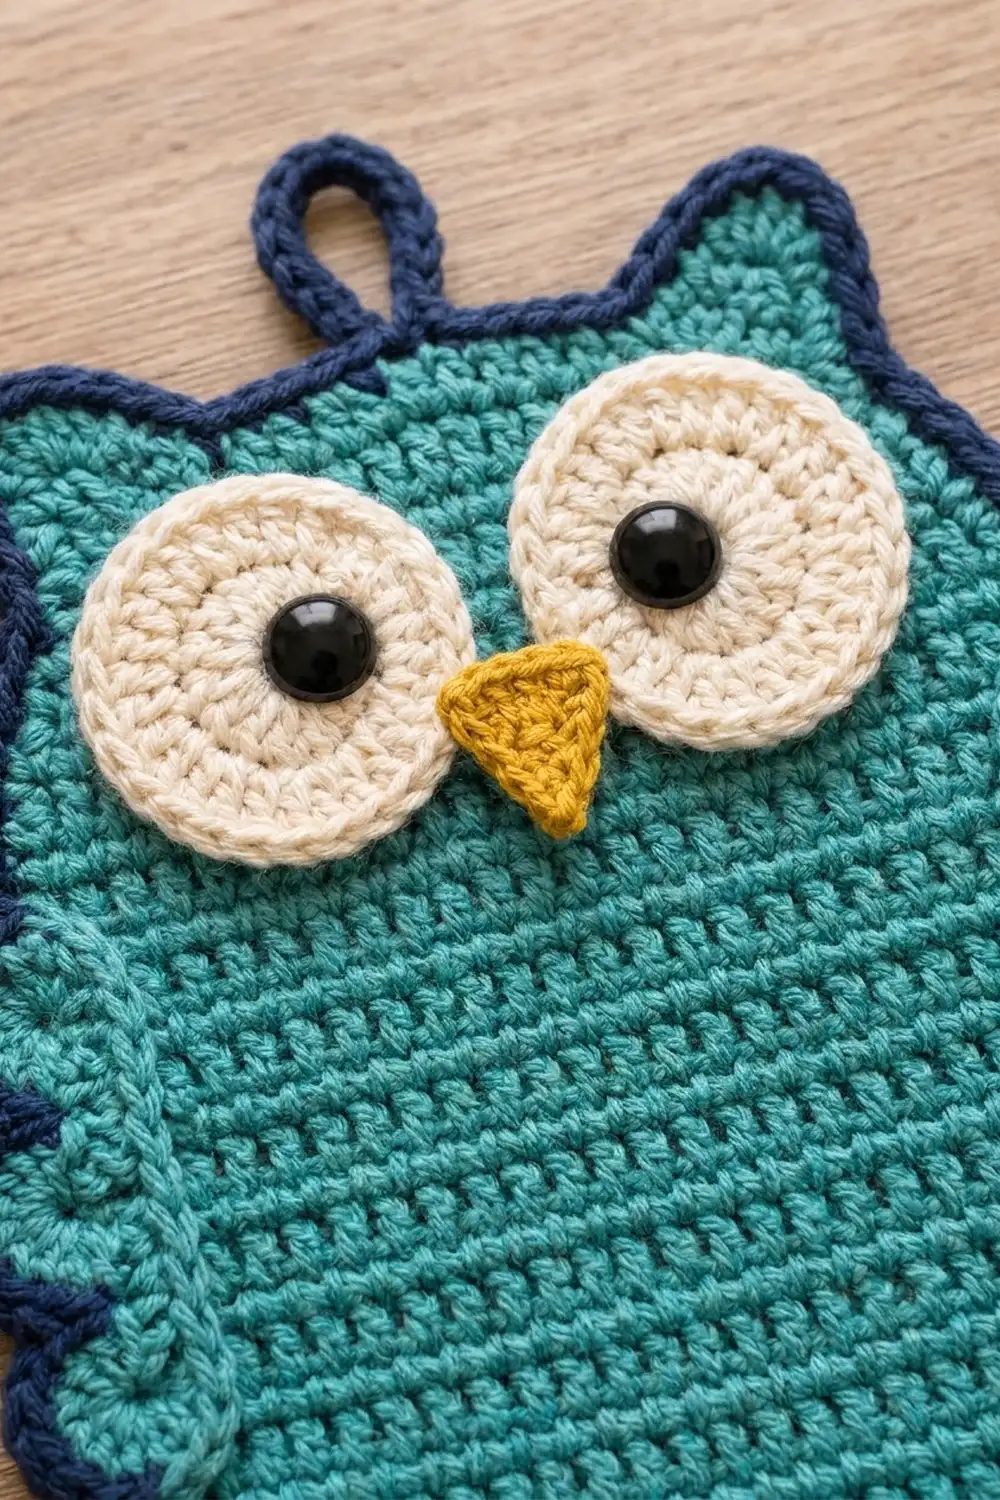
The colors are teal for the body, wings and strap, navy for the rope-like edging and hanging loop, cream for the eyes and mustard for the beak. Black safety eyes make the pupils. The look is graphic and tidy, so the owl works on a desk wall, in a hallway or in a kid’s room.
This pattern uses US crochet terms. The finished owl measures 8.3 in (21.1 cm) wide and 11.7 in (29.7 cm) tall from the bottom edge to the ear tips. With the wings, it’s about 10.3 in (26.2 cm) wide. The hanging loop adds about 1.5 in (3.8 cm) on top.
You work the body flat in single crochet rows from the bottom up, shaping a rounded base and two pointed ears. Two navy rounds finish the edge. Then you make the eyes, beak, wings and strap separately and sew them on.
Finished Size and Construction
- Finished size: 8.3 in x 11.7 in (21.1 cm x 29.7 cm), plus a 1.5 in (3.8 cm) loop
- Width including wings: about 10.3 in (26.2 cm)
- Skill level: Easy+
- Terminology: US
- Yarn weight: worsted (#4) cotton
- Hook: 4.0 mm (G-6)
- Number of pieces: 1 body panel + 6 sewn components (2 eyes, 1 beak, 2 wings, 1 strap)
- Layout: single panel, no joining
- Body size before border: 7.5 in x 10.9 in (19.1 cm x 27.7 cm), ears included
- Border depth: 0.4 in (1.0 cm) per side
Materials
Choose a smooth, firm cotton or cotton blend. Cotton holds its shape on a wall and won’t stretch when cables pull on the strap. Acrylic also works, but the panel will be softer.
- Teal (A): 130 g / 260 m
- Navy (B): 30 g / 60 m
- Cream (C): 10 g / 20 m
- Mustard (D): 3 g / 6 m
These amounts include about 15% extra to cover your gauge swatch and differences in tension.
Tools:
- 4.0 mm (G-6) crochet hook
- Two 12 mm black safety eyes
- Tapestry needle
- Stitch markers
- Scissors
- Pins and a blocking mat
- Tape measure
Abbreviations (US Terms)
- ch – chain
- sl st – slip stitch
- sc – single crochet
- dc – double crochet
- sc2tog – single crochet 2 together
- BLO – back loop only
- MR – magic ring
- st(s) – stitch(es)
- RS / WS – right side / wrong side
- rev sc – reverse single crochet (crab stitch)
Reverse single crochet: Keep the RS facing and work from left to right (right to left if you’re left-handed). Insert the hook into the next stitch to the right, yarn over, pull up a loop, yarn over and pull through both loops. This makes the corded, rope-like edge.
Gauge and Checkpoints
Gauge: 16 sc and 18 rows = 4 in (10.2 cm).
Work a swatch 20 sts wide and 20 rows tall, then measure the center. If you have more than 16 sts in 4 in, go up a hook size. If you have fewer, go down a size. Row gauge matters too, because the border math depends on the 16:18 ratio.
Body checkpoints:
- After Row 9: 30 sts, 7.5 in (19.1 cm) wide, 2 in (5.1 cm) tall
- After Row 27: 6 in (15.2 cm) tall
- After Row 45: 10 in (25.4 cm) tall
- After ears: 10.9 in (27.7 cm) tall
- After border: 8.3 in x 11.7 in (21.1 cm x 29.7 cm)
If the panel is more than 0.25 in (0.6 cm) too wide at Row 9, start over with a smaller hook. If it’s short at Row 45, add 1–2 straight rows before the ears. Each row adds about 0.22 in (0.6 cm). For each extra row, add 1 sc to each side in Border Rnd 1.
Body Panel
Use Teal (A). The ch 1 at the start of a row doesn’t count as a stitch. Row 1 is the RS.
Row 1 (RS): Ch 17. Sc in 2nd ch from hook and in each ch across, turn. (16 sts)
Row 2: Ch 1, 2 sc in first st, sc to last st, 2 sc in last st, turn. (18 sts)
Row 3: Repeat Row 2. (20 sts)
Row 4: Repeat Row 2. (22 sts)
Row 5: Repeat Row 2. (24 sts)
Row 6: Repeat Row 2. (26 sts)
Row 7: Ch 1, sc in each st across, turn. (26 sts)
Row 8: Repeat Row 2. (28 sts)
Row 9: Repeat Row 2. (30 sts)
The quick increases in Rows 2–6 and the slower ones in Rows 8–9 round off the bottom corners.
Rows 10–45: Ch 1, sc in each st across, turn. (30 sts in each row)
Don’t fasten off. The panel now measures 7.5 in x 10 in (19.1 cm x 25.4 cm).
Ears
First ear (worked over the first 8 sts of Row 45):
Row 46: Ch 1, sc2tog, sc 4, sc2tog, turn. Leave the remaining sts unworked. (6 sts)
Row 47: Ch 1, sc2tog, sc 2, sc2tog, turn. (4 sts)
Row 48: Ch 1, sc2tog twice, turn. (2 sts)
Row 49: Ch 1, sc2tog. (1 st) Fasten off.
Second ear: Skip the next 14 sts of Row 45. Join A in the next st, which is the 8th st from the end. Work Rows 46–49 the same way over these last 8 sts, then fasten off.
Stitch check: 8 (ear) + 14 (flat top) + 8 (ear) = 30. The flat top between the ears is 14 sts, or 3.5 in (8.9 cm).
Eyes (Make 2)
Use Cream (C). Work in continuous rounds and mark the first st of each round.
Rnd 1: 6 sc in MR. (6 sts)
Rnd 2: 2 sc in each st. (12 sts)
Rnd 3: (Sc 1, 2 sc in next) around. (18 sts) The eye should measure about 1.4 in (3.6 cm) across.
Rnd 4: (Sc 2, 2 sc in next) around. (24 sts)
Rnd 5: (Sc 3, 2 sc in next) around. (30 sts)
Sl st in the next st and fasten off, leaving a 12 in (30.5 cm) tail. Each eye is about 2.25 in (5.7 cm) across. Push a safety eye through the center between Rnds 1 and 2 and lock the washer on the back.
Beak
Use Mustard (D).
Row 1: Ch 5. Sc in 2nd ch from hook and in each ch across, turn. (4 sts)
Row 2: Ch 1, sc2tog twice, turn. (2 sts)
Row 3: Ch 1, sc2tog. (1 st)
Fasten off, leaving an 8 in (20.3 cm) tail. The beak is a downward-pointing triangle about 1 in (2.5 cm) wide and 0.7 in (1.8 cm) tall.
Wings (Make 2)
Base: Use Teal (A).
Row 1: Ch 18. Sc in 2nd ch from hook and in each ch across, turn. (17 sts)
Rows 2–4: Ch 1, sc in each st, turn. (17 sts)
Row 5 (scallops): Sl st in first st, skip 1 st, 5 dc in next st, skip 1 st, sl st in next st. Repeat from * to * 3 more times. (4 scallops, 5 sl sts) Fasten off.
Stitch check for Row 5: 1 sl st + (4 sts x 4 repeats) = 17 sts used.
Edging: Use Navy (B) with the RS facing. Join with a sl st in the first sl st of Row 5. Along the scallop edge, work sc in each of next 5 dc, sl st in next sl st 4 times. Along the short end, work 5 sc (1 per row end). Along the foundation chain, work 1 sc in each of the 17 chs. Along the second short end, work 5 sc. Sl st to the first st and fasten off, leaving a 16 in (40.6 cm) tail.
Edging count: 20 sc + 5 sl sts on the scallop edge, 5 + 5 sc on the ends and 17 sc along the base = 52 sts.
Each wing is 4.25 in (10.8 cm) long and about 1.75 in (4.4 cm) wide.
Cable Strap
Use Teal (A). The strap is 5 sts wide and gets longer with each row. Row 1 is the RS.
Row 1 (RS): Ch 6. Sc in 2nd ch from hook and in each ch across, turn. (5 sts)
Rows 2–8: Ch 1, sc in each st, turn. (5 sts)
Row 9 (RS, ridge): Ch 1, sc in BLO of each st, turn. (5 sts)
Rows 10–40: Repeat Rows 2–9 three more times, then work Rows 2–8 once more. Ridges fall on Rows 17, 25 and 33. (5 sts in each row)
Row 41: Ch 1, sc in each st. (5 sts) Fasten off, leaving a 24 in (61.0 cm) tail.
On the ridge rows, the unworked front loops form horizontal bars on the RS. These bars mark where you’ll tack the strap down. The strap measures 1.25 in x 9 in (3.2 cm x 22.9 cm), with 6 tack points (Rows 1, 9, 17, 25, 33 and 41) spaced 8 rows apart.
Border
Border gauge: Use the same 4.0 mm hook. Along the row ends, work 8 sc for every 9 rows. This matches the gauge ratio of 16 sts to 18 rows, so the sides stay flat.
Join Navy (B) at the bottom right corner with the RS facing.
Rnd 1: Ch 1, then sc around as follows:
- Bottom edge: 1 sc in the remaining loop of each of the 16 foundation chs, with 2 sc in the first and last chs (18 sc)
- Left curve (row ends 2–9): 1 sc in each row end (8 sc)
- Left side (row ends 10–45, 36 rows): sc in next 8 row ends, skip 1 4 times (32 sc)
- Left ear: 4 sc up the outer edge, 3 sc in the tip, 4 sc down the inner edge (11 sc)
- Top: 1 sc in each of the 14 unworked sts of Row 45 (14 sc)
- Right ear: 4 sc up, 3 sc in the tip, 4 sc down (11 sc)
- Right side: work as for the left side (32 sc)
- Right curve: 8 sc
Sl st to the first sc. (18 + 8 + 32 + 11 + 14 + 11 + 32 + 8 = 134 sts)
Rnd 2: Ch 1, rev sc in each st around. (134 sts) Sl st to the first st and fasten off.
Why the math works: Each straight side is 36 rows, which is 8 in (20.3 cm) at 18 rows per 4 in. The 32 sc along it also measure 8 in at 16 sts per 4 in, so the edging matches the fabric exactly. On the curves, 1 sc per row end adds the extra length the outward curve needs. The 3-sc ear tips and the 2-sc bottom corners let the edging turn without pulling.
Hanging loop: Join B in the 7th of the 14 top border sts. Ch 14, then sl st in the 8th top st. Turn, work 20 sc over the chain loop and sl st in the 7th st. Fasten off. The loop stands about 1.5 in (3.8 cm) tall.
Assembly
Measure every placement from the top edge of Row 45, which is the flat top between the ears.
- Eyes: Pin the eyes centered, 0.75 in (1.9 cm) below the top edge and 0.25 in (0.6 cm) apart. Whipstitch around Rnd 5 with the cream tails.
- Beak: Center the beak with its top 2.5 in (6.4 cm) below the top edge, between the lower curves of the eyes. Sew all the way around.
- Wings: Pin each wing with the scallops pointing outward and the top 3.25 in (8.3 cm) below the top edge. Place the base edge 0.75 in (1.9 cm) inside the outer edge of the border. Sew along the base only, so the scallops stick out about 1 in (2.5 cm) past the border.
- Strap: Center the strap vertically. Tack Row 1 across its full width, 3.5 in (8.9 cm) below the top edge. Tack Rows 9, 17, 25, 33 and 41 at 1.1 in (2.8 cm) intervals. The last tack sits 9 in (22.9 cm) below the top edge. Hide your stitches in the ridges.
Each strap section is 1.78 in (4.5 cm) long but covers only 1.1 in (2.8 cm), and that slack forms the loop.
Final Blocking
- Lightly mist the owl with water. Don’t soak it, because the sewn layers dry slowly.
- Lay it RS up on a blocking mat.
- Pin the body to 8.3 in x 11.7 in (21.1 cm x 29.7 cm).
- Pin the ear tips to sharp points and the bottom into a smooth curve.
- Spread each scallop into an even fan.
- Slide a ruler under the strap loops so they dry open.
- Let it dry completely, for at least 12 hours.
Final Quality-Control Checklist
- Rows 9–45 have 30 sts each, with 14 sts between the ears.
- Border Rnds 1 and 2 have 134 sts each.
- The sides lie flat, with no ruffling or cupping.
- The eyes are level and evenly spaced from the center.
- The beak is centered and points straight down.
- The wings sit at the same height, with 4 scallops each.
- The strap has 6 tack points 1.1 in (2.8 cm) apart, and the loops are even.
- The hanging loop is centered and secure.
- All ends are woven in on the WS.
Troubleshooting
Sides ruffle: There are too many border sc. Stick to 8 sc per 9 rows.
Sides pull in: Your rows are shorter than the gauge. Work 1 sc in every row end, or go down a hook size.
Bottom looks pointed: Check the counts for Rows 1–9: 16, 18, 20, 22, 24, 26, 26, 28, 30.
Eyes cup: Your tension is too tight. Go up half a hook size for the eyes.
Loops too tight: Space the tacks 1.0 in (2.5 cm) apart for more slack.
Panel sags: Add a plastic canvas backing cut to the body shape.
Care
Take the cables out first. Spot clean with mild soap and cool water, then dry flat without tumble drying.
Final Notes
Here’s how the measurements build. At a gauge of 16 sc x 18 rows = 4 in, the 30-stitch body is 7.5 in (19.1 cm) wide. The 45 rows make it 10 in (25.4 cm) tall, and the ears add 0.9 in (2.3 cm). The two-round, 134-stitch border brings the owl to 8.3 in x 11.7 in (21.1 cm x 29.7 cm). If you check each stage before moving on, your owl will hang straight and hold every cable neatly.
Happy crocheting!