

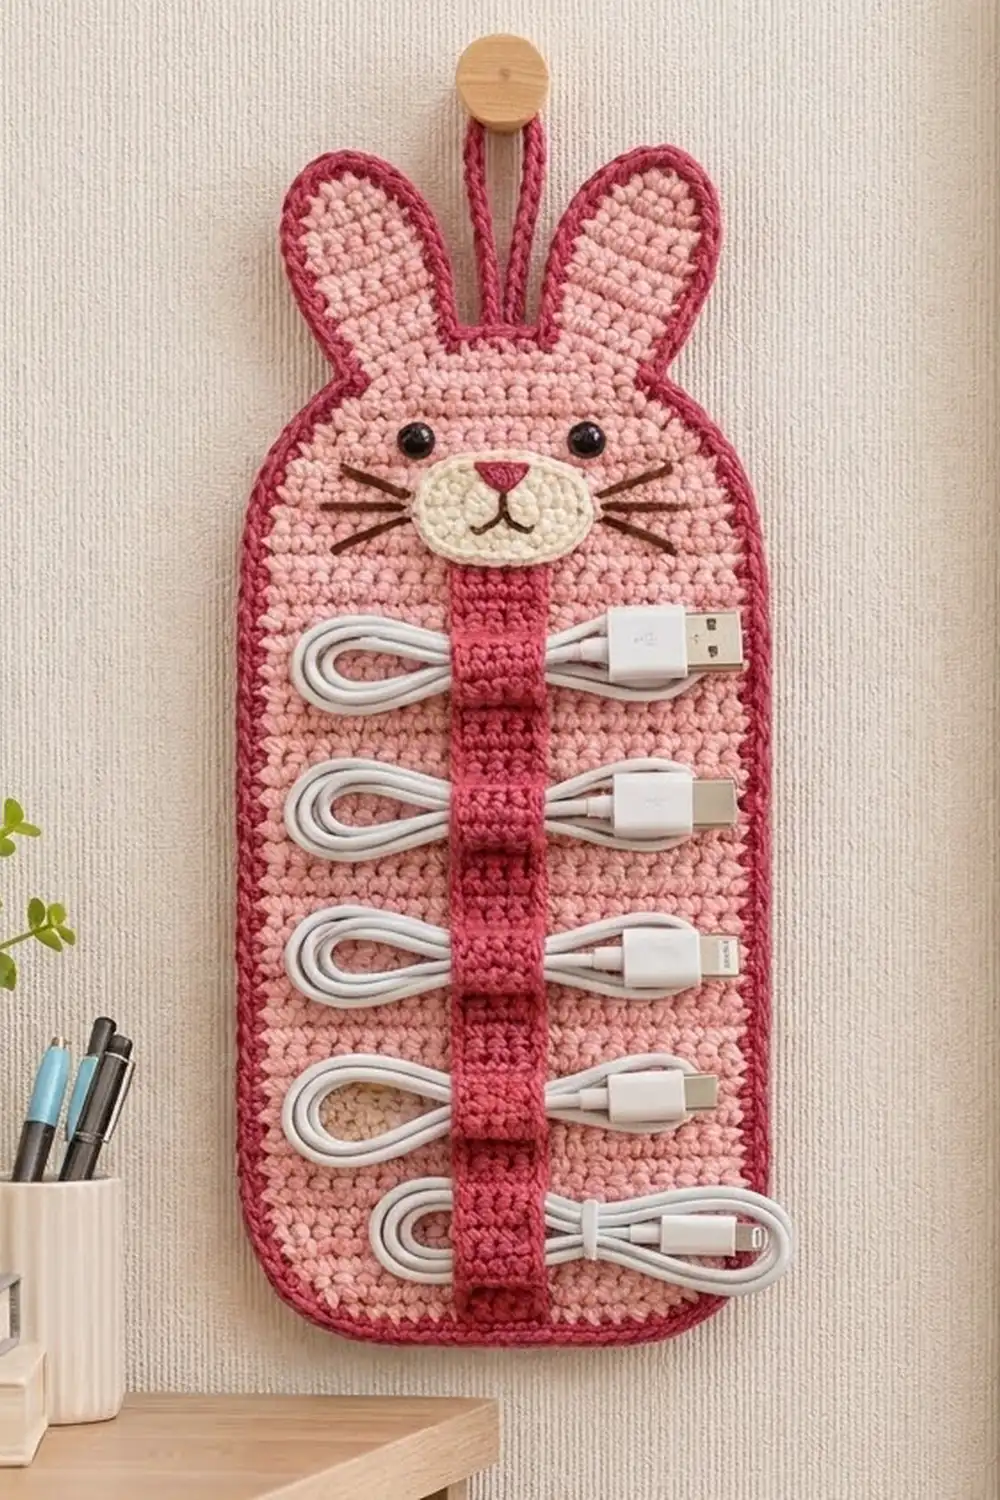
Meet the Bunny Burrow, a flat crochet wall hanger shaped like a bunny that keeps charging cables neat and easy to grab. Coiled cords slide under a raspberry strap down the bunny’s tummy. The whole piece hangs from a small loop between the ears.
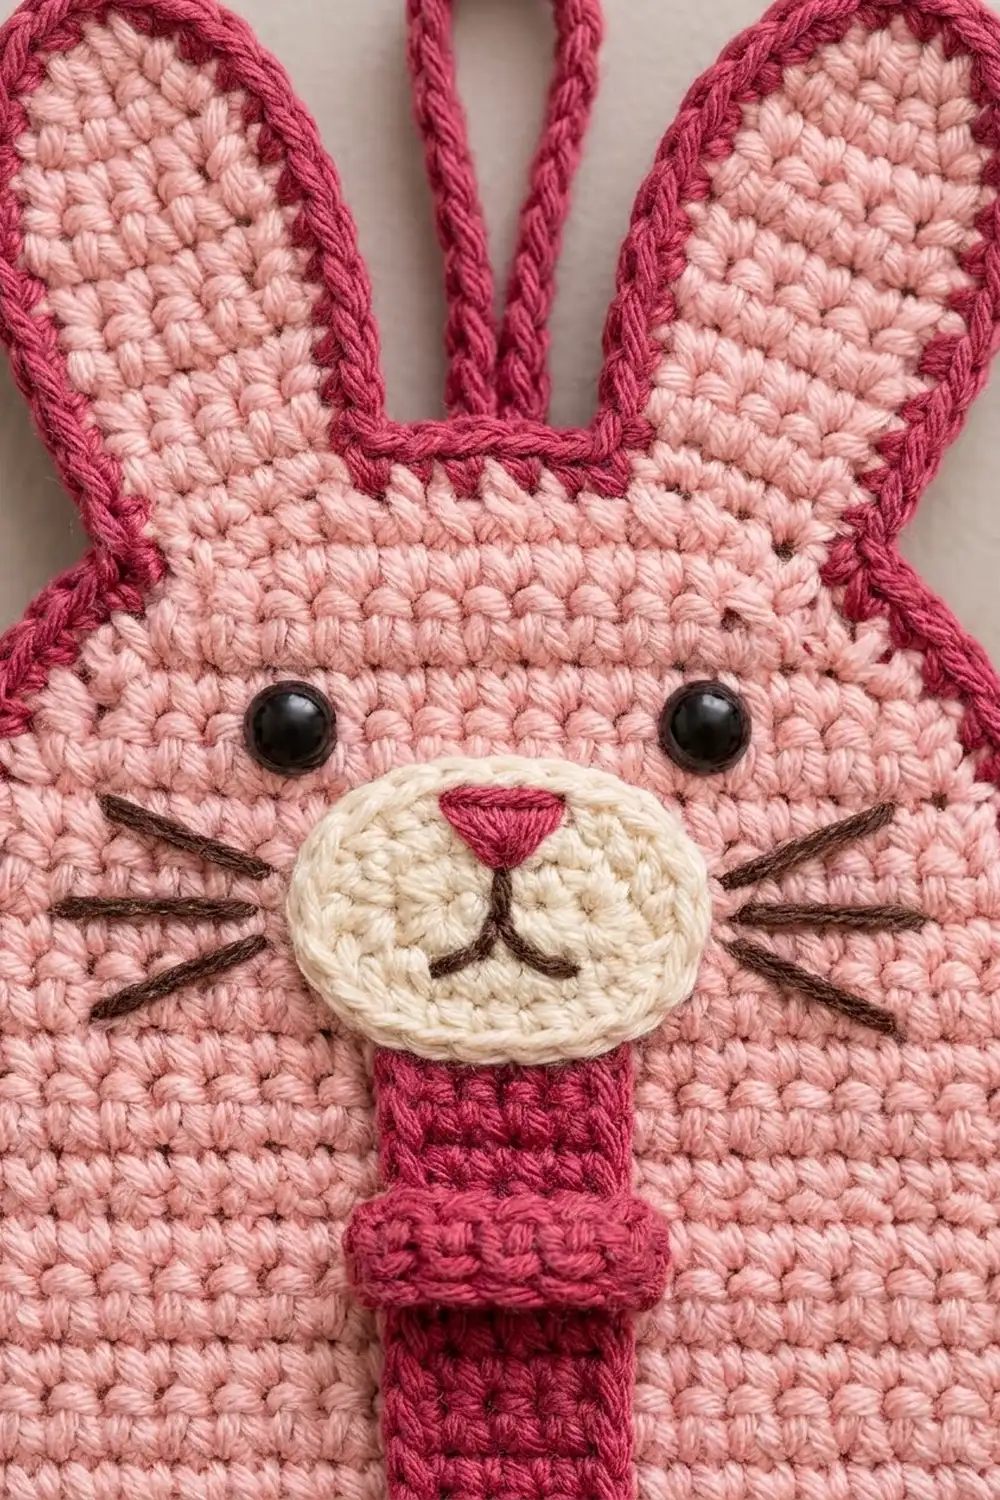
The colors are soft and cheerful: a blush pink body, a raspberry border, strap and hanging loop, a cream muzzle, black safety eyes, and dark brown embroidery. The look is clean and graphic, with tidy single crochet rows and a crisp outline.
This pattern uses US crochet terms. The finished organizer measures about 7.3 in (18.5 cm) wide and 14.4 in (36.6 cm) tall from the bottom edge to the ear tips, not counting the hanging loop.
You work the body flat in rows from the bottom up, then split at the top to work each ear directly on the panel. Next you make a small oval muzzle and a narrow tabbed strap, sew them on and add the face. A two-round border and a hanging loop finish it.
Finished Size and Construction
- Finished size: 7.3 in x 14.4 in (18.5 cm x 36.6 cm), loop not included
- Skill level: Easy (advanced beginner)
- Terminology: US crochet terms
- Yarn weight: Worsted (#4)
- Hook: 4.0 mm (G-6)
- Number of pieces: 1 body panel with ears, plus 1 muzzle, 1 strap and 1 hanging loop
- Layout: One panel, with the strap centered vertically below the face
- Panel size before border: 6.5 in x 13.6 in (16.5 cm x 34.5 cm)
- Border depth: 2 rounds of sc, about 0.4 in (1.0 cm) on every edge
Materials
Use a smooth worsted yarn with good stitch definition. Cotton or a cotton-acrylic blend makes a firm, flat fabric that holds cables without stretching out. Avoid fuzzy or very stretchy yarns.
- Blush Pink (main color, MC): 70 g, about 130 m
- Raspberry (contrast color, CC): 30 g, about 55 m
- Cream: 5 g, about 10 m
- Dark Brown: 2 m, for embroidery
These quantities include an extra 15-20 percent to allow for gauge differences and a test swatch.
Tools:
- 4.0 mm (G-6) crochet hook
- 2 black safety eyes, 9 mm
- Tapestry needle
- 4-6 locking stitch markers
- Rust-proof pins and a blocking mat
- Scissors and a measuring tape
Abbreviations (US Terms)
- ch: chain
- sc: single crochet
- sc2tog: single crochet 2 together (insert hook in next st and pull up a loop, insert hook in following st and pull up a loop, yarn over and draw through all 3 loops)
- sc3tog: single crochet 3 together (as sc2tog, but over 3 sts; draw through all 4 loops)
- sl st: slip stitch
- st(s): stitch(es)
- RS: right side
- MC / CC: main color / contrast color
Row-end: the side edge of one row. When the border says “sc in a row-end,” insert the hook under the outer post of the end stitch of that row.
Gauge and Checkpoints
Gauge: 16 sc and 18 rows = 4 in (10.2 cm) in sc rows with a 4.0 mm hook. That is 4 sts and 4.5 rows per inch.
Use the body itself as your test piece. Work Rows 1-5, then measure before you go on. Check these measurements as you work:
- After Row 1: 18 sts measure 4.5 in (11.4 cm).
- After Row 5: 26 sts measure 6.5 in (16.5 cm).
- After Row 45: the body is 10 in (25.4 cm) tall.
- After Row 49: the body is about 10.9 in (27.7 cm) tall.
- After the ears: the panel is about 13.6 in (34.5 cm) tall.
If your piece is too big: switch to a 3.75 mm hook and start again. If it is too small: switch to a 4.5 mm hook. Don’t change the stitch counts, because the border and strap placement depend on them.
Body Panel
With MC, ch 19.
Row 1 (RS): Sc in 2nd ch from hook and in each ch across, turn. (18 sts)
Row 2: Ch 1 (does not count as a st here and throughout), 2 sc in first st, sc in next 16 sts, 2 sc in last st, turn. (20 sts)
Row 3: Ch 1, 2 sc in first st, sc in next 18 sts, 2 sc in last st, turn. (22 sts)
Row 4: Ch 1, 2 sc in first st, sc in next 20 sts, 2 sc in last st, turn. (24 sts)
Row 5: Ch 1, 2 sc in first st, sc in next 22 sts, 2 sc in last st, turn. (26 sts)
These four increase rows make the rounded bottom corners.
Rows 6-45: Ch 1, sc in each st across, turn. (26 sts per row; 40 rows)
Check: 10 in (25.4 cm) tall and 6.5 in (16.5 cm) wide.
Row 46: Ch 1, sc2tog, sc in next 22 sts, sc2tog, turn. (24 sts)
Row 47: Ch 1, sc2tog, sc in next 20 sts, sc2tog, turn. (22 sts)
Row 48: Ch 1, sc2tog, sc in next 18 sts, sc2tog, turn. (20 sts)
Row 49: Ch 1, sc in each st across, turn. (20 sts)
The three decrease rows shape the sloped shoulders. Row 48 measures 5 in (12.7 cm) wide. Place markers to divide Row 49 into 7 sts (first ear), 6 sts (center dip) and 7 sts (second ear).
Ears
Each ear is worked directly on Row 49 and has 12 rows.
First ear
Ear Row 1: Ch 1, sc in the first 7 sts only, turn. (7 sts)
Ear Row 2: Ch 1, 2 sc in first st, sc in next 5 sts, 2 sc in last st, turn. (9 sts)
Ear Rows 3-8: Ch 1, sc in each st across, turn. (9 sts per row; 6 rows)
Ear Row 9: Ch 1, sc2tog, sc in next 5 sts, sc2tog, turn. (7 sts)
Ear Row 10: Ch 1, sc2tog, sc in next 3 sts, sc2tog, turn. (5 sts)
Ear Row 11: Ch 1, sc2tog, sc in next st, sc2tog, turn. (3 sts)
Ear Row 12: Ch 1, sc3tog. (1 st) Fasten off.
Second ear
Skip the next 6 sts of Row 49, which form the center dip. With RS facing, join MC in the next st. Work Ear Rows 1-12 over the last 7 sts.
Each ear is 2.25 in (5.7 cm) at its widest and about 2.7 in (6.9 cm) tall. The center dip is 6 sts, or 1.5 in (3.8 cm), wide. Weave in all MC ends.
Muzzle
With Cream, ch 7.
Rnd 1: Sc in 2nd ch from hook, sc in next 4 ch, 3 sc in last ch. Turn the chain and work along its other side: sc in next 4 ch, then 2 sc in the same ch as the first sc. Join with sl st to first sc. (14 sts)
Rnd 2: Ch 1, 2 sc in first st, sc in next 4 sts, 2 sc in each of next 3 sts, sc in next 4 sts, 2 sc in each of last 2 sts. Join. (20 sts = 14 sts worked 1-per-stitch + 6 extra)
Fasten off, leaving a 12 in (30.5 cm) tail. The oval measures about 2.25 in x 1.25 in (5.7 cm x 3.2 cm).
Cable Strap
The strap is worked in short rows. Tabs are two-row wider sections where the strap gets sewn down. The plain sections between the tabs stay loose and become the channels.
With CC, ch 5.
Row 1: Sc in 2nd ch from hook and in next 3 ch, turn. (4 sts)
Tab rows:
- Tab A: Ch 1, 2 sc in first st, sc in next 2 sts, 2 sc in last st, turn. (6 sts)
- Tab B: Ch 1, sc2tog, sc in next 2 sts, sc2tog, turn. (4 sts)
Channel rows: Ch 1, sc in each st across, turn. (4 sts per row)
Work in this order:
- Rows 2-3: Tab 1 (Tab A, then Tab B)
- Rows 4-7: Channel 1
- Rows 8-9: Tab 2
- Rows 10-13: Channel 2
- Rows 14-15: Tab 3
- Rows 16-19: Channel 3
- Rows 20-21: Tab 4
- Rows 22-25: Channel 4
- Rows 26-27: Tab 5
- Rows 28-31: Channel 5
- Rows 32-33: Tab 6
Row 34: Ch 1, sc in each st across. (4 sts) Fasten off, leaving a 36 in (91.4 cm) tail.
The strap is 1 in (2.5 cm) wide, or 1.5 in (3.8 cm) at the tabs, and about 7.6 in (19.3 cm) long. Each channel is about 0.9 in (2.3 cm) long.
Face and Strap Assembly
Lay the panel RS up. On the 26-st rows, the vertical center line falls between sts 13 and 14.
Muzzle: Center the muzzle on the center line, with its lower edge on Row 36 and its upper edge on Row 41. Pin it in place, then whipstitch around the edge with the Cream tail.
Eyes: Insert the safety eyes between Rows 43 and 44, one between sts 10 and 11 and one between sts 16 and 17. They sit 6 sts, or 1.5 in (3.8 cm), apart. Attach the washers on the wrong side.
Nose: With CC, satin stitch a small downward-pointing triangle at the top center of the muzzle, about 0.4 in (1.0 cm) wide.
Mouth: With Dark Brown, make one short straight stitch down from the tip of the nose. Then backstitch a shallow curve to each side to form a small “w.”
Whiskers: With Dark Brown, make three straight stitches on each side, each about 1 in (2.5 cm) long. Fan them slightly so they extend past the muzzle onto the pink body.
Strap: Center the strap over sts 12-15, which leaves 11 sts free on each side. Pin strap Row 1 to panel Row 2, and strap Row 34 to panel Row 34. Because the strap has 34 rows lying over 33 panel rows, it has about 0.25 in (0.6 cm) of ease. The channels lie flat but open easily.
With the CC tail, whipstitch all the way around strap Row 1, each of the six tabs and strap Row 34, going through the panel each time. Between tabs, carry the yarn on the wrong side of the panel. Leave the long edges of all five channels unsewn.
Border
Border gauge: The border keeps the body’s 4 sts per inch. On the straight sides there are more rows per inch (4.5) than stitches per inch (4), so you skip 1 row-end in every 10.
Rnd 1: With RS facing, join CC in the free loop of the foundation ch at one end of the bottom edge. Ch 1, then work around:
- Bottom edge: sc in each of the 18 foundation ch. (18)
- First bottom curve: 2 sc in the row-end of Row 1, sc in the row-ends of Rows 2-5. (6)
- First side, Rows 6-45: *sc in next 9 row-ends, skip 1 row-end; repeat from * 3 more times. (36)
- First shoulder: sc in the row-ends of Rows 46-49. (4)
- First ear, outer side: sc in the row-ends of Ear Rows 1-11. (11)
- Ear tip: 3 sc in the single st of Ear Row 12. (3)
- First ear, inner side: sc in the row-ends of Ear Rows 11-1. (11)
- Center dip: sc in each of the 6 skipped sts of Row 49. (6)
- Second ear: inner side 11, tip 3, outer side 11. (25)
- Second shoulder: sc in the row-ends of Rows 49-46. (4)
- Second side: same skip pattern as the first side. (36)
- Second bottom curve: sc in the row-ends of Rows 5-2, then 2 sc in the row-end of Row 1. (6)
Join with sl st to first sc. Total: 166 sts (18 + 12 + 72 + 8 + 44 + 6 + 6).
Rnd 2: Ch 1, then:
- Bottom edge: sc in each st. (18)
- Each bottom curve: sc in each st, but work 2 sc in the 2nd and 4th sts of the curve. (8 each)
- Each side: sc in each st. (36 each)
- Each shoulder: sc in each st. (4 each)
- Each ear, outer side: sc in each st. (11 each)
- Each ear tip: sc in first st, 3 sc in center st, sc in last st. (5 each)
- Inner sides and dip: sc in the first 10 inner sts of the first ear. Sc2tog over the last inner st and the first dip st. Sc in the next 4 dip sts. Sc2tog over the last dip st and the first inner st of the second ear. Sc in the remaining 10 inner sts. (10 + 1 + 4 + 1 + 10)
Join. Total: 172 sts. That is 162 sts worked 1-per-stitch, plus 2 sc2tog (covering 4 sts), plus 8 extra sts at the curves and tips.
Why the math works: On each side, 36 sc cover 40 rows, or about 8.9 in (22.6 cm). That is 4 sts per inch, the same as the body gauge, so the edge stays flat. Extra stitches go only on the outside curves (bottom corners and ear tips), so those don’t pull. The two sc2tog tighten the inside corners at the center dip, so it doesn’t pucker.
Hanging loop: Don’t fasten off. Sl st along Rnd 2 to the 2nd of the 4 dip sts. Ch 24, then sl st in the 3rd dip st. Work 32 sc around the ch-24 loop, then sl st in the 2nd dip st. Fasten off. The loop stands about 2.25 in (5.7 cm) tall.
Final Blocking
- Weave in all remaining ends on the wrong side.
- Mist the piece lightly with water. For cotton or blends, you can soak it instead and press out the extra water in a towel.
- Lay it RS up on a blocking mat.
- Pin the bottom edge straight to 7.3 in (18.5 cm).
- Pin both sides straight and parallel, to a height of 14.4 in (36.6 cm).
- Shape the ears into smooth, matching ovals and pin the tips.
- Smooth the strap flat and check that it is centered.
- Let it dry completely before you unpin it.
Final Quality-Control Checklist
- The panel measures 7.3 in x 14.4 in (18.5 cm x 36.6 cm).
- Both ears match in size and height.
- The border lies flat, with no ruffles at the curves and no pucker in the dip.
- The muzzle is centered and sewn down all the way around.
- The eyes are level and the washers are secure.
- The whiskers are balanced, three per side.
- All six tabs are firmly sewn and all five channels are open.
- The hanging loop is centered and sturdy.
- All ends are woven in.
Troubleshooting
- Border ruffles on the sides: Skip 1 row-end in every 8 instead of every 10.
- Border pulls or cups: Use a hook one size larger for the border only.
- Ears lean outward: Pin them upright while blocking, and check that both ears have 12 rows.
- Muzzle curls: Steam-block it flat before sewing it on.
- Channels too tight for thick cables: Sew the strap ends 1 row closer together on the panel to add ease.
- Panel sags on the wall: Use a firmer cotton yarn or a smaller hook.
Care
Spot clean, or hand wash in cool water, then lay flat to dry and reshape. Don’t tumble dry, because the safety eyes and the strap stitching need gentle handling.
Final Notes
Every measurement follows from your gauge. At 4 sts and 4.5 rows per inch, the panel comes out at 6.5 in x 13.6 in (16.5 cm x 34.5 cm). Two border rounds of about 0.4 in (1.0 cm) bring it to 7.3 in x 14.4 in (18.5 cm x 36.6 cm). The 34-row strap fits over 33 panel rows with a little ease. Check each stage as you go and your bunny will hang straight and keep your cables tidy.
Happy crocheting!