

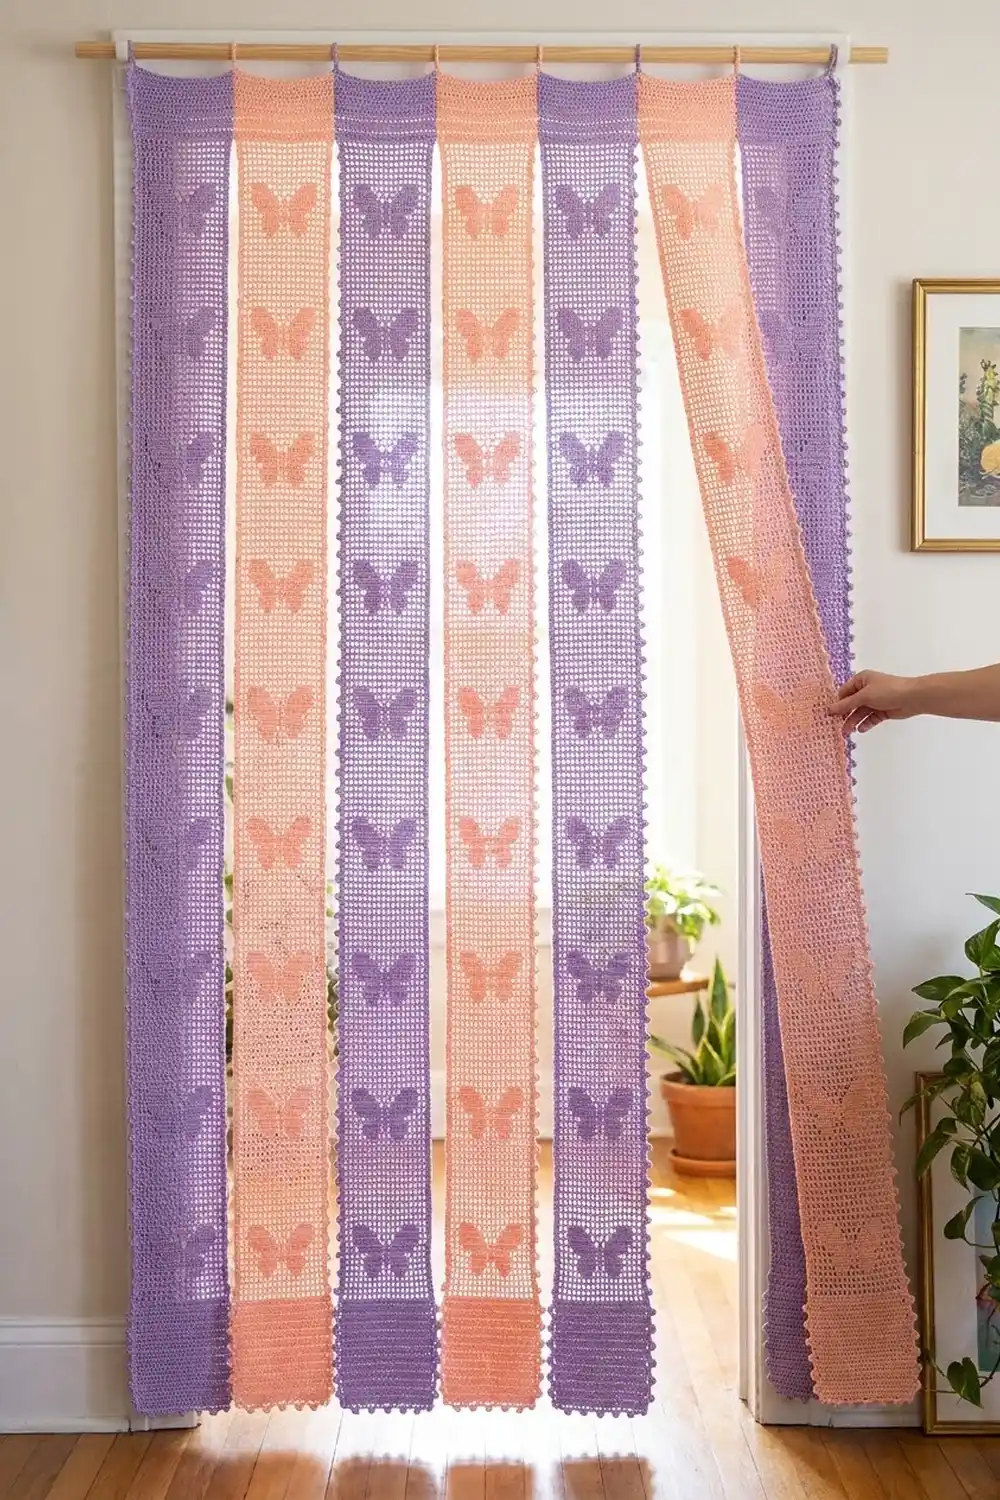
This curtain is made from seven separate filet crochet strips that hang side by side from a rod. Each strip has a single column of solid butterflies set into an airy open grid. Light passes through the mesh, and the butterflies seem to float in rows across the doorway.
The sample alternates lavender and soft peach strips: four lavender and three peach. The style is cottage-romantic and lacy but still practical. Each strip is edged with tiny three-petal picot flowers along the sides and bottom. All instructions use US crochet terms.
Each finished strip measures 6.7 in (17.0 cm) wide by 75.4 in (191.5 cm) long. With its hanging loops, it measures 77.4 in (196.6 cm) from the top of the loops to the bottom.
For construction, you work each strip flat from the top down in filet mesh. Next you add a two-round border with picot flowers, then crochet two hanging loops onto the top edge. The strips are never sewn together. They share the rod and move freely, so you can walk through the curtain easily.
Finished Size and Construction
- Finished strip size: 6.7 in × 75.4 in (17.0 cm × 191.5 cm)
- Hanging length including loops: 77.4 in (196.6 cm)
- Skill level: Intermediate (chart-style filet, long repetitive work)
- Terminology: US crochet terms
- Yarn weight: DK / light worsted (#3) cotton
- Hook: 3.5 mm (E-4)
- Number of pieces: 7 strips (4 lavender, 3 peach)
- Layout: 7 strips side by side in a single row, not joined
- Strip body size before border: 5.2 in × 74.4 in (13.2 cm × 189.0 cm), 13 squares wide and 186 rows long
- Border depth: 0.75 in (1.9 cm) per edge on the sides and bottom: 0.25 in (0.6 cm) of sc plus 0.5 in (1.3 cm) of picot flowers
- Full curtain width: 46.9 in (119.1 cm) with the strips edge to edge
Materials
Yarn: Use a smooth mercerized or combed cotton in DK weight, about 115 m per 50 g. Cotton keeps the grid crisp, holds blocking well, and hangs straight. Avoid fuzzy or very stretchy acrylics, because long strips can grow under their own weight.
- Lavender: 800 g (1840 m), for 4 strips
- Peach: 600 g (1380 m), for 3 strips
Each strip uses about 180 g (414 m). The quantities above include a margin of roughly 10% for swatching and dye-lot safety. Buy each color from one dye lot.
Tools:
– 3.5 mm (E-4) crochet hook
– Tapestry needle
– Stitch markers
– Measuring tape
– Rust-proof pins and blocking mats or a large towel
– Spray bottle
– Curtain rod up to 1 in (2.5 cm) in diameter and at least 50 in (127.0 cm) long
Abbreviations (US Terms)
- ch – chain
- sl st – slip stitch
- sc – single crochet
- dc – double crochet
- sk – skip
- sp – space
- st(s) – stitch(es)
- RS – right side
Filet squares:
– Open square (O): ch 2, sk 2 sts (or the ch-2 sp), dc in next dc.
– Filled square (F): dc in each of the next 2 sts, then dc in the next dc. When working over an open square, work 2 dc in the ch-2 sp, then dc in the next dc.
– Starting open square: ch 5 (counts as dc + ch 2), sk the next 2 sts or ch-2 sp, dc in next dc.
– Final dc of each row: worked into the 3rd ch of the turning ch-5, or into the top of the turning ch-3.
Special stitch – Flower Picot: ch 3, sl st in 3rd ch from hook; repeat from * 2 more times (3 petals), then sl st into the base of the first petal (the stitch you just worked). This makes a small three-petal flower.
Gauge and Checkpoints
Gauge: 10 filet squares and 10 rows = 4 in (10.2 cm) in filet mesh. One square is 0.4 in (1.0 cm) wide and one row is 0.4 in (1.0 cm) tall.
Each strip is very long, so check your gauge on the first strip before committing. Work Rows 1–16 and measure:
- After Row 2: width 5.2 in (13.2 cm)
- After Row 16 (first butterfly complete): length 6.4 in (16.3 cm)
- After Row 64: 25.6 in (65.0 cm)
- After Row 124: 49.6 in (126.0 cm)
- After Row 186: 74.4 in (189.0 cm)
Too big? Switch to a 3.25 mm (D-3) hook, or tighten your chains. Oversized ch-2 spaces are the most common cause.
Too small? Switch to a 3.75 mm (F-5) hook.
If your width is right but your rows run tall, pull up each dc loop a little less. Small errors add up: being 0.02 in off per row changes the finished length by nearly 4 in (10.2 cm).
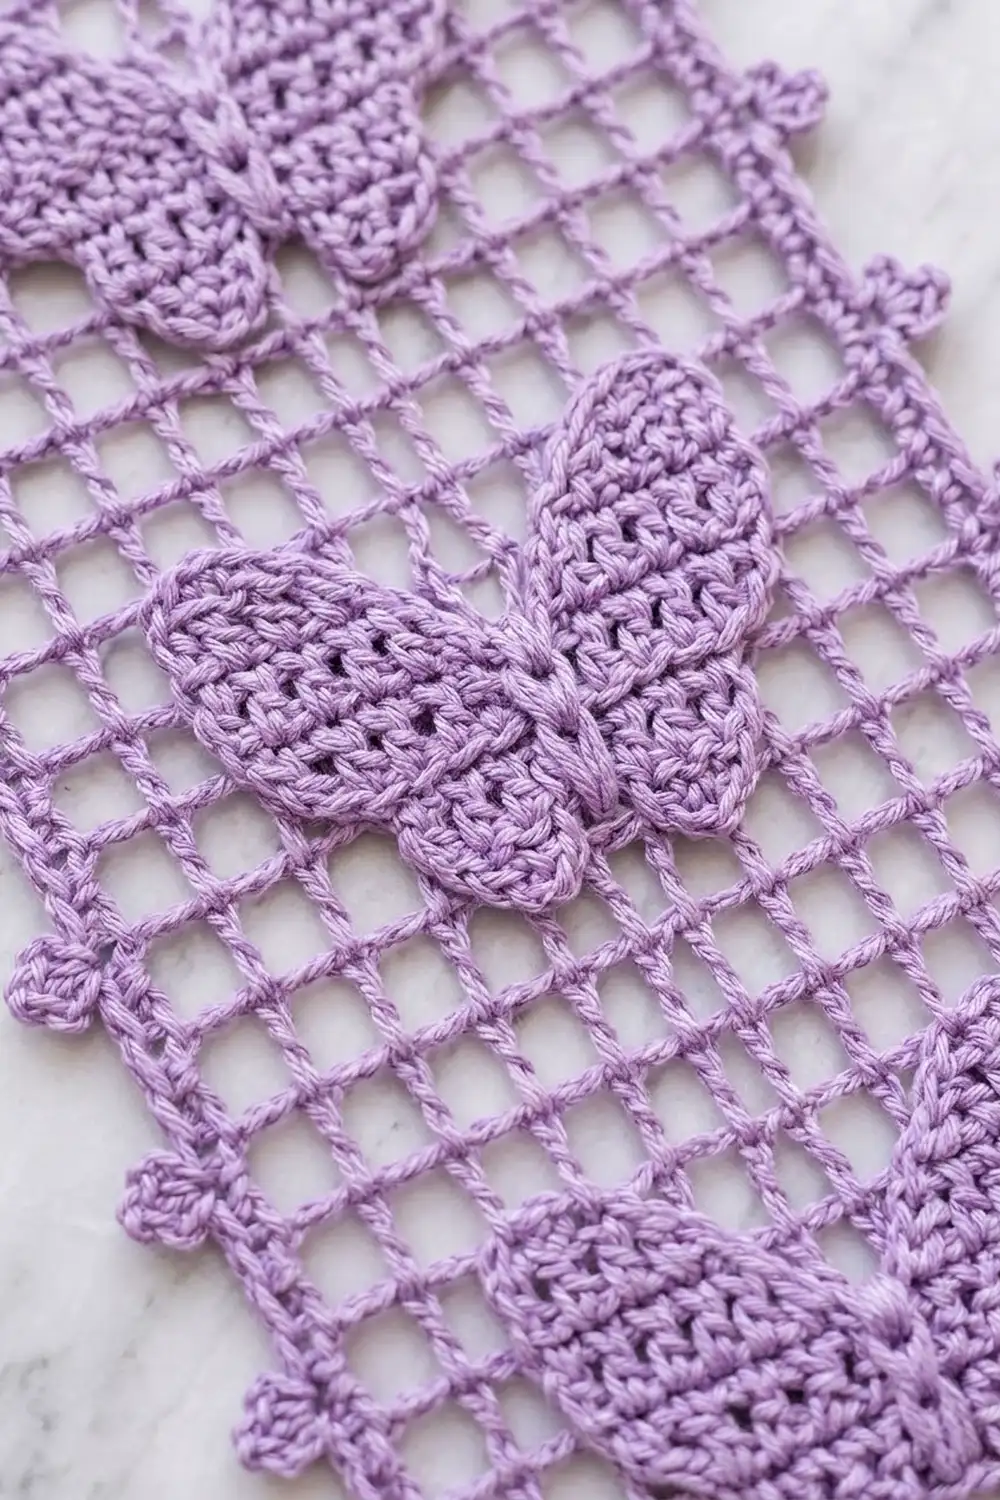
Strip Pattern (Make 7)
Every strip is worked flat from the top edge downward. Turn at the end of every row. Each row contains 40 sts, counting every chain as a stitch: 14 dc “posts” plus 13 squares × 2 sts between them.
Top Solid Band
Ch 42.
Row 1: Dc in 4th ch from hook and in each ch across. Turn. (40 dc, with the skipped 3 ch counting as the first dc)
Row 2: Ch 3 (counts as dc), dc in each st across, working the last dc in the top of the turning ch. Turn. (40 dc)
Checkpoint: the width is 5.2 in (13.2 cm).
Open Rows
Row 3: Ch 5 (counts as dc + ch 2), sk next 2 dc, dc in next dc. Ch 2, sk 2 dc, dc in next dc; repeat from * 11 more times. Turn. (13 open squares: 14 dc + 26 ch = 40 sts)
Row 4: Starting open square, then 12 open squares. Turn. (13 open squares, 40 sts)
Butterfly Repeat (Rows 5–16)
The butterfly sits in squares 3–11 and is centered on square 7. Two open squares always remain at each edge. Read each row from your starting edge. The motif is symmetrical, so it reads the same in both directions.
Row 5 (upper wing tips): O2, F3, O3, F3, O2. (26 dc, 14 ch)
Row 6: O2, F4, O1, F4, O2. (30 dc, 10 ch)
Row 7 (wings and top of body): O3, F7, O3. (28 dc, 12 ch)
Row 8: O4, F5, O4. (24 dc, 16 ch)
Row 9 (waist): O6, F1, O6. (16 dc, 24 ch)
Row 10: O4, F5, O4. (24 dc, 16 ch)
Row 11 (lower wings): O3, F3, O1, F3, O3. (26 dc, 14 ch)
Row 12 (lower wing tips): O4, F1, O3, F1, O4. (18 dc, 22 ch)
Rows 13–16: Work 13 open squares in each row. (14 dc, 26 ch each)
The butterfly measures 3.6 in (9.1 cm) wide by 3.2 in (8.1 cm) tall. One full repeat is 12 rows, or 4.8 in (12.2 cm).
Each row still totals 40 sts. Count your posts (14) on every row; this is the quickest way to catch a dropped square.
Rows 17–184: Repeat Rows 5–16 fourteen more times, for 15 butterflies in total. Row 184 is the last open row of the 15th repeat.
Put a marker at each completed butterfly to keep count.
Bottom Solid Band
Row 185: Ch 3 (counts as dc). 2 dc in ch-2 sp, dc in next dc; repeat from * 12 more times, working the last dc into the 3rd ch of the turning ch-5. Turn. (1 + 39 = 40 dc)
Row 186: Ch 3, dc in each st across. (40 dc) Do not fasten off.
Checkpoint: the strip body is 5.2 in × 74.4 in (13.2 cm × 189.0 cm).
Make All Pieces
- Lavender: 4 strips
- Peach: 3 strips
- Total: 7 strips
Layout, viewed from the room side, left to right:
| L | P | L | P | L | P | L |
 1   2   3   4   5   6   7
L = lavender   P = peach
Joining (Hanging Assembly)
Method: These strips are not seamed together. Each one hangs independently from its own two loops. The open layout lets people pass through the doorway, and it lets each strip be washed separately.
Stitch-to-stitch logic: Each strip has exactly the same body (40 sts wide and 186 rows long) and the same border counts. As a result, all seven hang at the same length and the picot flowers line up across the curtain. If one strip turns out longer, adjust that strip; do not move the loops.
Tension: Keep your border and loop tension the same across all seven strips. Even a slightly tighter sc border pulls a strip narrower and makes it hang shorter.
Size checkpoint: Edge to edge, the seven strips span 46.9 in (119.1 cm). With 0.5 in (1.3 cm) gaps between strips, the span is 49.9 in (126.7 cm). Measure your doorway and choose your spacing before you install the rod.
Border
Border gauge: 5 sc = 1 in (2.5 cm) along row ends. Each dc row is 0.4 in (1.0 cm) tall, so 2 sc per row end matches it exactly and keeps the edges flat.
Rnd 1 (sc frame): Continuing from Row 186, ch 1 and turn the work 90 degrees to work down the first long side.
- Side 1: Work 2 sc into each row end (around the dc post or turning ch). (372 sc for 186 rows)
- Bottom corner: Ch 1.
- Bottom edge: Work 1 sc into each of the 40 foundation chains. (40 sc)
- Corner: Ch 1.
- Side 2: 2 sc into each row end. (372 sc)
- Top corner: Ch 1.
- Top edge: Work 1 sc into each dc of Row 186. (40 sc)
- Final corner: Ch 1, then sl st to the first sc.
Total: 824 sc plus 4 corner ch-1 sps. The corner ch-1 spaces are not included in the per-side counts.
Because Row 186 is worked last, this border treats the Row 186 edge as the “top” and the foundation edge as the “bottom”. The strip is symmetrical, so choose either end as the hanging end, then keep that choice the same for all seven strips.
Checkpoint: 5.7 in × 74.9 in (14.5 cm × 190.2 cm).
Rnd 2 (Flower Picot edging): Ch 1. On this round you work across the top edge first, then down the side.
- Top edge: Sc in each of the 40 sc. (40 sc)
- Top corner sp: 1 sc.
- Side 1: Sc in next 3 sc, Flower Picot, sc in next 3 sc; repeat from * 61 more times. (372 sc, 62 flowers)
- Bottom corner sp: (Sc, Flower Picot, sc).
- Bottom edge: Sc in next 2 sc, then sc in next 3 sc, Flower Picot, sc in next 3 sc 6 times, then sc in last 2 sc. (2 + 36 + 2 = 40 sc, 6 flowers)
- Bottom corner sp: (Sc, Flower Picot, sc).
- Side 2: Work as for Side 1. (372 sc, 62 flowers)
- Top corner sp: 1 sc. Sl st to the first sc.
Total: 830 sc (40 + 1 + 372 + 2 + 40 + 2 + 372 + 1) and 132 flowers (62 + 1 + 6 + 1 + 62). Do not fasten off yet.
Why the math works: 372 divides evenly into 62 groups of 6 sc, so a flower sits every 6 sc. That spacing equals 3 rows, or 1.2 in (3.0 cm), and it is the same on both sides. On the bottom, 36 sc form six groups and a 2-sc margin sits at each end. The flowers on the sides and bottom therefore line up across all seven strips.
Hanging loops: Sl st along the top edge to the 4th sc. Ch 16, then sl st in the same sc to form a loop. Work 24 sc into the loop and sl st to the base. Sl st across to the 37th sc of the top edge and make a second loop the same way. Fasten off and weave in the ends.
Each loop hangs 2 in (5.1 cm) tall and fits a rod up to 1 in (2.5 cm) in diameter.
Final strip size: 6.7 in × 75.4 in (17.0 cm × 191.5 cm).
Final Blocking
- Soak one strip in cool water for 10 minutes, then press the water out gently. Do not wring it.
- Roll the strip in a towel to remove the excess moisture.
- Lay it on mats in sections. On a short surface, block 25 in (63.5 cm) at a time.
- Pin the body edges to 5.2 in (13.2 cm) wide, measuring from sc frame to sc frame minus the frame (or 5.7 in [14.5 cm] across the frame).
- Run a measuring tape along the strip to confirm 74.9 in (190.2 cm) to the outer edge of Rnd 1.
- Square up the grid: the posts should line up vertically, and the rows should run straight across.
- Pin each Flower Picot open so its three petals spread.
- Let it dry completely before unpinning. Repeat for all seven strips.
Final Quality-Control Checklist
- Every strip has 186 rows and 15 butterflies.
- Every row has 14 posts.
- All butterflies are centered, with 2 open squares at each edge.
- Rnd 1 counts are 372 sc per side and 40 sc on the top and bottom.
- Rnd 2 has 62 flowers per side and 8 across the bottom (including corners).
- The loops sit at the 4th and 37th top sc and are the same size.
- All seven strips are 75.4 in (191.5 cm) long, within 0.5 in (1.3 cm) of each other.
- The ends are woven in securely, never into open squares.
Troubleshooting
The butterfly is off-center. Count the opening squares again. Every butterfly row starts and ends with at least 2 open squares.
The edges ripple. The border has too many sc. Keep to exactly 2 sc per row end.
The edges pull in. Your sc are too tight; go up one hook size for the border only.
The strip grows after hanging. Cotton relaxes under its own weight. Reblock and dry the strip flat, and keep your chains firm on later strips.
The grid looks crooked. Check that you work into the 3rd ch of every turning ch-5, not into the space.
The strips are different lengths. Compare the row counts first, then compare blocking tension.
Care
Hand wash in cool water with mild detergent and dry flat, re-pinning if needed. Do not tumble dry, because the heat and weight can stretch the long strips.
Final Notes
The measurement chain is simple. A square of 0.4 in (1.0 cm) gives a body 13 squares wide, or 5.2 in (13.2 cm). Then 186 rows give a length of 74.4 in (189.0 cm). The border adds 0.75 in (1.9 cm) to each edge on the sides and bottom, for a strip of 6.7 in × 75.4 in (17.0 cm × 191.5 cm). Seven strips side by side make a curtain 46.9 in (119.1 cm) wide. Protect your gauge, count your posts, and the whole curtain will line up.
Happy crocheting!