

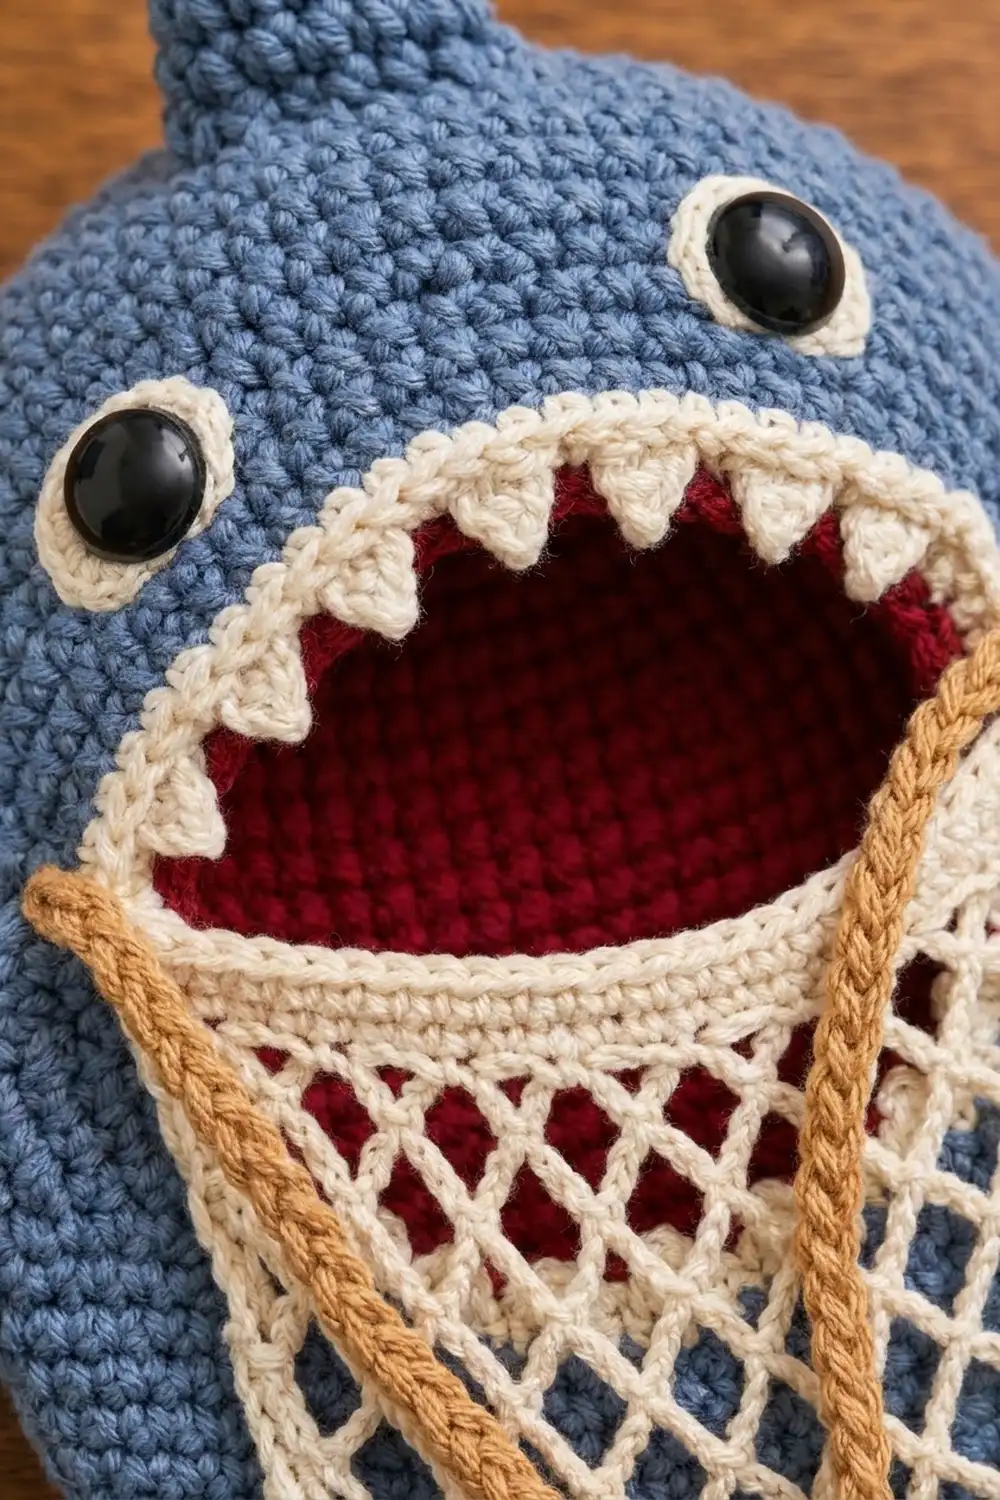
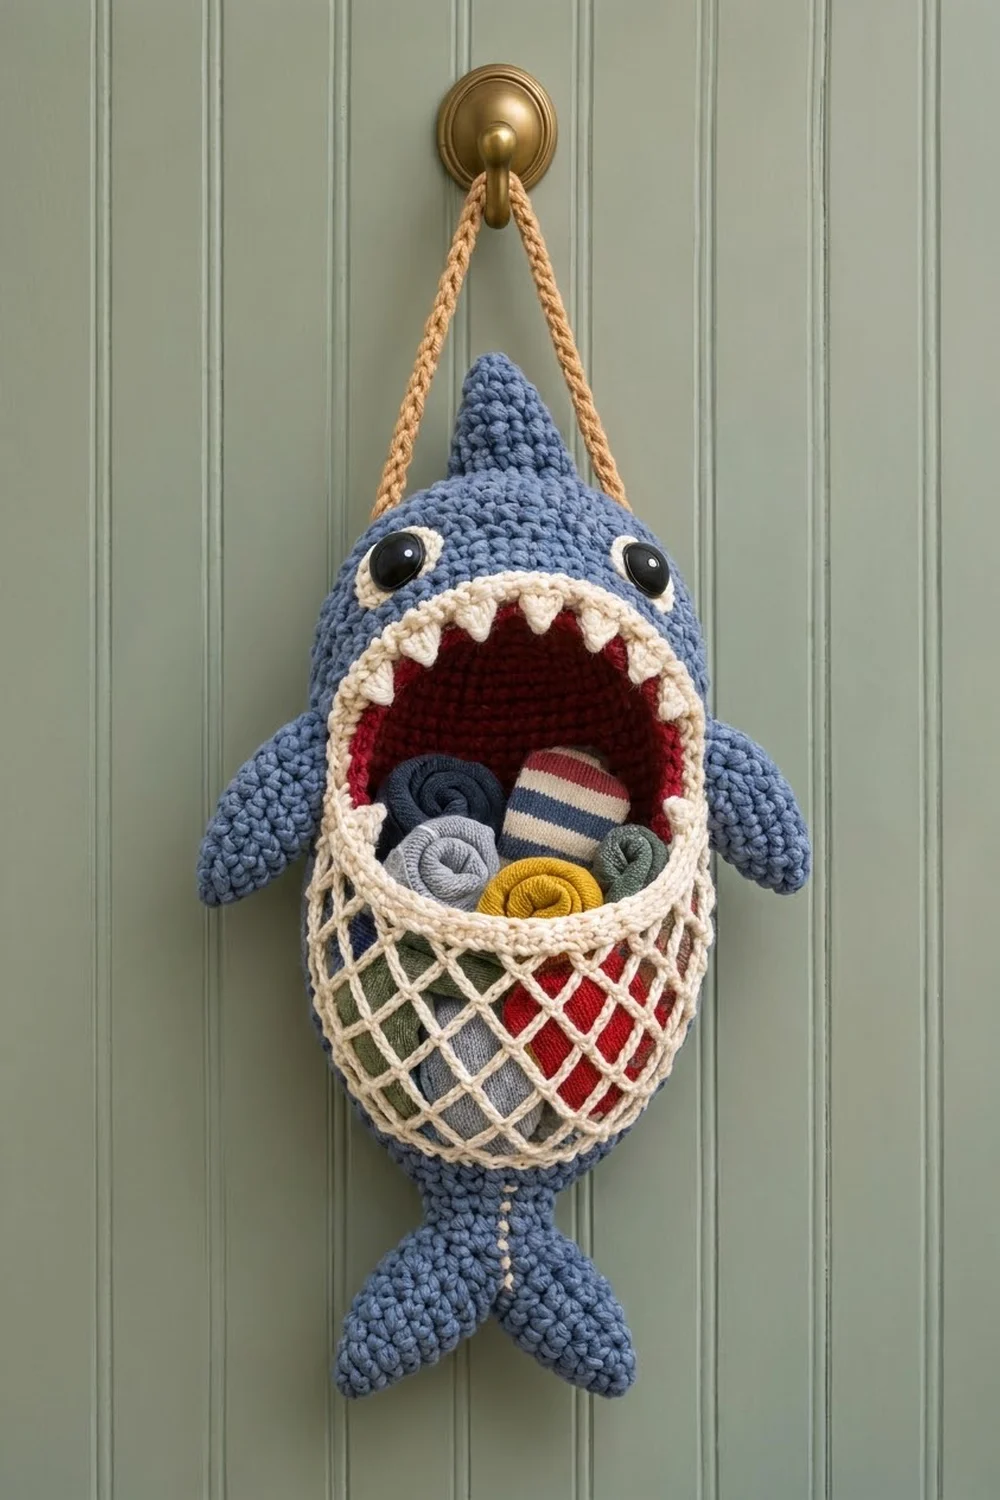
Chomp is a hanging storage basket shaped like a friendly shark. He has a dusty-blue body, a wide cranberry-red mouth trimmed with cream triangle teeth, a cream net pocket across his belly, and a caramel-tan strap for hanging him on a hook or doorknob. He’s sized for rolled socks, small toys, hair accessories or bath bits.
The style is chunky and graphic, with dense single crochet so the basket holds its shape. Black safety eyes on cream backings give him a wide-eyed look. All instructions use US crochet terms.
Not counting the fins and tail, the body measures about 7.5 in wide × 8.75 in tall (19.1 × 22.2 cm) and 1.25 in (3.2 cm) deep. With fins and tail, Chomp is about 11.5 in (29.2 cm) wide and 13.75 in (34.9 cm) tall.
You make a shallow oval tray for the back, an oval front panel with a mouth opening, a red mouth lining, a net pocket and the small parts. You trim the mouth with teeth and fit the eyes. Then you join the front, back and net in one round of single crochet. Last, you sew on the fins, tail and strap.
Finished Size and Construction
- Finished size: body 7.5 × 8.75 in (19.1 × 22.2 cm); 11.5 × 13.75 in (29.2 × 34.9 cm) overall
- Skill level: Easy-Intermediate
- Terminology: US
- Yarn weight: #5 bulky
- Hook: 5.5 mm (I-9)
- Number of pieces: 13 crocheted parts, assembled into one basket
- Layout: front panel on the back tray, net on the lower half, fins at the top and sides, tail at the bottom
- Piece size (back and front ovals): 7.5 × 8.75 in (19.1 × 22.2 cm), with 80 sts around the outer edge
- Mouth opening before border: 5 × 6.25 in (12.7 × 15.9 cm)
- Border depth (cream rim plus teeth): 0.75 in (1.9 cm), which leaves a visible red opening of about 3.5 × 4.75 in (8.9 × 12.1 cm)
Materials
Use a smooth bulky yarn: a cotton blend or a sturdy acrylic. Cotton holds the basket shape best. Avoid fluffy yarns, because they hide the teeth and the net.
- Blue (body, fins, tail): 170 g / 220 m
- Red (mouth lining): 40 g / 50 m
- Cream (teeth border, net, eye backings, tail line): 60 g / 75 m
- Tan (strap, held double): 25 g / 35 m
These quantities include a margin of about 15%.
Tools: 5.5 mm (I-9) hook, two 15 mm black safety eyes with washers, 4 stitch markers, a tapestry needle, rust-proof pins, scissors, and a measuring tape.
Abbreviations (US Terms)
- ch – chain
- sl st – slip stitch
- sc – single crochet
- hdc – half double crochet
- dc – double crochet
- inc – 2 sc in the same stitch
- MR – magic ring
- BLO – back loop only
- sk – skip
- sp – space
- st(s) – stitch(es)
- RS / WS – right side / wrong side
Special stitch: fsc (foundation single crochet). Ch 2 and insert your hook in the 2nd ch from the hook. Pull up a loop. Yarn over and draw through 1 loop; this is the “chain.” Yarn over and draw through 2 loops; this is the “sc.” For each fsc after that, insert your hook into the “chain” of the previous fsc and repeat.
Teeth shell: in one stitch, work (hdc, dc, ch 2, sl st in 2nd ch from hook, dc, hdc). The ch-2 picot makes the sharp point.
Gauge and Checkpoints
Gauge: 12 sc × 13 rounds = 4 in (10.2 cm), in sc worked in rounds.
Make the back panel first and use it as your gauge piece. Check it at these points:
- After Rnd 6 (44 sts): 3.75 in (9.5 cm) wide
- After Rnd 12 (80 sts): 7.5 in (19.1 cm) wide × 8.75 in (22.2 cm) tall
- After Rnd 16: the wall stands 1.25 in (3.2 cm) high
If your piece comes out bigger, go down half a hook size. If it’s smaller, go up half a size. If the oval cups before Rnd 12, your tension is too tight; go up half a size. If it ruffles, go down half a size. Don’t change the stitch counts, because the front panel and the joining round both depend on the 80-stitch edge.
Back Panel (Tray)
Use blue. Join each round with a sl st to the first sc. Start each new round with ch 1, which doesn’t count as a stitch. Place a marker in the first st.
Ch 7.
Rnd 1: 3 sc in 2nd ch from hook, sc in next 4 ch, 3 sc in last ch. Rotate and sc in the free loops of the next 4 ch. (14)
Rnd 2: [Inc 3 times, sc 4] twice. (20)
Rnd 3: [(Sc 1, inc) 3 times, sc 4] twice. (26)
Rnd 4: [(Sc 2, inc) 3 times, sc 4] twice. (32)
Rnd 5: [(Sc 3, inc) 3 times, sc 4] twice. (38)
Rnd 6: [(Sc 4, inc) 3 times, sc 4] twice. (44)
Rnd 7: [(Sc 5, inc) 3 times, sc 4] twice. (50)
Rnd 8: [(Sc 6, inc) 3 times, sc 4] twice. (56)
Rnd 9: [(Sc 7, inc) 3 times, sc 4] twice. (62)
Rnd 10: [(Sc 8, inc) 3 times, sc 4] twice. (68)
Rnd 11: [(Sc 9, inc) 3 times, sc 4] twice. (74)
Rnd 12: [(Sc 10, inc) 3 times, sc 4] twice. (80)
Each round adds 3 increases at each curved end and none along the two 4-stitch sides, so the oval stays flat. At Rnd 12, each curved end has 36 sts and each side has 4 sts: 36 + 4 + 36 + 4 = 80.
Rnd 13: Sc BLO in each st. (80) This round turns the wall up.
Rnds 14–16: Sc in each st. (80)
Fasten off. Mark the top center st, which is the 18th st of the first curved end. This end is the head.
Front Panel
Use blue.
Foundation: Fsc 56. Join to the first fsc to form a ring, taking care not to twist it. This ring is the mouth opening.
Rnd 1: Work into the sc edge of the fsc: [(sc 7, inc) 3 times, sc 4] twice. (62)
Rnd 2: [(Sc 8, inc) 3 times, sc 4] twice. (68)
Rnd 3: [(Sc 9, inc) 3 times, sc 4] twice. (74)
Rnd 4: [(Sc 10, inc) 3 times, sc 4] twice. (80)
Fasten off and leave a 12 in (30.5 cm) tail. The foundation ring has the same count and layout as Rnd 8 of the back (24 + 4 + 24 + 4). That means Rnds 1–4 match back Rnds 9–12 exactly, so the front lies flat and matches the back stitch for stitch.
Checkpoint: 7.5 × 8.75 in (19.1 × 22.2 cm) outside, with a mouth opening of 5 × 6.25 in (12.7 × 15.9 cm).
Mouth Lining
Use red. Work Rnds 1–9 of the back panel. (62) Fasten off and leave a 24 in (61.0 cm) tail. The lining measures about 5.5 × 6.75 in (14.0 × 17.1 cm).
Net Pocket
Use cream. Work in rows.
Row 1: Ch 26, sc in 2nd ch from hook and in each ch across. (25)
Rows 2–3: Ch 1, turn, sc in each st. (25) These rows form the top band.
Row 4: Ch 1, turn, sc in first st, [ch 5, sk 3, sc in next st] 6 times. (6 loops)
Row 5: Ch 5, turn, sc in first ch-5 loop, [ch 5, sc in next loop] 5 times, ch 2, dc in last sc. (6 loops plus a half loop)
Row 6: Ch 1, turn, sc in dc, sk ch-2 sp, [ch 5, sc in next loop] 6 times. Put the last sc in the 3rd ch of the turning ch-5. (6 loops)
Rows 7–8: Repeat Rows 5–6.
Row 9: Turn, sl st in first 3 ch of the first loop, ch 1, sc in the same loop, [ch 5, sc in next loop] 4 times. Leave the last loop unworked. (4 loops)
Row 10: Turn, sl st in first 3 ch, ch 1, sc in the same loop, [ch 5, sc in next loop] twice. Leave the last loop unworked. (2 loops)
Edging: Don’t turn. Work along the sides and bottom only:
- 10 sc down the first side: 1 in each of the 3 band row-ends, then 7 spaced over the mesh row-ends.
- 20 sc spaced evenly around the stepped bottom, about 3 in each open loop or step.
- 10 sc up the second side.
(40) Fasten off.
Checkpoint: 8.25 in (21.0 cm) across the band and 4.75 in (12.1 cm) tall.
Fins, Tail and Eye Backings
Use blue for the fins and tail, and work in continuous rounds.
Dorsal fin (make 1): Rnd 1: 4 sc in MR. (4) Rnd 2: [sc 1, inc] twice. (6) Rnd 3: [sc 2, inc] twice. (8) Rnd 4: [sc 3, inc] twice. (10) Rnd 5: [sc 4, inc] twice. (12) Rnd 6: [sc 5, inc] twice. (14) Flatten so there are 7 sts on each side. The fin is about 1.75 in (4.4 cm) tall.
Pectoral fins (make 2): Work Rnds 1–5 of the dorsal fin. (12) Rnds 6–8: sc in each st. (12) Flatten. Each fin is about 2.5 in (6.4 cm) long.
Tail flukes (make 2): Work Rnds 1–5 of the dorsal fin. (12) Rnds 6–7: sc in each st. (12) Flatten. Each fluke is about 2.25 in (5.7 cm) long.
Tail stem (make 1): Rnd 1: 8 sc in MR. (8) Rnds 2–5: sc in each st. (8) Rnd 6: [sc 3, inc] twice. (10) Rnd 7: sc in each st. (10) Flatten so there are 5 sts on each side. The stem is about 2 in (5.1 cm) long. With cream, embroider a line of 5 running stitches down the center front.
Eye backings (make 2): Use cream. Rnd 1: 6 sc in MR. (6) Rnd 2: inc in each st. (12) Each backing is 1.25 in (3.2 cm) across.
Strap (make 1): Use tan, held double. Ch 66, then sl st in the back bump of the 2nd ch from the hook and in each ch across. (65) The strap is about 20 in (50.8 cm) long.
Make All Pieces
Here’s the full list of parts:
- Blue: back tray (1), front panel (1), dorsal fin (1), pectoral fins (2), flukes (2), stem (1)
- Red: mouth lining (1)
- Cream: net pocket (1), eye backings (2)
- Tan: strap (1)
Front-view layout:
          [ strap loop ]
            [dorsal]
      ( eye   front    eye )
[fin] (    teeth / red     ) [fin]
      (== net band at mid ==)
      (     net pocket     )
             [stem]
         [fluke][fluke]
Mouth Border
Use cream, with the RS of the front panel facing you. The border uses the same gauge as the body: 12 sc = 4 in (10.2 cm).
Rnd 1: Join cream in the chain edge of the fsc ring, at the start of a 4-st side. Work 1 sc in each st: 4 along the side, 24 around the curved end, 4 along the second side and 24 around the second curved end. Join. (56)
Rnd 2 (teeth): [Sl st in next st, sk 1, teeth shell in next st, sk 1] 14 times. Join. (14 teeth) That puts 1 tooth on each side and 6 on each curved end.
Why the math works: each tooth repeat uses exactly 4 sts, and 4 + 24 + 4 + 24 = 56 = 4 × 14. The teeth come out evenly spaced, and the rim neither pulls in nor flares. Fold the teeth toward the center of the mouth and steam them lightly.
Joining
- Lining: Center the red oval on the inside of the back tray and whipstitch around its edge.
- Eyes: Push each safety eye through the center of a cream backing, then through the front panel at Rnds 2–3. Place them about 1.5 in (3.8 cm) to either side of the top center. Lock the washers on the WS.
- Stack the layers: Place the front panel on the back tray with the WS facing in, matching the top center markers. The 36-st curved ends and the 4-st sides line up exactly.
- Add the net: Lay the net on the front so its 40 edging sts sit over the lower 40 sts. Those sts run from the middle of one 4-st side (after its 2nd st), around the lower 36-st end, to the middle of the other side.
- Join round: With blue, work 1 sc in each st through both panels, catching the net as well on the lower half. (80) Join and fasten off.
Keep your tension even and firm, but don’t pull too tight or the net will pucker.
Checkpoint: the body still measures 7.5 × 8.75 in (19.1 × 22.2 cm), and the net band bows out about 0.5 in (1.3 cm) to form the pocket opening.
Sew on the remaining parts:
- Dorsal fin: at the top center.
- Pectoral fins: on the sides at mouth level, angled down.
- Stem: at the bottom center.
- Flukes: on the end of the stem, in a V.
- Strap: sew the ends to the back of the top curve, 2.5 in (6.4 cm) to either side of center.
Final Blocking
- Lightly mist the whole basket with water.
- Put a folded towel inside so the body fills out to its 1.25 in (3.2 cm) depth.
- Pin the body to 7.5 × 8.75 in (19.1 × 22.2 cm).
- Pin each tooth so it points toward the center of the mouth.
- Ease the net into a gentle curve.
- Let the basket dry completely before you remove the pins.
Final Quality-Control Checklist
- [ ] The back and front each have 80 sts on the outer edge
- [ ] There are 14 evenly spaced teeth, all pointing inward
- [ ] The eyes are level and the washers are fully locked
- [ ] The net is attached over exactly the lower 40 sts
- [ ] The fins and tail are sewn on securely and symmetrically
- [ ] The strap holds the basket’s weight without the body tilting
- [ ] All yarn ends are woven in on the WS
Troubleshooting
- The oval cups: your tension is too tight. Go up half a hook size.
- The front ruffles at the mouth: your fsc is too loose. Redo it with a smaller hook.
- The teeth flop outward: pin them inward when you block, and tack each point down if needed.
- The net sags: pull the edging snug and check that it has exactly 40 sts.
- The basket tilts when hung: move the strap ends so they’re the same distance from center.
Care
Hand wash in cool water. Reshape the basket over a folded towel and let it dry flat; don’t tumble dry it.
Final Notes
Each stage depends on the one before it. At a gauge of 12 sc per 4 in (10.2 cm), the back tray measures 7.5 × 8.75 in (19.1 × 22.2 cm) at 80 sts. The 56-st front ring makes a 5 × 6.25 in (12.7 × 15.9 cm) mouth, and the 56-st border adds 14 evenly spaced teeth. The join matches 80 sts to 80, with the net’s 40 sts over the lower half. Check the measurements at each stage and Chomp will hang neatly.
Happy crocheting!