

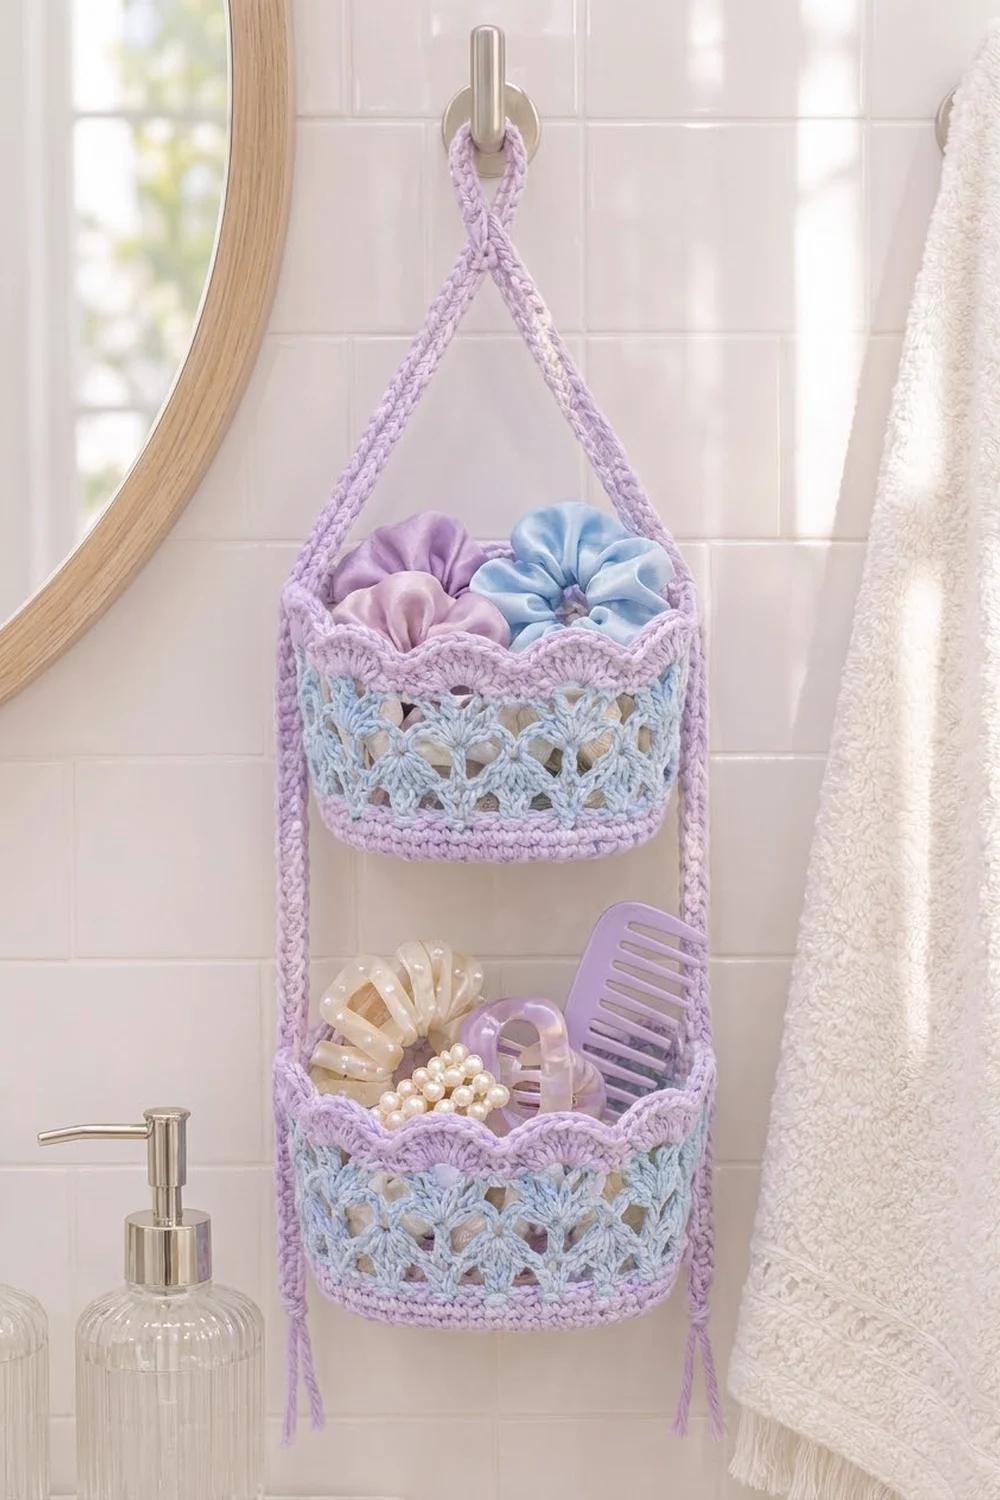
This hanging organizer has two pastel lace baskets stacked on one lavender cord. Hang it from a bathroom hook, a closet door, or a vanity mirror and use it for scrunchies, clips, combs, and other small things.
Lavender frames everything: the cord, the base edge, the lower wall band, and the scalloped rim. Soft sky blue fills the lace flower bases and the airy shell lattice in the walls. The look is light and cottage-pretty, and the cotton yarn keeps the baskets firm enough to use every day.
The pattern uses US crochet terms. Each basket is 6 in x 6 in (15.2 cm x 15.2 cm) at the base and 4.75 in (12.1 cm) tall. The cord is 45 in (114.3 cm) long, and the finished organizer hangs about 22 in (55.9 cm) from the top of the loop to the cord tails.
Each basket is one seamless piece: a square lace base worked in rounds, with the walls and rim worked upward from it. You then make one flat cord and stitch it to the sides of both baskets.
Finished Size and Construction
- Finished size: about 22 in (55.9 cm) hanging length; each basket 6 in x 6 in x 4.75 in (15.2 cm x 15.2 cm x 12.1 cm)
- Skill level: Intermediate
- Terminology: US crochet terms
- Yarn weight: Worsted (#4) cotton
- Hook: 4.0 mm (G-6)
- Number of pieces: 3 (2 baskets, 1 cord)
- Layout: 1 column x 2 rows, baskets stacked vertically
- Piece size: base 6 in (15.2 cm) square; wall perimeter 24 in (61.0 cm)
- Size before border: walls 4 in (10.2 cm) tall after Rnd 14
- Border depth: scalloped rim 0.75 in (1.9 cm)
Materials
Choose a smooth, mercerized or combed worsted-weight cotton. Cotton holds its shape and copes with bathroom humidity better than acrylic. The amounts below assume about 1.7 m per gram (roughly 85 m per 50 g ball).
- Color A – Sky Blue: 80 g / 136 m
- Color B – Lavender: 90 g / 153 m
Both amounts include about a 20% margin for gauge differences and swatching.
Tools:
- 4.0 mm (G-6) crochet hook
- 3.5 mm (E-4) hook for the cord (optional, gives a firmer cord)
- Tapestry needle
- 4 locking stitch markers
- Scissors and measuring tape
- Spray bottle and pins
- A box about 6 in (15.2 cm) square for blocking
Abbreviations (US Terms)
- ch – chain
- sl st – slip stitch
- sc – single crochet
- dc – double crochet
- sp(s) – space(s)
- sk – skip
- st(s) – stitch(es)
- BLO – back loop only
- MR – magic ring
- rep – repeat
- Rnd – round
Shell: 5 dc in the same stitch.
Scallop: 7 dc in the same stitch.
Gauge and Checkpoints
Gauge: 16 sc x 18 rounds = 4 in (10.2 cm) on a 4.0 mm hook. One dc round is about 0.55 in (1.4 cm) tall.
Finish one whole basket before you start the second. It serves as your gauge swatch.
Base checkpoints (measured flat):
- After Rnd 1: 1.75 in (4.4 cm) across
- After Rnd 2: 3 in (7.6 cm) across
- After Rnd 3: 4.25 in (10.8 cm) across
- After Rnd 4: 5.5 in (14.0 cm) across
- After Rnd 5: 6 in (15.2 cm) per side
Wall checkpoints (height above the base edge):
- After Rnd 7: 0.5 in (1.3 cm)
- After Rnd 10: 2.25 in (5.7 cm)
- After Rnd 14: 4 in (10.2 cm)
- After Rnd 16: 4.75 in (12.1 cm)
Base too big (over 6.25 in / 15.9 cm per side): go down to a 3.75 mm hook. Base too small (under 5.75 in / 14.6 cm per side): go up to a 4.5 mm hook. If the walls come out more than 0.5 in (1.3 cm) off, adjust your yarn-over tension, not the number of rounds.
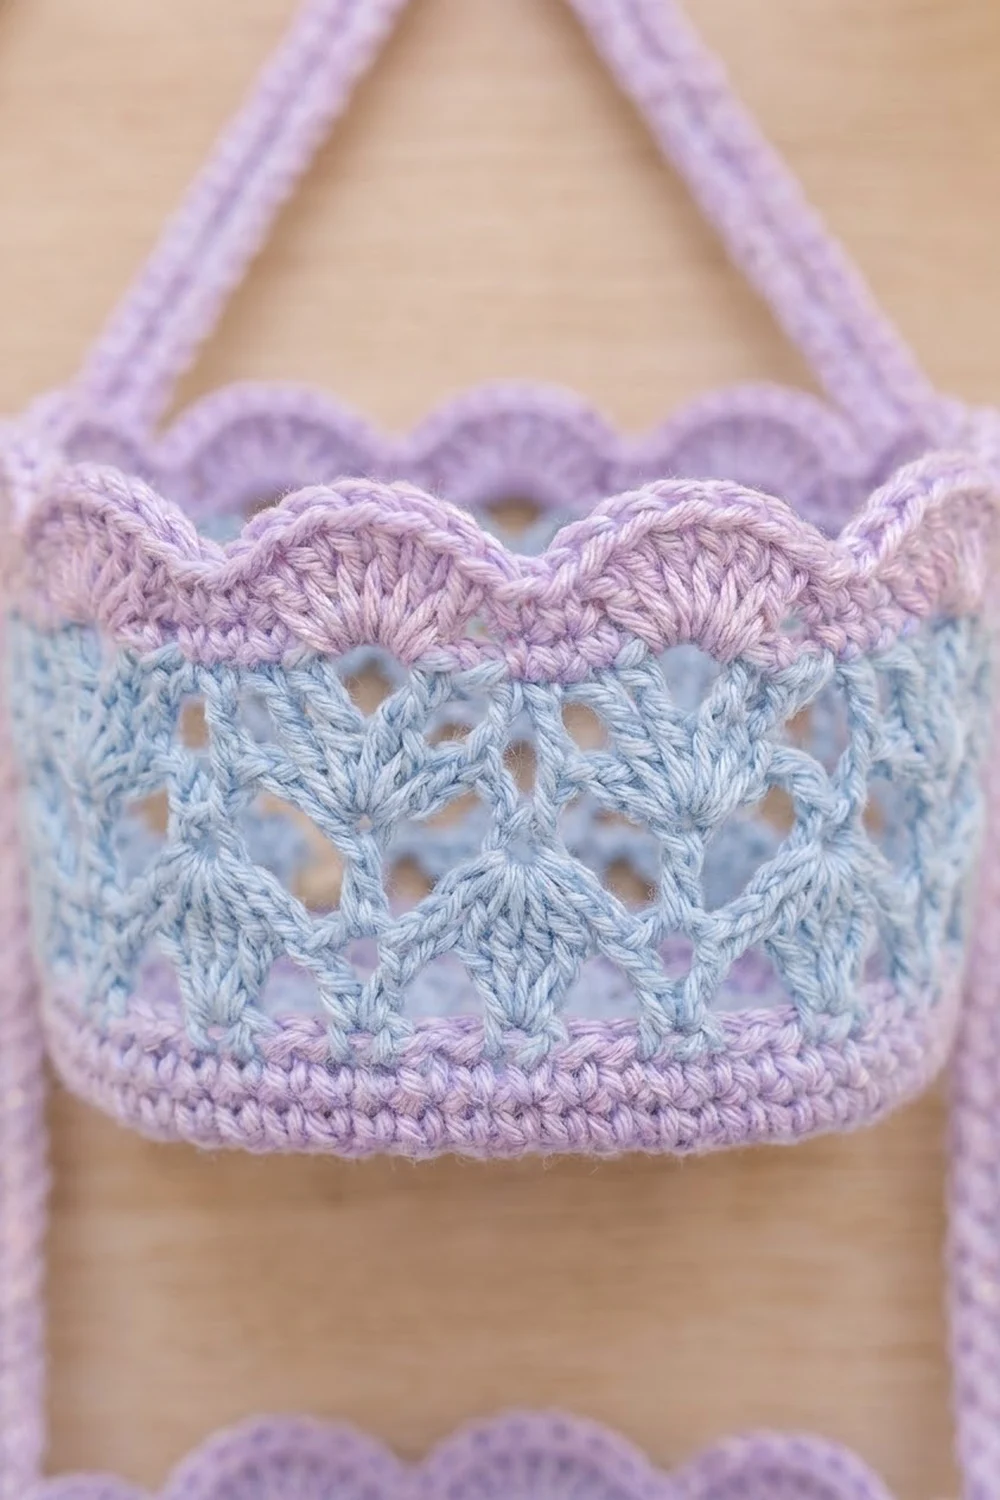
Basket (Make 2)
Base
Rnd 1 (Color A): MR, ch 3 (counts as dc), 15 dc in ring, join with sl st to top of beg ch-3. (16 dc)
Rnd 2: Ch 5 (counts as dc + ch 2), [dc in next dc, ch 2] 15 times, join to 3rd ch of beg ch-5. (16 dc, 16 ch-2 sps)
Rnd 3 (squaring round): Sl st into first ch-2 sp. Ch 3, (2 dc, ch 3, 3 dc) in same sp, ch 2, sc in next sp, ch 2, 3 dc in next sp, ch 2, sc in next sp, ch 2. *(3 dc, ch 3, 3 dc) in next sp, ch 2, sc in next sp, ch 2, 3 dc in next sp, ch 2, sc in next sp, ch 2; rep from * 2 more times, join to top of beg ch-3. (36 dc, 8 sc, 4 corner ch-3 sps, 16 ch-2 sps)
Each side now has four ch-2 spaces. These sit between the corners, the sc, and the center 3-dc group, and they form the points of the flower star.
Rnd 4: Sl st in next 2 dc and into corner sp. Ch 3, (2 dc, ch 2, 3 dc) in same sp. *3 dc in next ch-2 sp, [ch 1, 3 dc in next ch-2 sp] 3 times, (3 dc, ch 2, 3 dc) in next corner sp; rep from * 2 more times, then 3 dc in next ch-2 sp, [ch 1, 3 dc in next ch-2 sp] 3 times, join to top of beg ch-3. Fasten off Color A. (72 dc, 12 ch-1 sps, 4 corner ch-2 sps)
Don’t put a ch-1 between a corner half and the side group next to it. Leaving it out is what keeps the next round at 21 sts per side.
Rnd 5 (Color B): Join Color B in any corner ch-2 sp. Ch 1, 3 sc in same sp, *sc in each of the 18 dc and 3 ch-1 sps along the side (21 sc), 3 sc in next corner sp; rep from * 2 more times, then 21 sc along the last side, join to first sc. (96 sc)
Math: 4 x 21 + 4 x 3 = 96. Place a marker in the middle sc of each corner. Counting both corner markers, each side has 25 sts and measures 6 in (15.2 cm). For the walls, count each corner marker as the first st of its side, so each wall side has 24 sts.
Walls
Rnd 6: Ch 1, sc in BLO of each st around, join. (96 sc) The ridge left by the BLO turns the walls up. Move the markers up as you go.
Rnd 7: Ch 1, sc in each st around, join. Fasten off Color B. (96 sc)
Rnd 8 (Color A, shell round): Join Color A in a marked corner st. Ch 1, sc in same st, sk 1, shell in next st, sk 1, *sc in next st, sk 1, shell in next st, sk 1; rep from * 22 more times, join to first sc. (24 shells + 24 sc = 144 sts; 6 shells per side)
Rnd 9 (lattice round): Ch 5 (counts as dc + ch 2), *sc in center dc of next shell, ch 2, dc in next sc, ch 2; rep from * around, ending with sc in center dc of last shell, ch 2, join to 3rd ch of beg ch-5. (24 dc, 24 sc, 48 ch-2 sps)
Rnd 10 (offset shells): Ch 3 (counts as dc), 2 dc in same st, *sc in next sc, shell in next dc; rep from * around, ending with sc in last sc, 2 dc in first st, join to top of beg ch-3. Skip all ch-2 sps. (24 shells, including the split shell, + 24 sc = 144 sts)
Rnd 11 (lattice round): Ch 1, sc in same st (center of the split shell), ch 2, dc in next sc, ch 2, *sc in center dc of next shell, ch 2, dc in next sc, ch 2; rep from * around, join to first sc. (24 sc, 24 dc, 48 ch-2 sps)
Rnd 12 (shell round): Ch 1, sc in first sc, shell in next dc, *sc in next sc, shell in next dc; rep from * around, join. (24 shells + 24 sc = 144 sts)
Rnd 13 (lattice round): Work as Rnd 9. Fasten off Color A. (24 dc, 24 sc, 48 ch-2 sps)
The staggered shells make the open diamond lattice in the walls.
Rnd 14 (Color B, conversion round): Join Color B in 3rd ch of beg ch-5. Ch 1, sc in same st, *sc in next ch-2 sp, sc in next st; rep from * around, ending with sc in last ch-2 sp, join. (48 sc worked 1 per existing st + 48 sc added in ch-2 sps = 96 sc)
This round brings the count back to 96, the same as the base, so the walls stay straight. Re-mark the 4 corner sts directly above the base corners (24 sts per side).
Border: Scalloped Rim
Border gauge: one scallop repeat uses 6 sts, which is 1.5 in (3.8 cm).
Rnd 15 (Color B): Sl st across to the nearest marked corner st. Ch 1, sc in same st, sk 2, scallop in next st, sk 2, *sc in next st, sk 2, scallop in next st, sk 2; rep from * 14 more times, join to first sc. (16 scallops + 16 sc = 128 sts)
Per side: 24 ÷ 6 = 4 scallops, which is 4 sc + 28 dc = 32 sts. Four sides x 32 = 128.
Rnd 16: Ch 1, loosely sl st in each st around, join. Fasten off and weave in ends. (128 sl sts; 32 per side)
Why the math works: The rim starts on 96 sts, or 24 per side, and 24 divides evenly by the 6-st repeat. A sc lands on every corner and 4 scallops fit along every side, so the rim waves evenly all the way around. The sl st round firms up the edge without changing the count.
Make All Pieces
- Baskets: make 2, each about 30 g Color A and 30 g Color B.
- Cord: make 1 in Color B, about 15 g.
Cord: Ch 181. Row 1: Sc in 2nd ch from hook and each ch across. (180 sc) Row 2: Ch 1, turn, sl st in each sc across. (180 sl sts) Fasten off. Finished cord: 45 in (114.3 cm) long, about 0.4 in (1.0 cm) wide.
Cord map (stitches from one end, 4 sts = 1 in / 2.5 cm):
Sts 1-6      tail                    1.5 in (3.8 cm)
Sts 7-25     lower basket side       4.75 in (12.1 cm)
Sts 26-39    gap                     3.5 in (8.9 cm)
Sts 40-58    upper basket side       4.75 in (12.1 cm)
Sts 59-82    rise to cross           6 in (15.2 cm)
Sts 83-98    hanging loop            4 in (10.2 cm)
Sts 99-122   rise to cross           6 in (15.2 cm)
Sts 123-141  upper basket side       4.75 in (12.1 cm)
Sts 142-155  gap                     3.5 in (8.9 cm)
Sts 156-174  lower basket side       4.75 in (12.1 cm)
Sts 175-180  tail                    1.5 in (3.8 cm)
Each leg is 82 sts and the loop is 16 sts: 82 + 16 + 82 = 180.
Layout grid:
        [ loop ]
           X        <- cord crosses
          / \
  cord | UPPER  | cord
       | BASKET |
       |        |   3.5 in (8.9 cm) gap
  cord | LOWER  | cord
       | BASKET |
       '        '   tails
Joining
Method: Whipstitch the cord to the walls with Color B.
Placement: On each basket, pick two opposite sides as left and right. Find the center of each one, between st 12 and st 13 of its 24 wall sts.
Stitch-to-stitch logic: Each basket section of the cord is 19 sts. The bottom 16 sts lie against the wall from Rnd 6 to Rnd 14, a height of 4 in (10.2 cm). The top 3 sts run up past the 0.75 in (1.9 cm) rim. Make one whipstitch through each of the 9 wall rounds, which works out to roughly one per 2 cord sts. Add one tack at the base of Rnd 15.
- Fold the cord in half and mark sts 83–98 as the loop.
- Cross the legs once and tack them together with 3 small stitches.
- Pin the upper basket in place and sew one leg at a time.
- Pin the lower basket 3.5 in (8.9 cm) below it and sew it the same way.
Tension: Pull each stitch snug but not tight, because puckering bends the lattice. Keep the cord flat, not twisted.
Size checkpoint: Hang the organizer. The baskets should sit level, with a 3.5 in (8.9 cm) gap and a total drop of about 22 in (55.9 cm).
Final Blocking
- Mist each basket until damp.
- Slip it upside down over the 6 in (15.2 cm) box and pull the walls straight.
- Square the corners and line up the shells in vertical columns.
- Pin out the 4 scallops on each side so they open evenly.
- Mist the cord and lay it flat and straight.
- Let everything dry for 12–24 hours.
Final Quality-Control Checklist
- Each base measures 6 in (15.2 cm) per side.
- Rnd 14 has 96 sts, with 24 per side.
- Walls are 4 in (10.2 cm) tall before the rim and 4.75 in (12.1 cm) with it.
- Each rim side has exactly 4 scallops.
- The cord has 180 sts and measures 45 in (114.3 cm).
- The cord is centered on each side and sewn through all 9 wall rounds.
- The baskets hang level, 3.5 in (8.9 cm) apart.
- All ends are woven in.
Troubleshooting
- Base cups or ruffles: Check Rnd 4 for extra ch-1 sps beside the corners. There should be only 3 per side.
- Walls flare: Rnd 14 has more than 96 sts. Work exactly 1 sc per ch-2 sp.
- Walls lean inward: Rnd 6 is too tight. Redo it with looser tension.
- Uneven scallops: Recount Rnd 14. Each side needs 24 sts.
- Basket tilts: The cord is off-center. Remeasure to the st 12/13 midpoint.
- Cord stretches: Remake it with the 3.5 mm (E-4) hook.
Care
Hand wash in cool water with mild soap, press out the water in a towel, and reshape the baskets over the box to dry. Don’t tumble dry.
Final Notes
The measurements build on each other:
- A gauge of 16 sc = 4 in (10.2 cm) gives a 6 in (15.2 cm) base of 96 sts, 24 per side.
- Those 96 sts carry up through 24 shells into 4 in (10.2 cm) walls.
- The 0.75 in (1.9 cm) rim adds 4 scallops per side, for 4.75 in (12.1 cm) baskets.
- The 180-st, 45 in (114.3 cm) cord holds the baskets 3.5 in (8.9 cm) apart, for a 22 in (55.9 cm) organizer.
Check each measurement as you go, and the finished piece will hang straight and even.
Happy crocheting!