

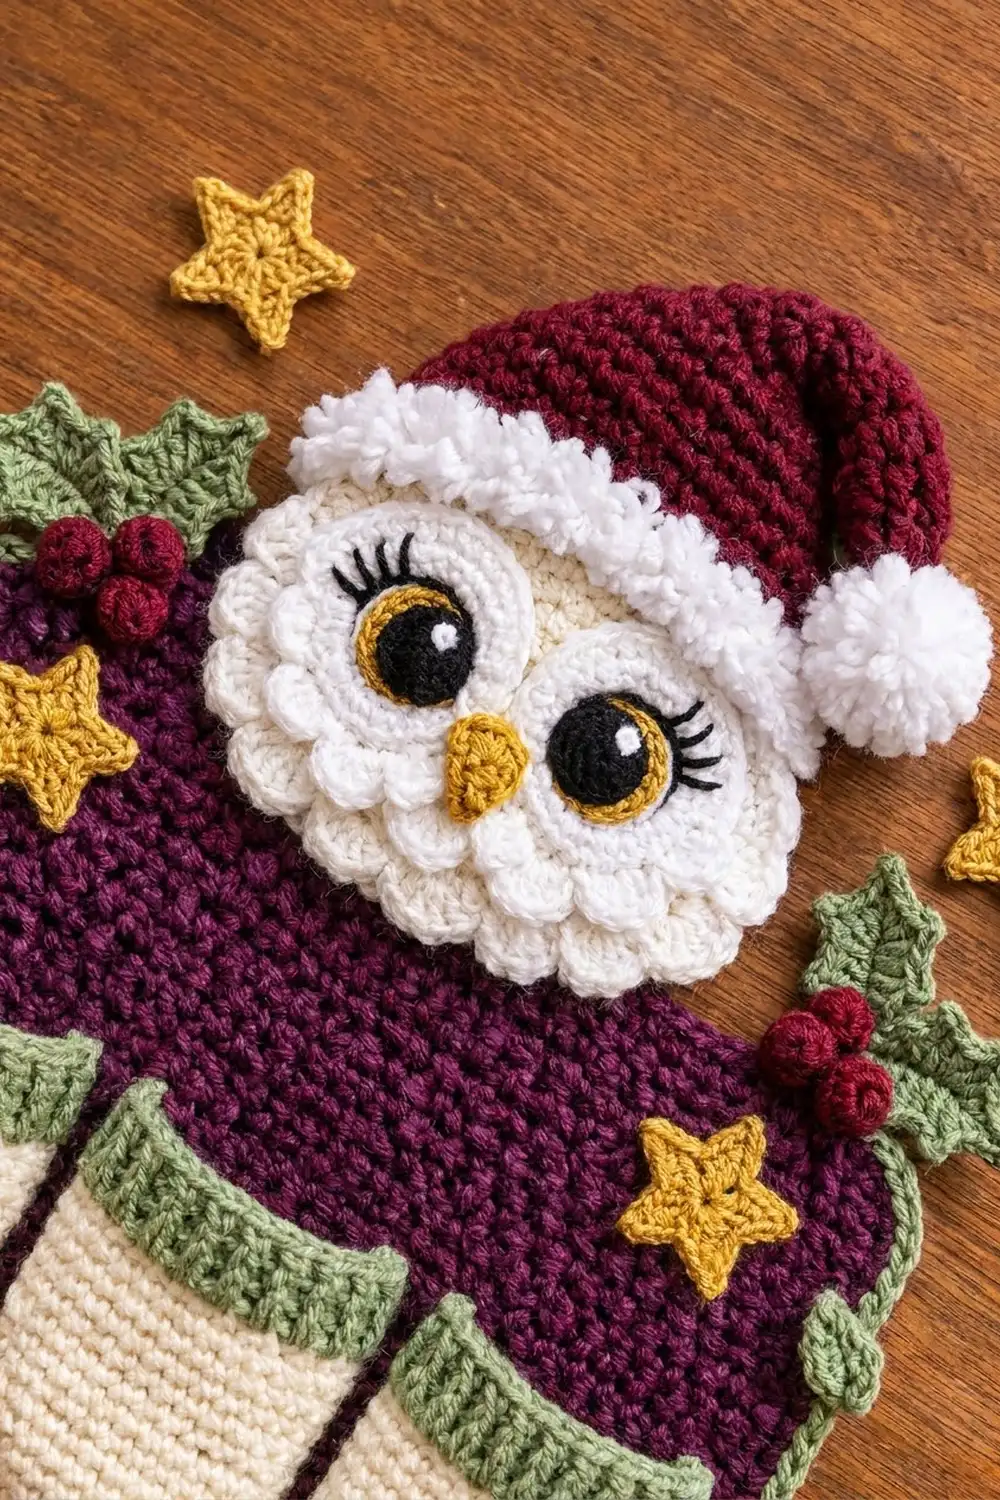
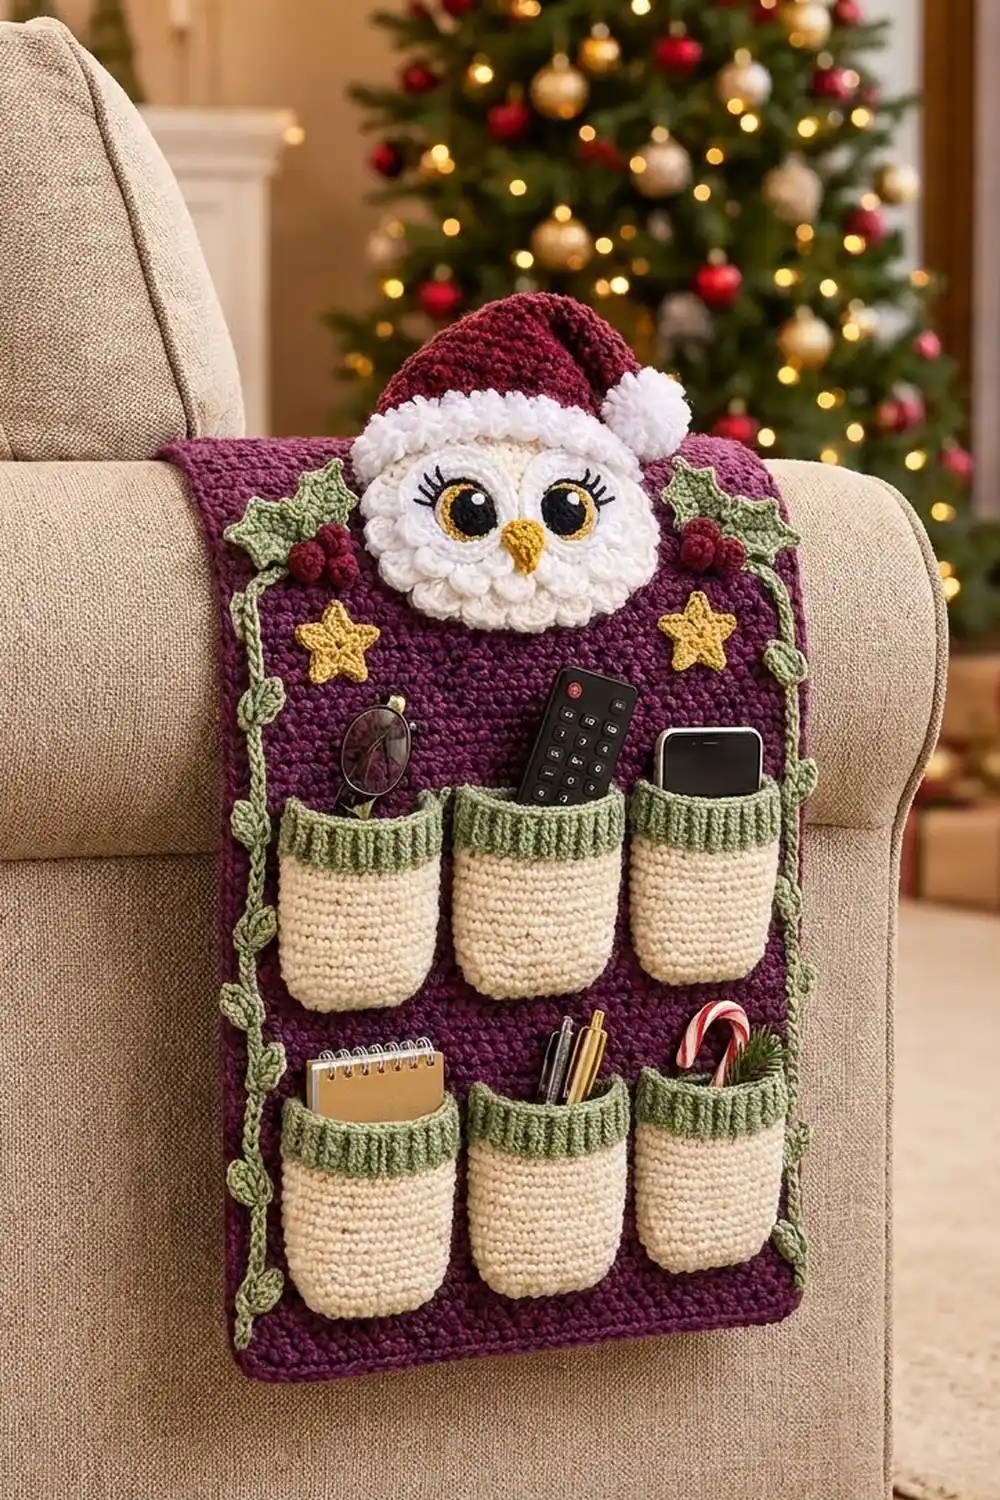
This cozy armrest caddy keeps the remote, phone, glasses and pens in one place over the holidays. A plum moss-stitch panel holds six cream pockets with sage ribbed tops. A snowy owl in a burgundy Santa hat peeks over the top edge.
The colors are deep plum, cream, sage green, burgundy, golden yellow and white. Holly sprigs, gold stars and two leafy sage vines finish the festive cottage look.
This pattern uses US crochet terms. The finished panel measures 11 x 15 in (27.9 x 38.1 cm) including the border. With the owl and hat, the caddy is about 20 in (50.8 cm) tall.
You work the panel flat in rows and then add a two-round border. Next you make six small pockets, then the owl, holly, stars and vines. Finally you sew everything onto the panel.
Finished Size and Construction
- Finished panel size: 11 x 15 in (27.9 x 38.1 cm)
- Overall height with owl: about 20 in (50.8 cm)
- Skill level: Intermediate
- Terminology: US
- Yarn weight: Worsted (#4)
- Hooks: 5.0 mm (H-8) for the panel, pockets, owl face, hat and vines; 4.0 mm (G-6) for the small appliqués
- Pieces: 1 panel, 6 pockets, plus the appliqués
- Pocket layout: 2 rows of 3
- Pocket size: 3 x 4.25 in (7.6 x 10.8 cm)
- Panel before border: 10 x 14 in (25.4 x 35.6 cm)
- Border depth: 0.5 in (1.3 cm) per side
Materials
Choose a smooth acrylic or cotton-blend worsted yarn of about 200 m per 100 g. A firm yarn holds the pockets’ shape when they are full.
- Plum: 150 g / 300 m (panel and border)
- Cream: 60 g / 120 m (pockets)
- Sage green: 35 g / 70 m (pocket bands, holly, vines)
- White: 25 g / 50 m (owl face, eye rings, brim, pompom)
- Burgundy: 15 g / 30 m (hat, berries)
- Golden yellow: 10 g / 20 m (eye rings, beak, stars)
Tools: 5.0 mm and 4.0 mm hooks, two 15 mm black safety eyes, black embroidery floss, tapestry needle, scissors, stitch markers, ruler, pins, and a little fiberfill or yarn scraps.
All yarn quantities include a margin of about 15%.
Abbreviations (US Terms)
- ch – chain
- sl st – slip stitch
- sc – single crochet
- hdc – half double crochet
- dc – double crochet
- sk – skip
- sp – space
- st(s) – stitch(es)
- sc2tog – single crochet 2 together
- BLO – back loop only
- FLO – front loop only
- fpdc / bpdc – front / back post double crochet
- RS / WS – right side / wrong side
Special stitches:
- Bobble: (yo, insert hook in st, yo, pull up a loop, yo, draw through 2 loops) 4 times in the same st, then yo and draw through all 5 loops on the hook.
- Picot: ch 3, sl st in the 3rd ch from the hook.
Gauge and Checkpoints
- Moss stitch (5.0 mm): 18 sts and 20 rows = 4 in (10.2 cm). Every sc and every ch-1 counts as a stitch.
- Single crochet (5.0 mm): 16 sc and 18 rows = 4 in (10.2 cm).
Make one pocket before you start the panel. After Row 3 it should be 3 in (7.6 cm) wide. When it is finished it should be 4.25 in (10.8 cm) tall.
Checkpoints:
- After panel Row 1, the row measures 10 in (25.4 cm).
- After Row 70, the panel measures 10 x 14 in (25.4 x 35.6 cm).
- After the border, the panel measures 11 x 15 in (27.9 x 38.1 cm).
- The owl face measures 5.25 in (13.3 cm) across.
If your pieces come out too big, go down one hook size. If they come out too small, go up one size. Don’t change the stitch counts, because the pocket spacing depends on the panel width.
Back Panel
With plum and the 5.0 mm hook:
Row 1 (RS): Ch 46. Sc in the 2nd ch from the hook, then ch 1, sk next ch, sc in next ch 22 times. Turn. (45 sts: 23 sc and 22 ch-1 sps)
Row 2: Ch 1. Sc in the first sc, then sc in the next ch-1 sp. Work ch 1, sk next sc, sc in next ch-1 sp 21 times, then sc in the last sc. Turn. (45 sts)
Row 3: Ch 1. Sc in the first sc. Work ch 1, sk next sc, sc in next ch-1 sp 21 times, then ch 1, sk next sc, sc in the last sc. Turn. (45 sts)
Rows 4–70: Repeat Rows 2 and 3 alternately, ending with a Row 2. (45 sts per row)
Do not fasten off.
Checkpoint: The panel should measure 10 x 14 in (25.4 x 35.6 cm).
Pockets (Make 6)
With cream and the 5.0 mm hook:
Row 1: Ch 9. Sc in the 2nd ch from the hook and in each ch across. Turn. (8 sc)
Row 2: Ch 1. Work 2 sc in the first st, sc in the next 6 sts, and 2 sc in the last st. Turn. (10 sc)
Row 3: Ch 1. Work 2 sc in the first st, sc in the next 8 sts, and 2 sc in the last st. Turn. (12 sc)
The increases in Rows 1–3 make the rounded bottom corners. The pocket should now be 3 in (7.6 cm) wide.
Rows 4–16: Ch 1, sc in each st across. Turn. (12 sc)
Fasten off the cream. The pocket should now be 3.5 in (8.9 cm) tall.
Row 17: Join the sage. Ch 2 (does not count as a st), then hdc in each st. Turn. (12 hdc)
Row 18: Ch 2. Work fpdc around the next st, bpdc around the next st 6 times. Turn. (12 sts)
Row 19: Ch 2. Work each st as it faces you: fpdc around each raised post and bpdc around each recessed post. (12 sts)
Fasten off and leave a 24 in (61.0 cm) tail for sewing. The ribbed band is 0.75 in (1.9 cm) deep, which makes the pocket 4.25 in (10.8 cm) tall.
Owl Face
With white and the 5.0 mm hook:
Rnd 1: Make a magic ring. Ch 3 (counts as dc), work 11 dc in the ring, and sl st to the top of the ch-3. (12 dc)
Rnd 2: Ch 3, dc in the same st, then 2 dc in each st around. Join. (24 dc)
Rnd 3 (BLO): Ch 3, dc in the same st. Work dc in next st, 2 dc in next st around, ending with dc in the last st. Join. (36 dc)
Rnd 4 (BLO): Ch 3, dc in the next st, 2 dc in the next st. Work dc in next 2 sts, 2 dc in next st around. Join. (48 dc)
Rnd 5 (both loops): Sl st in the next st. Work sk 1, 5 dc in next st, sk 1, sl st in next st 12 times. (12 scallops)
The face should now measure 5.25 in (13.3 cm) across.
Feather tier A: Hold the face with the RS up. Join the white in the front loop of Rnd 3 at the 9 o’clock position. Working around the lower half to 3 o’clock, work sl st in next loop, 5 dc in next loop, sk 1 loop 6 times over 18 loops. Fasten off. (6 scallops)
Feather tier B: In the same way, use the 12 lower front loops of Rnd 2. Work the same repeat 4 times. (4 scallops)
The three tiers overlap to make the layered breast feathers.
Eyes, Beak, Hat and Small Appliqués
Use the 4.0 mm hook for these pieces unless noted.
Eyes (make 2):
- Rnd 1: With gold, make a magic ring and work 8 sc. Leave a small hole in the center. Join.
- Rnd 2: With white, work 2 sc in each st. Join. (16 sc, about 1.25 in / 3.2 cm)
- Push a safety eye through the center hole, then through Rnd 2 of the face with the eye centers 1.5 in (3.8 cm) apart. Fix the washers.
- Embroider three black lashes at the upper outer edge of each eye.
Beak: With gold, ch 4. Work the following rows:
- Row 1: Sc in the 2nd ch from the hook and in the next 2 ch. (3 sc)
- Row 2: Ch 1, turn, sc2tog, sc. (2 sc)
- Row 3: Ch 1, turn, sc2tog. (1 sc)
Sew the beak point-down between the eyes.
Hat: Use burgundy and the 5.0 mm hook.
- Row 1: Ch 23. Sc in the 2nd ch from the hook and across. (22 sc, 5.5 in / 14.0 cm)
- Row 2 (BLO): Ch 1, sc across. (22 sc)
- Rows 3–12 (BLO): Ch 1, sc2tog, sc to the last 2 sts, sc2tog. Each row loses 2 sts: 20, 18, 16, 14, 12, 10, 8, 6, 4, 2.
- Row 13: Ch 1, sc2tog. (1 sc) Fasten off.
The hat is about 2.9 in (7.4 cm) tall.
Brim: Use white and the 5.0 mm hook.
- Row A (RS): Join in the foundation loops of the hat. Ch 1 and work 22 sc.
- Row B (WS): Ch 1, turn. Sc in the first st, then bobble in next st, sc in next st 10 times, then sc in the last st. (22 sts, 10 bobbles)
Finishing the hat: Fold the top 1 in (2.5 cm) of the hat to the right and tack it in place. Sew a white yarn pompom of 1.25 in (3.2 cm) to the tip. Sew the hat to the face so that the brim overlaps the top of the face by 0.75 in (1.9 cm).
Holly leaves (make 4): With sage, ch 9.
- Work up one side: sl st in the 2nd ch from the hook, sc, hdc, picot, dc, dc, picot, hdc, sc.
- In the last ch, work (sc, picot, sc).
- Work down the other side in the remaining loops: sc, hdc, picot, dc, dc, picot, hdc, sc, sl st.
Each leaf has 5 picots and is about 2 in (5.1 cm) long.
Berries (make 6): With burgundy, make a magic ring and work 6 sc. On the next round, sc2tog 3 times. Tuck the tails inside and close the berry.
Stars (make 2):
- Rnd 1: With gold, make a magic ring and work 5 sc. Join.
- Rnd 2: Work ch 4, sl st in the 2nd ch from the hook, sc in the next ch, hdc in the next ch, sl st in the next sc of Rnd 1 5 times.
Each star is about 1.5 in (3.8 cm) across.
Vines (make 2): Use sage and the 5.0 mm hook.
- Ch 61. Sl st in the 2nd ch from the hook and in the next 4 ch.
- Work ch 5, sl st in the 2nd ch from the hook, sc, hdc, sc, sl st in the same vine ch, sl st in the next 5 ch to the end.
- Make a final leaf at the end of the vine. (12 leaves, 15 in / 38.1 cm)
Make All Pieces
- Cream / sage: 6 pockets
- White: 1 face, 1 pompom
- Burgundy: 1 hat, 6 berries
- Gold / white: 2 eyes
- Gold: 1 beak, 2 stars
- Sage: 4 holly leaves, 2 vines
Pocket layout (from the top of the panel to the bottom):
[ top plum area – owl, holly, stars ]
[ P1 ] [ P2 ] [ P3 ]
[ P4 ] [ P5 ] [ P6 ]
[ bottom margin ]
Joining the Pockets
Add the border before you sew on the pockets (see the Border section). Measure all pocket positions from the edges of the panel body, not from the border.
Horizontal position: Leave 0.25 in (0.6 cm) at each side and between the pockets. Pocket centers sit 1.75 in (4.4 cm), 5 in (12.7 cm) and 8.25 in (21.0 cm) from the left edge. The pockets span:
- 0.25–3.25 in (0.6–8.3 cm)
- 3.5–6.5 in (8.9–16.5 cm)
- 6.75–9.75 in (17.1–24.8 cm)
Vertical position:
- Lower row: The pocket bottoms sit along panel Row 5, which is 0.8 in (2.0 cm) up from the bottom edge.
- Upper row: The pocket bottoms sit along Row 30, and the pocket tops reach about 10 in (25.4 cm) up from the bottom edge. This leaves 4 in (10.2 cm) of plum above the pockets.
Sewing:
- Pin each pocket in place.
- Whipstitch the sides and the curved bottom. Make one stitch through each pocket row-end or edge stitch and catch one panel stitch underneath.
- Leave the ribbed top open, but tack the two top corners of the band twice.
Keep your stitches snug but not tight. The panel should stay flat, with no puckering behind the pockets.
Checkpoint: Lay the caddy flat. The space between pockets should still be 0.25 in (0.6 cm), and the panel should still measure 11 x 15 in (27.9 x 38.1 cm).
Border
The border is worked in plum with the 5.0 mm hook. Border gauge: 18 sc = 4 in (10.2 cm), which matches the panel.
Rnd 1: Continue from Row 70 and turn so the RS faces you. Work as follows:
- Ch 1. Work 3 sc in the first st (corner).
- Sc in each of the next 43 sts, working into the sc or the ch-1 sp.
- Work 3 sc in the last st (corner).
- Work 63 sc evenly down the side, about 9 sc for every 10 row-ends.
- Work 3 sc in the first foundation loop (corner), sc in the next 43 loops, and 3 sc in the last loop (corner).
- Work 63 sc evenly up the side, then join.
Rnd 1 total: 43 + 43 + 63 + 63 + (4 × 3) = 224 sc.
Rnd 2: Ch 1. Sc in each st, working 3 sc in the center st of each corner. Join and fasten off.
Each side now has 45 sc on the short sides and 65 on the long sides, plus 3 sc at each corner: 90 + 130 + 12 = 232 sc. That is 8 more than Rnd 1.
Why the math works:
- The top row has 45 sts. The first and last are corner stitches, which leaves 43 between them.
- The long sides are 14 in (35.6 cm) long, and 14 × 4.5 = 63 sc, which matches the border gauge.
- The 3-sc corners turn cleanly, so the edges lie flat.
- Two rounds add 0.5 in (1.3 cm) per side, which takes the panel from 10 x 14 in to 11 x 15 in (27.9 x 38.1 cm).
Final Assembly and Blocking
- Center the owl face on the panel so that the lower 2 in (5.1 cm) overlaps the top edge. Whipstitch around the overlapping part, then tack the panel’s top edge to the back of the face.
- Sew one sprig of two leaves and three berries to each upper corner, beside the owl’s cheeks.
- Sew the stars 1.5 in (3.8 cm) below the top edge and 1 in (2.5 cm) in from each side.
- Lay one vine along each long side over Rnd 2 of the border, with the leaves alternating on both sides of the edge. Tack the vine every 1 in (2.5 cm).
Blocking:
- Pin the caddy to a 11 x 15 in (27.9 x 38.1 cm) rectangle on a blocking mat.
- Mist the panel and pockets lightly, or hover steam above them. Keep the safety eyes and the bobble brim away from heat.
- Pat the pockets flat and square the ribbed bands.
- Let everything dry completely before you unpin it.
Final Quality-Control Checklist
- [ ] The panel measures 11 x 15 in (27.9 x 38.1 cm).
- [ ] All six pockets are 3 x 4.25 in (7.6 x 10.8 cm), level and evenly spaced.
- [ ] The pocket tops are open and the band corners are secure.
- [ ] The border corners lie flat, with no ruffling.
- [ ] The safety eye washers are fully engaged.
- [ ] All three feather tiers lie downward.
- [ ] The hat tip is tacked and the pompom is secure.
- [ ] The vines are tacked along their full length.
- [ ] All yarn ends are woven in.
Troubleshooting
- The panel edges wave: You have too many border stitches on the sides. Rework Rnd 1 with exactly 63 sc per long side.
- The panel edges pull in: You have too few border stitches on the sides. Check that you have 63 sc on each long side.
- The pockets bulge: Check that each pocket is 12 sts wide. Block the pockets before you sew them on.
- The owl face cups: Your dc tension is too tight. Go up a hook size for Rnds 3–5.
- The ribbing looks flat: You worked the wrong post on Row 19. Each stitch should follow the post that faces you.
- The caddy slips off the sofa arm: Put a small bean bag or a flat stone inside a top pocket to add weight.
Care
Hand wash in cool water, press out the water in a towel, and dry flat. Because of the safety eyes, keep the caddy out of reach of small children.
Final Notes
Here is how the measurements fit together:
- The 45-stitch moss rows give a 10 in (25.4 cm) width, and 70 rows give a 14 in (35.6 cm) height.
- The two border rounds bring the panel to 11 x 15 in (27.9 x 38.1 cm).
- Six 12-stitch pockets of 3 in (7.6 cm) each fit across the panel with 0.25 in (0.6 cm) gaps.
- The owl sits on top, and the overall height is about 20 in (50.8 cm).
If you check your gauge early, every piece will fit where it belongs. Happy crocheting!