

This little wall organizer turns a tangle of charging cables into a festive display. The base is a lacy oval panel in deep forest green. It has a spoked wheel at each rounded end and a column of paired pointed leaves up the middle. A burgundy picot border frames the panel, and a burgundy hanging loop sits at the top.
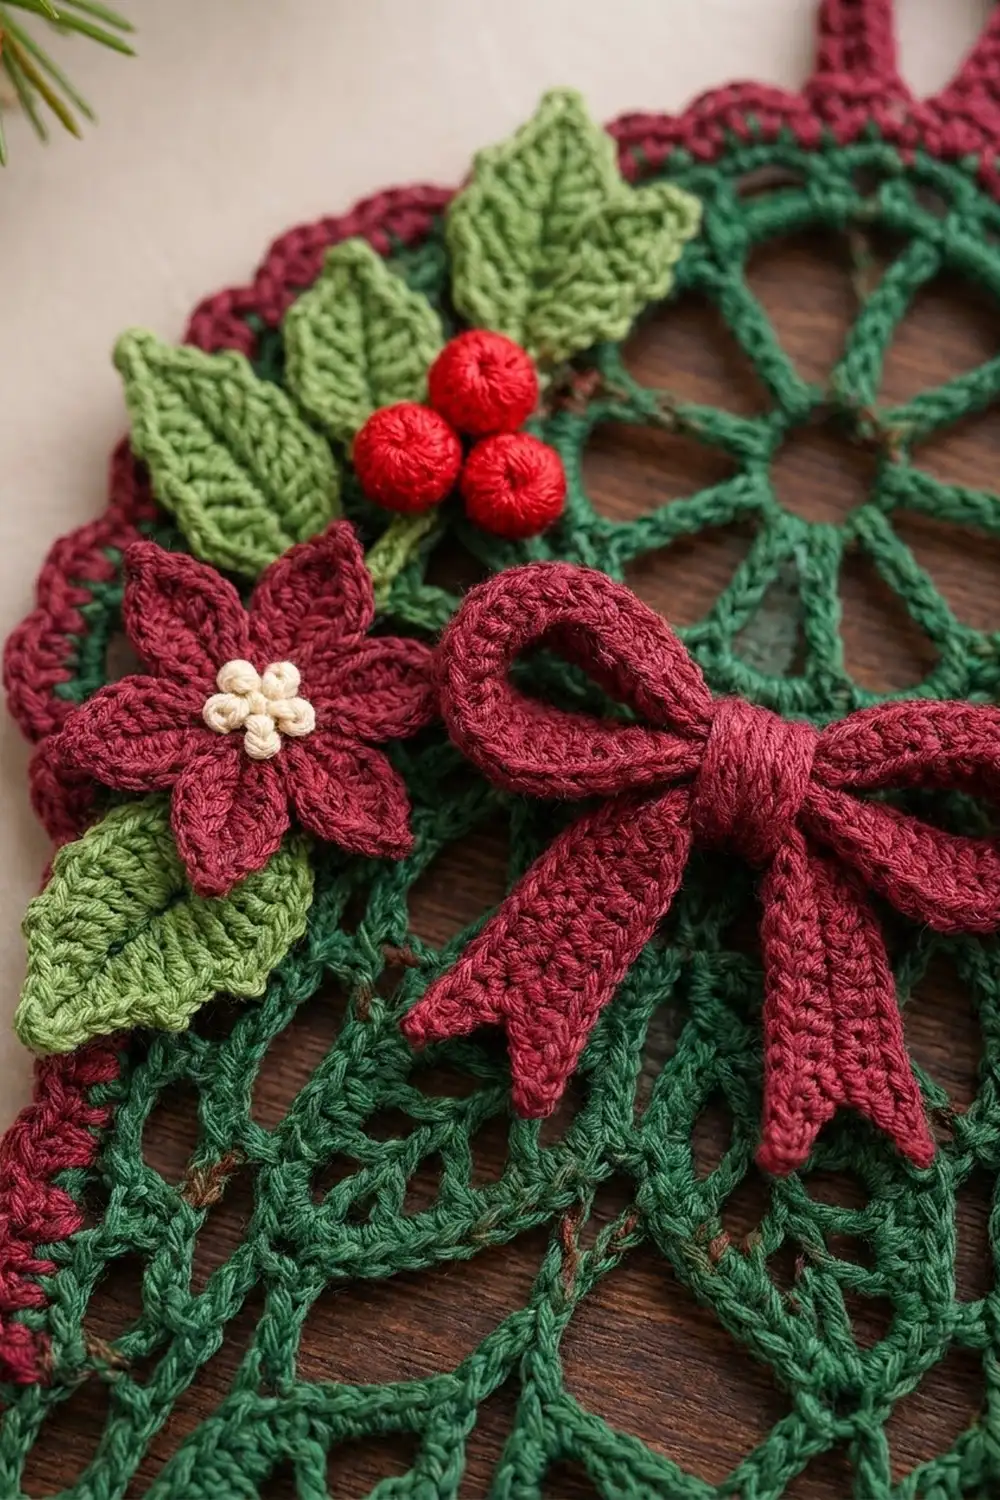
The top of the panel carries a cheerful holiday cluster: a burgundy bow with tails, two burgundy poinsettias with cream centers, light green holly leaves, and bright red berries. Below the bow, a burgundy strap runs down the center. Four wrap-around bands on the strap hold coiled cables in place.
The pattern uses US crochet terms. The finished panel measures 7 in (17.8 cm) wide by 17 in (43.2 cm) tall, or 18.5 in (47.0 cm) including the hanging loop.
The construction is simple. You work the green panel in rounds around a foundation chain that has a small ring at each end. Then you add a three-round burgundy border. The appliqués, strap, and bands are made separately and sewn on after blocking.
Finished Size and Construction
- Finished size: 7 in (17.8 cm) wide x 17 in (43.2 cm) tall, plus a 1.5 in (3.8 cm) hanging loop
- Skill level: Intermediate
- Terminology: US crochet terms
- Yarn weight: DK (light #3) cotton
- Hook: 4.0 mm (G-6)
- Number of pieces: 1 main lace panel, plus sewn-on embellishments (1 strap, 4 bands, 1 bow, 2 poinsettias, 8 holly leaves, 6 berries)
- Layout: a single vertical oval panel; no motifs are joined
- Panel size before border: 5.5 in (14.0 cm) x 15.5 in (39.4 cm)
- Border depth: 0.75 in (1.9 cm) on every side
Materials
Choose a smooth, mercerized DK cotton. It shows lace stitches clearly and holds its shape when hung. The quantities below assume about 115 m per 50 g.
- Dark forest green (A): 40 g / 92 m (panel)
- Burgundy (B): 40 g / 92 m (border, loop, strap, bands, bow, poinsettias)
- Light leaf green (C): 10 g / 23 m (holly leaves)
- Bright red (D): 5 g / 12 m (berries)
- Cream (E): 2 g / 5 m (poinsettia centers)
All quantities include a margin of about 15 percent, so a small difference in tension won’t leave you short.
Tools: 4.0 mm (G-6) hook, tapestry needle, stitch markers, rust-proof pins, blocking board, spray bottle, sharp scissors.
Abbreviations (US Terms)
- ch – chain
- sl st – slip stitch
- sc – single crochet
- hdc – half double crochet
- dc – double crochet
- tr – treble crochet
- sp(s) – space(s)
- st(s) – stitch(es)
- beg – beginning
- MR – magic ring
Picot: ch 3, sl st in 3rd ch from hook.
Leaf (special stitch, worked over 7 chains): sc in next ch, hdc in next ch, dc in next ch, (tr, picot, tr) in next ch, dc in next ch, hdc in next ch, sc in next ch. Each Leaf has 8 stitches plus 1 picot at the tip.
Gauge and Checkpoints
Gauge: 17 sc and 20 sc rows = 4 in (10.2 cm) with a 4.0 mm hook.
Make a quick sc swatch first. Then treat Rounds 1–3 of the panel as your real test piece. Measure flat, without stretching:
- After Round 1: 11.75 in (29.8 cm) x 1.75 in (4.4 cm)
- After Round 3: 13.25 in (33.7 cm) x 3.25 in (8.3 cm)
- After Round 5: 15.5 in (39.4 cm) x 5.5 in (14.0 cm)
- After border: 17 in (43.2 cm) x 7 in (17.8 cm)
The two end rings should be about 10 in (25.4 cm) apart, measured center to center.
If your piece is more than 0.25 in (0.6 cm) too large at Round 3, go down to a 3.75 mm hook. If it’s too small, go up to 4.5 mm. If the ends ruffle while the sides lie flat, your chain spaces are too loose. Tighten the chains slightly rather than changing the hook.
Main Panel
Use color A.
Foundation: Ch 8, sl st in first ch to form Ring 1. Ch 42 for the spine. Ch 8, sl st in 8th ch from hook to form Ring 2.
Round 1 (wheel hubs and leaves): Ch 3 (counts as dc), 9 dc in Ring 2. Work along one side of the spine toward Ring 1, making 6 Leaves (42 ch used). Work 10 dc in Ring 1. Rotate and work 6 Leaves along the opposite side of the spine. Sl st to top of beg ch-3.
Count: 20 dc + 12 Leaves (96 sts) = 116 sts, plus 12 picots. The leaves on each side mirror each other, forming pairs along the spine.
Round 2 (spokes and leaf bars): Ch 4 (counts as dc + ch 1), (dc in next dc, ch 1) 9 times around the Ring 2 end. Ch 6, sc in picot of first Leaf, (ch 7, sc in picot of next Leaf) 5 times, ch 6. (Dc in next dc, ch 1) 10 times around the Ring 1 end. Ch 6, sc in picot of first Leaf on this side, (ch 7, sc in next picot) 5 times, ch 6. Sl st to 3rd ch of beg ch-4.
Count: 20 dc, 12 sc, 20 ch-1 sps, 4 ch-6 sps, 10 ch-7 sps. Each end now looks like a spoked wheel.
Round 3 (wheel rim): Ch 1. At each end, sc in each dc and each ch-1 sp (20 sc per end). Along each side, work 6 sc in each ch-6 sp and 6 sc in each ch-7 sp (12 + 30 = 42 sc per side). Don’t work into the sc on the picots. Sl st to first sc.
Count: 20 + 42 + 20 + 42 = 124 sc.
Round 4 (mesh): Start at the first sc of the Ring 2 end. The beg ch-4 counts as the first dc + ch 1 of the end repeat.
– Each end (20 sc): (dc in next sc, ch 1, sk 1 sc) twice, dc in next sc, ch 1 4 times = 12 mesh units.
– Each side (42 sc): (dc in next sc, ch 1, sk 1 sc) 21 times = 21 mesh units.
Sl st to 3rd ch of beg ch-4.
Count: 12 + 21 + 12 + 21 = 66 mesh units (66 dc, 66 ch-1 sps).
Round 5 (growth mesh): Sl st into first ch-1 sp, ch 4 (counts as dc + ch 1).
– Each end (12 sps): (dc, ch 1) in each of next 2 sps, (dc, ch 1, dc, ch 1) in next sp 4 times = 16 mesh units.
– Each side (21 sps): (dc, ch 1) in each sp = 21 mesh units.
Sl st to 3rd ch of beg ch-4. Fasten off A.
Count: 16 + 21 + 16 + 21 = 74 mesh units (74 dc, 74 ch-1 sps).
Check the size now: 15.5 in (39.4 cm) x 5.5 in (14.0 cm). Fix any problem here, before the border locks it in.
Border
The border gauge is the same as the main gauge: 17 sc = 4 in (10.2 cm). Each long side carries 42 sts, which is about 10 in (25.4 cm), the same length as the straight section of the panel. That’s why the sides stay flat with no added stitches.
Round 6 (trim round, B): Join B at the start of an end. Ch 1.
– Each side: sc in each dc and each ch-1 sp = 21 + 21 = 42 sc.
– Each end: sc in each dc (16). In the ch-1 sps, alternate 1 sc and 2 sc (8 x 1 + 8 x 2 = 24). That makes 40 sc: (32 worked 1-per-existing) + (8 extra).
Sl st to first sc.
Count: 42 + 40 + 42 + 40 = 164 sc.
Round 7 (hdc round): Ch 2 (does not count).
– Each side: hdc in each sc = 42 hdc.
– Each end: hdc in each sc, working 2 hdc in the 14th and 27th sc. That makes 42 hdc: (40 worked 1-per-existing) + (2 extra).
Sl st to first hdc.
Count: 42 x 4 = 168 hdc.
Round 8 (picot edge): Ch 1. Sc in next 2 hdc, (sc, picot) in next hdc around. Each side and each end holds 42 sts, which divides evenly into 14 repeats. Sl st to first sc.
Count: 168 sc, 56 picots.
Why the math works: every section of Rounds 7 and 8 is a multiple of 3, so the picots fall evenly with no partial repeat. The extra stitches at the ends only make up for the longer outer curve, so the edge lies flat.
Hanging loop: At the top end, find the center picot. Join B in the 3rd sc to the right of it, ch 18, and sl st in the 3rd sc to the left of it. Ch 1, work 26 sc into the ch-18 loop, then sl st into the border. Fasten off. The loop stands about 1.5 in (3.8 cm) tall.
Embellishments
Strap (B): Ch 6. Row 1: sc in 2nd ch from hook and each ch across (5 sc). Rows 2–60: ch 1, turn, sc in each sc (5 sc). Fasten off. The strap measures 1.2 in (3.0 cm) x 12 in (30.5 cm).
Bands (make 4, B): Ch 5. Row 1: sc in 2nd ch from hook and each ch across (4 sc). Rows 2–24: ch 1, turn, sc in each sc (4 sc). Each strip measures about 1 in (2.5 cm) x 4.8 in (12.2 cm). Leave a 10 in (25.4 cm) tail.
Bow (B): Ch 31. Row 1: sc in 2nd ch from hook and each ch across (30 sc). Rows 2–6: ch 1, turn, sc in each sc (30 sc). Sew the short ends together to form a ring. Flatten it with the seam centered at the back. The bow is about 3.5 in (8.9 cm) wide.
Tails (make 2): Ch 9, sc in 2nd ch from hook and each ch across (8 sc), then work 1 more row. Each tail is about 2 in (5.1 cm) long.
Center wrap: Ch 5, sc in 2nd ch from hook and each ch across (4 sc), then work 8 rows total. Pinch the bow at the center. Wrap this piece around the pinch, over the tops of both tails, and sew it closed at the back.
Poinsettias (make 2, B): MR, ch 1, 10 sc in ring, sl st to first sc (10 sc). Ch 5, sc in 2nd ch from hook, hdc in next ch, dc in next ch, hdc in next ch, sk next sc on ring, sl st in next sc 5 times = 5 pointed petals. Fasten off. With E, work 4 French knots in the center. Each flower is about 2.25 in (5.7 cm) across.
Holly leaves (make 8, C): Ch 9. Sl st in 2nd ch from hook, sc in next ch, hdc in next ch, picot, dc in each of next 2 ch, picot, hdc in next ch, sc in next ch, (sc, ch 2, sc) in last ch for the tip. Then work along the opposite side of the chain: sc in next ch, hdc in next ch, picot, dc in each of next 2 ch, picot, hdc in next ch, sc in next ch, sl st in last ch.
Count: 16 sts, 4 picots, 1 ch-2 tip. Each leaf is about 1.75 in (4.4 cm) long.
Berries (make 6, D): MR, 6 sc in ring. Round 2: sc in each sc (6 sc). Fasten off, stuff the berry with the tail, and gather it closed. Each berry is about 0.5 in (1.3 cm) across.
Final Blocking
Block the panel before you sew anything onto it.
- Weave in all ends on the panel.
- Mist the panel evenly until it’s damp but not dripping.
- Pin it to 7 in (17.8 cm) x 17 in (43.2 cm). Pin the two rings first, 10 in (25.4 cm) apart, then the straight sides.
- Pin each picot outward. Pin each Leaf tip so the pairs open evenly.
- Let the panel dry fully, for at least 12 hours.
- Lightly steam the strap and bands flat.
Assembly: Center the strap over the spine, with its top 3.75 in (9.5 cm) below the top edge of the border. Wrap each band around the strap and sew its short ends together at the back. Place the first band’s center 3 in (7.6 cm) below the top of the strap. Space the remaining bands 2.75 in (7.0 cm) apart, center to center. Tack each back seam to the strap so the bands can’t slide. Sew both long edges of the strap to the panel, stitching only between the bands so cables can still pass under them.
Sew the bow over the top of the strap. Place a poinsettia on each side of the bow, and a cluster of 3 berries above each poinsettia. Arrange 4 holly leaves on each side: 2 fanned behind the berries, 1 at the outer edge, and 1 below the poinsettia. Tack every piece at its center and at its tips so nothing curls.
Final Quality-Control Checklist
- Panel measures 7 in (17.8 cm) x 17 in (43.2 cm)
- Border Round 8 has 56 evenly spaced picots
- Both wheel ends are round and flat
- Leaf pairs mirror each other along the spine
- Strap runs straight down the center
- All four bands are evenly spaced and secured at the back
- Cables slip in and out of each band easily
- All ends are woven in and hidden from the front
- Hanging loop is centered and firm
Troubleshooting
- Ends cup: The chains are too tight. Loosen the ch-1 spaces at the ends in Rounds 4–5.
- Ends ruffle: The chains are too loose. Tighten them, or block firmly.
- Sides wave: The spine chain is too loose. Redo it with a smaller hook.
- Picots don’t fall evenly: Recount Round 7. Each section must have 42 hdc.
- Panel sags when hung: Sew the strap down more firmly, and add a second line of stitches across the base of the loop.
- Bands are too tight for cables: Add 2–4 rows to each band.
Care
Hand wash in cool water with mild soap, press out the water in a towel, and dry flat. Re-pin the picot edge if needed.

Final Notes
The whole design depends on one chain of measurements. The spine sets the 10 in (25.4 cm) straight sides. Rounds 1–5 build the panel to 5.5 in (14.0 cm) x 15.5 in (39.4 cm). The border, with 42 stitches on every side and end, brings it to 7 in (17.8 cm) x 17 in (43.2 cm). Check your size at each stage and the embellishments will fall into place.
Happy crocheting!