

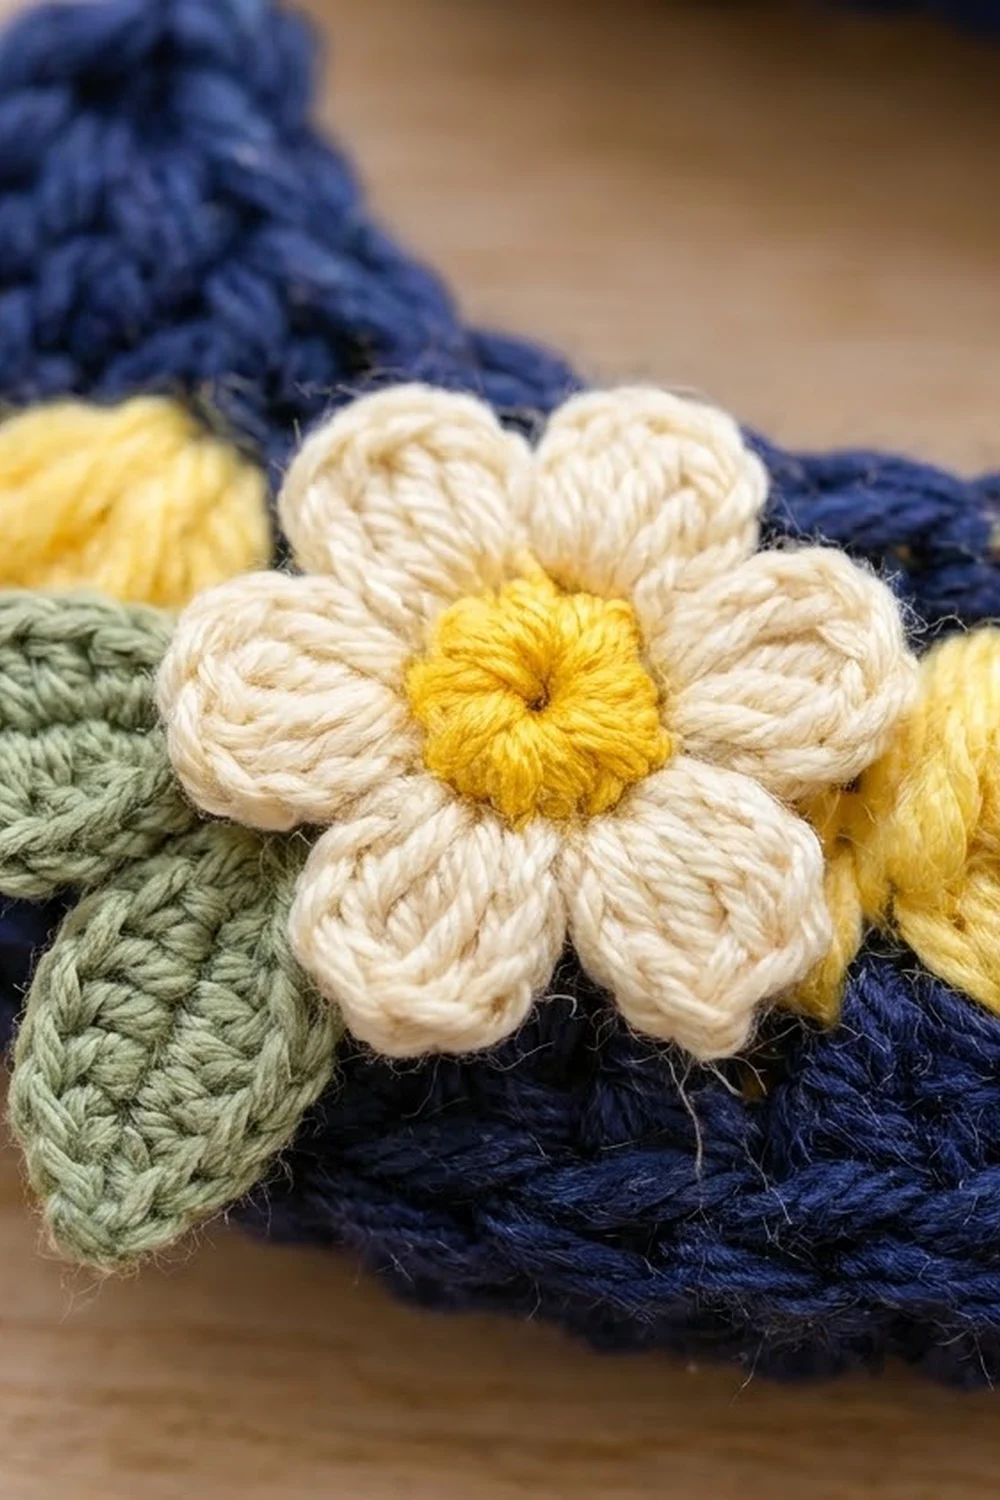
This little letter S keychain is bright, cheerful, and quick to make. It has a navy center line with a row of soft yellow puff stitches on each side and a neat navy outer edge, so the stripes run the full length of the letter. Three small cream daisies with yellow centers and sage-green leaves sit on top. A gold keyring with a short chain clips it to a bag, backpack, or set of keys.
The colors are classic collegiate navy and yellow, with a cottage-garden touch from the daisies. The puff stitches give the letter a bumpy, beaded texture. The ends of the letter are rounded with a slight inward curl.
This pattern uses US crochet terms. The finished letter is 4.25 in (10.8 cm) tall and 3 in (7.6 cm) wide, not counting the hardware. The keyring and chain add about 2.25 in (5.7 cm) at the top.
The letter is one single piece. You crochet a straight strip in the round, working around both sides of a foundation chain. There are three rounds: navy, then yellow puffs, then a navy edge. You then block the strip into an S over a paper template and add the daisies and keyring last.
Finished Size and Construction
- Finished size: 4.25 in (10.8 cm) tall x 3 in (7.6 cm) wide
- Skill level: Easy / advanced beginner
- Terminology: US crochet terms
- Yarn weight: DK (light worsted, #3) cotton or cotton blend
- Hook: 3.5 mm (E-4)
- Number of pieces: 1 letter strip, plus 3 small daisy appliqués and 6 leaves
- Layout: a single strip shaped into an S
- Strip size (straight, after border): 8.25 in (21.0 cm) long x 0.9 in (2.3 cm) wide
- Size before border: 8 in (20.3 cm) long x 0.7 in (1.8 cm) wide
- Border depth: 0.1 in (0.3 cm) on each long edge
Materials
Use a smooth cotton or cotton-blend DK yarn. Cotton holds its shape after blocking and stands up to daily handling. Avoid fuzzy yarns, because they hide the puff texture. If you only have sport or worsted cotton, you can still make the letter. Follow the gauge checkpoints closely and change hook size until your strip matches.
- Navy: 8 g / 20 m (Rounds 1 and 3)
- Yellow: 6 g / 15 m (Round 2 and daisy centers)
- Cream: 2 g / 5 m (daisy petals)
- Sage green: 1 g / 3 m (leaves)
These amounts include a small margin for testing gauge and weaving in ends.
Tools:
- 3.5 mm (E-4) crochet hook
- Tapestry needle
- Scissors
- Stitch marker
- 1 gold split keyring, about 1.25 in (3.2 cm) across, with a short chain and jump ring
- Flat-nose pliers
- Blocking board or foam mat, rust-proof pins, and a spray bottle
- Paper and pencil for a letter template
- Optional: fabric stiffener or light spray starch
Abbreviations (US Terms)
- ch – chain
- sl st – slip stitch
- sc – single crochet
- hdc – half double crochet
- dc – double crochet
- st(s) – stitch(es)
- MR – magic ring
- rnd – round
Puff stitch (puff): [Yarn over, insert hook in stitch, yarn over and pull up a loop to hdc height] 3 times. You now have 7 loops on the hook. Yarn over and pull through all 7 loops. Each puff counts as 1 stitch.
Gauge and Checkpoints
Gauge: 20 sc and 24 rows = 4 in (10.2 cm) in sc. That works out to 5 sc and 6 rows per 1 in (2.5 cm).
Gauge matters on a small piece like this, because the strip length sets the size of the S. To make a swatch, ch 21 and work 24 rows of sc (20 sts per row). Measure across the center of the swatch, not the edges. You can also skip the swatch and use Rounds 1 and 2 of the strip as your gauge test, since they’re quick to rip back. Either way, measure before you go on.
Checkpoints (strip laid flat and straight):
- After Rnd 1: 7.5 in (19.1 cm) long x 0.4 in (1.0 cm) wide
- After Rnd 2: 8 in (20.3 cm) long x 0.7 in (1.8 cm) wide
- After Rnd 3: 8.25 in (21.0 cm) long x 0.9 in (2.3 cm) wide
If your strip is too long, go down to a 3.25 mm (D-3) hook. If it’s too short, go up to a 3.75 mm (F-5) hook. A difference of 0.25 in (0.6 cm) or less is fine, because blocking takes care of it. A bigger difference will change the proportions of the letter.
Letter Strip
Foundation and Round 1 (Navy)
With navy, ch 38.
Rnd 1: Sc in 2nd ch from hook and in next 35 ch (36 sc). Work 3 sc in the last ch. Rotate the work and continue along the other side of the foundation chain. Sc in next 35 ch, then 2 sc in the last ch, which is the same ch that holds the first sc. Join with sl st to first sc. (76 sc)
The 76 stitches are arranged like this:
- Start end: 3 sts (st 1 plus the last 2 sts)
- Long side A: 35 sts (sts 2–36)
- Far end: 3 sts (sts 37–39)
- Long side B: 35 sts (sts 40–74)
- Rest of the start end: sts 75–76
Check: 3 + 35 + 3 + 35 = 76. Place a marker in st 2. Fasten off navy.
Round 2 (Yellow Puff Round)
Rnd 2: Join yellow in the marked st 2. Ch 1, sc in the same st.
- Side A: [Puff in next st, sc in next st] 17 times. (35 sts: 18 sc and 17 puffs)
- Far end: 2 sc in each of the next 3 sts. (6 sc)
- Side B: Sc in next st, [puff in next st, sc in next st] 17 times. (35 sts: 18 sc and 17 puffs)
- Start end: 2 sc in each of the last 3 sts. (6 sc)
Join with sl st to first sc. (82 sts: 34 puffs and 48 sc)
Check: 35 + 6 + 35 + 6 = 82. Each long side starts and ends with an sc, so the puffs are evenly spaced and never land on the ends. Push each puff to the right side as you go. Together the puffs make the yellow beaded stripe on each side of the navy center.
Fasten off yellow. Move the marker to the first sc of this round.
Daisy Appliqués (Make 3)
Rnd 1 (yellow): MR, 6 sc in ring. Pull the ring closed and join with sl st to first sc. (6 sc) Fasten off yellow.
Rnd 2 (cream): Join cream in any sc. [Ch 2, 2 dc, ch 2, sl st] all in the same st, then sl st into the next st. Repeat from * 5 more times. End the last repeat in the joining st. (6 petals)*
Fasten off, leaving a 6 in (15.2 cm) tail for sewing. Each daisy is about 0.9 in (2.3 cm) across, with a 0.35 in (0.9 cm) yellow center.
Leaves (Make 6)
With sage green, ch 5. Sl st in 2nd ch from hook, sc in next ch, hdc in next ch, sc in last ch. (4 sts)
Fasten off, leaving a 6 in (15.2 cm) tail. Each leaf is about 0.6 in (1.5 cm) long. You’ll use 2 leaves per daisy.
Border
Border gauge: The border is plain sc at the same gauge as the body, 5 sc per 1 in (2.5 cm). Each long side has 35 sc, so it measures 7 in (17.8 cm) between the two rounded ends.
Rnd 3 (navy): Join navy in the marked first sc of Rnd 2. Ch 1, sc in the same st.
- Side A: Sc in next 34 sts. This gives 35 sc on the side, worked into the tops of all 17 puffs and 18 sc.
- Far end: [Sc in next st, 2 sc in next st] 3 times. (9 sc)
- Side B: Sc in next 35 sts. (35 sc)
- Start end: [Sc in next st, 2 sc in next st] 3 times. (9 sc)
Join with sl st to first sc. (88 sc)
Check: 35 + 9 + 35 + 9 = 88. Fasten off, leaving a 10 in (25.4 cm) tail for attaching the jump ring.
Why the math works: Each long side stays at 35 stitches in Rounds 1, 2, and 3. The count never changes along the sides, so they lie flat and don’t ruffle. All the growth happens at the rounded ends, which go from 3 to 6 to 9 stitches. That’s 3 stitches added per end per round, the same rate as a flat half circle, so the ends lie flat too. At each end, Rnd 2 is 3 stitches worked 1-per-stitch plus 3 added (6). Rnd 3 is 6 stitches worked 1-per-stitch plus 3 added (9).
Final Blocking
- Make a template. On paper, draw an S that’s 4.25 in (10.8 cm) tall and 3 in (7.6 cm) wide. Draw it as two stacked open curves, with a center line about 8.25 in (21.0 cm) long from tip to tip. Tape the template under clear plastic on your blocking board.
- Dampen. Mist the strip until it’s evenly damp but not dripping.
- Pin the spine. Lay the middle of the strip along the diagonal spine of the S and pin it there first.
- Form the curves. Bend the top half up and around to the left. Bend the bottom half down and around to the right. Ease the inner edge in gently. Sc fabric compresses well, so the inner edges gather slightly while the outer edges open out. Pin every 0.5 in (1.3 cm) along both edges.
- Curl the tips. Turn each rounded end slightly inward, so the top end hooks down and the bottom end hooks up.
- Stiffen (optional). Brush on a thin layer of fabric stiffener or spray starch so the S holds its shape.
- Dry completely. Leave it pinned for at least 12 hours.
- Add the daisies. Sew one daisy near the top end, one on the upper-left curve next to the spine, and one at the lower-left end. Tuck 2 leaves under each daisy, angled outward. Sew through the back loops only so no stitches show on the front.
- Add the hardware. Open the jump ring with pliers and slip it through the top end, 2 stitches in from the edge. Attach the chain and close the ring flat. Use the long navy tail to whip a few stitches around the base of the ring for strength.
- Weave in all ends on the back.
Final Quality-Control Checklist
- Letter measures 4.25 in (10.8 cm) tall x 3 in (7.6 cm) wide
- Strip is 0.9 in (2.3 cm) wide along its full length
- Stripe order across the strip is navy, yellow, navy, yellow, navy
- 17 puffs on each long side, all pushed to the front
- Rnd 3 count is 88 sc: 35 on each side and 9 at each end
- Ends are round and flat, with a slight inward curl
- 3 daisies, each with 2 leaves, sewn on securely
- Jump ring is closed with no gap, and the chain hangs straight
- No tails showing on the front
Troubleshooting
Puffs are on the back: Push each puff forward with a finger as you finish it. Make sure the right side of Rnd 1 is facing you.
Strip is too wide: Your puffs may be too tall. Pull each loop up only to hdc height, and keep all 3 loops the same length.
Ends ruffle: You probably added too many stitches. Recount: there should be 6 sc per end in Rnd 2 and 9 sc per end in Rnd 3.
Ends cup or pucker: Your increases are too tight. Loosen your tension at the ends, or work the increases with a hook one size up.
Strip twists: Foundation chains often twist. Before Rnd 1, check that all the V’s on the chain face up. Blocking flat will fix a mild twist.
S won’t hold its shape: Block it again with stiffener, or sew a matching S-shaped felt backing to the back.
Petals are uneven: Keep the tension the same on the ch-2 at both sides of each petal.
Keyring pulls at the edge: Move the jump ring 2 stitches in from the edge and reinforce it with the navy tail.
Care
Spot clean with a damp cloth and mild soap, reshape, and dry flat. Don’t put a stiffened keychain in the washing machine.

Final Notes
Here’s the measurement chain from start to finish:
- Keep your gauge at 5 sc per 1 in (2.5 cm).
- The strip measures 7.5 in (19.1 cm) after Rnd 1 and 8 in (20.3 cm) after Rnd 2.
- After the border, it measures 8.25 in (21.0 cm) by 0.9 in (2.3 cm).
- Block it over the template into a 4.25 in (10.8 cm) by 3 in (7.6 cm) S.
- Add the daisies and the gold keyring.
To make other letters, keep the same three rounds and change the chain length in steps of 2 chains. Each 2 extra chains add 1 puff and 1 sc to each long side, or about 0.4 in (1.0 cm) of length. The side counts stay odd, so each side still starts and ends with an sc.
Happy crocheting!