

The Lavender Flutter Bag Holder is a tall hanging tube that keeps plastic grocery bags tidy and looks pretty on a pantry wall. The middle section is a lavender lace of stacked butterflies. Cream bands frame it at the top and bottom, and a wooden ring holds it up.
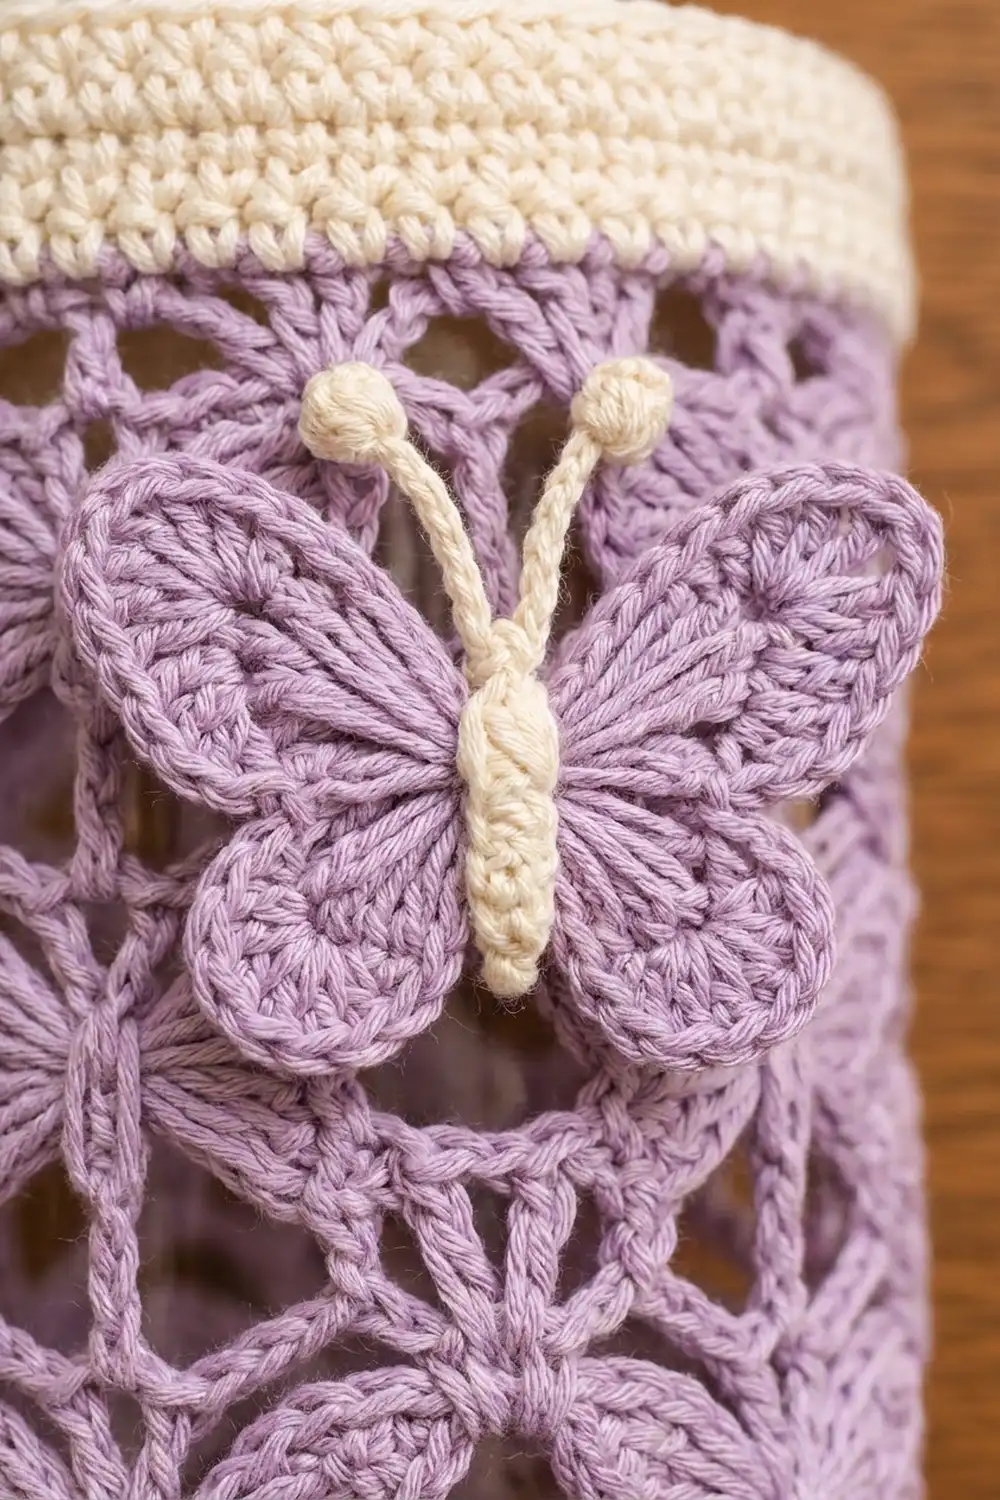
Two 3D butterflies finish the design: a large lavender one near the top and a small cream one near the bottom. Both have contrast bodies and knobbed antennae. The holder uses only two colors, which gives it a calm, slightly vintage look. A sage green lace section works just as well.
This pattern uses US terms. The finished holder is 18 in (45.7 cm) around and 9 in (22.9 cm) wide when flattened. The body is 15.4 in (39.1 cm) tall, or about 18 in (45.7 cm) including the ring.
You make seven pieces: a lace tube, a top band, a bottom band with a slot, a round base, a tab and two butterflies. Every body piece has exactly 90 stitches around, so the pieces join stitch for stitch.
Finished Size and Construction
- Finished size: 18 in (45.7 cm) around; body 15.4 in (39.1 cm) tall; about 18 in (45.7 cm) with tab and ring
- Skill level: Intermediate
- Terminology: US
- Yarn weight: DK (#3) cotton or cotton blend
- Hook: 4.0 mm (G-6)
- Number of pieces: 7 crocheted pieces plus 1 wooden ring
- Layout: stacked vertically: ring, tab, top band, lace tube, bottom band, base
- Piece size: each body piece is 90 sts around; lace tube 10.2 in (25.9 cm) tall; top band 2.0 in (5.1 cm); bottom band 2.9 in (7.4 cm); base 5.7 in (14.5 cm) across
- Size before border: body 15.1 in (38.4 cm) tall
- Border depth: 0.3 in (0.8 cm) at the top rim, plus a flat slot edging
Materials
Choose a smooth DK cotton at about 225 m per 100 g. Cotton holds its shape when the holder is full of bags. Stretchy acrylic lets the tube sag.
- Lavender (lace tube, large wings, small body): 65 g, about 146 m
- Cream (bands, base, tab, small wings, large body, antennae): 80 g, about 180 m
These amounts include a margin of about 20 percent for swatching and seams.
Tools: 4.0 mm (G-6) hook; 2 in (5.1 cm) wooden ring; tapestry needle; stitch markers; rustproof pins; measuring tape; spray bottle; a round form about 5.7 in (14.5 cm) across, such as a canister or a rolled towel.
Abbreviations (US Terms)
- ch: chain
- sl st: slip stitch
- sc: single crochet
- hdc: half double crochet
- dc: double crochet
- tr: treble crochet
- sk: skip
- sp: space
- st(s): stitch(es)
- rep: repeat
- RS / WS: right side / wrong side
- rev sc: reverse single crochet (crab stitch)
3-dc cluster (cl): *Yarn over, insert hook, pull up a loop, yarn over and draw through 2 loops; rep from * 2 more times in the same place. Yarn over and draw through all 4 loops.
3-dc bobble: A cluster worked into a single chain. It forms the knob at the tip of each antenna.
Gauge and Checkpoints
Solid gauge: 20 sc and 22 rounds = 4 in (10.2 cm).
Lace gauge: one 10-st repeat is 2 in (5.1 cm) wide, and one 4-round tier is 2 in (5.1 cm) tall after blocking.
Make the top band first and use it as your gauge test. It should measure 18 in (45.7 cm) around and 2.0 in (5.1 cm) tall.
Checkpoints:
- Base after Rnd 5: 1.9 in (4.8 cm) across; after Rnd 10: 3.8 in (9.7 cm); after Rnd 15: 5.7 in (14.5 cm)
- Lace tube after Rnd 5: 2.2 in (5.6 cm) tall; after Rnd 13: 6.2 in (15.7 cm); after Rnd 21: 10.2 in (25.9 cm)
- Bottom band: slot 3.6 in (9.1 cm) wide by 0.7 in (1.8 cm) tall; finished band 2.9 in (7.4 cm) tall
If your band is too big, go down a hook size. If it’s too small, go up a size. Change the hook, not the stitch counts, because every join depends on 90 stitches.
Top Band (Cream)
Ch 90 and sl st to the first ch to join. Make sure the chain isn’t twisted.
Rnd 1: Ch 1, sc in each ch around; join. (90 sts)
Rnds 2-11: Ch 1, sc in each st around; join. (90 sts)
Fasten off. The foundation edge joins to the lace, and Rnd 11 becomes the top rim.
Lace Tube (Lavender)
Ch 90 and sl st to the first ch to join, without twisting. Work every round with the RS facing you.
Rnd 1: Ch 1, sc in each ch around; join. (90 sts)
Rnd 2 (lower wings): Ch 1, *sc in next st, ch 3, sk 4 sts, (cl, ch 3, cl) in next st, ch 3, sk 4 sts; rep from * 8 more times; join. (9 sc, 18 cl, 27 ch-3 sps) Each repeat uses 10 sts, so the 9 repeats use all 90.
Rnd 3 (body): Ch 1, *sc in sc, ch 4, sk ch-3 sp and cl, (sc, ch 3, sc) in center ch-3 sp, ch 4, sk cl and ch-3 sp; rep from * around; join. (27 sc, 18 ch-4 sps, 9 ch-3 sps)
Rnd 4 (upper wings): Ch 1, *sc in first sc of repeat, ch 3, sk ch-4 sp and sc, (cl, ch 3, cl) in ch-3 sp, ch 3, sk sc and ch-4 sp; rep from * around; join. (9 sc, 18 cl, 27 ch-3 sps)
Rnd 5 (reset): Ch 1, *sc in sc, 2 sc in ch-3 sp, sc in cl, 3 sc in center ch-3 sp, sc in cl, 2 sc in ch-3 sp; rep from * around; join. (90 sts)
Each repeat now has 1 + 2 + 1 + 3 + 1 + 2 = 10 sc. The 6th st of each repeat sits over the butterfly body, so the butterflies stack in straight columns.
Rnds 6-21: Rep Rnds 2-5 four more times, for 5 tiers in all. (Rnd 21: 90 sts)
Fasten off. You now have 45 butterflies: 9 columns, each 5 tiers tall.
Bottom Band with Dispensing Slot (Cream)
Ch 90 and sl st to the first ch to join, without twisting.
Rnds 1-5: Ch 1, sc in each st (or ch) around; join. (90 sts)
Row 6: Ch 1, sc in the same st and the next 71 sts. Turn and leave the last 18 sts unworked. (72 sts)
Rows 7-9: Ch 1, sc across, turn. (72 sts)
Close the slot: Ch 18 and sl st into the last st of Row 9 on the far side of the gap.
Rnd 10: Ch 1, sc in the same st and the next 71 sts, then 1 sc in each of the 18 ch; join. (72 + 18 = 90 sts) The direction is now reversed, which is fine in sc.
Rnds 11-16: Ch 1, sc in each st around; join. (90 sts)
Fasten off.
Base (Cream)
Rnd 1: Make a magic ring, ch 1, 6 sc in ring; join. (6 sts)
Rnd 2: 2 sc in each st. (12 sts)
Rnds 3-15: Increase 6 sts evenly in each round, with one more plain sc between increases every round. Stagger the increases. The round totals are: Rnd 3 (18), Rnd 4 (24), Rnd 5 (30), Rnd 6 (36), Rnd 7 (42), Rnd 8 (48), Rnd 9 (54), Rnd 10 (60), Rnd 11 (66), Rnd 12 (72), Rnd 13 (78), Rnd 14 (84), Rnd 15 (90).
Fasten off. The base should lie flat and measure 5.7 in (14.5 cm) across.
Hanging Tab (Cream)
Row 1: Ch 9, sc in 2nd ch from hook and each ch across. (8 sts)
Rows 2-26: Ch 1, turn, sc across. (8 sts)
The tab measures 1.6 by 4.7 in (4.1 by 11.9 cm).
Butterflies
Large butterfly (lavender): Make a magic ring.
- Rnd 1: (Ch 4, 5 tr, ch 4, sl st in ring) twice for the upper wings, then (ch 3, 4 dc, ch 3, sl st in ring) twice for the lower wings. Pull the ring tight.
- Rnd 2: Upper wings: 3 sc along the ch-4, 2 sc in each tr, 3 sc along the ch-4 (16 sc each). Lower wings: 2 sc along the ch-3, 2 sc in each dc, 2 sc along the ch-3 (12 sc each). Sl st in the ring between wings. (56 sc) The finished butterfly is about 2.5 in (6.4 cm) wide.
Small butterfly (cream): For Rnd 1, work (ch 3, 5 dc, ch 3, sl st) twice, then (ch 2, 4 hdc, ch 2, sl st) twice. For Rnd 2, upper wings get 2 + 10 + 2 = 14 sc each and lower wings get 1 + 8 + 1 = 10 sc each. (48 sc) The finished butterfly is about 2 in (5.1 cm) wide.
Bodies: For the large butterfly, use cream: ch 7, then sc across (6 sts), about 1.2 in (3.0 cm) long. For the small butterfly, use lavender: ch 6, then sc across (5 sts), about 1 in (2.5 cm) long.
Antennae (cream, 2 per butterfly): Ch 3, work a 3-dc bobble in the 3rd ch from hook, then ch 5 for the stem.
Sew each body down the center of its wings, and tuck the antenna stems under the head end.
Make All Pieces
Cream: top band, bottom band, base, tab, small butterfly wings, large butterfly body, 4 antennae.
Lavender: lace tube, large butterfly wings, small butterfly body.
        [ wooden ring ]
        [ tab, folded ]
[ top band: cream, 11 rnds    ]
[ lace tube: lavender, 21 rnds ]  <- large butterfly, upper right
[                              ]  <- small butterfly, lower left
[ bottom band: cream, 16 rnds ]  <- slot on front
[ base: cream, 15 rnds        ]
Joining
Every seam joins 90 sts to 90 sts. Work 1 st through each pair of stitches and add nothing at the seams.
- Base to bottom band: Hold the pieces WS together and sc through the base’s Rnd 15 and the band’s foundation edge. (90 sc) Rnds 1-5 sit below the slot, which keeps the opening near the bottom.
- Bottom band to lace: With the RS together, sl st through band Rnd 16 and the foundation loops of lace Rnd 1. (90 sl sts)
- Lace to top band: Sl st through lace Rnd 21 and the top band’s foundation loops the same way. (90 sl sts) Turn RS out.
- Tab: Fold the tab through the ring. Sew both ends inside the top band, opposite the slot, overlapping 1 in (2.5 cm) below the rim. About 1.3 in (3.3 cm) of tab shows above the band.
- Butterflies: Sew the large butterfly over the top tier on the right front, with one wing touching the top band. Sew the small butterfly over the lowest tier on the left front. Stitch through the bodies only so the wings lift.
Tension: Keep each seam as loose as the fabric around it. If a seam measures more than 0.5 in (1.3 cm) under 18 in (45.7 cm), redo it more loosely.
Size checkpoint: The body should be 2.9 + 10.2 + 2.0 = 15.1 in (38.4 cm) tall.
Border
Border gauge: the same as the solid gauge, 20 sc = 4 in (10.2 cm). When the holder is flattened, there are 45 sts on the front and 45 on the back.
Rim Rnd 1: Join cream at the back. Sc in each st of top band Rnd 11, working through the band only and not the tab. (45 + 45 = 90 sts)
Rim Rnd 2: Ch 1, rev sc in each st around; join. (90 sts) This adds 0.3 in (0.8 cm), so the body is now 15.4 in (39.1 cm) tall.
Slot edging: Work 1 round of sc around the slot: 18 along the bottom edge (one in each unworked Rnd 5 st), 4 up the side (one per row end), 18 along the chain edge and 4 down the other side. (18 + 4 + 18 + 4 = 44 sts) Corner stitches are already counted in the 18s.
Why the math works: The rim has exactly one sc per existing stitch, so it stays 18 in (45.7 cm) around without flaring. Each slot edge gets one stitch per stitch or row end, so the opening lies flat and doesn’t gape.
Final Blocking
- Weave in the ends along solid sc rows, not through the lace.
- Spray the holder until it’s evenly damp.
- Slide it over the round form so it measures 18 in (45.7 cm) around.
- Ease the lace to 10.2 in (25.9 cm) tall, with the columns straight.
- Pat the base flat and round the bottom band gently.
- Pin the butterfly wings so they lift slightly.
- Let it dry completely before removing it.
Final Quality-Control Checklist
- Every seam measures 18 in (45.7 cm) around
- The body is 15.4 in (39.1 cm) tall
- There are 9 straight butterfly columns, each 5 tiers tall
- The slot is centered opposite the tab
- The tab holds firmly when pulled
- The butterflies and antennae are secure
- No ends show on the RS
Troubleshooting
- Lace wider than the bands: Go down a hook size for the lace only.
- Columns drift: Recount Rnd 5. It needs 10 sc per repeat.
- Base ruffles: Check the round totals, then go down a hook size.
- Base cups: Go up a hook size.
- Seam puckers: Pull it out and redo it more loosely.
Care
Hand wash in cool water, roll in a towel and dry over a round form. Don’t tumble dry.

Final Notes
Everything rests on 90 stitches. A gauge of 20 sc to 4 in (10.2 cm) gives bands 18 in (45.7 cm) around, and 9 lace repeats of 2 in (5.1 cm) match them. The base reaches 90 sts at 5.7 in (14.5 cm) across. Stacked together, the pieces give a body 15.1 in (38.4 cm) tall, and the border brings it to 15.4 in (39.1 cm).
Happy crocheting!