

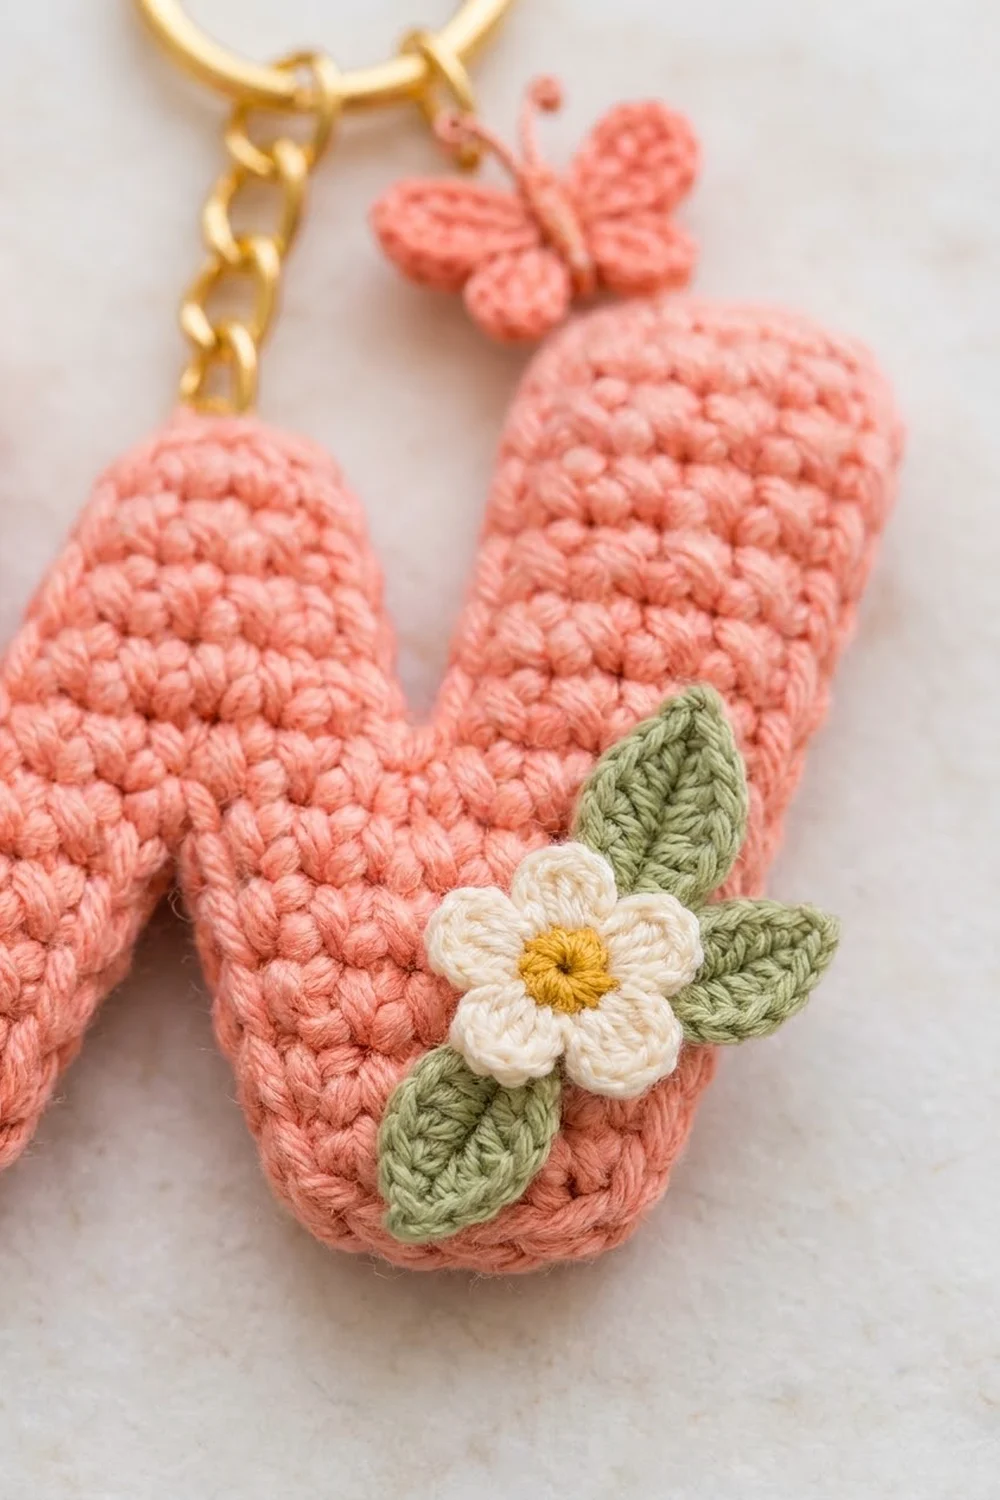
This puffy coral letter W is a quick, personal charm for a bag, backpack, or keys. It has a cream flower with leaves on each side and a tiny coral butterfly hanging from a gold keyring, for a soft spring-garden look.
The colors are coral for the letter and butterfly, cream for the petals, mustard yellow for the flower centers, and sage green for the leaves. The stitches are tight, so the charm stays firm and neat even with daily use.
This pattern uses US crochet terms. The finished charm measures about 3.8 in (9.7 cm) wide and 3.3 in (8.4 cm) tall, not counting the hardware.
You make two identical flat W panels in single crochet rows from the bottom up. Then you sew the flowers and leaves to the front panel and join both panels with one round of single crochet edging, adding a little stuffing as you go. Last, you add the keyring, the chain, and the butterfly.
Finished Size and Construction
- Finished size: 3.8 in (9.7 cm) wide x 3.3 in (8.4 cm) tall
- Skill level: Easy to intermediate
- Terminology: US crochet terms
- Yarn weight: Sport weight (#2 fine) cotton
- Hook: 2.5 mm (US B/1 or C/2)
- Number of pieces: 2 letter panels, 2 flowers, 4 leaves, 1 butterfly
- Layout: Front and back panels stacked wrong sides together and joined by the edging
- Panel size: 3.5 in (8.9 cm) wide x 3.0 in (7.6 cm) tall
- Size before border: 3.5 in (8.9 cm) x 3.0 in (7.6 cm)
- Border depth: 1 round, about 1/6 in (0.4 cm) on each edge
Materials
Use a smooth, mercerized or combed sport-weight cotton, about 180 yd (165 m) per 50 g. Cotton gives crisp stitches. Fuzzy yarns hide the stitch texture, so avoid them.
- Coral: 8 g, about 26 m (panels, edging, butterfly)
- Cream: 3 g, about 10 m (petals)
- Mustard yellow: 1 g, about 3 m (flower centers)
- Sage green: 2 g, about 7 m (leaves)
Tools:
- 2.5 mm crochet hook
- Tapestry needle
- Small amount of polyester fiberfill
- Gold split keyring, 1 in (2.5 cm) across
- Gold chain, 1.5 in (3.8 cm), plus a second piece 0.75 in (1.9 cm) long
- Three 6 mm jump rings and two pairs of flat-nose pliers
- Pins and scissors
Yarn amounts include a margin of about 20 percent.
Abbreviations (US Terms)
- ch – chain
- sl st – slip stitch
- sc – single crochet
- hdc – half double crochet
- dc – double crochet
- sc2tog – (insert hook in next st, yarn over, pull up a loop) twice, yarn over, pull through all 3 loops
- MR – magic ring
- st(s) – stitch(es)
- WS – wrong side
Standing sc: With a slip knot on the hook, insert the hook in the stitch, yarn over, pull up a loop, yarn over, and pull through both loops.
Gauge and Checkpoints
Gauge: 12 sc and 12 rows = 2 in (5.1 cm), which is 6 sc and 6 rows per 1 in (2.5 cm). The gauge is square, so the edging can use exactly 1 sc per row-end.
Finish one panel before you start the second, and check these points:
- Row 4 (each foot): 7 sts = 1.2 in (3.0 cm) wide, 0.7 in (1.8 cm) tall
- Row 9 (band): 21 sts = 3.5 in (8.9 cm) wide; height 1.5 in (3.8 cm)
- Each arm: 5 sts = 0.8 in (2.0 cm) wide
- Row 13 (middle arm done): peak is 2.2 in (5.6 cm) above the bottom
- Row 18 (finished panel): 3.5 in (8.9 cm) x 3.0 in (7.6 cm)
If Row 9 is wider than 3.6 in (9.1 cm), use a hook 0.25 mm smaller. If it is narrower than 3.4 in (8.6 cm), use a hook 0.25 mm larger. Never change the stitch counts, because the edging depends on them.
Letter Panels (Make 2)
Use coral. The ch 1 at the start of each row does not count as a stitch.
Feet
Foot A:
- Row 1: Ch 6, sc in 2nd ch from hook and in each ch across. (5 sts)
- Row 2: Ch 1, turn, 2 sc in first st, sc in next 3 sts, 2 sc in last st. (7 sts)
- Rows 3–4: Ch 1, turn, sc in each st across. (7 sts)
Fasten off.
Foot B: Work Rows 1–4 the same as Foot A, but do not fasten off.
The Row 2 increases round off the bottom corners.
Band
- Row 5 (joining row): Ch 1, turn, sc in each of the 7 sts of Foot B, ch 7, then sc in each of the 7 sts of Foot A, with Foot A’s last row facing up. (7 sc + 7 ch + 7 sc = 21 sts)
- Row 6: Ch 1, turn, sc in next 7 sts, sc in the back bump of each of the 7 ch, sc in last 7 sts. (21 sts)
- Rows 7–9: Ch 1, turn, sc in each st across. (21 sts)
The 7-chain bridge leaves a gap between the feet, which forms the two lower points of the W.
Arms
Row 9 splits into: arm 5 sts, gap 3 sts, middle arm 5 sts, gap 3 sts, arm 5 sts (5 + 3 + 5 + 3 + 5 = 21).
First outer arm:
- Row 10: Ch 1, turn, sc in next 5 sts. Leave the remaining 16 sts unworked. (5 sts)
- Rows 11–17: Ch 1, turn, sc in each st across. (5 sts)
- Row 18: Ch 1, turn, sc2tog, sc in next st, sc2tog. (3 sts)
Fasten off. The decreases round the tip.
Middle arm: Skip the next 3 sts of Row 9. With the same side facing as Row 10, make a standing sc in the next st.
- Row 10: That standing sc plus sc in the next 4 sts. (5 sts)
- Rows 11–12: Ch 1, turn, sc in each st across. (5 sts)
- Row 13: Ch 1, turn, sc2tog, sc in next st, sc2tog. (3 sts)
Fasten off. This shorter arm forms the center peak.
Last outer arm: Skip the next 3 sts of Row 9 and make a standing sc in the next st.
- Row 10: That standing sc plus sc in the next 4 sts, ending in the last st of Row 9. (5 sts)
- Rows 11–17: Ch 1, turn, sc in each st across. (5 sts)
- Row 18: Ch 1, turn, sc2tog, sc in next st, sc2tog. (3 sts)
Fasten off. Weave in all the tails on one side, which becomes the WS.
Flowers (Make 2)
Large flower, 1.2 in (3.0 cm) across:
- Round 1 (yellow): MR, 10 sc in ring, sl st to the first sc. (10 sts) Fasten off.
- Round 2 (cream): Join in any st. *[sl st, ch 2, 2 dc] in next st, [2 dc, ch 2, sl st] in following st; repeat from * 4 more times. (5 petals, 4 dc each)
Fasten off, leaving a 12 in (30.5 cm) tail for sewing.
Small flower, 0.9 in (2.3 cm) across: Work Round 1 the same way. For Round 2, work *[sl st, ch 1, 2 hdc] in next st, [2 hdc, ch 1, sl st] in following st; repeat from * 4 more times. (5 petals, 4 hdc each)
Leaves (Make 4)
Use sage. Each leaf is about 1 in (2.5 cm) long.
Ch 7. Starting in the 2nd ch from the hook, work sc, hdc, dc, dc, hdc, sc (6 sts). Ch 1 for the tip. Then work along the opposite side of the chain: sc, hdc, dc, dc, hdc, sc (6 sts). Sl st to the first sc. (12 sts + tip ch) Fasten off, leaving an 8 in (20.3 cm) tail.
Butterfly (Make 1)
Use coral. The butterfly is about 1 in (2.5 cm) wide.
- MR. [Ch 3, 3 dc, ch 3, sl st] in the ring twice for the upper wings.
- [Ch 2, 3 hdc, ch 2, sl st] in the ring twice for the lower wings.
- Pull the ring tight.
Wrap the yarn 4 times around the center to form the body and secure it on the back. For the antennae, thread a 3 in (7.6 cm) coral strand through the top of the body, knot each end, and trim to 0.4 in (1.0 cm).
Appliqué Placement on the Front Panel
Pick the neater panel as the front. Sew the appliqués on before joining so the knots stay hidden inside.
- Pin the large flower in the center of the upper left arm, with its top 0.5 in (1.3 cm) below the arm tip. Tuck one leaf under it pointing up and right, and one pointing down and left.
- Pin the small flower on the lower right arm, just above the right foot. Place one leaf pointing up and right and one pointing down and left.
- Sew through the front panel only, with small stitches around each center and under each petal tip. Tie off on the WS.
Keep each appliqué at least 1/6 in (0.4 cm) inside the panel edge.
Border: Joining Edging
Border gauge: 6 sc per 1 in (2.5 cm), the same as the panel. Work 1 sc per stitch or chain along tops and bottoms, and 1 sc per row-end along sides.
Hold the panels WS together with the front facing you and the edges lined up. Work through both layers the whole way around. Right-handed crocheters work counterclockwise; the counts are the same in either direction.
Join coral with a sl st in the Row 18 row-end at the top of the left outer side, ch 1, and work the segments below. “Tip” means 2 sc in the first st, sc across, and 2 sc in the last st.
| Segment | Edge positions | Edging sc |
|---|---|---|
| 1. Left outer side (rows 18 to 1) | 18 row-ends | 18 |
| 2. Left foot bottom (tip) | 5 ch | 7 |
| 3. Left foot inner side | 4 row-ends | 4 |
| 4. Bridge underside | 7 ch | 7 |
| 5. Right foot inner side | 4 row-ends | 4 |
| 6. Right foot bottom (tip) | 5 ch | 7 |
| 7. Right outer side | 18 row-ends | 18 |
| 8. Right arm top (tip) | 3 sts | 5 |
| 9. Right arm inner side | 9 row-ends | 9 |
| 10. Right valley | 3 sts | 3 |
| 11. Middle arm right side | 4 row-ends | 4 |
| 12. Middle arm top (tip) | 3 sts | 5 |
| 13. Middle arm left side | 4 row-ends | 4 |
| 14. Left valley | 3 sts | 3 |
| 15. Left arm inner side | 9 row-ends | 9 |
| 16. Left arm top (tip) | 3 sts | 5 |
Total: 102 edge positions + 10 corner increases = 112 sc. Sl st to the first sc.
Stuffing:
- After segment 7, lightly stuff the feet, the band, and the right arm.
- After segment 12, stuff the middle arm.
- After segment 15, stuff the left arm.
Use thin wisps only. The charm should be about 1/4 in (0.6 cm) thick and still lie flat.
Why the math works: The gauge is square, so 1 sc per edge position matches the edge length exactly. The 10 outer (convex) corners, 2 per tip, each need 1 extra sc to turn smoothly, which keeps the tips rounded. The 6 inner (concave) corners, 4 at the valleys and 2 under the bridge, are naturally shorter. They get no extra stitches and stay crisp. One round adds about 1/6 in (0.4 cm) per side, so the 3.5 x 3.0 in (8.9 x 7.6 cm) panel becomes a 3.8 x 3.3 in (9.7 x 8.4 cm) charm.
Fasten off and hide the tail inside.
Hardware:
- Pass a jump ring through the middle sc of the right arm top (segment 8), through both layers. Add the 1.5 in (3.8 cm) chain and close the ring.
- Join the other end of the chain to the keyring with a second jump ring.
- Put the third jump ring through the butterfly’s body wraps, add the 0.75 in (1.9 cm) chain, and hang it on the keyring.
Final Blocking
- Lay the charm face up on a towel.
- Pinch each arm tip and foot into a smooth curve.
- Pin the outer sides straight, putting pins through the edging only.
- Hold a steam iron 1 in (2.5 cm) above the charm and steam it briefly. Never press down.
- While it’s still warm, flatten the petals and leaves with a fingertip.
- Let it dry, remove the pins, and check that it measures 3.8 x 3.3 in (9.7 x 8.4 cm).
Final Quality-Control Checklist
- Each panel measured 3.5 x 3.0 in (8.9 x 7.6 cm) before joining.
- The edging has 112 sc, with 2 sc at all 10 convex corners.
- The valleys are sharp and the tips are rounded.
- The stuffing is light and even.
- The appliqués are secure and no tails show.
- All jump rings are fully closed.
- The butterfly hangs freely beside the letter.
Troubleshooting
- Panel too wide: Check your gauge at Row 9 and go down a hook size.
- Gaps at the bridge: Work Row 6 into the back bumps of the chain.
- Sides ruffle: Use exactly 1 sc per row-end.
- Tips pucker: A corner increase is missing; work 2 sc at each tip corner.
- Valleys look rounded: Don’t add stitches at inner corners.
- Charm too round: Remove some stuffing.
- Petals flip up: Tack down the underside of each petal tip.
Care
Spot clean with mild soap and cool water, then air dry flat. Keep the metal hardware dry to protect the gold finish.

Final Notes
Here is how the measurements build. A gauge of 6 sc x 6 rows per 1 in (2.5 cm) gives a 21-st band 3.5 in (8.9 cm) wide and an 18-row panel 3.0 in (7.6 cm) tall. The 112-st edging (102 edge positions plus 10 corner increases) brings the charm to 3.8 x 3.3 in (9.7 x 8.4 cm). If each checkpoint matches, the finished keychain will too.
Happy crocheting!