

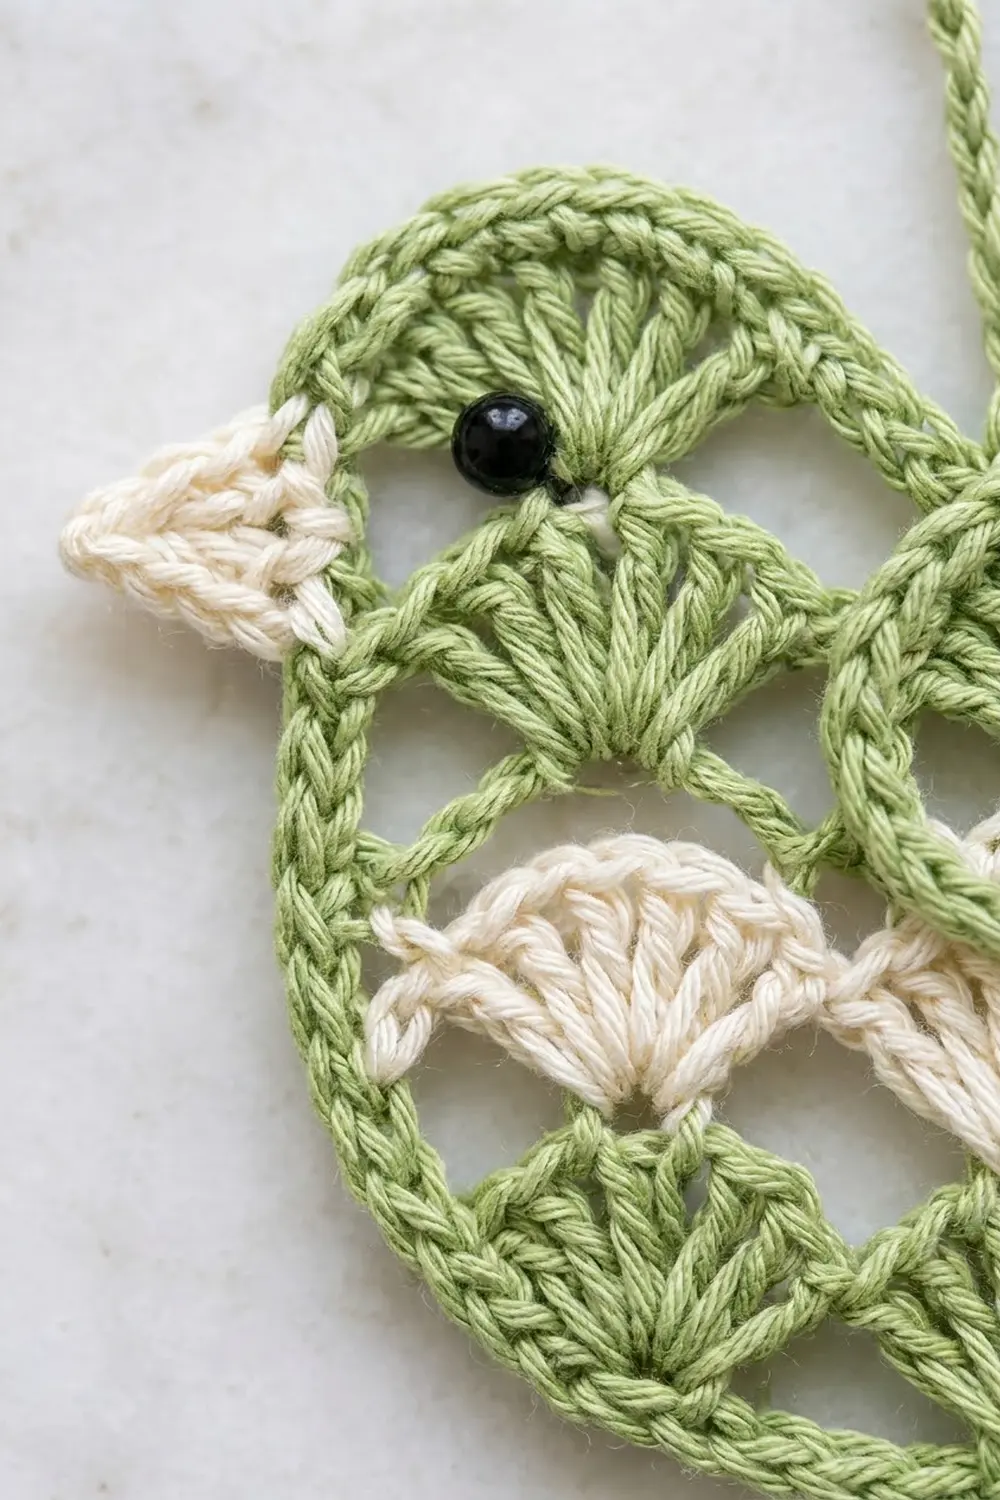
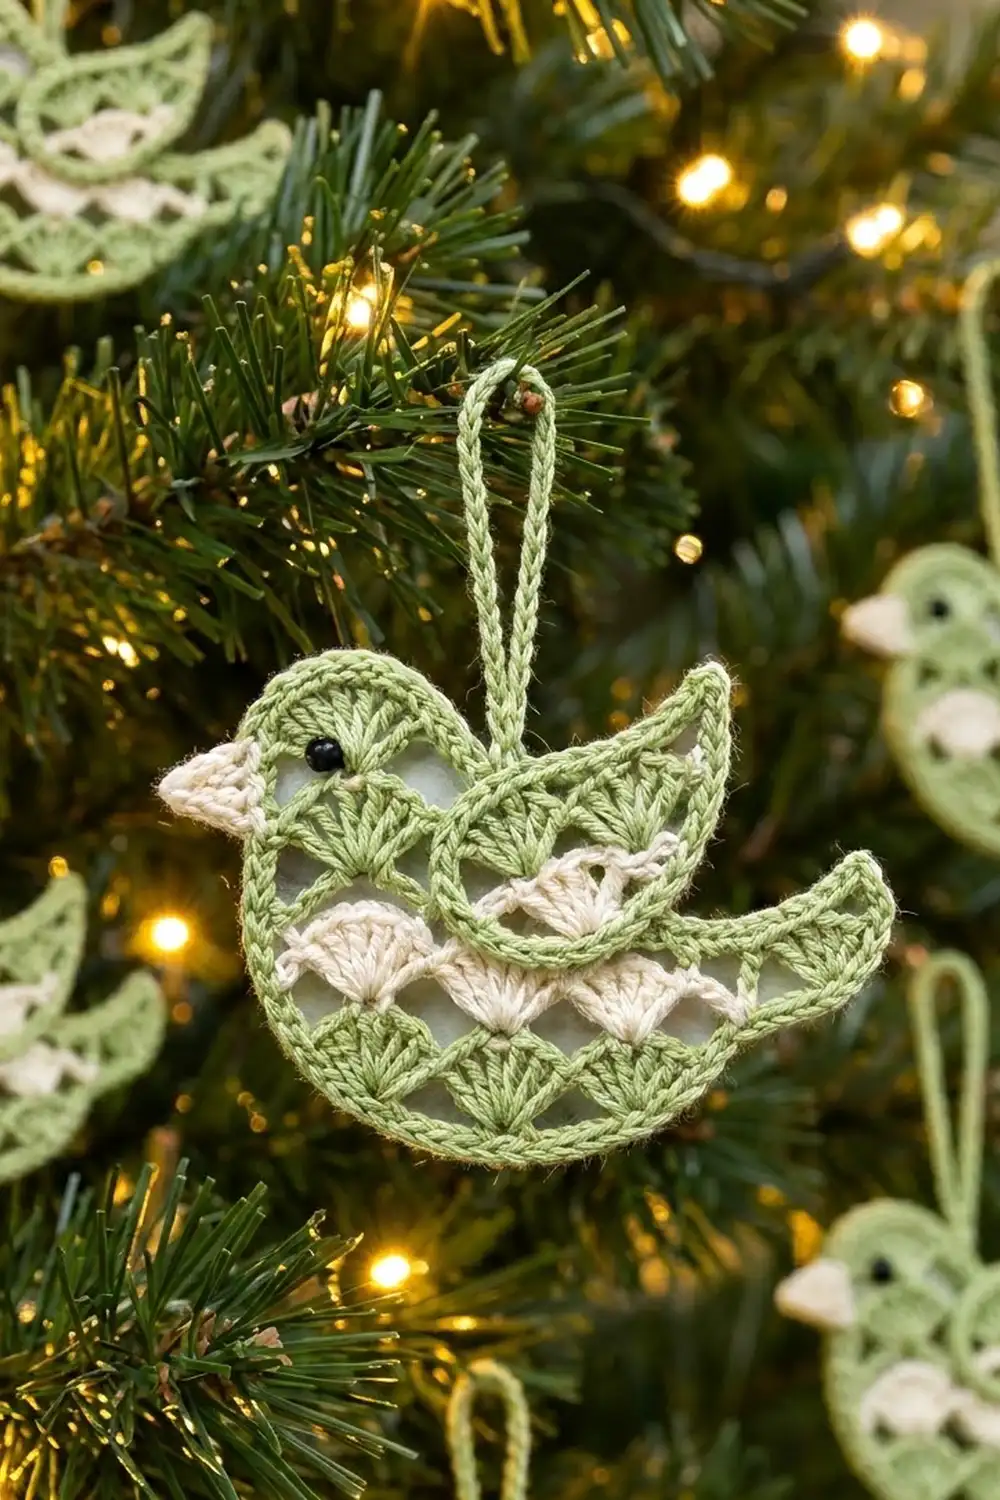
The Sage Songbird is a small, flat lace bird ornament with a soft vintage look. Its body is built from rows of shell stitches, so light shows through every fan. Hung on a tree, it reads as delicate lacework rather than a solid shape.
It is worked in two colors: sage green and cream. Green shells form the belly, head and upturned tail. A band of cream shells runs across the middle. A raised green outline holds the whole silhouette together, and a teardrop wing, a cream beak and a black bead eye finish the bird.
This pattern uses US crochet terms. The finished bird measures 5 in (12.7 cm) wide by 3 in (7.6 cm) tall. With the beak it is 5.5 in (14.0 cm) wide, and the hanging loop adds 2.5 in (6.4 cm) above the back.
The body is crocheted in shell rows from the belly upward. You then split the work to make a rounded head on the left and a flared tail on the right. Two outline rounds go all the way around. The wing, beak and loop are made separately and sewn on.
Finished Size and Construction
- Finished size: 5 in (12.7 cm) wide x 3 in (7.6 cm) tall, not counting beak and loop
- Width with beak: 5.5 in (14.0 cm)
- Skill level: Intermediate
- Terminology: US crochet terms
- Yarn weight: Sport (#2) cotton or light fingering cotton
- Hook: 2.5 mm
- Number of pieces: 1 ornament (a body plus a sewn-on wing, beak and loop)
- Layout: Single bird facing left, wing on the back, loop at the top center
- Body size before outline: 4.5 in (11.4 cm) wide x 2.5 in (6.4 cm) tall
- Outline depth: 0.25 in (0.6 cm) on every edge
- Wing size: 1.75 in (4.4 cm) x 1.25 in (3.2 cm)
Materials
Choose a smooth, mercerized cotton. It gives crisp shells and holds its shape after blocking. Avoid fuzzy or very stretchy yarns, because they hide the lace.
- Sage green: 7 g (about 21 m)
- Cream: 3 g (about 9 m)
- Tools:
- 2.5 mm crochet hook
- One 4 mm black bead (or black embroidery floss for a French knot)
- Tapestry needle
- Sewing needle and green thread
- Scissors
- Blocking mat and rust-proof pins
- Spray bottle or light spray starch
These quantities are for one ornament and include a margin of about 15 percent for swatching and tails.
Abbreviations (US Terms)
- ch – chain
- sl st – slip stitch
- sc – single crochet
- dc – double crochet
- tr – treble crochet
- sc2tog – single crochet 2 together
- st(s) – stitch(es)
- sk – skip
- sp – space
- tch – turning chain
- RS / WS – right side / wrong side
Special stitch – Shell: 5 dc in the same stitch. The center dc of a shell is the 3rd dc.
Half shell: 3 dc in the same stitch at the edge of a row. If the row starts with ch 3, that ch 3 counts as the first dc.
Gauge and Checkpoints
Make the first ornament as your test piece. It is small, so checking it costs very little.
- Row 1: 4 shells measure 4 in (10.2 cm) wide and 0.5 in (1.3 cm) tall.
- After Row 3: 4 in (10.2 cm) wide x 1.5 in (3.8 cm) tall.
- After the head and tail: 4.5 in (11.4 cm) wide x 2.5 in (6.4 cm) tall at the head.
- After the outline: 5 in (12.7 cm) x 3 in (7.6 cm).
If Row 1 is wider than 4.25 in (10.8 cm), go down 0.25 mm in hook size. If it is narrower than 3.75 in (9.5 cm), go up 0.25 mm. Different yarn weights also work. They simply make a bigger or smaller bird, and the stitch counts stay the same.
Body
Every shell row has 25 stitches. On every row, the single crochets sit on positions 1, 7, 13, 19 and 25, and the shell centers sit on positions 4, 10, 16 and 22. Keeping this grid in mind makes the head and tail split easy to place.
Row 1 (RS, green): Ch 26. Sc in the 2nd ch from the hook. Sk 2 ch, shell in the next ch, sk 2 ch, sc in the next ch. Repeat from * 3 more times. You now have 4 shells and 5 sc, for 25 sts. This row ends at the head end (the left).
Row 2 (WS, cream): Change to cream in the last st of Row 1. Ch 3, turn (counts as dc). Work 2 dc in the first sc. Sc in the center dc of the next shell, shell in the next sc. Repeat from * 2 more times. Sc in the center dc of the last shell, then 3 dc in the last sc. You now have 2 half shells, 3 shells and 4 sc, for 25 sts (3 + 18 + 1 + 3).
Row 3 (RS, green): Change to green. Ch 1, turn. Sc in the first dc. Shell in the next sc, sc in the center dc of the next shell. Repeat from * 2 more times. Shell in the next sc, then sc in the top of the tch. You now have 4 shells and 5 sc, for 25 sts. Fasten off.
Checkpoint: 4 in (10.2 cm) x 1.5 in (3.8 cm). The belly edge should curve gently into a crescent.
Head
The head is worked over the first 13 sts at the head end, which are positions 1 to 13.
Row 4 (WS, cream): With the WS facing, join cream with a sl st in the last sc of Row 3 (position 1). Ch 3, then 2 dc in the same st. Sc in the center dc of the next shell (position 4). Shell in the next sc (position 7). Sc in the center dc of the next shell (position 10). Work 3 dc in the next sc (position 13). You have 13 sts (3 + 1 + 5 + 1 + 3). Leave the remaining 12 sts unworked. Fasten off.
Row 5 (RS, green): Join green in the last dc made. Ch 1, then sc in the same st. Work 7 dc in the next sc, then sc in the center dc of the shell. Work 7 dc in the next sc, then sc in the top of the tch. You have 17 sts (1 + 7 + 1 + 7 + 1). The two 7-dc fans round out the crown. Fasten off.
Tail
Row 4T (WS, green): With the WS facing, join green with a sl st in position 19 of Row 3. Ch 3, then 2 dc in the same st. Sc in the center dc of the next shell (position 22). Work 7 tr in the last sc (position 25). You have 11 sts (3 + 1 + 7). The tr fan flares outward and upward at the tail end.
Row 5T (RS, green): Ch 1, turn. Sc in the first tr, sk 2 tr, 7 tr in the next (center) tr, sk 2 tr, sc in the next tr. You have 9 sts (1 + 7 + 1). Leave the last 4 sts of Row 4T (1 sc and the 3-st half shell) unworked. Fasten off.
Positions 14 to 18 of Row 3 stay open between the head and the tail. This dip forms the bird’s back, and the wing covers it later.
Checkpoint: 4.5 in (11.4 cm) wide x 2.5 in (6.4 cm) tall at the head.
Wing (Make 1)
Row 1 (cream): Ch 4. Work 8 dc in the 4th ch from the hook. You have 9 dc, counting the skipped ch 3. This makes a half-circle fan. Fasten off.
Rnd 2 (green): Join green in the top of the ch 3. Ch 1, then 2 sc in each st across the fan’s curved edge, for 18 sc. Ch 16, then sl st in the first sc. The chain forms the open, pointed end of the teardrop.
Rnd 3: Ch 1. Sc in each of the 18 sc. Working into the ch-16, sc in the next 7 ch, then (sc, ch 3, sc) in the next ch, then sc in the last 8 ch. Sl st in the first sc. You have 35 sc (18 + 17) and 1 ch-3 point.
Rnd 4: Sl st loosely in each sc, and work (sl st, ch 3, sl st) in the ch-3 point, for 37 sl sts. Fasten off, leaving a 10 in (25.4 cm) tail for sewing.
Beak (Make 1)
Row 1 (cream): Ch 5. Sc in the 2nd ch from the hook and in the next 3 ch, for 4 sc.
Row 2: Ch 1, turn, sc2tog twice, for 2 sts.
Row 3: Ch 1, turn, sc2tog, for 1 st. Fasten off, leaving an 8 in (20.3 cm) tail.
The beak measures 0.75 in (1.9 cm) across the base and 0.5 in (1.3 cm) to the point.
Hanging Loop
With green, ch 28. Sl st in the back bump of the 2nd ch from the hook and in each ch across, for 27 sl sts. This makes a firm cord about 5 in (12.7 cm) long. Leave 6 in (15.2 cm) tails at both ends.
Border (Outline)
Border gauge: about 6 sc per 1 in (2.5 cm) along straight edges, which matches the body gauge. Each dc-height row end is 0.5 in (1.3 cm) tall, so it takes 3 sc. On the foundation edge, you work 1 sc in each ch.
Rnd 1 (RS, green): Join green at the head end of the foundation chain and work these sections in order:
- A, belly: 3 sc in the first ch, sc in the next 23 ch, 3 sc in the last ch: 29 sc.
- B, tail end: 3 sc in each row end of Rows 1, 2, 3 and 4T: 12 sc.
- C, tail top: Sc in the first sc of Row 5T, sc in the next 3 tr, (sc, ch 3, sc) in the center tr, sc in the next 3 tr, sc in the last sc: 10 sc plus 1 ch-3 tail point.
- D, back dip: Sc in each of the 4 unworked sts of Row 4T, sc in positions 18 to 14 of Row 3, and 2 sc up the row end of the head’s Row 4: 11 sc (4 + 5 + 2).
- E, crown: Sc in the first sc of Row 5. On each 7-dc fan, sc in 3 dc, 3 sc in the center dc, and sc in 3 dc. Sc in the middle sc and the last sc: 21 sc (1 + 9 + 1 + 9 + 1).
- F, head front: 3 sc in each row end of Rows 4, 3, 2 and 1, but 2 sc in the row end of Row 5: 14 sc (2 + 12).
Sl st in the first sc. Total: 97 sc (29 + 12 + 10 + 11 + 21 + 14) and 1 ch-3 point.
Rnd 2: Ch 1. Sl st loosely in each sc around, and work (sl st, ch 3, sl st) in the ch-3 point. Total: 99 sl sts and 1 ch-3 point. This gives the raised, braided-looking edge. Fasten off.
Why the math works: Every edge gets stitches at the same density as the body, so nothing ruffles or pulls. The corners and fan centers have extra stitches (3 sc in 1 st) only where the outline turns outward. The back dip and the top row end of the head get fewer stitches because those edges curve inward. The 2 outline rounds add 0.25 in (0.6 cm) per side, which takes the body from 4.5 x 2.5 in (11.4 x 6.4 cm) to 5 x 3 in (12.7 x 7.6 cm).
Assembly
- Wing: Place the wing over the back dip. Its rounded cream end points toward the head and its tip points up toward the tail. Using the yarn tail, whipstitch the wing’s outer outline to the body only where the two touch, so the lace stays open.
- Beak: Center the base on the head front (section F) at about the Row 4 level, with the point facing out. Sew it through the back loops of the outline.
- Eye: Sew the black bead on Row 5, between the front fan and the outline, about 0.6 in (1.5 cm) above the beak.
- Loop: Fold the cord in half. Sew both ends to the WS of the outline at the center of the back dip, just in front of the wing.
Final Blocking
- Weave in all ends along the outline sts, then trim.
- Mist the bird until it is damp, but not dripping.
- Pin the belly into a smooth crescent, 5 in (12.7 cm) wide.
- Pin the crown to 3 in (7.6 cm) tall, and pin the tail point up and out.
- Pin each shell open. Use one pin at the tip of each fan to open the lace.
- Lightly starch the bird if you want a firmer ornament, and let it dry completely.
- Unpin and check the measurements again.
Final Quality-Control Checklist
- Rows 1–3 each have 25 sts, and all shells line up.
- The head has 13 sts in Row 4 and 17 sts in Row 5.
- The tail has 11 sts in Row 4T and 9 sts in Row 5T.
- Outline Rnd 1 has 97 sc, and Rnd 2 has 99 sl sts.
- The wing has 35 sc in Rnd 3 and 37 sl sts in Rnd 4.
- The bird measures 5 x 3 in (12.7 x 7.6 cm).
- The beak, eye and loop are secure, and no ends show on the RS.
Troubleshooting
- Belly is flat, not curved: Your tension was tight on Row 1. Block the belly into a curve, or work Row 1 with a 0.25 mm larger hook.
- Outline ruffles: Your outline tension is too loose. Use 1 fewer sc in each row-end group.
- Outline cups or puckers: You have too few stitches. Add 1 sc in sections B and F.
- Wing looks round, not teardrop-shaped: Pin the ch-3 point firmly while blocking, and pull the chain section taut.
- Shells lean sideways: You missed the center dc. Count to the 3rd dc of every shell.
Care
Hand wash in cool water and lay flat to dry, re-pinning if needed. Store the ornament flat between tissue so the fans stay crisp.
Final Notes
The measurement chain is simple:
- Row 1 is 4 in (10.2 cm) wide.
- After Row 3, the body is 4 in x 1.5 in (10.2 x 3.8 cm).
- After the head and tail, it is 4.5 in x 2.5 in (11.4 x 6.4 cm).
- The 2 outline rounds bring it to 5 in x 3 in (12.7 x 7.6 cm).
If your Row 1 matches, the rest follows. Make one, then fill a branch with a whole flock.
Happy crocheting!