

The Lilac Flutter Curtain is a light, airy window panel made from an open diamond net with small lace butterflies scattered across it. A soft lilac mesh frames each butterfly. The wings alternate between lilac-and-cream and all-cream, so the curtain shows a gentle checkerboard of color when light comes through.
The style is romantic but simple. Each butterfly is a layered appliqué: two cream lower wings, two larger upper wings, and a raised lilac body with curled antennae. The pattern uses US crochet terms throughout.
The finished curtain has seven separate strips. Each strip measures 7.25 in x 69 in (18.4 cm x 175.3 cm) before the tab loop. Hung edge to edge, the seven strips cover 50.75 in (128.9 cm) of rod.
Here is the construction. You work each rectangular motif in rows of mesh, then add one frame round. You sew a butterfly onto each motif and join eight motifs into a strip. Next, you add two border rounds and one tab loop at the top.
Finished Size and Construction
- Finished strip size: 7.25 in x 69 in (18.4 cm x 175.3 cm), plus a tab loop about 3 in (7.6 cm) deep
- Full curtain: 7 strips, 50.75 in (128.9 cm) wide when hung edge to edge
- Skill level: Intermediate
- Terminology: US
- Yarn weight: Worsted (#4) cotton
- Hook: 4.5 mm (US 7)
- Number of pieces: 56 mesh motifs and 56 butterflies, made into 7 strips of 8 motifs each
- Layout: each strip is 1 motif wide x 8 motifs tall; the strips are not joined to each other
- Motif size: 6.25 in x 8.5 in (15.9 cm x 21.6 cm), including the frame round
- Strip size before border: 6.25 in x 68 in (15.9 cm x 172.7 cm)
- Border depth: 0.5 in (1.3 cm) on each side
Materials
Use a smooth, mercerized or combed worsted cotton. Cotton keeps the mesh crisp and hangs straight. Avoid fuzzy yarns, because the diamond net needs clear stitch definition. Figures below assume about 190 m per 100 g.
- Lilac: 800 g (about 1,520 m) for the mesh, frames, joins, border, tabs, bodies, and lilac upper wings
- Cream: 250 g (about 475 m) for all lower wings and the cream upper wings
Tools:
- 4.5 mm (US 7) crochet hook
- Tapestry needle
- Stitch markers
- Rust-proof pins and a blocking surface
- Measuring tape
- Scissors
All yarn quantities include a margin of about 10% for gauge swatches and tension differences.
Abbreviations (US Terms)
- ch: chain
- sl st: slip stitch
- sc: single crochet
- hdc: half double crochet
- dc: double crochet
- sp(s): space(s)
- st(s): stitch(es)
- RS / WS: right side / wrong side
Special stitch – scallop: 3 dc worked into the same space. Each scallop is followed by 1 sc, which anchors it.
Gauge and Checkpoints
Gauge in sc: 16 sts and 16 rows = 4 in (10.2 cm), so 4 sts and 4 rows = 1 in.
Make one full motif before anything else and measure it. This is your real gauge test.
- After Row 17 of the mesh: 5.75 in x 8 in (14.6 cm x 20.3 cm), lightly stretched
- After the frame round: 6.25 in x 8.5 in (15.9 cm x 21.6 cm)
- Upper wing: about 2.25 in (5.7 cm) wide
- Lower wing: about 1.75 in (4.4 cm) wide
If your motif comes out too big, go down one hook size. If it is too small, go up one size. Keep the frame round at exactly 25 sts across and 34 sts down each side, whatever hook you use. The border math depends on those counts.
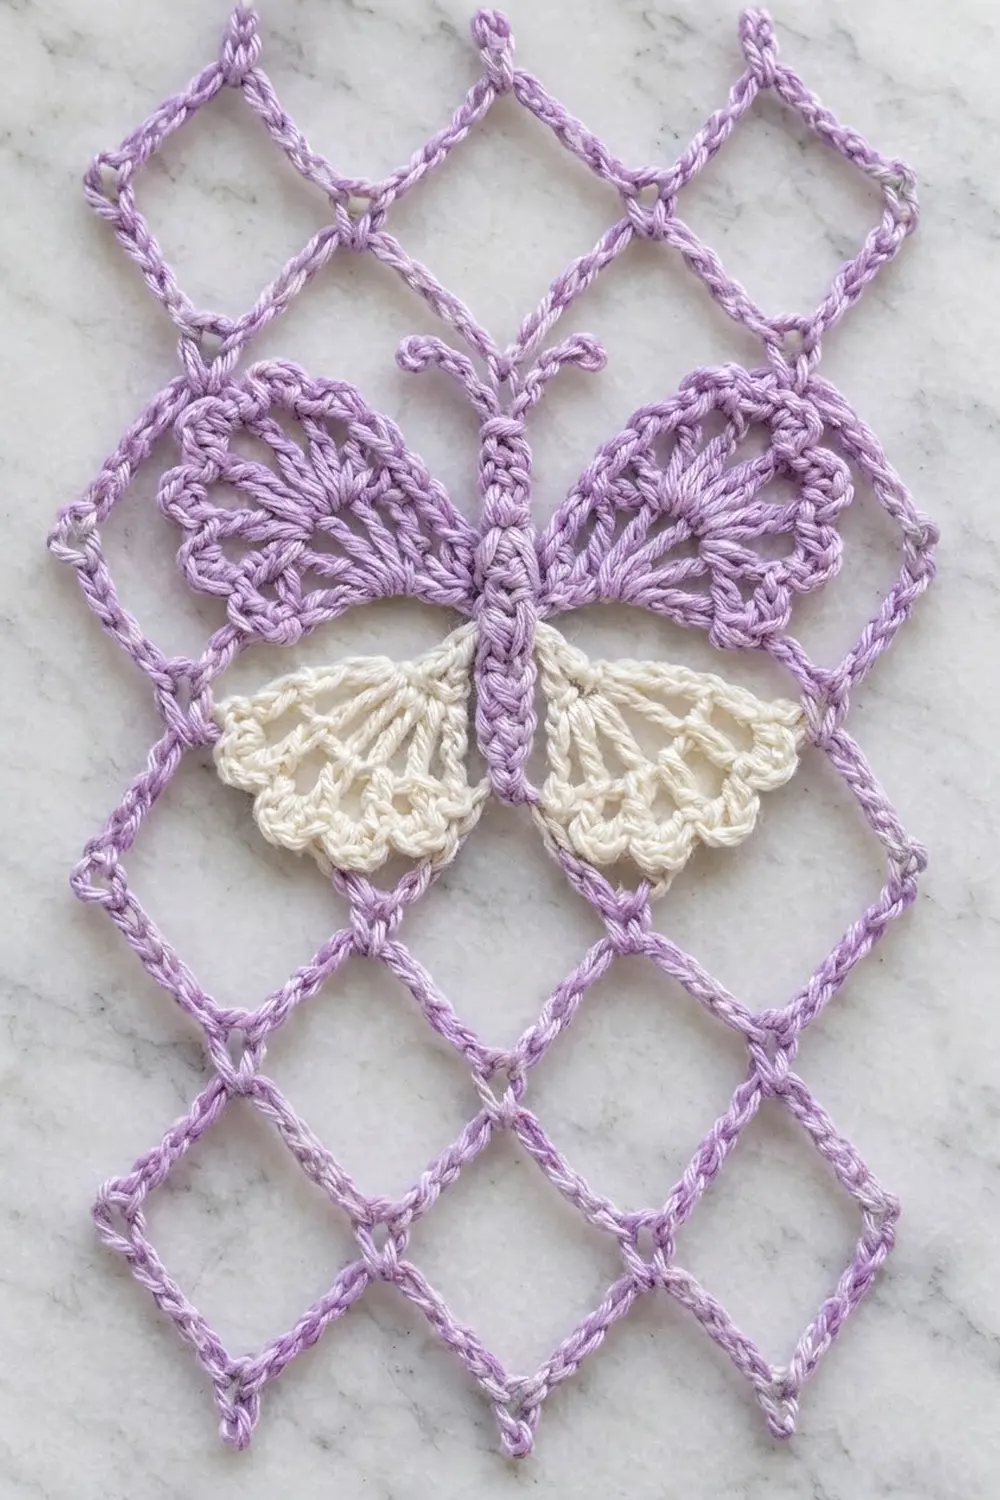
Mesh Motif (make 56, lilac)
Ch 26.
Row 1 (RS): Sc in 2nd ch from hook, *ch 5, sk 3 ch, sc in next ch; rep from * 5 more times. (7 sc, 6 ch-5 loops)
Row 2: Ch 5 (counts as dc + ch 2), turn, sc in first ch-5 loop, *ch 5, sc in next ch-5 loop; rep from * 4 more times, ch 2, dc in last sc. (6 sc, 5 ch-5 loops, 2 half loops)
Row 3: Ch 1, turn, sc in first dc, *ch 5, sc in next ch-5 loop; rep from * 4 more times, ch 5, sc in 3rd ch of turning ch. (7 sc, 6 ch-5 loops)
Rows 4–17: Repeat Rows 2 and 3 seven more times. Row 17 is a Row 3 type, with 7 sc and 6 ch-5 loops.
Each loop now sits offset from the loops below it, which forms the diamond net. Do not fasten off.
Frame Round: Ch 1, turn. Work along the top edge: sc in first sc, *3 sc in next ch-5 loop, sc in next sc; rep from * 5 more times. That is 1 + (6 x 4) = 25 sc. Ch 2 for the corner.
Work down the side, putting 2 sc in each of the 17 row ends. (34 sc) Ch 2.
Work along the bottom into the free loops of the foundation chain: sc in each of the 25 ch. (25 sc) Ch 2.
Work up the second side with 2 sc in each row end. (34 sc) Ch 2, then sl st to the first sc.
Round total: 25 + 34 + 25 + 34 = 118 sc, plus 4 ch-2 corner sps. In this pattern, “per side” counts do not include the corners. The corners are ch-2 spaces, not stitches. Fasten off.
Butterfly Appliqué (make 56)
Make 28 Butterfly A (lilac upper wings, cream lower wings) and 28 Butterfly B (cream upper wings, cream lower wings). Every butterfly has a lilac body.
Upper Wing (make 2 per butterfly)
Ch 5.
Row 1: Dc in 5th ch from hook (the skipped ch count as dc + ch 1), *ch 1, dc in same ch; rep from * 3 more times. (6 dc, 5 ch-1 sps)
Row 2: Ch 4 (counts as dc + ch 1), turn, dc in next ch-1 sp, ch 1, dc in next dc, ch 1; rep from * 4 more times, ending the last repeat at *. (11 dc, 10 ch-1 sps)
Row 3: Ch 1, turn, sc in first dc, *3 dc in next ch-1 sp, sc in next ch-1 sp; rep from * 4 more times, sc in last dc. (15 dc + 7 sc = 22 sts, 5 scallops)
Fasten off, leaving a 10 in (25.4 cm) tail. The result is a rounded fan with a scalloped outer edge.
Lower Wing (make 2 per butterfly, cream)
Ch 4.
Row 1: 4 dc in 4th ch from hook. (5 dc, with the skipped ch counting as the first dc)
Row 2: Ch 4 (counts as dc + ch 1), turn, *dc in next dc, ch 1; rep from * 2 more times, dc in top of turning ch. (5 dc, 4 ch-1 sps)
Row 3: Ch 1, turn, sc in first dc, *3 dc in next ch-1 sp, sc in next dc; rep from * 3 more times. (12 dc + 5 sc = 17 sts, 4 scallops)
Fasten off, leaving a 10 in (25.4 cm) tail.
Body (make 1 per butterfly, lilac)
Ch 9.
Rnd 1: Hdc in 3rd ch from hook and in each of the next 5 ch, 3 hdc in last ch. Rotate and work along the other side of the chain: hdc in each of the next 6 ch, then sl st to the top of the first hdc. (6 + 3 + 6 = 15 hdc)
This makes a firm oval about 2 in (5.1 cm) long. The 3-hdc end is the head. Leave a 12 in (30.5 cm) tail.
Assembly (in layer order)
- Lay the motif RS up with the foundation edge at the bottom. Mark the center column, which runs from the 4th sc of Row 1 to the 4th sc of Row 17.
- Lower wings: Pin each cream lower wing with its starting point touching the center column at Row 7. Angle the scalloped edges down and out. Whipstitch the wing edges to the mesh loops underneath.
- Upper wings: Pin each upper wing with its starting point at Row 9. Angle the scallops up and out, and let the lower edge overlap the top of the lower wing by about 0.25 in (0.6 cm). Sew around the outer edge.
- Body: Center the body over the wing points along the center column, with the head toward the top. Sew all around the body so it covers the wing bases.
- Antennae: Join lilac at the head. *Ch 6, 2 sc in 2nd ch from hook, sl st in each of the remaining 4 ch, sl st into the head; rep from * once more. Pinch each tip so it curls outward.
Weave in all ends on the WS.
Make All Pieces
- Mesh motifs: 56 in lilac
- Butterfly A: 28 (56 lilac upper wings, 56 cream lower wings, 28 lilac bodies)
- Butterfly B: 28 (56 cream upper wings, 56 cream lower wings, 28 lilac bodies)
Sew Butterfly A onto 28 motifs and Butterfly B onto the other 28.
Layout for the curtain, with strips 1–7 from left to right and Row 1 at the top:
Row | S1 S2 S3 S4 S5 S6 S7
 1  |  A  B  A  B  A  B  A
 2  |  B  A  B  A  B  A  B
 3  |  A  B  A  B  A  B  A
 4  |  B  A  B  A  B  A  B
 5  |  A  B  A  B  A  B  A
 6  |  B  A  B  A  B  A  B
 7  |  A  B  A  B  A  B  A
 8  |  B  A  B  A  B  A  B
Every strip has 4 A and 4 B motifs. Strips 1, 3, 5, and 7 start with A, and strips 2, 4, 6 start with B.
Joining
Join motifs only top to bottom, into vertical strips of 8. The strips stay separate.
Method: sc join through both layers, in lilac.
- Hold two motifs WS together, with the bottom edge of the upper motif against the top edge of the lower motif.
- Join lilac through both corner ch-2 sps with a sl st.
- Sc through both layers in each st across: 25 sc, one for each matching pair of frame sts.
- Sl st through both opposite corner ch-2 sps. Fasten off.
The join is stitch to stitch: 25 sts meet 25 sts, with nothing added or skipped. Keep the seam at the same tension as the frame. If the seam pulls tight, the strip will pinch at each join. If it is loose, the strip will grow.
Make 7 seams per strip.
Checkpoint: each joined strip measures 6.25 in x 68 in (15.9 cm x 172.7 cm), which is 8 x 8.5 in (21.6 cm).
Border
Border gauge: 4 sc = 1 in (2.5 cm), the same as the frame.
Starting counts per strip:
- Short sides: 1 motif x 25 sts = 25 sts
- Long sides: 8 motifs x 34 sts = 272 sts
No stitches are added at the seams.
Rnd 1 (RS): Join lilac in any st. Sc in each st around. In each of the 4 outer corner ch-2 sps, work (sc, ch 2, sc). At each seam, skip the joined corner sps; they are already closed by the sl sts.
- Short sides: 1 + 25 + 1 = 27 sc each
- Long sides: 1 + 272 + 1 = 274 sc each
- Round total: 27 + 274 + 27 + 274 = 602 sc, plus 4 ch-2 corner sps
Rnd 2: Sl st into the corner ch-2 sp. Sc in each sc around, and in each corner ch-2 sp work (sc, ch 2, sc).
- Short sides: 29 sc each
- Long sides: 276 sc each
- Round total: 29 + 276 + 29 + 276 = 610 sc, plus 4 ch-2 corner sps
Sl st to the first sc. Do not fasten off if you are starting the tab at this corner; otherwise fasten off.
Why the math works: each border round adds 1 sc at each end of every side, and each sc round adds 0.25 in (0.6 cm) to every edge. Short side: 29 sts ÷ 4 = 7.25 in (18.4 cm), which is 6.25 in + 0.5 in + 0.5 in. Long side: 276 sts ÷ 4 = 69 in (175.3 cm), which is 68 in + 0.5 in + 0.5 in. The stitch count and the physical size grow together, so the edges lie flat.
Tab Loop (1 per strip)
The top short side has 29 sts. Count to the center 9 sts (sts 11–19), which leaves 10 sts on each side.
Row 1: Join lilac in st 11, ch 1, sc in the same st and in each of the next 8 sts. (9 sc)
Rows 2–24: Ch 1, turn, sc in each st across. (9 sc)
The tab measures 2.25 in x 6 in (5.7 cm x 15.2 cm). Fold it to the WS and sew the last row across the same 9 sts at the base of Border Rnd 1. That makes a loop about 3 in (7.6 cm) deep, which fits rods up to 1.25 in (3.2 cm) across.
Final Blocking
- Soak each strip in cool water for 15 minutes, then press out the water gently. Do not wring.
- Roll the strip in a towel to remove more water.
- Pin the strip flat to 7.25 in x 69 in (18.4 cm x 175.3 cm).
- Pin each motif’s mesh open so the diamonds are even.
- Shape the wing scallops with your fingertips, and curl the antennae.
- Let the strip dry completely before you unpin it.
Final Quality-Control Checklist
- Every frame round has 25 / 34 / 25 / 34 sts.
- Each strip has 8 motifs in the correct A/B order.
- Each strip measures 68 in (172.7 cm) before the border.
- Border Rnd 2 has 29 / 276 / 29 / 276 sts.
- Each tab is centered over sts 11–19.
- Lower wings sit under the upper wings, with the body on top.
- All ends are woven in on the WS.
Troubleshooting
- Mesh leans to one side: check that each row starts with the correct turning chain: ch 5 on even rows, ch 1 on odd rows.
- Strip ripples at the edges: your border is looser than the frame; go down a hook size for the border only.
- Strip pinches at the seams: the sc join is too tight; loosen it or go up a hook size for joining.
- Wings curl up: block them flat, and add a few tacking stitches near the scallops.
- Butterfly is off-center: remove it and re-pin it using the center column as a guide.
Care
Hand wash in cool water with a mild detergent and dry flat, reshaping the strips while damp. Avoid hanging the strips wet, because the weight will stretch the mesh.

Final Notes
The measurement chain is simple. The frame round sets each motif at 6.25 in x 8.5 in (15.9 cm x 21.6 cm). Eight motifs make a 68 in (172.7 cm) strip. Two border rounds bring each strip to 7.25 in x 69 in (18.4 cm x 175.3 cm). Seven strips cover 50.75 in (128.9 cm) of rod. If you hold the counts at each stage, the curtain will hang straight and even.
Happy crocheting!