
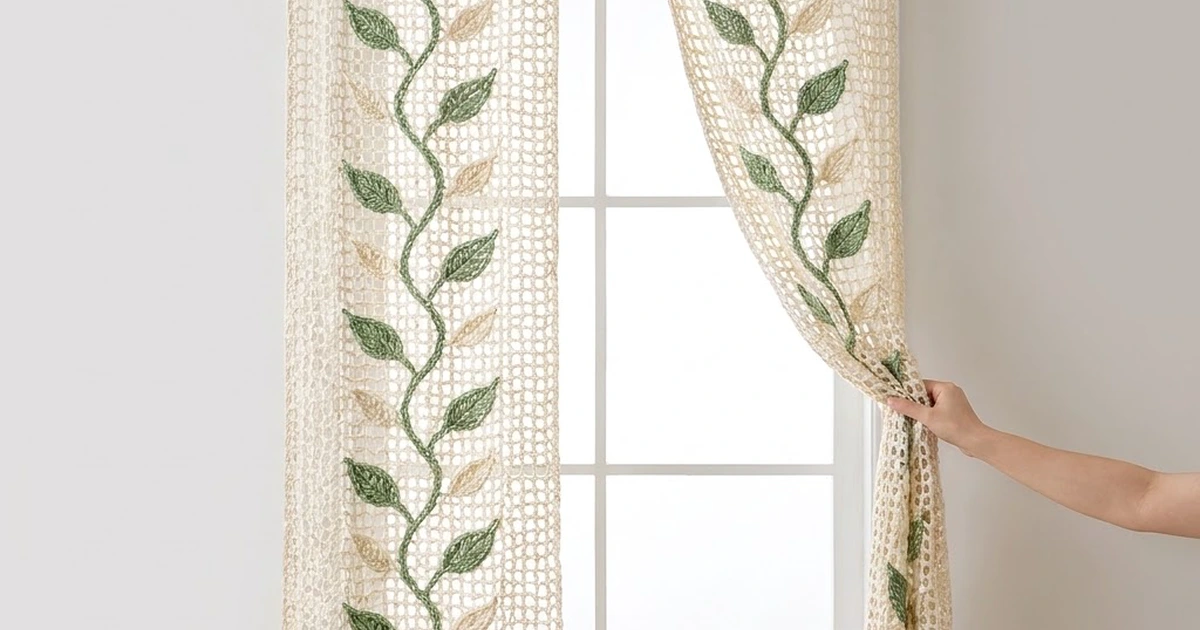
These curtains are made of light cream mesh with a single green vine climbing up each panel. Leaves in sage green and cream alternate along the vine. Light comes through the open diamond net, so the vine looks like it is growing up a garden trellis on your window.
The pattern makes a matching pair. Each panel is one separate piece about 31 in (78.7 cm) wide and 76.5 in (194.3 cm) long from the top of the header to the bottom of the scallops. With the tab loops added, it hangs about 79.5 in (201.9 cm) from the top of the rod. The panels are not joined to each other.
All terms are US crochet terms. You work the mesh in rows from the bottom up, then add a solid header. A two-round border adds scallops at the bottom, and six tabs go across the top. The vine is a separate chain cord sewn on in soft S-curves. The leaves are small pieces worked around a chain and sewn along the vine.
The construction is simple, but the panels are large. This pattern focuses on measurement checkpoints so both panels finish the same size.
Finished Size and Construction
- Finished panel size: 31 in x 76.5 in (78.7 cm x 194.3 cm), plus 3 in (7.6 cm) tab loops
- Skill level: Intermediate
- Terminology: US
- Yarn weight: Worsted (#4) cotton or cotton blend
- Hook: 5.0 mm (H-8)
- Number of pieces: 2 identical panels, hung separately (not joined)
- Layout: one panel on each side of the window
- Panel size before border: 30 in x 75 in (76.2 cm x 190.5 cm)
- Border depth: 0.5 in (1.3 cm) at the sides and top, 1 in (2.5 cm) at the bottom
Materials
Choose a smooth, mercerized or matte worsted cotton. Cotton holds the mesh open and doesn’t stretch much when the panel hangs. Avoid acrylic, which can grow in length under its own weight.
- Cream (main color): 700 g, about 1,260 m (mesh, header, border, tabs, cream leaves)
- Sage green: 50 g, about 90 m (vines and green leaves)
- 5.0 mm (H-8) crochet hook
- Tapestry needle
- Locking stitch markers (at least 20)
- Rust-proof pins and a large blocking surface
- Measuring tape
- Spray bottle
These quantities cover both panels and include a margin of about 15 percent.
Abbreviations (US Terms)
- ch: chain
- sl st: slip stitch
- sc: single crochet
- hdc: half double crochet
- dc: double crochet
- tr: treble crochet
- sk: skip
- sp: space
- st(s): stitch(es)
- RS / WS: right side / wrong side
Special stitch: Net Loop. Ch 5, then sc in the next ch-5 loop. Each net loop measures 1 in (2.5 cm) across when blocked.
Gauge and Checkpoints
Mesh gauge (blocked): 4 net loops = 4 in (10.2 cm) wide. 4 rows = 3 in (7.6 cm) tall, so each row is 0.75 in (1.9 cm).
Border gauge: 4 sc = 1 in (2.5 cm), both horizontally and along the side edges.
Test piece: Ch 21 and work Rows 1–9 of the mesh pattern below with 5 loops per row. Block it. It should measure 5 in x 6.75 in (12.7 cm x 17.1 cm).
- If your swatch is too large, go down 0.5 mm.
- If it is too small, go up 0.5 mm.
- Row height matters more than width. A difference of 0.1 in (0.3 cm) per row adds up to almost 10 in (25.4 cm) over 99 rows.
Checkpoints (measured lightly stretched, as if blocked):
- After Row 1: 30 in (76.2 cm) wide
- After Row 33: 24.75 in (62.9 cm) tall
- After Row 99: 74.25 in (188.6 cm) tall
- After the header: 75 in (190.5 cm) tall

Mesh Body (Make 2)
With cream, ch 121.
Row 1 (RS): Sc in 2nd ch from hook. Ch 5, sk 3 ch, sc in next ch. Repeat from * across. You now have 31 sc and 30 ch-5 loops.
Row 2: Ch 5 (counts as dc + ch 2), turn. Sc in first ch-5 loop. Ch 5, sc in next ch-5 loop. Repeat from * across, ending with sc in the last loop. Ch 2, dc in the last sc. This row has 30 sc, 29 full ch-5 loops and 2 half loops (ch-2) at the edges.
Row 3: Ch 1, turn. Sc in the dc. Skipping the ch-2 half loop, ch 5, sc in next ch-5 loop. Repeat from * 28 more times. Ch 5, then sc in the 3rd ch of the turning ch-5. This row has 31 sc and 30 ch-5 loops.
Rows 4–99: Repeat Rows 2 and 3 alternately, ending with a Row 3. Row 99 has 31 sc and 30 ch-5 loops.
The half loops on even rows keep the side edges straight. Without them, the edges would zigzag. If you lose count, check the last row: odd rows always start and end with sc, and even rows start with ch-5 and end with dc.
Header
Row 100: Ch 1, turn. Sc in first sc. 3 sc in next ch-5 loop, sc in next sc. Repeat from * across. The row has 121 sc (1 + 30 x 4).
Rows 101–102: Ch 1, turn. Sc in each st across. Each row has 121 sc.
Don’t fasten off yet. The panel now measures 30 in x 75 in (76.2 cm x 190.5 cm).
Make Both Panels
Work two complete mesh bodies with header, border and tabs before adding any vine or leaves. Make 2 vines and 16 leaves in total.
| Item | Panel A (left) | Panel B (right) |
|---|---|---|
| Mesh + header + border + tabs | cream, 1 | cream, 1 |
| Vine cord | green, 1 | green, 1 |
| Green leaves | 8 | 8 |
| Cream leaves | 8 | 8 |
Layout at the window:
[ Panel A: vine curves start left ] [ window ] [ Panel B: vine mirrored ]
The panels are not joined, so there is no joining section. Hang them side by side on the same rod.
Border
Border gauge: 4 sc = 1 in (2.5 cm). Each side’s count below includes both of its corner center stitches.
Round 1: Continue from Row 102 with RS facing.
- Corner: Work 3 sc in the last st of Row 102.
- First side: Work down the side edge. Make 3 sc in each mesh row end and 1 sc in each header row end. That is 297 + 3 = 300 sc.
- Bottom corner: Work 3 sc in the first foundation ch.
- Bottom: Sc in each of the next 119 foundation ch.
- Corner: Work 3 sc in the last foundation ch.
- Second side: Work up the other side with 300 sc.
- Top: Work 3 sc in the first st of Row 102, then sc in the next 119 sts. Join with sl st to the first sc.
Per-side counts for Round 1:
- Top: 123
- Bottom: 123
- Each side: 304
Round 1 totals 850 sts (2 x 123 + 2 x 304 − 4 shared corners).
Why the math works: 75 in x 4 sc = 300 sc along each side. Each mesh row is 0.75 in, so it gets exactly 3 sc. Each header row is 0.25 in (0.6 cm), so it gets 1 sc. Across the top and bottom, 121 sts plus 2 corner extras gives 123.
Round 2: Ch 1. Work the sides and top first, then the bottom.
- Top: Sc in each st across the top. That is 123 sc, with 1 sc in each corner center.
- Sides: Sc in each st down the first side and later up the second side, 302 sc each (corner centers already worked).
- Bottom: Sc in the corner center and in the next st. Sk 2, 7 dc in next st, sk 2, sc in next st. Repeat from * 20 times total. The last sc lands in the st just before the corner center. Sc in the corner center.
- Join with a sl st and fasten off.
Why the scallop math works: The bottom has 123 sts. The 2 corner centers plus the extra sc beside the first corner use 3 of them. That leaves 120 sts, which fit exactly 20 scallops of 6 sts. Each scallop is 1.5 in (3.8 cm) wide.
Tabs (6 per panel)
Count across the Round 2 top sts from right to left. Each tab is 8 sts wide (2 in, 5.1 cm), and the gaps between tabs are 15 sts (3.75 in, 9.5 cm). Mark sts 1–8, 24–31, 47–54, 70–77, 93–100 and 116–123. The math: 6 x 8 + 5 x 15 = 123.
Tab Row 1: Join cream in the first marked st, then sc in the same st and the next 7. You have 8 sc.
Tab Rows 2–24: Ch 1, turn. Sc in each st across (8 sc).
Fasten off, leaving a 12 in (30.5 cm) tail. Fold the tab to the WS and whipstitch the last row to the base of the tab. This makes a 3 in (7.6 cm) loop.
Vine Cord (Make 2)
With green, chain until the cord measures 96 in (243.8 cm) relaxed, about 420 ch. Sl st in the back bump of the 2nd ch from hook and in each ch back along the chain. This turns the chain into a firm, rounded cord. Fasten off, leaving long tails at both ends.
Leaves (Make 8 Green and 8 Cream per Panel)
Ch 11.
Round 1: Work into the 10 chains starting in the 2nd ch from hook.
- First side: Sc in the first ch, hdc in next, dc in next 2, tr in next 2, dc in next 2, hdc in next.
- Tip: Work (sc, ch 2, sc) in the last ch.
- Second side: Rotate and work along the opposite side of the foundation ch. Hdc in next, dc in next 2, tr in next 2, dc in next 2, hdc in next, sc in last.
- Sl st to the first sc.
This round has 20 sts plus a ch-2 tip.
Fasten off, leaving a 10 in (25.4 cm) tail. Each leaf measures about 2.25 in x 1.25 in (5.7 cm x 3.2 cm). The center foundation chain forms the raised vein. The trebles make the widest part, and the stitches get shorter toward the tip and the stem end, which gives the tapered point.
Attaching the Vine and Leaves
Lay a panel RS up and pin the vine from the top of the bottom border to just under the header. Shape it into gentle S-curves that swing about 4 in (10.2 cm) to each side of a line 12 in (30.5 cm) in from the left edge. On the second panel, mirror the curves using a line 12 in (30.5 cm) in from the right edge.
Using a green tail, sew the cord down with small stitches at every mesh intersection it crosses. Tuck both ends under the cord.
Place one leaf about every 4.5 in (11.4 cm) along the vine. Alternate colors (green, cream, green, cream) and sides (left, right). Sew each leaf around its full outline at the stem end, and tack the tip down so it lies flat.
Final Blocking
- Lightly mist the panel until it is damp, not soaked.
- Lay it flat with RS up on a large surface or on clean towels on the floor.
- Pin the side edges straight to 31 in (78.7 cm) wide.
- Pin the length to 76.5 in (194.3 cm), excluding the tabs.
- Open each scallop and pin the top of each tab.
- Smooth the mesh so the diamonds look even, and flatten the leaves with your fingers.
- Let it dry completely before unpinning.
- Block the second panel to exactly the same measurements.
Final Quality-Control Checklist
- Each panel measures 31 in x 76.5 in (78.7 cm x 194.3 cm) after blocking.
- Both panels match in length within 0.5 in (1.3 cm).
- Rows 1–99 are complete, with straight side edges.
- The header has 121 sts, and Border Round 1 has 850 sts.
- There are 20 scallops evenly spaced across the bottom.
- There are 6 tabs, each 2 in (5.1 cm) wide, folded and secured.
- The vine is stitched down at every intersection with no loose loops.
- Each panel has 16 leaves alternating color and side.
- All tails are woven in on the WS.
Troubleshooting
Side edges zigzag: You probably skipped the ch-2 half loops or the end dc on even rows. Rip back and recheck Row 2.
Panel is too long after hanging: Cotton can relax. Re-block shorter, or take out 2 mesh rows before you work the header.
Header pulls in: Work 3 sc per loop, not 2. The header must have 121 sts.
Scallops ripple or cup: Check that you skipped exactly 2 sts on each side of every 7-dc group.
Vine puckers the mesh: Sew it with the panel flat and without stretching the cord. Let it follow the curves loosely.
Leaves curl: Steam them lightly and pin them flat before you sew them on.
Care
Hand wash cold or machine wash on a gentle cycle in a mesh bag, then lay flat to dry, blocking back to size. Don’t hang the panels to dry while wet, because the weight of the water will stretch them.

Final Notes
The size of each panel depends on these measurements, in order:
- Every 1 in (2.5 cm) loop sets the width: 30 loops make the 30 in (76.2 cm) body.
- Every 0.75 in (1.9 cm) row sets the length: 99 rows plus the header make 75 in (190.5 cm).
- Border Round 1 uses 4 sc per inch, so each side gets 300 sc.
- The 20 six-stitch scallops and 6 tabs fit the 123-stitch edges exactly.
If you check each stage as you go, both panels will hang at 31 in x 76.5 in (78.7 cm x 194.3 cm) and match each other.
Happy crocheting!