
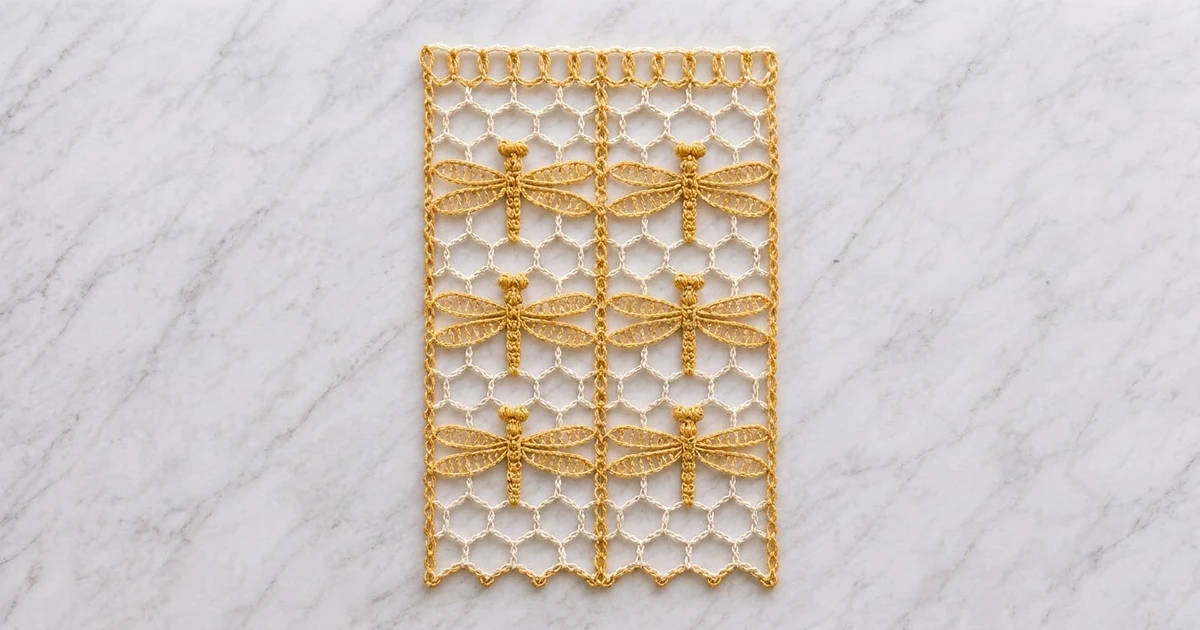
This panel pairs an airy cream honeycomb mesh with golden dragonflies in light relief. Each dragonfly has four oval wings crossed by ladder bars, a chunky segmented body, and two bobble eyes.
Two colors do all the work: cream for the mesh and mustard gold for the dragonflies, edging, center seam, and border. The look is light and slightly vintage, so the panel suits a café curtain, a door insert, or a wall hanging. All instructions use US crochet terms.
The finished panel measures 14.5 in x 21 in (36.8 cm x 53.3 cm), including the top hanging loops and the bottom picot scallops.
You work two narrow mesh strips, edge each one in gold, and sew on three dragonflies per strip. Then you slip-stitch the strips together and add the border.
Finished Size and Construction
- Finished size: 14.5 in x 21 in (36.8 cm x 53.3 cm)
- Skill level: Intermediate
- Terminology: US terms
- Yarn weight: DK (weight 3) cotton
- Hooks: 4.0 mm (G-6) for the mesh, edging, joining, and border; 3.5 mm (E-4) for the appliqués
- Number of pieces: 2 mesh strips and 6 dragonflies (each dragonfly is 4 wings, 1 body, and 1 eye piece)
- Layout: 2 strips side by side, with 3 dragonflies on each
- Strip size with edging: 6.75 in x 19 in (17.1 cm x 48.3 cm)
- Size before border: 13.5 in x 19 in (34.3 cm x 48.3 cm)
- Border depth: 0.5 in (1.3 cm) at each side. The top loops and the bottom scallops each add 0.75 in (1.9 cm).
Materials
Use a smooth mercerized DK cotton, about 107 m (117 yd) per 50 g. Fuzzy or stretchy fibers blur the honeycomb cells.
- Cream (mesh): 60 g, about 128 m (140 yd)
- Gold (dragonflies, edging, seam, border): 70 g, about 150 m (164 yd)
Both quantities include a margin of about 15% for swatching and differences in tension.
Tools: 4.0 mm (G-6) and 3.5 mm (E-4) hooks, a tapestry needle, locking stitch markers, rust-proof pins, a blocking mat, and a measuring tape.
Abbreviations (US Terms)
- ch – chain
- sl st – slip stitch
- sc – single crochet
- hdc – half double crochet
- dc – double crochet
- tr – treble crochet
- sk – skip
- sp(s) – space(s)
- st(s) – stitch(es)
- RS – right side
Bobble (bob): Yarn over, insert the hook in the stated place, yarn over, and pull up a loop. Yarn over and draw through 2 loops. Repeat these steps 4 more times in the same place. Yarn over and draw through all 6 loops.
Bar: Work (sc, ch 2, sc) in one ch-5 loop. Bars form the short vertical sides of the honeycomb cells.
Gauge and Checkpoints
Mesh gauge (4.0 mm hook, blocked): One row of 4 ch-5 loops is 6.25 in (15.9 cm) wide. 8 rows measure 4 in (10.2 cm) tall.
Edging and border gauge: 4 sc = 1 in (2.5 cm).
Make one full strip before you start the second one. That first strip is your real gauge test. Check it at these points:
- After Row 9: 4.5 in (11.4 cm) tall, gently stretched
- After Row 37, blocked: 6.25 in x 18.5 in (15.9 cm x 47.0 cm)
- After the edging: 6.75 in x 19 in (17.1 cm x 48.3 cm)
If the strip is too wide, go down one hook size. If it’s too narrow, go up one size. If only the height is off, work ch 4 loops (if too tall) or ch 6 loops (if too short), but keep every stitch count the same.

Mesh Strip (Make 2)
Use cream and the 4.0 mm hook.
Foundation: Ch 21.
Row 1: Sc in 2nd ch from hook, ch 5, sk 4 ch, sc in next ch 4 times. Turn. (5 sc, 4 ch-5 loops)
Row 2 (bar row): Ch 1, sc in first sc, ch 3, bar in next ch-5 loop 4 times, ch 3, sc in last sc. Turn. (10 sc, 4 bars, 5 ch-3 sps)
Row 3 (offset loop row): Ch 5 (counts as dc + ch 2), sc in ch-2 sp of next bar, ch 5 3 times, sc in ch-2 sp of next bar, ch 2, dc in last sc. Turn. (4 sc, 3 ch-5 loops, 2 ch-2 half loops)
Row 4 (offset bar row): Ch 1, sc in first dc, ch 3, bar in next ch-5 loop 3 times, ch 3, sc in 3rd ch of the turning ch-5. Turn. (8 sc, 3 bars, 4 ch-3 sps)
Row 5 (loop row): Ch 1, sc in first sc, ch 5, sc in ch-2 sp of next bar 3 times, ch 5, sc in last sc. Turn. (5 sc, 4 ch-5 loops, the same as Row 1)
Rows 6–37: Repeat Rows 2–5 eight more times. Row 37 is a loop row with 5 sc and 4 ch-5 loops. Fasten off.
The bars stack in a staggered pattern, and the loops between them pull into slanted sides. Together they make six-sided cells about 1.5 in (3.8 cm) across.
Strip Edging
Use gold and the 4.0 mm hook, with RS facing.
Edging Rnd:
- Join with sc in the first sc of Row 37. Work 5 sc in next ch-5 loop, sc in next sc 4 times. (25 sc)
- Ch 2 for the corner. Work 2 sc in each of the 37 row-ends. (74 sc)
- Ch 2. Working along the foundation, sc in the base of the first sc. Work 5 sc in next 4-ch gap, sc in base of next sc 4 times. (25 sc)
- Ch 2. Work 2 sc in each row-end. (74 sc)
- Ch 2, then sl st to the first sc. Fasten off.
Count: 198 sc plus 4 corner ch-2 sps. The short sides have 25 sts and the long sides have 74 sts. These counts include the end stitches of each side. The corner chains aren’t counted.
Dragonfly Appliqué (Make 6)
Use gold and the 3.5 mm hook. The smaller hook keeps the pieces firm.
Upper Wing (Make 2 per Dragonfly)
Foundation: Ch 18.
Row 1 (rungs): Sl st in 2nd ch from hook, ch 1, sk 1 ch, hdc in next ch, ch 1, sk 1, dc in next, (ch 1, sk 1, tr in next) 3 times, ch 1, sk 1, dc in next, ch 1, sk 1, hdc in next, ch 1, sk 1, sl st in last ch. Don’t turn. (7 rungs)
Row 2: Ch 2, sc in top of next rung, ch 2 7 times, sl st in the first sl st. (7 sc, 8 ch-2 sps)
Rnd 3 (outline):
- Ch 1, 2 sc in next ch-2 sp, sc in next sc 7 times, then 2 sc in last sp. (23 sc)
- Work 3 sc around the tip.
- Sc in each of the 15 foundation chs between the tips.
- Work 3 sc around the second tip, then sl st to the first sc. (44 sc)
Fasten off, leaving a 10 in (25.4 cm) tail.
The rungs get taller toward the center, which shapes the pointed oval. The open spaces between them read as ladder bars. The upper wing measures 2.75 in x 1 in (7.0 cm x 2.5 cm).
Lower Wing (Make 2 per Dragonfly)
Foundation: Ch 14.
Row 1: Sl st in 2nd ch from hook, (ch 1, sk 1, then work the next stitch in the next ch) using this sequence: hdc, dc, tr, dc, hdc. Then ch 1, sk 1, sl st in last ch. (5 rungs)
Row 2: Ch 2, sc in top of next rung, ch 2 5 times, sl st in the first sl st. (5 sc, 6 ch-2 sps)
Rnd 3:
- Ch 1, 2 sc in next sp, sc in next sc 5 times, then 2 sc in last sp. (17 sc)
- Work 3 sc around the tip, 11 sc along the foundation, and 3 sc around the second tip.
- Sl st to the first sc. (34 sc)
Fasten off, leaving a tail. The lower wing measures 2.25 in x 0.75 in (5.7 cm x 1.9 cm).
Body (Make 1 per Dragonfly)
Foundation: Ch 18.
Rnd 1:
- Work 3 sc in 2nd ch from hook (tail tip).
- Sc in next 10 ch, hdc in next 3 ch, dc in next 2 ch.
- Work 5 dc in last ch (head end).
- Working along the other side of the chain, dc in next 2 ch, hdc in next 3 ch, sc in next 10 ch.
- Sl st to the first sc. (38 sts)
Fasten off, leaving a 12 in (30.5 cm) tail.
Segments: Wrap the tail tightly twice around the tail section at 4 points spaced 0.5 in (1.3 cm) apart. This pinches the tail into chunky segments. The body measures 3 in x 0.5 in (7.6 cm x 1.3 cm).
Eyes (Make 1 per Dragonfly)
Ch 4 and sl st to the first ch to form a ring. (Ch 2, bob in ring, ch 2, sl st in ring) twice. Fasten off, leaving a tail.
Assembly
Layer the pieces from the bottom up:
- Upper wings: Lay them tip to tip, foundation edges down, with a 0.5 in (1.3 cm) gap between the inner tips.
- Lower wings: Place them just below the upper wings, angled slightly downward.
- Body: Center it over the gap so the thorax covers all four inner wing tips. Whipstitch it in place.
- Eyes: Sew them onto the head end.
The finished dragonfly is 3.5 in (8.9 cm) tall with a 6 in (15.2 cm) wingspan.
Attaching the Appliqués
Center each dragonfly on a strip, side to side. Place the dragonfly centers 3.25 in (8.3 cm), 9.25 in (23.5 cm), and 15.25 in (38.7 cm) below the top of the mesh. Sew through the outline into the bars and sc, not the loose loops.
Make All Pieces
- Cream: 2 mesh strips
- Gold: 2 edgings, 12 upper wings, 12 lower wings, 6 bodies, 6 eye pieces, plus the seam and border
Layout (top to bottom):
[Strip A: Dragonfly 1] | [Strip B: Dragonfly 4]
[Strip A: Dragonfly 2] | [Strip B: Dragonfly 5]
[Strip A: Dragonfly 3] | [Strip B: Dragonfly 6]
Joining
Use gold and the 4.0 mm hook.
- Lay the two strips side by side, RS up, with the long edges touching.
- Pull up a loop through both top corner ch-2 sps.
- Sl st through the inner loops of the 74 facing sts, matching them one to one.
- Sl st through both bottom corner sps, then fasten off.
Both edges have 74 sts, so the seam stays straight. On the RS it forms the raised gold center line.
Keep the sl sts at the same tension as your edging. Too tight puckers the panel, and too loose leaves gaps.
Checkpoint: The joined panel should measure 13.5 in x 19 in (34.3 cm x 48.3 cm).
Border
Use gold and the 4.0 mm hook. Border gauge is 4 sc = 1 in (2.5 cm).
Starting counts:
- Top and bottom: 2 strips x 25 sts = 50 sts each
- Sides: 1 strip x 74 sts = 74 sts each
Where the strips meet, skip both corner sps and the seam sl st. No stitches are added at the seam.
Rnd 1: With RS facing, join in the top-left corner ch-2 sp. Ch 1 and work (sc, ch 2, sc) in the same sp. Sc in each st along the edge, and work (sc, ch 2, sc) in each corner sp. Sl st to the first sc.
- Top and bottom: 50 sts (1 per st) + 2 corner sc = 52 sts each
- Sides: 74 sts (1 per st) + 2 corner sc = 76 sts each
- Total: 256 sc plus 4 ch-2 sps
Checkpoint: 14 in x 19.5 in (35.6 cm x 49.5 cm).
Rnd 2:
- Top: Sl st into the corner sp, ch 1, sc in next st. Ch 9, sk 2, sc in next st 17 times. (17 hanging loops)
- Right side: Work (sc, ch 2, sc) in the corner sp, then sc in each of the 76 sts.
- Bottom: Work (sc, ch 2, sc) in the corner sp, then sc in the first st. Ch 5, sk 2, sc in next st 17 times. (17 arches)
- Left side: Work (sc, ch 2, sc) in the corner sp, then sc in each of the 76 sts.
- Work (sc, ch 2, sc) in the starting sp, then sl st to the first sc. Fasten off.
The sides now have 76 sts (1 per st) + 2 corner sc = 78 sts each.
Why the math works: Each repeat uses 3 sts: 2 skipped sts and 1 anchor sc. With the first anchor sc, 1 + (17 x 3) = 52, which is exactly the edge count. The loops space evenly, and the end loops land at the corners.
Row 3 (bottom scallops): With RS facing, join in the first bottom anchor sc. Work (3 sc, ch 3, 3 sc) in next ch-5 arch, sl st in next anchor sc 17 times. Fasten off.
Checkpoint: 14.5 in x 21 in (36.8 cm x 53.3 cm).
Final Blocking
- Weave in all ends under the edging or the appliqués.
- Soak the panel in cool water for 10 minutes, then roll it in a towel to remove the water. Don’t wring it.
- Lay it RS up on the mat. Pin the body of the panel (not the loops and scallops) to 14.5 in x 19.5 in (36.8 cm x 49.5 cm).
- Pin the seam and the sides every 2 in (5.1 cm).
- Open each honeycomb cell and pin each picot point.
- Smooth the wings flat.
- Let the panel dry completely before you unpin it.
Final Quality-Control Checklist
- Each strip has 37 rows and edging counts of 25/74/25/74.
- All 6 dragonflies are centered and spaced 6 in (15.2 cm) apart.
- Each body covers all four of its inner wing tips.
- The seam lies flat.
- Border Rnd 1 counts are 52 on the top and bottom and 76 on the sides.
- There are 17 loops along the top and 17 scallops along the bottom.
Troubleshooting
- Cells look like diamonds: Work every bar as (sc, ch 2, sc), then block the panel firmly.
- Strip edges wave: Redo the edging with a larger hook and keep 74 sts.
- Wings curl: Steam them flat before you sew them on.
- Seam puckers: Redo it more loosely or with a larger hook.
- Loops twist: Chain evenly and skip exactly 2 sts each time.
Care
Hand wash in cool water with mild soap, then lay flat to dry and reshape. Keep the panel out of the dryer.

Final Notes
Here is how the measurements build:
- Each mesh strip measures 6.25 in x 18.5 in (15.9 cm x 47.0 cm).
- With the edging, each strip measures 6.75 in x 19 in (17.1 cm x 48.3 cm).
- Joined, the two strips measure 13.5 in x 19 in (34.3 cm x 48.3 cm).
- Border Rnd 1 brings the panel to 14 in x 19.5 in (35.6 cm x 49.5 cm).
- The finished panel measures 14.5 in x 21 in (36.8 cm x 53.3 cm).
If you check your stitch counts at each stage, everything lines up.
Happy crocheting!