
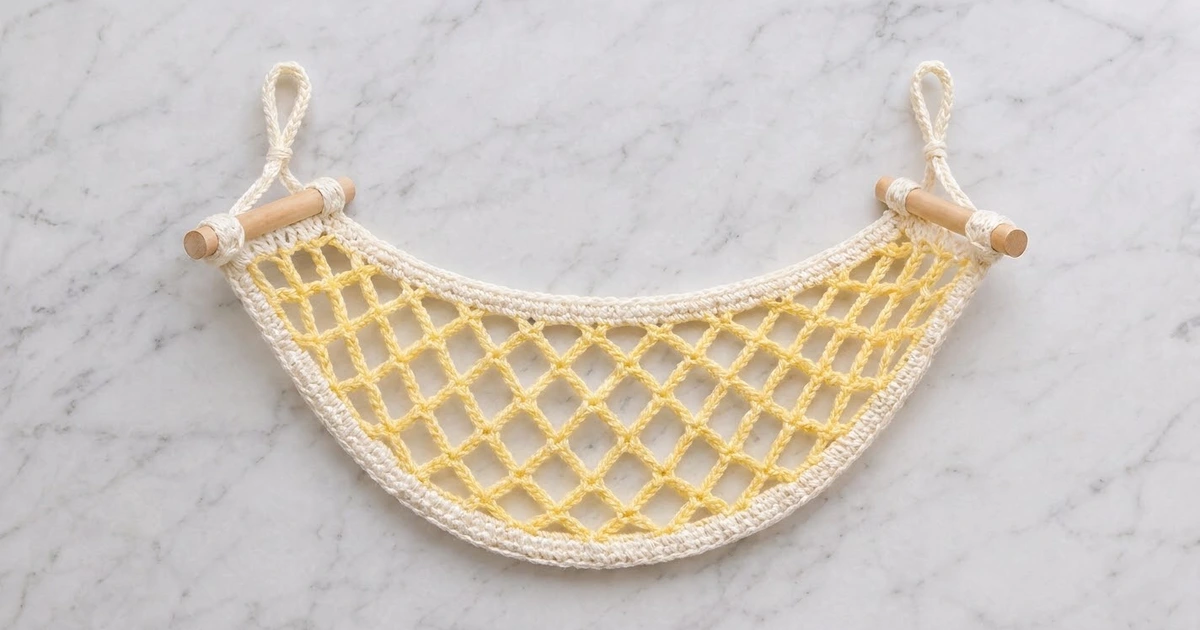
The Lemon Drop Fruit Hammock is a light, airy net that hangs under a kitchen cabinet and keeps lemons, limes, or small fruit off the counter. Its open diamond mesh lets air move around the fruit, and the solid border gives it a clean, finished edge.
The net is pale lemon-yellow and the border and hanging cords are soft cream. Two natural-wood dowels hold the tips open. The look is fresh and simple and suits a farmhouse or bright modern kitchen.
This pattern uses US crochet terms. The finished hammock measures about 19.5 in (49.5 cm) along the top edge and 9 in (22.9 cm) deep at the center, measured flat after blocking.
You’ll start with a long foundation chain and work the mesh in rows. Each row is one loop shorter than the last, so the net narrows into a trapezoid. Next, you’ll work three rounds of cream single crochet around the whole edge. Blocking then turns the trapezoid into a crescent. Finally, you’ll wrap each tip around a dowel and tie on the slip-stitch hanging cords.
Finished Size and Construction
- Finished size: 19.5 in (49.5 cm) along the top edge × 9 in (22.9 cm) deep
- Skill level: Easy / Advanced Beginner
- Terminology: US crochet terms
- Yarn weight: Worsted (#4) cotton
- Hook: 5.5 mm (I-9)
- Number of pieces: 1 hammock body, plus 2 small hanging cords
- Layout: Single crescent-shaped net with dowels at the 2 tips
- Net size before border: 18 in (45.7 cm) top edge × 7.5 in (19.1 cm) deep; bottom row 9 in (22.9 cm) wide
- Border depth: 3 rounds, 0.75 in (1.9 cm)
Materials
Use a smooth, firm 100% cotton or cotton-blend worsted yarn. Cotton holds its shape under weight and is easy to wash. Avoid stretchy acrylic, because a fruit hammock sags more over time when made with it.
- Pale lemon yellow (net): 50 g, about 85 m (93 yd)
- Cream (border and cords): 50 g, about 85 m (93 yd)
Tools:
– 5.5 mm (I-9) crochet hook
– 2 wooden dowels, 4 in (10.2 cm) long and 0.5 in (1.3 cm) in diameter
– Tapestry needle
– Scissors
– Stitch markers (2)
– Rustproof pins and a blocking mat
– Spray bottle
– 2 cup hooks for hanging
Yarn quantities include a margin of about 25% for your gauge swatch and tension differences.
Abbreviations (US Terms)
- ch – chain
- sc – single crochet
- sl st – slip stitch
- sk – skip
- sp – space
- st(s) – stitch(es)
- RS / WS – right side / wrong side
Special stitch – mesh loop: ch 5, then sc in the next ch-5 loop. The sc goes around the loop, into the space under it, at its center.
Slip-stitch cord: Chain the required length. Then sl st into the back bump of the 2nd ch from the hook and into the back bump of each ch across. This makes a firm, round-looking cord.
Gauge and Checkpoints
Gauge (blocked): 4 mesh loops = 4 in (10.2 cm) wide; 4 rows = 3 in (7.6 cm) deep. Each row is about 0.75 in (1.9 cm) deep.
Border gauge: 4 sc = 1 in (2.5 cm).
Test swatch first: Ch 22. Work Row 1 as written below. You’ll get 5 loops, because the 20 chains after the first sc make 5 repeats of 4. Work 3 more rows, which gives you 4, 3, and 2 loops. Pin the swatch flat, mist it, and let it dry. Then measure 4 loops across Row 1.
- If 4 loops measure more than 4 in (10.2 cm): go down to a 5.0 mm (H-8) hook, or make ch-4 loops instead of ch-5.
- If 4 loops measure less than 4 in (10.2 cm): go up to a 6.0 mm (J-10) hook.
Checkpoints during the work:
– After Row 1, stretched gently: 18 in (45.7 cm) long
– After Row 5: about 3.75 in (9.5 cm) deep
– After Row 10: 7.5 in (19.1 cm) deep, and the bottom row is 9 in (22.9 cm) wide
– After Border Round 3: the top edge measures 19.5 in (49.5 cm) along the edge
The Net (Pale Yellow)
Foundation: With yellow, ch 74.
Row 1 (RS): Sc in 2nd ch from hook. Ch 5, sk 3 ch, sc in next ch. Repeat from * across, ending with sc in the last ch.
Count: 18 ch-5 loops, 19 sc. The 72 chains after the first sc make 18 repeats of 4.
Row 2: Turn. Sl st in each of the first 3 ch of the first loop, which brings you to its center. Ch 1, then sc in the same loop. Ch 5, sc in next ch-5 loop. Repeat from * across. The last sc goes in the last loop. Do not work into the end sc of Row 1.
Count: 17 loops, 18 sc.
When you skip the half loop at each end, the row steps in by 0.5 in (1.3 cm) on each side. This step-in is what shapes the hammock.
Rows 3–10: Repeat Row 2. Each row has 1 fewer loop than the row before it.
– Row 3: 16 loops
– Row 4: 15 loops
– Row 5: 14 loops
– Row 6: 13 loops
– Row 7: 12 loops
– Row 8: 11 loops
– Row 9: 10 loops
– Row 10: 9 loops
The rule is that Row r has 19 − r loops. The whole net has 135 loops.
After Row 10, fasten off yellow and weave in the ends.
Shape check: The net is now an upside-down trapezoid. The top edge is 18 in (45.7 cm) and the bottom edge is 9 in (22.9 cm), which is 18 loops versus 9 loops. Each slanted side steps in 4.5 in (11.4 cm) over 7.5 in (19.1 cm) of depth, so each side edge is about 8.75 in (22.2 cm) long. The math matches: 18 − 9 = 9 in (22.9 cm), which is 2 × 4.5 in (11.4 cm).
Border (Cream)
The border is worked in rounds with the RS facing. It has two “sides”:
– Top edge: along the foundation chain.
– Outer edge: one continuous edge that runs down the first slanted side, across Row 10, and back up the second slanted side.
The two points where these edges meet are the tips. Each side’s stated count includes its own 2 tip stitches.
Round 1: With RS facing, join cream in the first foundation ch at the right-hand tip. Ch 1, then work as follows.
- Top edge: Sc in the same ch and in each foundation ch across. That’s 74 sc. Ch 1 for the tip.
- First slanted side: Work 4 sc evenly in the end of each of Rows 1–10, going around the sl sts and the edge sc. That’s 40 sc.
- Row 10: Work 4 sc in each of the 9 ch-5 loops. That’s 36 sc.
- Second slanted side: Work 4 sc in the end of each of Rows 10–1. That’s 40 sc. Ch 1 for the tip.
Sl st to the first sc to join.
Count: top edge 74 sc; outer edge 40 + 36 + 40 = 116 sc; total 190 sc, plus 2 tip ch-1 sps.
Round 2: Ch 1. Sc in each sc around. In each tip ch-1 sp, work (sc, ch 1, sc). Sl st to the first sc to join.
Count: 190 sc worked 1-per-stitch + 4 tip sc added = 194 sc. The top edge has 76 sc and the outer edge has 118 sc.
Round 3: Repeat Round 2. Fasten off, leaving a 12 in (30.5 cm) tail at one tip for sewing.
Count: 194 sc worked 1-per-stitch + 4 tip sc added = 198 sc. The top edge has 78 sc and the outer edge has 120 sc.
Why the math works:
– Top edge: It starts at 74 sc on an 18 in (45.7 cm) edge and gains 2 sc per round. That gives 78 sc, and at 4 sc per inch, 78 sc = 19.5 in (49.5 cm). This matches the net plus 0.75 in (1.9 cm) of border at each tip.
– Row 10 edge: 36 sc fit its 9 in (22.9 cm) width exactly.
– Slanted sides: 40 sc each relax to 10 in (25.4 cm), which is a little more than their 8.75 in (22.2 cm) straight length. That fuller outer edge (120 sc, about 30 in or 76.2 cm) is what lets it block into a smooth convex curve. Meanwhile, the tighter top edge pulls into a gentle smile. This is how the trapezoid becomes a crescent.
– Depth: 7.5 in (19.1 cm) of net + 0.75 in (1.9 cm) of border at the top + 0.75 in (1.9 cm) at the bottom = 9 in (22.9 cm).
Hanging Cords (Make 2, Cream)
Ch 61. Sl st in the back bump of the 2nd ch from the hook and in each ch across.
Count: 60 sl st. The cord should be about 14 in (35.6 cm) long. Fasten off, leaving 6 in (15.2 cm) tails.
Final Blocking
- Wet the hammock thoroughly in cool water, then press out the water in a towel. Don’t wring it.
- Lay it RS up on a blocking mat.
- Pin the two tips 19 in (48.3 cm) apart, measured in a straight line.
- Pin the center of the top edge 1.5 in (3.8 cm) below the line between the tips. This creates the smile curve.
- Ease the outer edge into one smooth convex arc so that the center bottom sits 9 in (22.9 cm) below the top edge. Pin every 1 in (2.5 cm).
- Open each diamond with your fingers so that the mesh lines run evenly.
- Let it dry completely. This takes about 24 hours.
- Unpin the hammock.
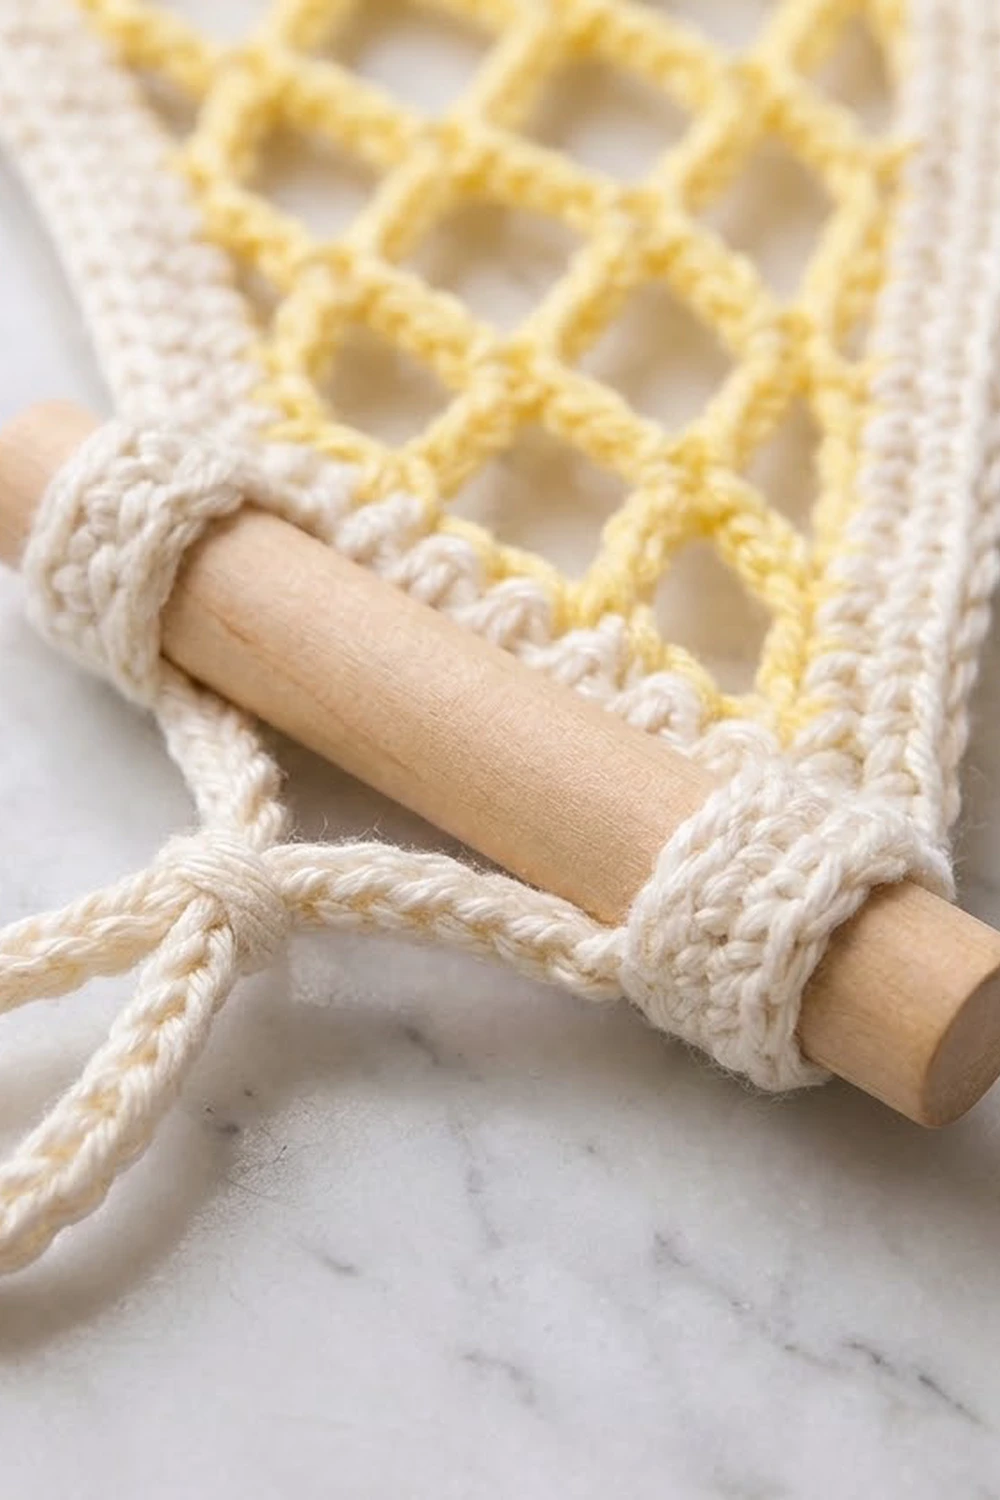
Attach the dowels:
1. Lay one dowel across a tip, centered on it.
2. Fold the last 1 in (2.5 cm) of the tip over the dowel toward the WS.
3. Whipstitch the fold in place with cream yarn, sewing through both layers of the border.
4. Repeat at the second tip.
Attach the cords:
1. Fold a cord in half.
2. Tie an overhand knot 1.5 in (3.8 cm) below the fold. This makes the hanging loop.
3. Tie one tail tightly around each end of a dowel, so the cord forms a V above the dowel.
4. Weave in the tails along the cord.
5. Repeat with the second cord at the other tip.
Final Quality-Control Checklist
- Row 1 has 18 loops and Row 10 has 9 loops.
- Every row has 1 fewer loop than the row before it.
- No ch-5 loop is twisted or skipped.
- Border Round 3 totals 198 sc: 78 on the top edge and 120 on the outer edge.
- The top edge measures 19.5 in (49.5 cm) along the edge.
- The center depth is 9 in (22.9 cm).
- Both tips are folded the same amount over their dowels.
- Both hanging loops are the same length.
- All ends are woven in securely.
Troubleshooting
- The net is narrowing too fast or too slow: Check that each row starts at the center of the first loop and ends in the last loop, not in the edge sc.
- The border ruffles along the sides: Work 3 sc instead of 4 in every third row end. Keep the count the same on both sides.
- The top edge puckers: Your Round 1 tension is too tight. Redo it with a hook one size larger.
- The hammock sags too much with fruit in it: Shorten the mesh loops to ch 4, or switch to a firmer cotton yarn.
- The hammock hangs crooked: Retie the cord tails so that both V legs are the same length.
Care
Slide the dowels out of their casings, then hand wash the hammock in cool water and lay it flat to dry. Re-pin the curve lightly if it loses its shape.

Final Notes
The measurement chain runs like this:
– 4 loops = 4 in (10.2 cm) gives you an 18 in (45.7 cm) top row.
– Ten rows at 0.75 in (1.9 cm) each give 7.5 in (19.1 cm) of depth.
– Three border rounds add 0.75 in (1.9 cm) on every edge.
– The result is a crescent 19.5 in (49.5 cm) wide and 9 in (22.9 cm) deep.
If you check your gauge swatch and each checkpoint as you go, your fruit hammock will hang evenly and hold its shape.
Happy crocheting!