
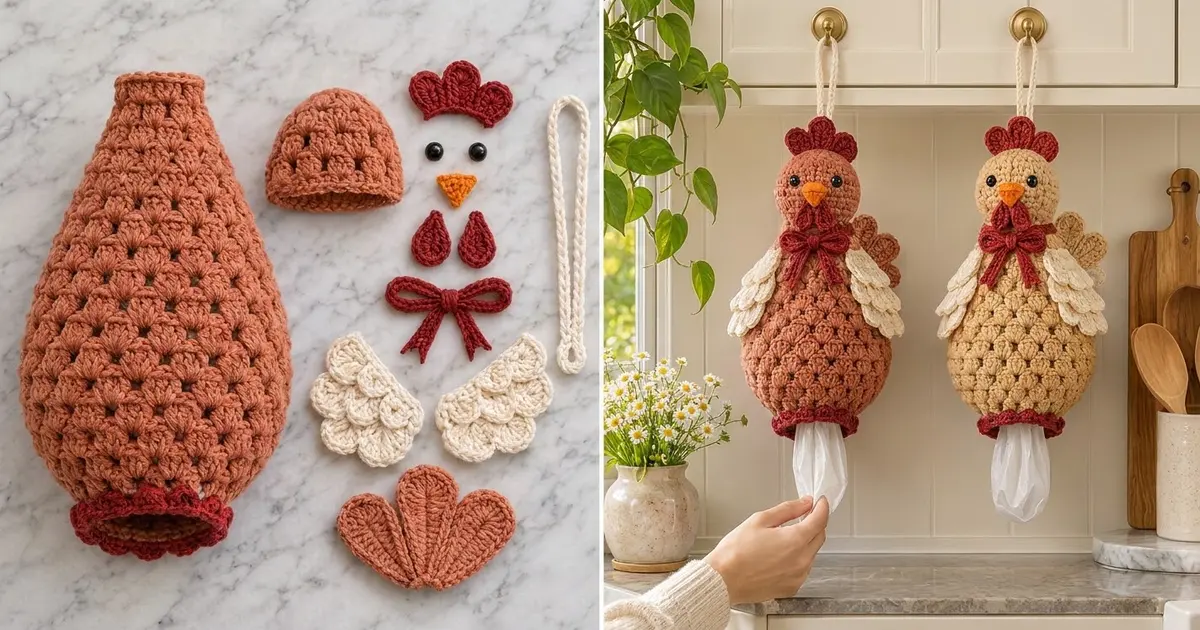
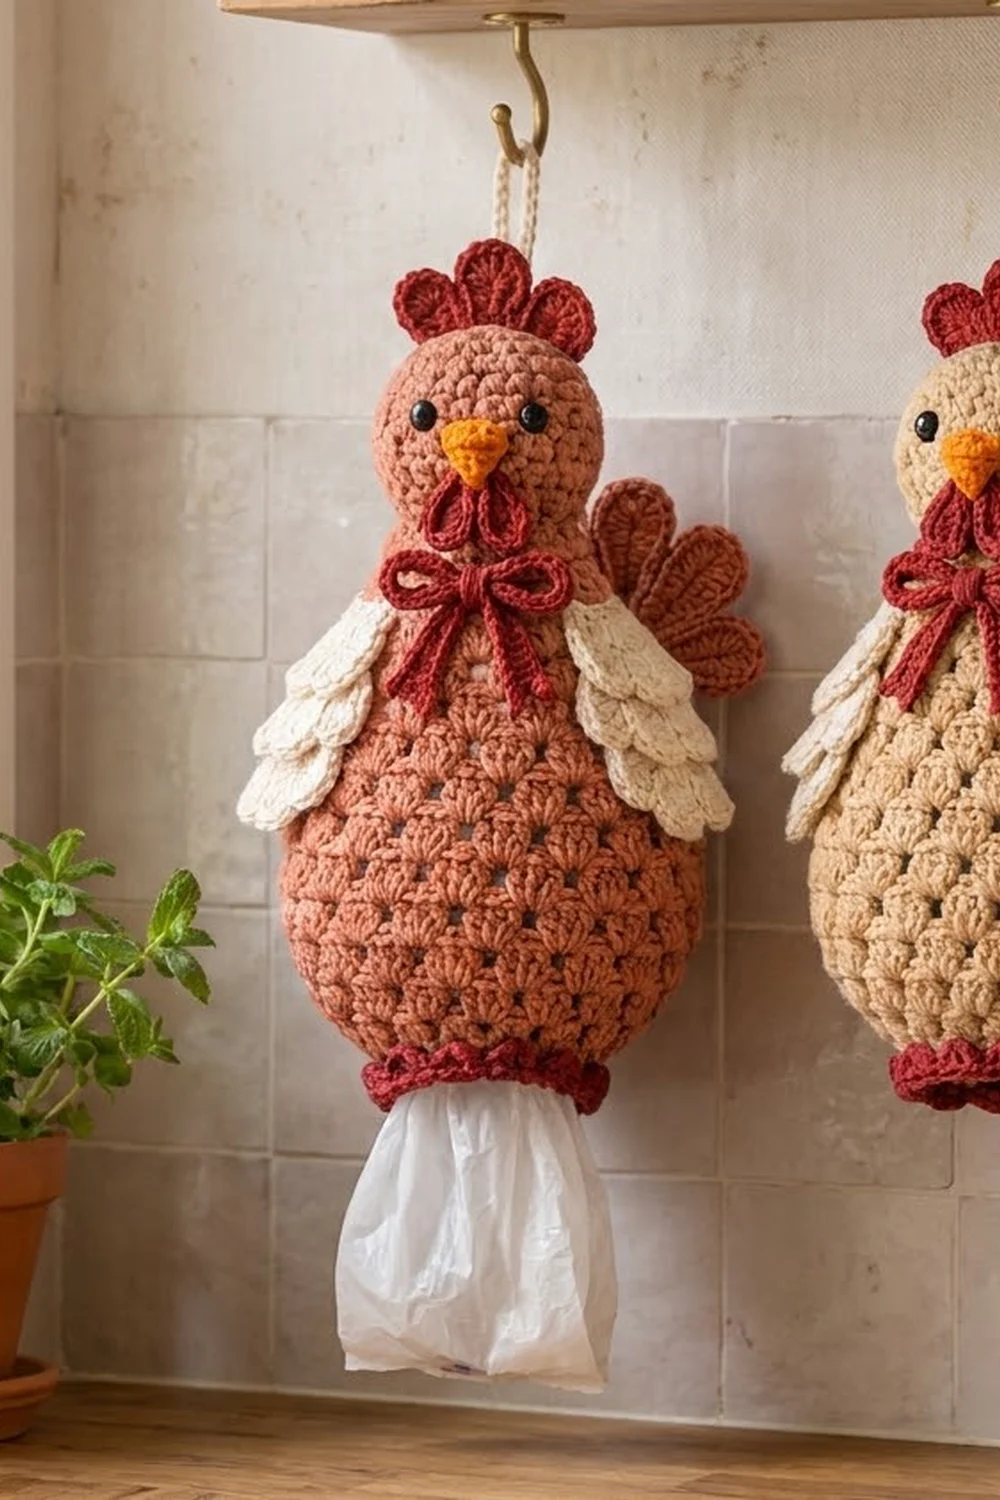
This hen gives your plastic grocery bags a cheerful home. Her body is a tall, vase-shaped tube of openwork granny clusters in warm terracotta. She is wide and round at the bottom and narrows to a slim neck, and a rounded head cap sits on top. The bags go in and come out through a ruffled deep-red opening at the bottom.
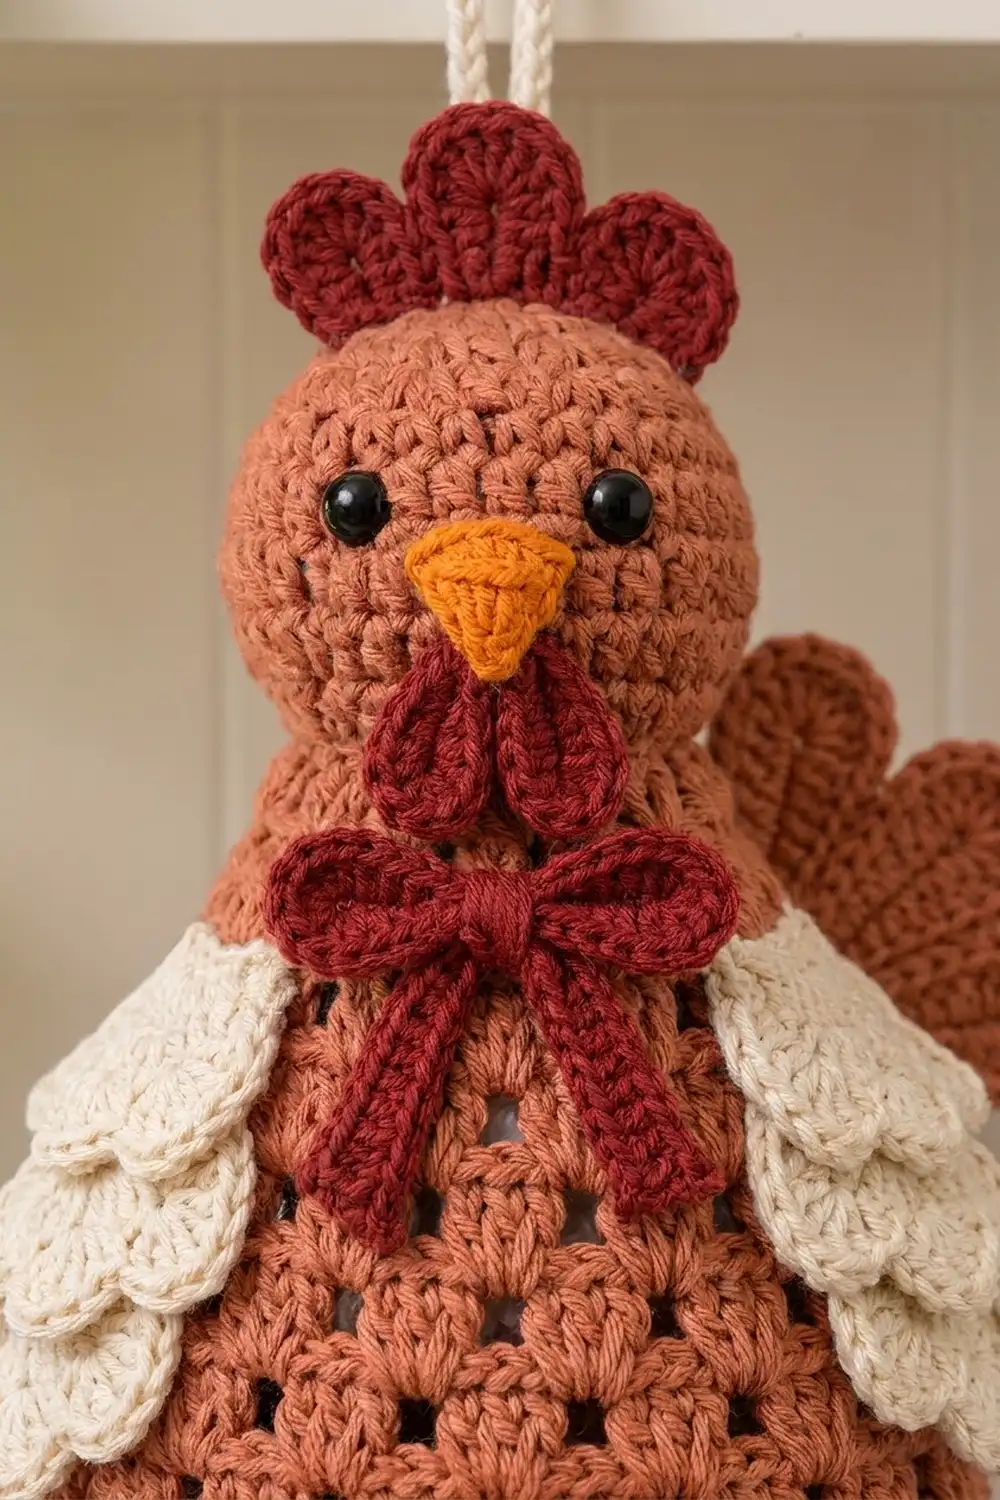
The trims add the farmhouse charm: a three-lobed red comb, an orange beak, two red teardrop wattles, a red chain-cord bow, layered cream wings, a terracotta tail fan, and a cream hanging loop. Black safety eyes finish the face.
The pattern uses US crochet terms. The finished hen is about 8 in (20.3 cm) wide at the widest point and about 17 in (43.2 cm) tall from the bottom trim to the top of the head. The hanging loop adds about 4 in (10.2 cm).
You work the body in joined rounds from the bottom opening up to a closed neck. Next you crochet the head cap from the top down and slip it over the neck. Then you make the small appliqués, sew everything on, and add the scalloped red trim around the bottom opening.
Finished Size and Construction
- Finished size: 8 in (20.3 cm) wide x 17 in (43.2 cm) tall, plus a 4 in (10.2 cm) loop
- Skill level: Easy-intermediate
- Terminology: US
- Yarn weight: Worsted (#4), cotton or cotton blend
- Hook: 5 mm (H-8)
- Number of pieces: 1 finished bag holder made from 1 body, 1 head cap, and 15 small pieces (1 comb, 1 beak, 2 wattles, 1 bow cord, 6 wing strips, 3 tail feathers, 1 hanging loop)
- Layout: Single item with no grid; the appliqués are sewn onto the body
- Body size: 16 in (40.6 cm) around at the widest point, which lies flat at 8 in (20.3 cm)
- Size before border: 8 in (20.3 cm) x 14 in (35.6 cm) body only
- Border depth: 1 in (2.5 cm) ruffled scallop trim at the bottom opening
Materials
Use a smooth worsted-weight cotton or cotton blend. Cotton keeps its shape and won’t sag when the hen is full of bags. These yardages assume about 85 m per 50 g.
- Terracotta (body, head cap, tail): 150 g, about 255 m
- Cream (wings, hanging loop): 30 g, about 51 m
- Deep red (comb, wattles, bow, bottom trim): 25 g, about 43 m
- Orange (beak): 5 g, about 9 m
All quantities include a margin of about 10–15% for your test piece and for small differences in tension.
Tools:
– 5 mm (H-8) crochet hook
– Two 9 mm black safety eyes
– A small handful (about 10 g) of polyester fiberfill
– Tapestry needle
– Stitch markers
– Straight pins
– Scissors
– Measuring tape
Abbreviations (US Terms)
- ch – chain
- sl st – slip stitch
- sc – single crochet
- hdc – half double crochet
- dc – double crochet
- sc2tog – single crochet 2 together
- sp – space
- st(s) – stitch(es)
- rep – repeat
- beg – beginning
Cluster: (3 dc, ch 1) in the same sp.
Beg cluster: ch 3 (counts as dc), 2 dc in the same sp, ch 1.
Inc (cluster increase): (3 dc, ch 1, 3 dc, ch 1) in the same sp. This makes 2 clusters from 1 sp.
Gdec (granny decrease): 2 dc in the next ch-1 sp, 1 dc in the following ch-1 sp, ch 1. This uses up 2 sps but makes only 1 cluster.
Joining a granny round: sl st in the top of the beg ch-3, then sl st in each of the next 2 dc and into the next ch-1 sp so you are ready for the next round.
Gauge and Checkpoints
- Granny gauge: 4 clusters (each 3 dc + ch 1) = 4 in (10.2 cm); 4 rounds = 3 in (7.6 cm)
- Sc gauge: 16 sc x 16 rows = 4 in (10.2 cm)
Before starting the body, crochet the head cap first as your test piece. After Round 2 it should measure about 2 in (5.1 cm) across. After Round 5 it should lie flat at about 4 in (10.2 cm) wide. If it comes out bigger, go down half a hook size. If it comes out smaller, go up half a hook size.
Body checkpoints:
– After Round 5: 16 in (40.6 cm) around and 2.75 in (7.0 cm) tall
– After Round 10: 6.5 in (16.5 cm) tall
– After Round 19: 13.25 in (33.7 cm) tall; the neck lies flat at 3 in (7.6 cm)
– After Round 23: about 14 in (35.6 cm) tall
If a checkpoint height is off by more than 0.5 in (1.3 cm), check whether your dc are getting tall and loose. A small change in how high you pull up each loop can bring the height back on target. Don’t add or remove rounds to fix it, because that changes the shaping.
Body (Terracotta)
The body starts at the bottom opening. Work in joined rounds with the right side facing you the whole time.
Foundation: Ch 32 and sl st to the first ch to form a ring, taking care not to twist the chain.
Round 1: Ch 1, sc in each ch around, sl st to the first sc. (32 sc)
Round 2: Ch 1, sc in each sc around, sl st to the first sc. (32 sc)
Round 3: Ch 3 (counts as dc), 2 dc in the same sc, ch 1, sk 3 sc. *3 dc in the next sc, ch 1, sk 3 sc; rep from * 6 more times. Join. (8 clusters)
This round converts the sc band to clusters: 32 sc divided by 4 sts per cluster gives 8 clusters.
Round 4: Beg cluster in the first sp, (3 dc, ch 1) in the same sp to complete an inc, cluster in the next sp. *Inc in the next sp, cluster in the next sp; rep from * 2 more times. Join. (12 clusters)
Round 5: Beg cluster plus (3 dc, ch 1) in the first sp for an inc, cluster in each of the next 2 sps. *Inc in the next sp, cluster in each of the next 2 sps; rep from * 2 more times. Join. (16 clusters)
Check that the body now measures 16 in (40.6 cm) around. The bowl shape should already be clear.
Rounds 6–10: Beg cluster in the first sp, cluster in each sp around. Join. (16 clusters in each round)
Round 11: Beg cluster in the first sp, cluster in each of the next 5 sps, gdec. *Cluster in each of the next 6 sps, gdec; rep from * once more. Join. (14 clusters)
This uses 2 x (6 + 2) = 16 sps and makes 2 x (6 + 1) = 14 clusters.
Round 12: Cluster in each sp around. (14 clusters)
Round 13: *Cluster in each of the next 5 sps, gdec; rep from * once more, with the first cluster worked as the beg cluster. (12 clusters)
Round 14: Cluster in each sp around. (12 clusters)
Round 15: *Cluster in each of the next 4 sps, gdec; rep from * once more. (10 clusters)
Round 16: Cluster in each sp around. (10 clusters)
Round 17: *Cluster in each of the next 3 sps, gdec; rep from * once more. (8 clusters)
Round 18: Cluster in each sp around. (8 clusters)
Round 19: *Cluster in each of the next 2 sps, gdec; rep from * once more. (6 clusters)
Place each gdec at the sides of the body, in line with the gdecs from earlier rounds. This keeps the front and back smooth and the taper even.
Round 20 (conversion): Ch 1, sc in each dc and in each ch-1 sp around, sl st to the first sc. That’s 18 sc worked 1 per dc, plus 6 sc worked 1 per sp, for 24 sc.
Round 21: Sc in each sc around. (24 sc)
Round 22: Sc2tog around. (12 sc)
Round 23: Sc2tog around. (6 sc)
Fasten off, leaving a 6 in (15.2 cm) tail. Weave the tail through the front loops of the last 6 sts, pull tight to close the top, and secure.
Head Cap (Terracotta)
The cap is worked from the top down.
Round 1: Make a magic ring. Ch 3 (counts as dc), 11 dc in the ring, then pull the ring closed. Sl st to the top of the ch-3. (12 dc)
Round 2: Ch 3, dc in the same st, then 2 dc in each st around. Join. (24 dc)
Round 3 (conversion): Ch 3, 2 dc in the same st, ch 1, sk 2 sts. *3 dc in the next st, ch 1, sk 2 sts; rep from * 6 more times. Join. (8 clusters, using all 24 dc)
Rounds 4–5: Beg cluster in the first sp, cluster in each sp around. Join. (8 clusters in each round)
Round 6 (trim): Ch 1, sc in each dc around, skipping the ch-1 sps. Sl st to the first sc. That’s 24 sc worked 1 per dc, with 0 added. (24 sc)
Fasten off, leaving a 24 in (61.0 cm) tail for sewing. The cap is about 3.5 in (8.9 cm) tall. Its 24-st rim matches the 24 sts of body Round 20 exactly.
Insert the safety eyes into the center dc of two Round 4 clusters, leaving one cluster between them. The eyes should end up about 1.5 in (3.8 cm) apart. Fasten the washers on the inside.
Small Pieces
Comb (deep red, make 1): Ch 14. Sl st in the 2nd ch from the hook. Sk 1 ch, 7 dc in the next ch, sk 1 ch, sl st in the next ch. Sk 1 ch, 9 dc in the next ch, sk 1 ch, sl st in the next ch. Sk 1 ch, 7 dc in the next ch, sk 1 ch, sl st in the last ch. (3 scallops, with the tallest in the middle; about 2.5 in / 6.4 cm wide)
Beak (orange, make 1):
– Row 1: Ch 4, sc in the 2nd ch from the hook and in the next 2 ch. (3 sc)
– Row 2: Ch 1, turn, sc2tog, sc. (2 sc)
– Row 3: Ch 1, turn, sc2tog. (1 sc)
Fasten off. You now have a small triangle.
Wattles (deep red, make 2): Ch 4 and sl st to form a ring. Ch 1, then work (2 sc, 2 hdc, 2 dc, ch 2, 2 dc, 2 hdc, 2 sc) in the ring. Sl st to the first sc. (12 sts plus a ch-2 point) The center stays open, which gives a teardrop with a small hole.
Bow cord (deep red, make 1): Ch 61. Sl st in the back bump of the 2nd ch from the hook and in each ch across. (60 sl st, about 14 in / 35.6 cm) Tie the cord into a bow about 2.5 in (6.4 cm) wide, with loose tails.
Wing strips (cream, make 2 sets): Each wing uses three strips. Each scallop below means: sk 1 ch, 5 dc in the next ch, sk 1 ch, sl st in the next ch.
– Strip A (top): Ch 10. Sl st in the 2nd ch from the hook, then work 2 scallops.
– Strips B and C: Ch 14 for each strip. Sl st in the 2nd ch from the hook, then work 3 scallops.
To build a wing, lay Strip C down first. Overlap Strip B 0.75 in (1.9 cm) above it so that B’s scallops cover C’s straight edge. Center Strip A on top in the same way. Whipstitch along the straight edges. Each wing is about 3 in (7.6 cm) wide and 2 in (5.1 cm) tall.
Tail feathers (terracotta, make 3): Ch 9. Sc in the 2nd ch from the hook, hdc in the next ch, dc in the next 4 ch, hdc in the next ch, 5 hdc in the last ch. Working along the other side of the chain: hdc in the next ch, dc in the next 4 ch, hdc in the next ch, sl st in the first sc. (19 sts; each feather is about 2.5 in / 6.4 cm long) Overlap the narrow ends of the three feathers into a fan and stitch them together.
Hanging loop (cream, make 1): Ch 41. Sl st in the back bump of the 2nd ch from the hook and in each ch across. (40 sl st, about 9 in / 22.9 cm)
Assembly
- Put a small ball of fiberfill on top of the closed neck. Pull the head cap down over the neck.
- Line up the cap’s 24 sc rim with the 24 sc of body Round 20 and whipstitch them stitch to stitch. Keep the sewing tension firm but not puckered.
- Fold the hanging loop in half and sew both ends to the top center of the cap.
- Sew the comb just in front of the loop, standing upright.
- Sew the beak between and just below the eyes, with the point facing down.
- Sew the wattles just under the beak, with the points hanging down over the cap rim.
- Tack the bow at the front of the neck, just below the wattles.
- Pin a wing to each side over Rounds 11–14, with Strip A on top, and stitch them in place.
- Sew the tail fan to the back on the right side over Rounds 9–13 so that the feathers peek out past the wing.
To use the holder, push bags up through the bottom opening and pull them out one at a time from the same opening.
Border: Bottom Trim (Deep Red)
The trim is worked into the free bottom loops of the foundation chain. It uses the sc gauge of 16 sc = 4 in (10.2 cm).
Round 1: Join the red yarn in any free loop. Ch 1 and sc in each loop around. Sl st to the first sc. (32 sc, 1 per foundation ch)
Round 2: Ch 1. *Sc in the next sc, 2 sc in the next sc; rep from * 15 more times. Sl st to the first sc. That’s 32 sc worked 1 per stitch, plus 16 added sc, for 48 sc.
Round 3: *Sk 1 sc, 5 dc in the next sc, sk 1 sc, sl st in the next sc; rep from * 11 more times. (12 scallops)
Fasten off and weave in the ends.
Why the math works: The 32-ch foundation matches the 32 sc of body Round 1. Round 2 adds 16 sts to make the edge ruffle. Each scallop uses exactly 4 sts, and 48 ÷ 4 = 12 scallops with nothing left over. The opening stays 8 in (20.3 cm) around, and the scallops flare to make the 1 in (2.5 cm) ruffle.
Final Blocking
- Lightly mist the body with water. Don’t soak it.
- Fill the body with plastic bags to shape it.
- Smooth the cluster rows so the openings line up vertically.
- Pin the wings, comb, and tail fan flat on a towel and mist them.
- Pull the bottom scallops outward evenly.
- Let everything dry completely, about 24 hours.
- Check that the hen measures 8 in (20.3 cm) wide and 17 in (43.2 cm) tall.
Final Quality-Control Checklist
- The body has 16 clusters at its widest and 6 clusters at the neck
- The gdecs line up at the sides, so the front looks smooth
- The cap rim (24 sc) is sewn evenly to body Round 20 (24 sc)
- The safety eyes are locked with their washers
- The comb, loop, and bow are firmly attached
- The bottom trim has 12 evenly spaced scallops
- Measurements: 8 in (20.3 cm) x 17 in (43.2 cm), with a 4 in (10.2 cm) loop
- All ends are woven in securely
Troubleshooting
- Body leans or spirals: Your joins are drifting. Always move into the ch-1 sp with sl sts before starting the beg cluster.
- Gaps are too large: Keep the ch-1 snug, or try a hook 0.5 mm smaller.
- Neck is too wide for the cap: Re-count Round 20. It must have exactly 24 sc.
- Ruffle curls under: Block it flat, or work Round 2 more loosely.
- Loop stretches: Sew the loop ends through the cap and down into the closed top of the body (Round 23).
Care
Hand wash in cool water with mild soap, press out the water in a towel, and lay flat to dry. Do not tumble dry, because the scallops and wings may lose their shape.
Final Notes
The measurement chain is simple. Gauge of 4 clusters = 4 in (10.2 cm) gives a 32-st opening that is 8 in (20.3 cm) around. That opening grows to 16 clusters, or 16 in (40.6 cm) around and 8 in (20.3 cm) flat. The body then tapers to a 24-st neck, which matches the 24-st cap rim. With the 1 in (2.5 cm) scalloped trim, the finished hen stands about 17 in (43.2 cm) tall.
Happy crocheting!