
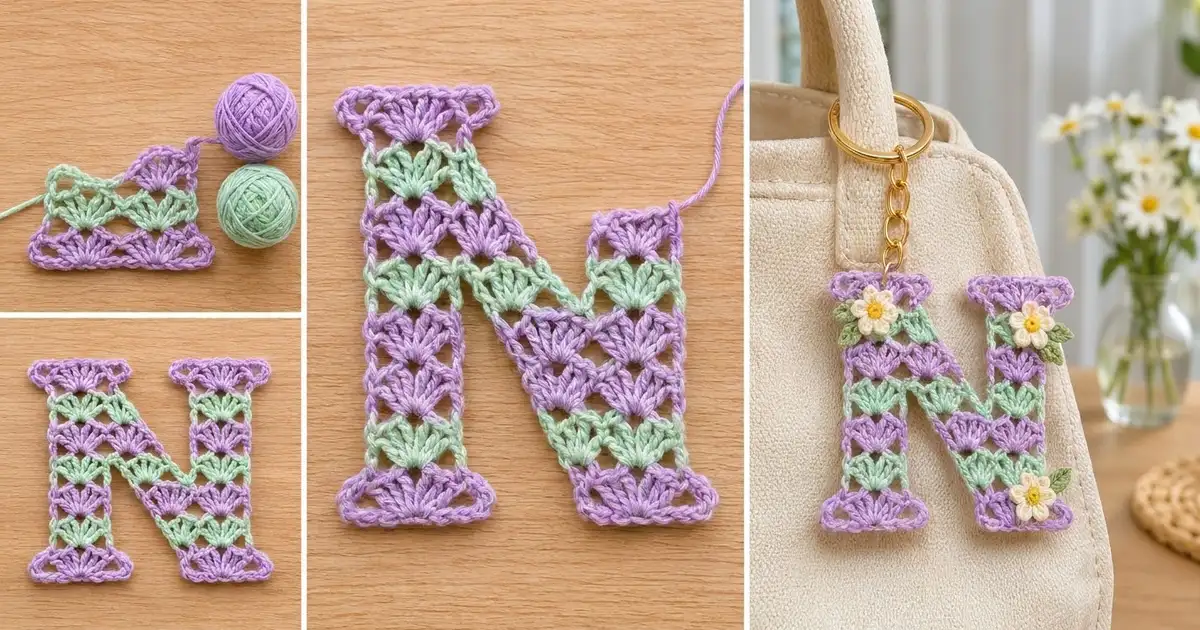
This letter N bag charm is worked in fan-shaped shell stitches, with one-row stripes that alternate between soft lavender and fresh mint. Each leg ends in a flared lavender serif with small open points at the corners. Three cream-and-yellow daisies with tiny green leaves sit on top.
The pattern uses US crochet terms. The finished letter measures 4.7 in wide x 3.8 in tall (11.9 x 9.7 cm), not counting the keyring.
You work the letter in ten striped rows. For the first five rows the left leg and the right half are two separate strips. Row 6 bridges them into one piece. After that you add four serifs, one sc border round and the daisies.
Every row is worked with the right side facing and is fastened off at the end. That keeps each stripe crisp and lets the diagonal move cleanly across the letter.
Finished Size and Construction
- Finished size: 4.7 x 3.8 in (11.9 x 9.7 cm), not counting the hardware
- Skill level: Intermediate
- Terminology: US
- Yarn weight: Fingering / super fine (#1) cotton
- Hook: 2.5 mm
- Number of pieces: 1 letter, plus 3 daisies and 5 leaves sewn on
- Layout: Left leg, diagonal and right leg worked as one piece
- Piece size after Row 10: 4.0 x 3.0 in (10.2 x 7.6 cm)
- Size before border (with serifs): 4.5 x 3.6 in (11.4 x 9.1 cm)
- Border depth: 0.1 in (0.3 cm) on each side
Materials
Use a smooth mercerized cotton. It shows the shell texture clearly and stands up to being handled. The amounts below assume about 170 m per 50 g.
- Lavender: 6 g (20 m)
- Mint green: 4 g (14 m)
- Cream: 2 g (7 m)
- Yellow: 1 g (3 m)
- Leaf green: 1 g (3 m)
These amounts include a margin for yarn tails and a gauge swatch.
Tools:
– 2.5 mm crochet hook
– Tapestry needle
– Scissors
– Rust-proof pins and a foam blocking mat
– Spray bottle
– Gold keyring, about 1.25 in (3.2 cm) across, with a short chain attached
– One 8 mm gold jump ring
– 2 pairs of flat-nose pliers
Abbreviations (US Terms)
- ch chain
- sl st slip stitch
- sc single crochet
- hdc half double crochet
- dc double crochet
- sk skip
- st(s) stitch(es)
- RS right side
Special stitches
- Shell: 5 dc in the same st.
- Half-shell: 3 dc in the same st. When a half-shell starts a section, work it as: sl st into the st, ch 3 (counts as dc), 2 dc in the same st.
- Serif shell: 7 dc in the same st.
- Standing sc: With a slip knot on the hook, insert the hook into the st and work a sc.
Shell-Edge Leg Row (13 sts, worked over a sc-edge row): Join with sl st in the first sc, ch 3, 2 dc in the same sc. Sk 2 dc, sc in next dc. Sk 2 dc, 5 dc in next sc. Sk 2 dc, sc in next dc. Sk 2 dc, 3 dc in last sc.
Sc-Edge Leg Row (13 sts, worked over a shell-edge row): Standing sc in the top of the beginning ch-3. [Sk 2 dc, 5 dc in next sc, sk 2 dc, sc in next dc] twice.
Working direction: Never turn the work. Every row is worked from right to left with the RS facing, and each section is fastened off with a 3 in (7.6 cm) tail. Crochet over the starting tail for the first few stitches of each section.
Left-handed crocheters: follow the pattern as written. Your N will read as a mirror image from the working side, so use the other side as the RS for the serifs, border and daisies.
Gauge and Checkpoints
Gauge: 13 sts (2 shell repeats) = 1.3 in (3.3 cm) wide, and 10 rows = 3.0 in (7.6 cm) tall, so each row is 0.3 in (0.8 cm). In the border, 10 sc = 1 in (2.5 cm).
Test the left leg first. Work Rows 1–5 of the left leg only. It should measure 1.3 in wide x 1.5 in tall (3.3 x 3.8 cm). If it does, keep it as your real left leg.
Checkpoints:
– After Row 1: each strip is 1.3 in (3.3 cm) wide.
– After Row 5: both strips are 1.5 in (3.8 cm) tall.
– After Row 6: the piece is joined and 4.0 in (10.2 cm) wide.
– After Row 10: the piece is 4.0 x 3.0 in (10.2 x 7.6 cm).
– After the serifs: 4.5 x 3.6 in (11.4 x 9.1 cm).
– After the border: 4.7 x 3.8 in (11.9 x 9.7 cm).
If your leg is too wide or too tall, go down 0.25 mm in hook size. If it is too small, go up 0.25 mm. A difference of 0.1 in (0.3 cm) or less across the leg is fine.

Letter Body
Odd rows are lavender and even rows are mint.
Row 1 (lavender)
Left leg: Ch 14. Sc in 2nd ch from hook, then [sk 2 ch, 5 dc in next ch, sk 2 ch, sc in next ch] twice. Fasten off. (13 sts: 3 sc, 2 shells)
Right strip: Ch 16. Work 2 dc in 4th ch from hook; the skipped ch counts as a dc, so this is your half-shell. Then: sk 2 ch, sc in next ch; sk 2 ch, 5 dc in next ch; sk 2 ch, sc in next ch; sk 2 ch, 3 dc in last ch. Ch 3 for the extension, then fasten off. (13 sts plus the ch-3)
Lay the right strip to the right of the left leg, with the foundation chains at the bottom and a gap of 1.4 in (3.6 cm) between them. Row 1 total: 26 sts.
In every row, work the right-hand section first.
Row 2 (mint)
Right strip: Standing sc in the top of the beginning ch-3. [Sk 2 dc, 5 dc in next sc, sk 2 dc, sc in next dc] twice. Sk 2 ch, 3 dc in last ch. Ch 3 and fasten off. (16 sts)
Left leg: Work a Shell-Edge Leg Row. (13 sts)
Row 2 total: 29 sts.
Row 3 (lavender)
Right strip: Join with sl st in the first sc, ch 3, 2 dc in the same sc. [Sk 2 dc, sc in next dc, sk 2 dc, 5 dc in next sc] twice. Sk 2 dc, sc in next dc. Sk 2 ch, 3 dc in last ch. Ch 3 and fasten off. (19 sts)
Left leg: Work a Sc-Edge Leg Row. (13 sts)
Row 3 total: 32 sts.
Row 4 (mint)
Right strip: Standing sc in the top of the beginning ch-3. [Sk 2 dc, 5 dc in next sc, sk 2 dc, sc in next dc] 3 times. Sk 2 ch, 3 dc in last ch. Ch 3 and fasten off. (22 sts)
Left leg: Work a Shell-Edge Leg Row. (13 sts)
Row 4 total: 35 sts.
Row 5 (lavender)
Right strip: Join with sl st in the first sc, ch 3, 2 dc in the same sc. [Sk 2 dc, sc in next dc, sk 2 dc, 5 dc in next sc] 3 times. Sk 2 dc, sc in next dc. Sk 2 ch, 3 dc in last ch. Fasten off; there is no extension on this row. (25 sts)
Left leg: Work a Sc-Edge Leg Row. (13 sts)
Row 5 total: 38 sts.
The right strip has stepped 3 sts to the left in each row, and that step is what forms the lower half of the diagonal. The gap between the strips is now only 0.2 in (0.5 cm).
Row 6 (mint): the joining row
Right leg: Standing sc in the top of the beginning ch-3 of the right strip. [Sk 2 dc, 5 dc in next sc, sk 2 dc, sc in next dc] twice. Fasten off. (13 sts)
Left section: Sk the next 2 dc. Join with sl st in the next sc, ch 3, 2 dc in the same sc. Then work:
– Sk 2 dc, sc in next dc.
– Sk 2 dc, 5 dc in next sc.
– Sk 2 dc, sc in the last dc of the right strip.
– Work 5 dc in the first sc of the left leg. This shell bridges the gap, so pull it snug.
– Sk 2 dc, sc in next dc.
– Sk 2 dc, 5 dc in next sc.
– Sk 2 dc, sc in next dc.
– Sk 2 dc, 3 dc in last sc.
Fasten off. (25 sts)
Row 6 total: 38 sts. The 2 dc you skipped between the sections form the bottom of the top notch.
Rows 7–10
From here the right leg stays at 13 sts. The left section gets one half-shell shorter on its right end in each row, which forms the upper half of the diagonal.
Row 7 (lavender):
– Right leg: Shell-Edge Leg Row. (13 sts)
– Left section: Sk the first 3 dc. Join with sl st in the next sc, ch 3, 2 dc in the same sc. [Sk 2 dc, sc in next dc, sk 2 dc, 5 dc in next sc] 3 times. Sk 2 dc, sc in last dc. (22 sts)
– Row total: 35 sts.
Row 8 (mint):
– Right leg: Sc-Edge Leg Row. (13 sts)
– Left section: Sk the first 3 dc. Join with sl st in the next sc, ch 3, 2 dc in the same sc. [Sk 2 dc, sc in next dc, sk 2 dc, 5 dc in next sc] twice. Sk 2 dc, sc in next dc. Sk 2 dc, 3 dc in last sc. (19 sts)
– Row total: 32 sts.
Row 9 (lavender):
– Right leg: Shell-Edge Leg Row. (13 sts)
– Left section: Sk the first 3 dc. Join with sl st in the next sc, ch 3, 2 dc in the same sc. [Sk 2 dc, sc in next dc, sk 2 dc, 5 dc in next sc] twice. Sk 2 dc, sc in last dc. (16 sts)
– Row total: 29 sts.
Row 10 (mint):
– Right leg: Sc-Edge Leg Row. (13 sts)
– Left section: Sk the first 3 dc. Starting in the next sc, work a Shell-Edge Leg Row. (13 sts)
– Row total: 26 sts.
The piece should now measure 4.0 x 3.0 in (10.2 x 7.6 cm).
Serifs (lavender, make 4)
Work one serif across each of the four leg ends, each 13 sts wide:
– Top serifs: across the 13 sts of each Row 10 section.
– Bottom serifs: turn the letter upside down and work into the 13 free loops of each foundation chain. On the right strip, skip the 3 turning chains.
Serif Row:
1. Join with sl st in the first st, ch 5, sc in the same st. This makes the first tip loop.
2. Sk 2 sts, 7 dc in next st.
3. Sk 2 sts, sc in next st.
4. Sk 2 sts, 7 dc in next st.
5. Sk 2 sts, sc in last st.
6. Ch 5, sl st in the same st for the second tip loop.
7. Fasten off.
Each serif has 17 sts (3 sc and 14 dc) plus 2 ch-5 loops. Putting 7-dc shells over a 13-st base makes each end flare out by 0.25 in (0.6 cm) on each side. Each serif adds 0.3 in (0.8 cm) of height, so the letter now measures 4.5 x 3.6 in (11.4 x 9.1 cm).
Daisies (make 3)
Rnd 1 (yellow): Make a magic ring and work 6 sc into it. Join with sl st and fasten off. (6 sts)
Rnd 2 (cream): Join with sl st in any sc. Work (ch 2, 2 dc, ch 2, sl st) in the same sc, then sl st in the next sc. Repeat from * 5 more times. Fasten off. (6 petals)
Each daisy is 0.8 in (2.0 cm) across.
Leaves (make 5, leaf green)
- Ch 6.
- Sl st in 2nd ch from hook, sc in next ch, hdc in next 2 ch, sc in last ch.
- Ch 1.
- Working along the other side of the chain: sc in next ch, hdc in next 2 ch, sc in next ch, sl st in the tip ch.
- Fasten off.
Each leaf is 0.5 in (1.3 cm) long.
Border
Border gauge: 10 sc = 1 in (2.5 cm).
Each row end is 0.3 in (0.8 cm) tall, so it takes exactly 3 sc. Along the top of any stitches, work 1 sc per st. In each ch-5 tip loop, work (3 sc, ch 2, 3 sc) to make a point.
Round 1 (lavender): Join with a standing sc in the Row 10 row end on the left outer edge. Work around the letter, laying the tails along the edge and working over them.
- Left outer edge (down): 3 sc in each of the 10 row ends. (30 sc)
- Bottom-left serif: first tip loop, 17 sc across the serif, second tip loop. (29 sc)
- Bottom notch: 43 sc in total:
- 3 sc in each of the 5 row ends on the inner side of the left leg (15 sc)
- 1 sc at the top point, under the shell that bridges the gap
- 3 sc in each of the 5 left row ends of the right strip (15 sc)
- 3 sc under each of the 4 ch-3 extensions (12 sc)
- Bottom-right serif: tip loop, 17 sc, tip loop. (29 sc)
- Right outer edge (up): 3 sc in each of the 10 row ends. (30 sc)
- Top-right serif: 29 sc.
- Top notch: 44 sc in total:
- 3 sc in each of the 5 row ends on the inner side of the right leg (15 sc)
- 1 sc in each of the 2 skipped dc at the bottom of the notch (2 sc)
- 3 sc in each of the 5 right row ends of the left section, Rows 6–10 (15 sc)
- 1 sc in each of the 3 dc of the 4 half-shells left uncovered at the end of Rows 6–9 (12 sc)
- Top-left serif: 29 sc.
Join with sl st to the first sc. The round has 263 sc and 8 ch-2 spaces.
Why the math works: The two outer edges are 3.0 in (7.6 cm) tall. At 10 sc per inch that needs 30 sc, which is exactly 10 row ends x 3 sc. Every stitched edge gets 1 sc per stitch, so it neither stretches nor gathers. The extra stitches go only into the 8 tip loops, which need them to make points. The border adds 0.1 in (0.3 cm) on each side, so 4.5 x 3.6 in becomes 4.7 x 3.8 in (11.9 x 9.7 cm).
Final Blocking
- Weave in any remaining tails through stitches of the same color, then trim them.
- Pin the letter right side up. Keep the legs parallel and the notches open, and pin each serif point out.
- Check the measurements: 4.7 in (11.9 cm) across the bottom serif points and 3.8 in (9.7 cm) tall.
- Mist the letter until it is damp and let it dry completely.
- Sew one daisy to each leg just below its top serif. Tuck two leaves under the left daisy pointing left, and two under the right daisy pointing right.
- Sew the third daisy above the bottom-right serif, with one leaf peeking out to the upper right.
- With pliers, open the jump ring. Thread it through the border and the center sc of the top-left serif, add the keyring chain, and close the ring.
Final Quality-Control Checklist
- Row totals read 26, 29, 32, 35, 38, 38, 35, 32, 29, 26.
- The stripes alternate evenly, with lavender at both ends of the letter.
- Both notches are open triangles.
- All 4 serifs flare evenly and all 8 tips form points.
- The border has 263 sc and lies flat.
- The finished letter is 4.7 x 3.8 in (11.9 x 9.7 cm).
- The daisies, leaves and jump ring are all secure.
Troubleshooting
- The diagonal looks stepped: Check that you skipped exactly 3 dc at the start of the left section in Rows 7–10.
- The two strips don’t line up in Row 6: Pull the bridging shell snug and keep the gap at 0.2 in (0.5 cm).
- The border ruffles: Use 2 sc in the notch row ends instead of 3, and keep your tension even.
- The border cups or pulls in: Use a hook 0.25 mm larger for the border round only.
- The serifs curl: Pin the tips out firmly when blocking.
- There are too many tails: Work over each starting tail as you begin a section.
Care
Hand wash in cool water and lay flat to dry. Remove the metal hardware before washing so it doesn’t tarnish.

Final Notes
Each check builds on the one before it:
– The gauge strip measures 1.3 x 1.5 in (3.3 x 3.8 cm).
– The 10 rows make a 4.0 x 3.0 in (10.2 x 7.6 cm) letter.
– The serifs bring it to 4.5 x 3.6 in (11.4 x 9.1 cm).
– The border finishes it at 4.7 x 3.8 in (11.9 x 9.7 cm).
If each stage matches, the finished letter will too.
Happy crocheting!