
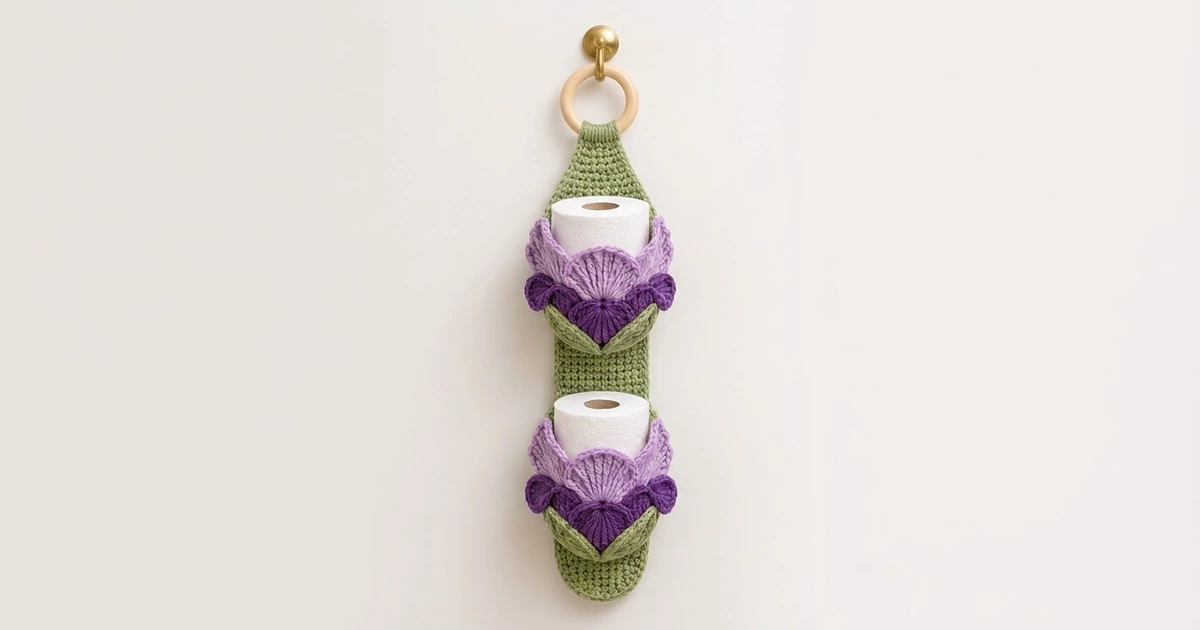
This hanging holder turns spare toilet rolls into a small piece of bathroom décor. A long sage-green strip hangs from a natural wooden ring, and two deep green baskets are sewn to its front. Each basket has a layered iris on the front. At the top are a lilac fan and two curling lilac side petals. Below them are a deep purple center and two rounded purple petals, and two pointed green leaves form a V at the base.
The colors are sage green, light lilac and deep violet. The pieces use dense single crochet, and the fans are double crochet with ridges that fan out from the center. The pattern uses US terms throughout.
The finished strip measures 4.5 in (11.4 cm) wide and 25.25 in (64.1 cm) long below the ring fold. With the ring, the holder hangs about 28 in (71.1 cm). Each basket is about 5 in (12.7 cm) across and 2.75 in (7.0 cm) deep, and holds one standard roll.
Construction is simple. Crochet one strip in rows, add the edging, and wrap the top tab around the ring. Then crochet two baskets in the round, make sixteen small appliqués, and sew everything together in layers.
Finished Size and Construction
- Finished size: 4.5 in x 25.25 in (11.4 cm x 64.1 cm) strip; about 28 in (71.1 cm) hanging length with ring
- Skill level: Easy-intermediate
- Terminology: US
- Yarn weight: Worsted (#4), cotton or cotton blend
- Hook: 5 mm (H-8)
- Number of pieces: 1 strip, 2 baskets, 16 appliqués (8 per basket)
- Layout: 2 baskets stacked vertically on 1 strip
- Piece size: basket 5 in (12.7 cm) diameter x 2.75 in (7.0 cm) deep
- Size before border: strip body 4 in x 25 in (10.2 cm x 63.5 cm)
- Border depth: 0.25 in (0.6 cm) on each long side and the bottom
Materials
Choose a firm, smooth cotton. It holds the basket shape, shows the petal ridges clearly, and copes with bathroom humidity.
- Sage green: 200 g / about 340 m (strip, baskets, leaves)
- Light lilac: 50 g / about 85 m (fans and side petals)
- Deep purple: 50 g / about 85 m (centers and lower petals)
These amounts include a margin of roughly 20% to allow for gauge swatches and differences in tension.
Tools:
- 5 mm (H-8) crochet hook
- 3 in (7.6 cm) unfinished wooden ring
- Tapestry needle
- Stitch markers (at least 6)
- Rust-proof pins
- Scissors and measuring tape
- Optional: fabric stiffener spray for the petals
Abbreviations (US Terms)
- ch – chain
- sl st – slip stitch
- sc – single crochet
- hdc – half double crochet
- dc – double crochet
- tr – treble crochet
- sc2tog – single crochet 2 together
- BLO – back loop only
- MR – magic ring
- st(s) – stitch(es)
- RS / WS – right side / wrong side
Special stitch – sc2tog: Insert hook in next st, yarn over, pull up a loop. Insert hook in following st, yarn over, pull up a loop. Yarn over and pull through all 3 loops.
Gauge and Checkpoints
Gauge: 14 sc x 16 rows = 4 in (10.2 cm) in sc rows. That is 3.5 sts and 4 rows per inch.
Test one piece first. Before starting the strip, make one basket base through Round 9. It should measure about 5 in (12.7 cm) across. If it is larger, go down to a 4.5 mm hook. If it is smaller, go up to 5.5 mm.
Checkpoints:
- Strip after Row 4: 4 in (10.2 cm) wide
- Strip after Row 84: 21 in (53.3 cm) long
- Strip after Row 100: 25 in (63.5 cm) long
- Basket base after Round 5: 2.75 in (7.0 cm) across
- Basket base after Round 9: 5 in (12.7 cm) across
- Basket wall after Round 20: 2.75 in (7.0 cm) tall
If the strip comes out too long, take rows out of the plain section between the baskets (Rows 16–43) in multiples of 4. If it comes out too narrow, change hook size instead of adding stitches, because each basket back is matched to the strip’s 14 stitches.

Back Strip
Worked in sage green, in rows, from the rounded bottom up.
Row 1: Ch 9, sc in 2nd ch from hook and in each ch across, turn. (8 sc)
Row 2: Ch 1, 2 sc in first st, sc in next 6 sts, 2 sc in last st, turn. (10 sc)
Row 3: Ch 1, 2 sc in first st, sc in next 8 sts, 2 sc in last st, turn. (12 sc)
Row 4: Ch 1, 2 sc in first st, sc in next 10 sts, 2 sc in last st, turn. (14 sc)
Rows 1–4 form the rounded bottom end.
Rows 5–84: Ch 1, sc in each st across, turn. (14 sc)
Row 85: Ch 1, sc2tog, sc in next 10 sts, sc2tog, turn. (12 sts)
Rows 86–88: Ch 1, sc across, turn. (12 sc)
Row 89: Ch 1, sc2tog, sc in next 8 sts, sc2tog, turn. (10 sts)
Rows 90–92: Ch 1, sc across, turn. (10 sc)
Row 93: Ch 1, sc2tog, sc in next 6 sts, sc2tog, turn. (8 sts)
Rows 94–96: Ch 1, sc across, turn. (8 sc)
Row 97: Ch 1, sc2tog, sc in next 4 sts, sc2tog, turn. (6 sts)
Rows 98–100: Ch 1, sc across, turn. (6 sc)
Rows 85–100 form the tapered shoulder, which is 4 in (10.2 cm) long.
Rows 101–112 (tab): Ch 1, sc across, turn. (6 sc)
Fasten off with a 12 in (30.5 cm) tail. The tab is 3 in (7.6 cm) long and isn’t counted in the strip length.
Baskets (make 2)
Worked in sage green, in continuous rounds. Mark the first st of each round.
Round 1: 6 sc in MR. (6 sc)
Round 2: 2 sc in each st. (12 sc)
Round 3: Sc in next st, 2 sc in next st 6 times. (18 sc)
Round 4: Sc in next 2 sts, 2 sc in next st 6 times. (24 sc)
Round 5: Sc in next 3 sts, 2 sc in next st 6 times. (30 sc)
Round 6: Sc in next 4 sts, 2 sc in next st 6 times. (36 sc)
Round 7: Sc in next 5 sts, 2 sc in next st 6 times. (42 sc)
Round 8: Sc in next 6 sts, 2 sc in next st 6 times. (48 sc)
Round 9: Sc in next 7 sts, 2 sc in next st 6 times. (54 sc)
Round 10: Sc in BLO of each st. (54 sc) Working in the back loop only turns the wall up sharply.
Rounds 11–20: Sc in each st. (54 sc)
Round 21: Sl st loosely in each st, join to first sl st. (54 sl st)
Fasten off. The wall (Rounds 10–20) is 11 rounds, or 2.75 in (7.0 cm) tall. On Round 20, place markers on 14 stitches in a row, centered over the round’s jog, to mark the back panel.
Iris Appliqués (8 per basket)
Leave a 10 in (25.4 cm) sewing tail on every piece.
Lilac Fan (make 1 per basket)
Row 1: In MR, ch 3 (counts as dc), work 5 dc, pull ring closed, turn. (6 dc)
Row 2: Ch 3, dc in first st, 2 dc in each remaining st, turn. (12 dc)
Row 3: Ch 3, dc in first st, dc in next st, 2 dc in next st 5 times, dc in last st, turn. (18 dc)
Row 4 (trim): Ch 1, sc in next 5 sts, 2 sc in next st 3 times. 18 sc worked 1-per-stitch + 3 extra sc = 21 sc.
The fan is a semicircle about 3.25 in (8.3 cm) wide and 1.75 in (4.4 cm) tall, with ridges that fan out from the ring.
Lilac Side Petals (make 2 per basket)
Row 1: Ch 9. Sc in 2nd ch from hook, hdc in next ch, dc in next ch, 2 dc in next ch, 2 tr in next ch, 2 tr in next ch, 2 dc in next ch, (hdc, sc) in last ch, turn. (13 sts)
Row 2 (ruffle): Ch 1, 2 sc in each st across. (26 sc)
Doubling every stitch on the edge makes the petal curl and wave. Each petal is about 2.5 in (6.4 cm) long.
Purple Center (make 1 per basket)
Rows 1–3: Work as Lilac Fan Rows 1–3. (18 dc)
There is no trim row, so this piece is a little smaller than the lilac fan, about 2.75 in (7.0 cm) wide.
Purple Side Petals (make 2 per basket)
Row 1: In MR, ch 3 (counts as dc), work 5 dc, pull ring closed, turn. (6 dc)
Row 2: Ch 1, 2 sc in each st. (12 sc)
Each rounded petal is about 1.5 in (3.8 cm) across.
Leaves (make 2 per basket, sage green)
Round 1: Ch 10. Along one side of the chain: sc in 2nd ch from hook, hdc in next ch, dc in next 4 ch, hdc in next ch, sc in next ch, 3 sc in last ch. Along the opposite side: sc in next ch, hdc in next ch, dc in next 4 ch, hdc in next ch, sc in last ch, sl st to first sc. (8 + 3 + 8 = 19 sts)
Round 2 (trim): Sl st in each st around, working (sl st, ch 2, sl st) in the center sc of the tip. 19 sl st worked 1-per-stitch + 1 extra sl st = 20 sl st, plus 1 ch-2 tip.
Each leaf is 2.75 in (7.0 cm) long and 1 in (2.5 cm) wide, with a crisp outlined edge and a sharp point.
Make All Pieces
Sage green: 1 strip, 2 baskets, 4 leaves
Light lilac: 2 fans, 4 side petals
Deep purple: 2 centers, 4 side petals
Layout (strip rows, counted from the bottom):
        [ wooden ring ]
        Rows 101–112  tab, folded to WS
        Rows 85–100   tapered shoulder
        Rows 56–84    plain strip
        Rows 44–55    UPPER BASKET (rim on Row 55)
        Rows 16–43    plain strip
        Rows 4–15     LOWER BASKET (rim on Row 15)
        Rows 1–3      rounded bottom
Border
Work the border on the strip by itself, before you attach the baskets. Because no basket stitches are involved, the count doesn’t need any extra seam stitches.
Border gauge: 3.5 sc per inch, the same as the body.
Edging Row 1: With RS facing, join sage green at the top of Row 100 on the right edge. Work down the right side into the row-ends: sc in next 7 row-ends, skip 1 row-end 12 times, sc in last 4 row-ends. (84 + 4 = 88 sc) Across the free loops of the foundation chain, sc in each loop. (8 sc) Work up the left side the same way as the right side. (88 sc) Total: 88 + 8 + 88 = 184 sc. Turn.
Edging Row 2: Ch 1, sl st in each sc. (184 sl st) Fasten off.
Why the math works: Each side covers 100 rows, which is 25 in (63.5 cm). At 3.5 sts per inch, 25 in needs about 87.5 sts, so 88 sc lies flat. Working one sc into every row-end (100 sts) would make the edge ruffle. The 8 sc along the bottom match the 8 foundation stitches exactly. The edging adds 0.25 in (0.6 cm) to each edge. The width becomes 4 in + 0.5 in = 4.5 in (11.4 cm), and the length becomes 25 in + 0.25 in = 25.25 in (64.1 cm).
Joining
Ring: Wrap the tab over the ring from front to back. On the WS, sew the last row of the tab (6 sts) across the center 6 sts of Row 92, stitch to stitch.
Baskets: Whipstitch each basket in place with sage green:
- Line up the 14 marked stitches of Round 20 with the 14 stitches of the rim row (Row 55 for the upper basket, Row 15 for the lower). Sew them stitch to stitch.
- Sew down each side of the back panel, joining the 11 wall rounds (Rounds 10–20) to 11 strip rows (Rows 45–55 upper, Rows 5–15 lower). This works stitch to stitch because the rounds and rows are the same 0.25 in (0.6 cm) height.
- Sew the 14 back stitches of Round 9 across the row below the panel (Row 44 upper, Row 4 lower).
Keep your tension firm but not tight. The strip should stay flat behind each basket without puckering.
Appliqués (per basket, layered from back to front):
- Lilac side petals: Sew the straight edges along the upper front wall on the left and right. They should rise about 1 in (2.5 cm) above the rim and curl outward.
- Lilac fan: Center the ring at mid-wall. The arc rises about 0.75 in (1.9 cm) above the rim, between the side petals.
- Purple center: Place the ring just below the fan’s ring, with the arc pointing down toward the base.
- Purple side petals: Place one on each side of the center, overlapping the lower ends of the lilac petals.
- Leaves: Bring the bases together at bottom center on the fold between Rounds 9 and 10, with the tips angled up and out in a V.
Sew down each piece with small stitches in a matching color. Leave the top 1 in (2.5 cm) of each lilac side petal free so it can curl.
Size checkpoint: The lower basket base should sit 1 in (2.5 cm) above the foundation edge. The upper basket base should sit 11 in (27.9 cm) above it.
Final Blocking
- Lightly mist the strip and pin it flat to 4.5 in x 25.25 in (11.4 cm x 64.1 cm), keeping the baskets off the board.
- Stuff each basket with a toilet roll or a folded towel to set its round shape.
- Shape the fans and petals with your fingers, curling the lilac side petals outward.
- Apply fabric stiffener to the petals if you like.
- Let everything dry completely before hanging.
Final Quality-Control Checklist
- The strip is 4.5 in (11.4 cm) wide, with straight, flat edges
- The hanging length is about 28 in (71.1 cm)
- Both baskets are centered and level
- Each basket holds a roll snugly
- All 16 appliqués are sewn on, and the petals curl evenly
- The leaves form a matching V on both baskets
- The ring tab is secure and lies flat on the WS
- All tails are woven in on the WS
Troubleshooting
- Strip edges wave: Redo Edging Row 1, skipping every 7th row-end instead of every 8th.
- Basket too shallow: Add one wall round and sew the back panel to one more strip row.
- Basket tips forward: Add a second line of stitching across the rim.
- Fan cups instead of lying flat: Add 3 more increases in Row 4.
- Side petals don’t curl: Work Row 2 tighter, or go down a hook size.
- Roll sits too loose: Stop increasing after Round 8 (48 sts) and work the wall on 48 sts.
Care
Spot clean, or hand wash in cool water and lay flat to dry. Reshape the petals while they are still damp.

Final Notes
Here is how the measurements fit together. 14 sc make a 4 in (10.2 cm) strip, 100 rows make 25 in (63.5 cm), and the edging brings the strip to 4.5 in x 25.25 in (11.4 cm x 64.1 cm). Each 54-stitch basket has a 5 in (12.7 cm) base, and its 14-stitch back panel matches the strip width exactly. Check your gauge on the first basket base, and the rest of the pieces will fit.
Happy crocheting!