

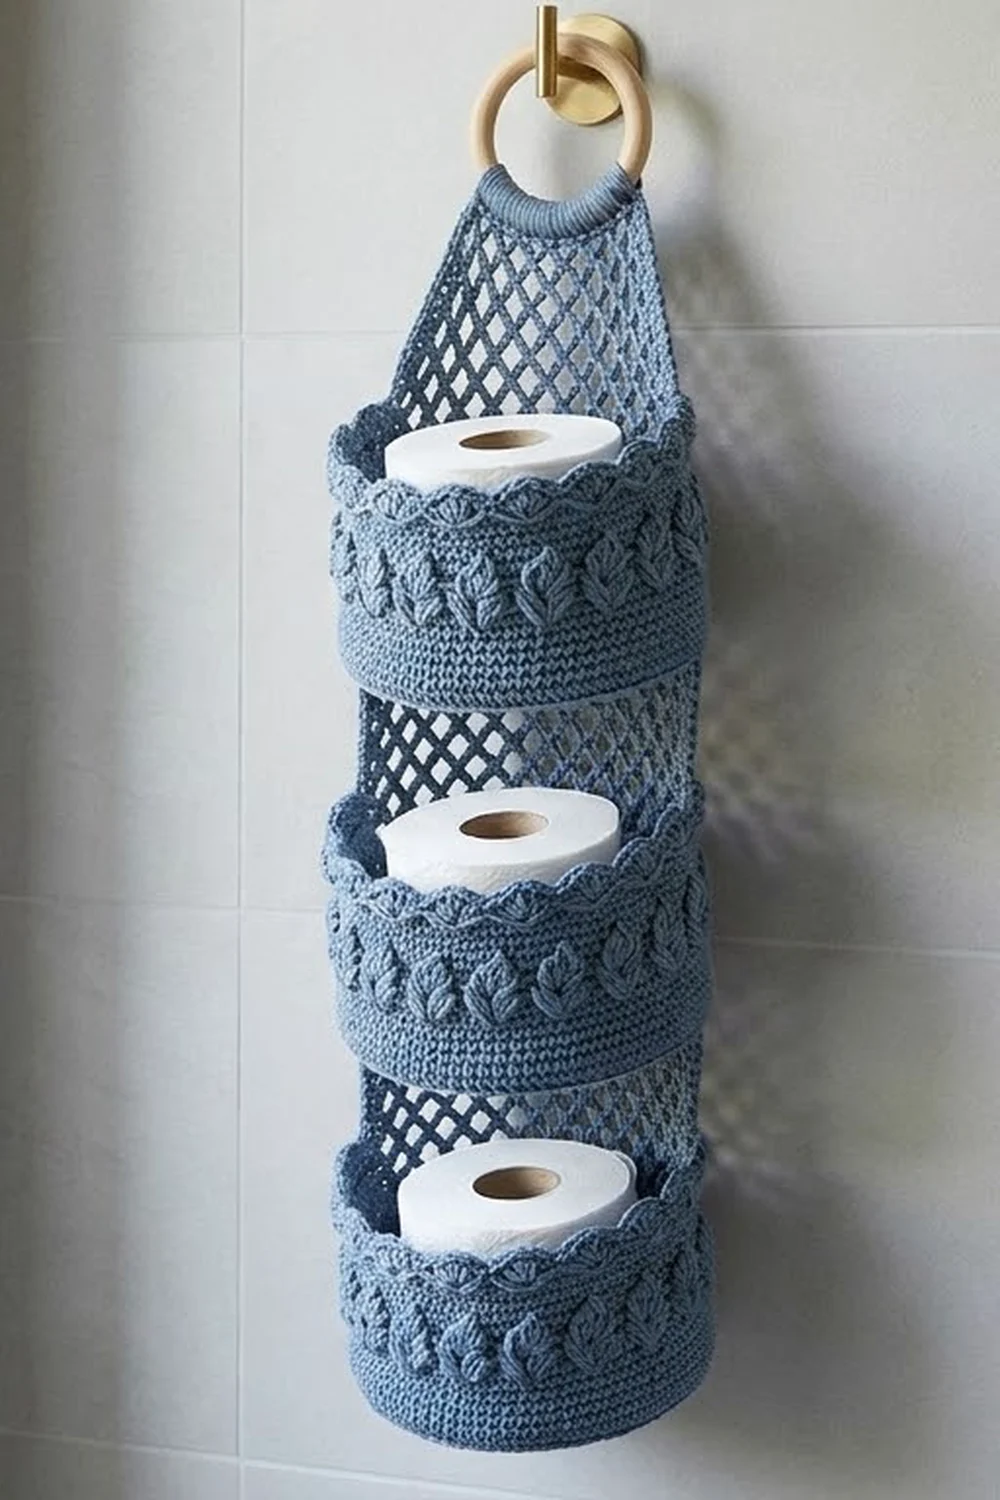
This hanging holder stacks three spare rolls in a column of leafy oval baskets. Each basket has a band of raised, pointed leaves under a wavy scalloped rim. Open diamond mesh connects the baskets and rises at the top to a natural wooden ring.
The sample is a soft dusty denim blue, which looks fresh against white tile. A creamy natural version looks just as good and suits a warmer, farmhouse-style bathroom. The style is light and airy, but the solid bases keep the rolls stable.
The pattern uses US crochet terms. The finished holder measures about 7.5 in (19.1 cm) wide and about 21 in (53.3 cm) long from the top of the ring to the bottom of the lowest basket. Each basket is 3.5 in (8.9 cm) tall.
You make three baskets in joined rounds, starting from an oval base. Then you make two mesh connector panels and one tapering top mesh. All pieces are joined with single crochet along ridges built into the baskets, and the top is finished around the ring.
Finished Size and Construction
- Finished size: about 7.5 in (19.1 cm) wide × 21 in (53.3 cm) long
- Skill level: Intermediate
- Terminology: US crochet terms
- Yarn weight: #4 worsted / aran-weight cotton
- Hook: 5.0 mm (US H-8)
- Number of pieces: 6 crocheted pieces (3 baskets, 2 connector panels, 1 top mesh) plus 1 wooden ring
- Layout: one vertical column, from the top: ring, top mesh, basket, connector, basket, connector, basket
- Basket size: base 7 × 4.75 in (17.8 × 12.1 cm); rim about 7.5 × 5 in (19.1 × 12.7 cm); height 3.5 in (8.9 cm)
- Basket height before border: 2.75 in (7.0 cm)
- Border (scalloped rim) depth: 0.75 in (1.9 cm)
Materials
Yarn: Use a firm worsted or aran-weight 100% cotton or a cotton blend. Cotton holds the basket shape, doesn’t stretch much with weight, and handles bathroom humidity well. Avoid soft acrylics, because the baskets will sag.
- Dusty Blue (main color): 200 g / 340 m (about 372 yd)
- Optional alternate colorway, Cream: the same amount, 200 g / 340 m, if you make the natural version instead
Per piece (approximate): each basket uses 45 g / 77 m, each connector uses 6 g / 10 m, and the top mesh uses 8 g / 14 m.
Tools:
– 5.0 mm (US H-8) crochet hook
– One wooden ring, 2.75 in (7.0 cm) diameter
– 4 locking stitch markers
– Tapestry needle
– Scissors
– Measuring tape
– Blocking pins and a spray bottle
– A standard toilet roll (for shaping)
All quantities include a margin of about 25%, so you won’t run short if your tension differs slightly.
Abbreviations (US Terms)
- ch: chain
- sl st: slip stitch
- sc: single crochet
- hdc: half double crochet
- dc: double crochet
- tr: treble crochet
- BLO: back loop only
- rev sc: reverse single crochet (crab stitch)
- sk: skip
- sp: space
- st(s): stitch(es)
- rep: repeat
Special stitches
- dc7tog (leaf cluster): [Yarn over, insert hook in next st, pull up a loop, yarn over, pull through 2 loops] 7 times (8 loops on hook). Yarn over and pull through all 8 loops. This counts as 1 st.
- rev sc: Work single crochet from left to right (right-handed), inserting the hook into the next stitch to the right. This makes the rolled, cord-like edge.
Gauge and Checkpoints
Gauge: 14 sc and 15 rounds = 4 in (10.2 cm) in single crochet.
Mesh gauge: each ch-5 loop is about 1.2 in (3.0 cm) wide, and each mesh row is about 0.6 in (1.5 cm) tall.
Make one complete basket before anything else. It is your gauge swatch, and every other piece is sized from it.
Checkpoints:
1. After Round 5 (46 sts), the base measures about 5 × 2.75 in (12.7 × 7.0 cm).
2. After Round 9 (70 sts), the base measures 7 × 4.75 in (17.8 × 12.1 cm).
3. After Round 15 (the leaf band), the wall is 2.2 in (5.6 cm) tall.
4. After Round 17, the wall is 2.75 in (7.0 cm) tall.
5. After Round 19, the basket is 3.5 in (8.9 cm) tall and a roll sits inside with a little room to spare.
If your base is too big: go down to a 4.5 mm hook. If it is too small: go up to a 5.5 mm hook. Don’t add or remove rounds. The 70-stitch count drives the leaf repeat, the scallop repeat, and the joining math.
Basket (make 3)
Base
Ch 11.
Round 1: Work 3 sc in the 2nd ch from the hook, sc in the next 8 ch, and 3 sc in the last ch. Rotate the work and sc in the bottom loops of the next 8 ch. Join with a sl st to the first sc. (22 sts: two ends of 3 sts each and two sides of 8 sts each)
From Round 2 on, every round starts at the first stitch of an end. Each round adds 3 increases at each end and none along the sides.
Rounds 2–9: Ch 1. [(Sc in the next X sts, 2 sc in the next st) 3 times, sc in the next 8 sts] twice. Join with a sl st to the first sc.
X is the round number minus 2, so Round 2 has X = 0 (work only the 2-sc increases), Round 3 has X = 1, and so on up to Round 9 with X = 7.
Stitch counts:
– Round 2: 28 sts
– Round 3: 34 sts
– Round 4: 40 sts
– Round 5: 46 sts
– Round 6: 52 sts
– Round 7: 58 sts
– Round 8: 64 sts
– Round 9: 70 sts
Check that the base measures 7 × 4.75 in (17.8 × 12.1 cm).
Wall
Round 10 (turning round): Ch 1, then sc in BLO of each st around. Join. (70 sts: 70 worked 1 per stitch + 0 added)
This leaves the front loops of Round 9 free on the outside bottom edge. That line of loops is the base ridge, which you’ll use later for joining.
Rounds 11–13: Ch 1, then sc in each st around. Join. (70 sts each)
Round 14 (leaf fans): Ch 1. *Sc in the next st, hdc in the next st, sk 2, 7 dc in the next st, sk 2, hdc in the next st, sc in the next 2 sts; rep from * 6 more times (7 repeats). Join to the first sc.
(84 sts: 7 repeats × 12 sts. Each repeat uses 10 sts of the previous round.)
Round 15 (leaf tips): Ch 4 (counts as tr). Dc in the next hdc, ch 2, dc7tog over the 7 dc of the fan, ch 2, dc in the next hdc, tr in the next 2 sc. *Tr in the next sc, dc in the next hdc, ch 2, dc7tog over the next 7 dc, ch 2, dc in the next hdc, tr in the next 2 sc; rep from * 5 more times. Join with a sl st to the top of the beginning ch-4.
(70 sts: 7 repeats × 10, counting each ch as 1 st)
The 7-dc fan opens from a single stitch and the cluster closes it again, which gives a leaf with a point at both ends. The ch-2 gaps outline the upper half of each leaf. There are 7 leaves per basket.
Round 16: Ch 1, then sc in each st and in each ch around (work into the chain itself, not the space). Join. (70 sts)
Round 17: Ch 1, then sc in BLO of each st around. Join. (70 sts)
This leaves the front loops of Round 16 free on the outside. That line of loops is the rim ridge, which sits just below the scallops.
Border: Scalloped Rim
The border is worked at the main gauge of 14 sts = 4 in (10.2 cm). Each scallop covers 10 sts of the previous round, which is about 2.85 in (7.2 cm), and sits centered over one leaf.
Round 18 (scallops): Ch 1. *Sc in the next st, hdc in the next st, dc in the next 2 sts, 2 dc in each of the next 2 sts, dc in the next 2 sts, hdc in the next st, sc in the next st; rep from * 6 more times. Join.
(84 sts: 70 worked 1 per stitch + 14 added, which is 2 extra per scallop × 7 scallops)
Round 19 (rolled edge): Ch 1, then rev sc in each st around. Join. (84 sts) Fasten off and weave in the ends.
Why the math works: 70 divides evenly into 7 repeats of 10. The leaf rounds expand to 12 per repeat and come back to 10 per repeat, so the wall stays at 70 sts. The scallop round adds only 2 sts per repeat. That’s enough for a gentle wave at the peaks without making the rim ruffle.
Leaf veins: With a 12 in (30.5 cm) length of yarn, work surface slip stitches up the center of each leaf, from the base point to the cluster tip. Weave in the ends on the inside.
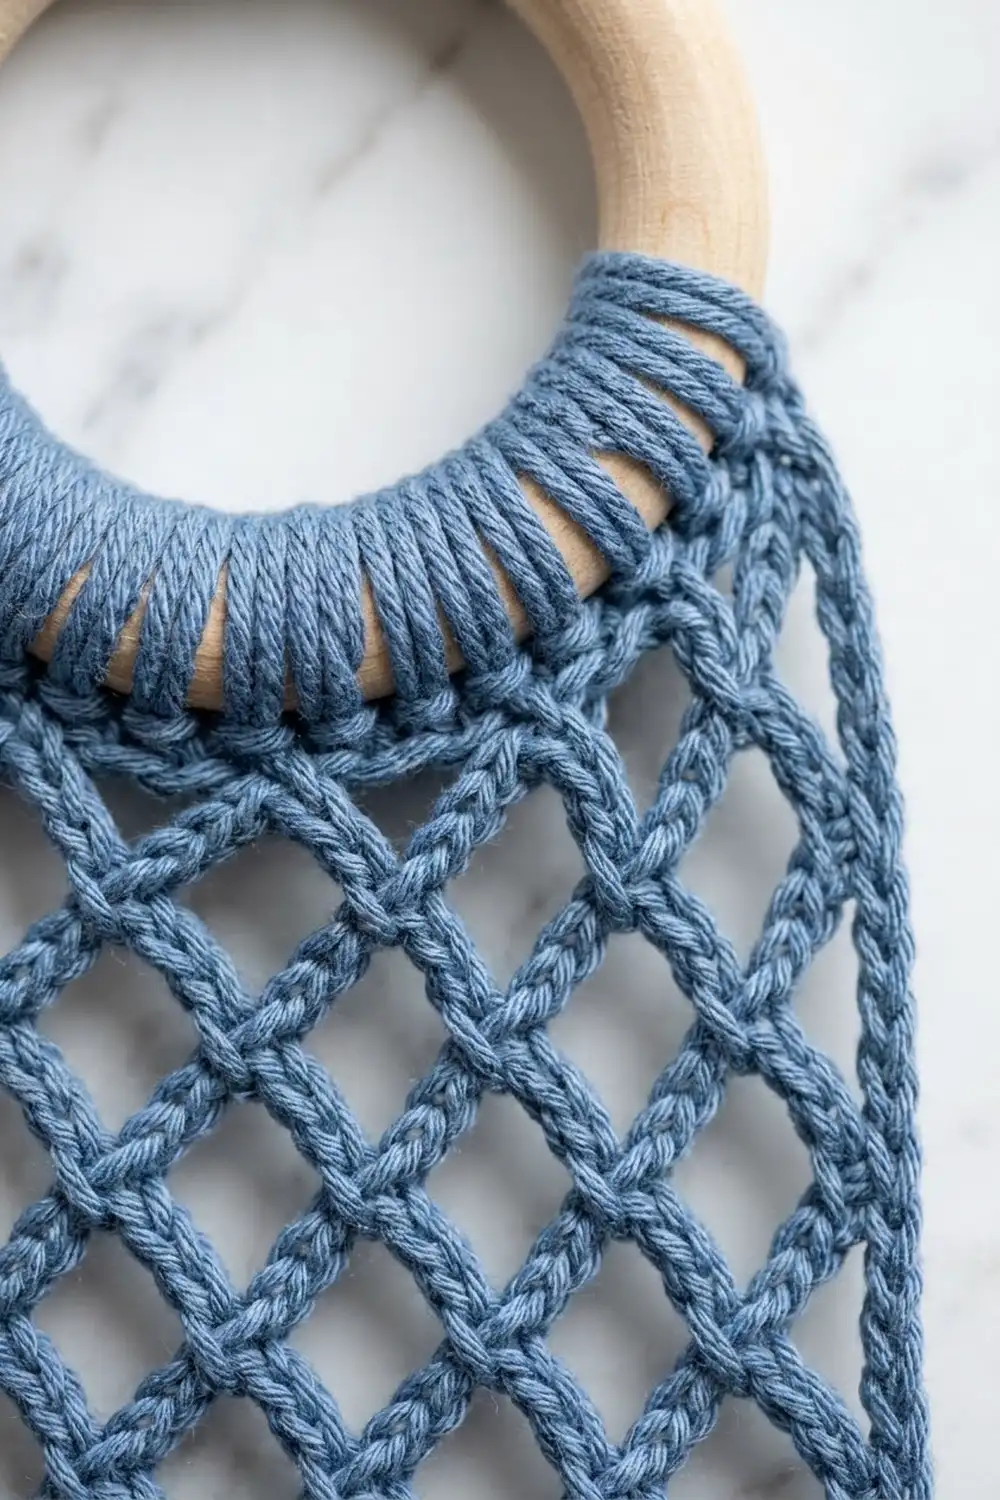
Connector Panel (make 2)
Ch 34.
Row 1 (RS): Sc in the 2nd ch from the hook. Ch 5, sk 3 ch, sc in the next ch; rep from * 7 more times. (8 ch-5 loops, 9 sc points)*
Row 2: Ch 5 (counts as dc + ch 2) and turn. Sc in the first ch-5 sp. Ch 5, sc in the next ch-5 sp; rep from * 6 more times. Ch 2, dc in the last sc. (7 ch-5 loops plus 2 half loops at the edges)*
Row 3: Ch 1 and turn. Sc in the dc. Ch 5, sc in the next ch-5 sp; rep from * 6 more times. Ch 5, sc in the 3rd ch of the turning ch. (8 loops, 9 sc points)*
Rows 4–5: Repeat Rows 2–3.
Fasten off, leaving a 6 in (15.2 cm) tail. The panel measures about 9.5 × 3 in (24.1 × 7.6 cm). It has 9 points along the foundation edge and 9 points along Row 5.
Top Mesh (make 1)
Ch 34. Work Row 1 as for the connector (8 loops, 9 points).
Rows 2–8 (decrease rows): Ch 1 and turn. Sl st across the first 3 ch of the first loop. Sc in that loop. *Ch 5, sc in the next loop; rep from * across to the last loop and sc in it. Each row has 1 loop fewer than the row before:
– Row 2: 7 loops
– Row 3: 6 loops
– Row 4: 5 loops
– Row 5: 4 loops
– Row 6: 3 loops
– Row 7: 2 loops
– Row 8: 1 loop
Don’t fasten off. Leave the yarn attached for the ring finish.
The top mesh is a triangle about 9.5 in (24.1 cm) wide at the base and 4.8 in (12.2 cm) tall.
Make All Pieces
All pieces are made in Dusty Blue (or all in Cream):
– 3 baskets
– 2 connector panels
– 1 top mesh
Layout from the top:
        [ ring ]
       /  TOP  \
      [ BASKET 1 ]
      [CONNECTOR 1]
      [ BASKET 2 ]
      [CONNECTOR 2]
      [ BASKET 3 ]
Joining
Mark the back. On each basket, choose one straight side as the back. Place a marker in the 4th of the 8 straight-side sts on both the base ridge (Round 9 front loops) and the rim ridge (Round 16 front loops). This marked stitch is the center back.
Join logic. Every joining edge has 9 mesh points spaced 4 sts apart. Together they span 33 basket sts: the center st plus 16 on each side. In each joining row:
– Line up the 5th (middle) mesh point with the center back stitch.
– Work sc through the mesh point and the basket loop together.
– Work 1 sc in each of the next 3 basket loops alone.
– Repeat until all 9 points are joined.
That makes 33 sc per joining row: 9 that catch a mesh point and 24 worked in the basket only. No stitches are added at the mesh points.
Join the pieces in this order:
1. Top mesh foundation edge to the Basket 1 rim ridge.
2. Connector 1 Row 5 edge to the Basket 1 base ridge.
3. Connector 1 foundation edge to the Basket 2 rim ridge.
4. Connector 2 to Basket 2 and Basket 3 in the same way.
Tension: Keep the joining sc snug but not tight, so the mesh lies smooth across the back curve instead of pulling it flat.
Ring: Using the yarn still attached to Row 8 of the top mesh, work 10 sc around the wooden ring. Sl st into the first sc of Row 8 and fasten off, leaving a 24 in (61.0 cm) tail. Wrap the tail tightly 8 times around the mesh just below the ring, then thread it down through the wraps and secure it.
Size checkpoint: Hang the holder. It should measure about 21 in (53.3 cm) from the top of the ring to the bottom of Basket 3, with about 3 in (7.6 cm) of mesh showing between baskets.
Final Blocking
- Lightly mist the whole holder until it is damp, not soaked.
- Put a toilet roll inside each basket and push the walls out evenly against it.
- Pinch each scallop peak upright, and press each leaf so it sits slightly raised.
- Lay the holder flat with the rolls in place. Pin the mesh open into even diamonds, keeping the connectors 3 in (7.6 cm) tall.
- Let it dry completely, then remove the pins and rolls.
Final Quality-Control Checklist
- Each base is 7 × 4.75 in (17.8 × 12.1 cm) with 70 sts in Round 9.
- Each basket has 7 leaves, all with veins, and 7 scallops centered over the leaves.
- Each basket is 3.5 in (8.9 cm) tall.
- Every joining row has 33 sc with 9 mesh points caught.
- The center mesh point lines up with the center back on every join.
- The ring wrap is tight and the tail is secured.
- All ends are woven in on the inside.
Troubleshooting
- Base cups or ruffles: If it cups, your tension is too tight, so use a larger hook. If it ruffles, your increases are probably drifting; recount each end so it has 3 increases per round.
- Leaves look flat: Pull the dc7tog loops up evenly, and don’t skip the surface-slip-stitch veins.
- Rim ruffles: Make sure Round 18 has only 2 increases per scallop (84 sts total).
- Basket tilts forward: The mesh join is probably off-center. Re-align the middle mesh point with the center back stitch.
- Mesh too long: Your loops may be loose. Work ch 4 instead of ch 5 and keep the same loop count.
Care
Hand wash in cool water with mild soap, press out the water in a towel, and dry flat with rolls inside to keep the shape. Don’t tumble dry.
Final Notes
The measurement chain:
– 14 sc = 4 in (10.2 cm) gives a 70-stitch base of 7 × 4.75 in (17.8 × 12.1 cm).
– The wall is 2.75 in (7.0 cm) before the border, and the 0.75 in (1.9 cm) scalloped rim brings each basket to 3.5 in (8.9 cm).
– Mesh panels with 9 points join to 33 sts on each ridge, giving a 21 in (53.3 cm) holder.
Check each link in the chain as you go and the finished holder will hang straight.
Happy crocheting!