
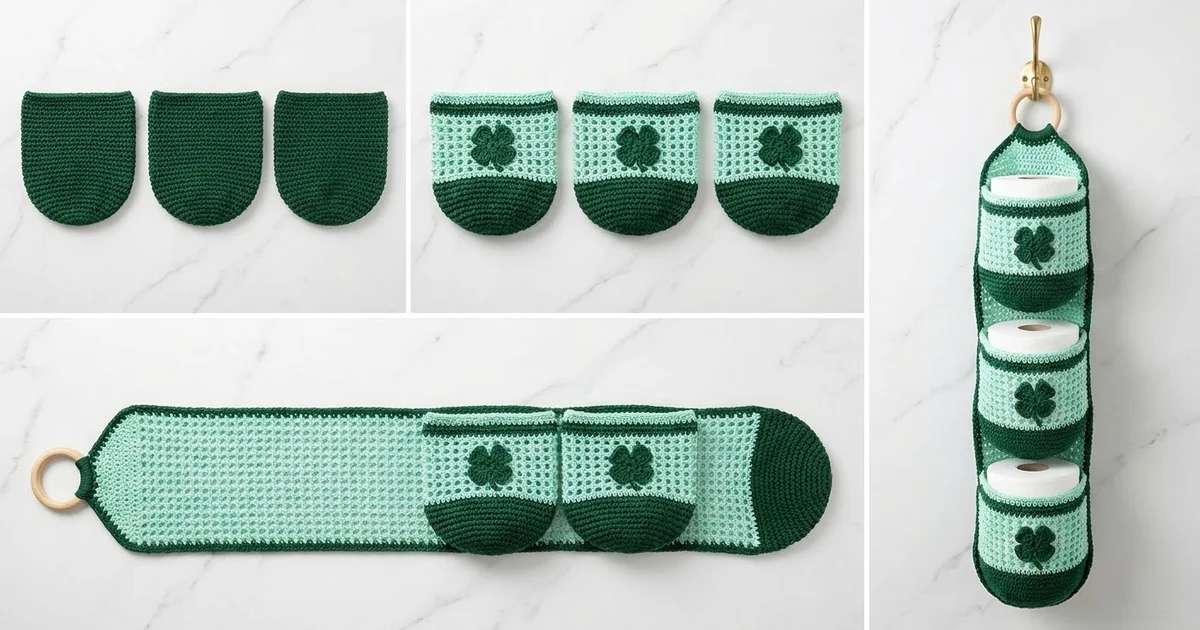
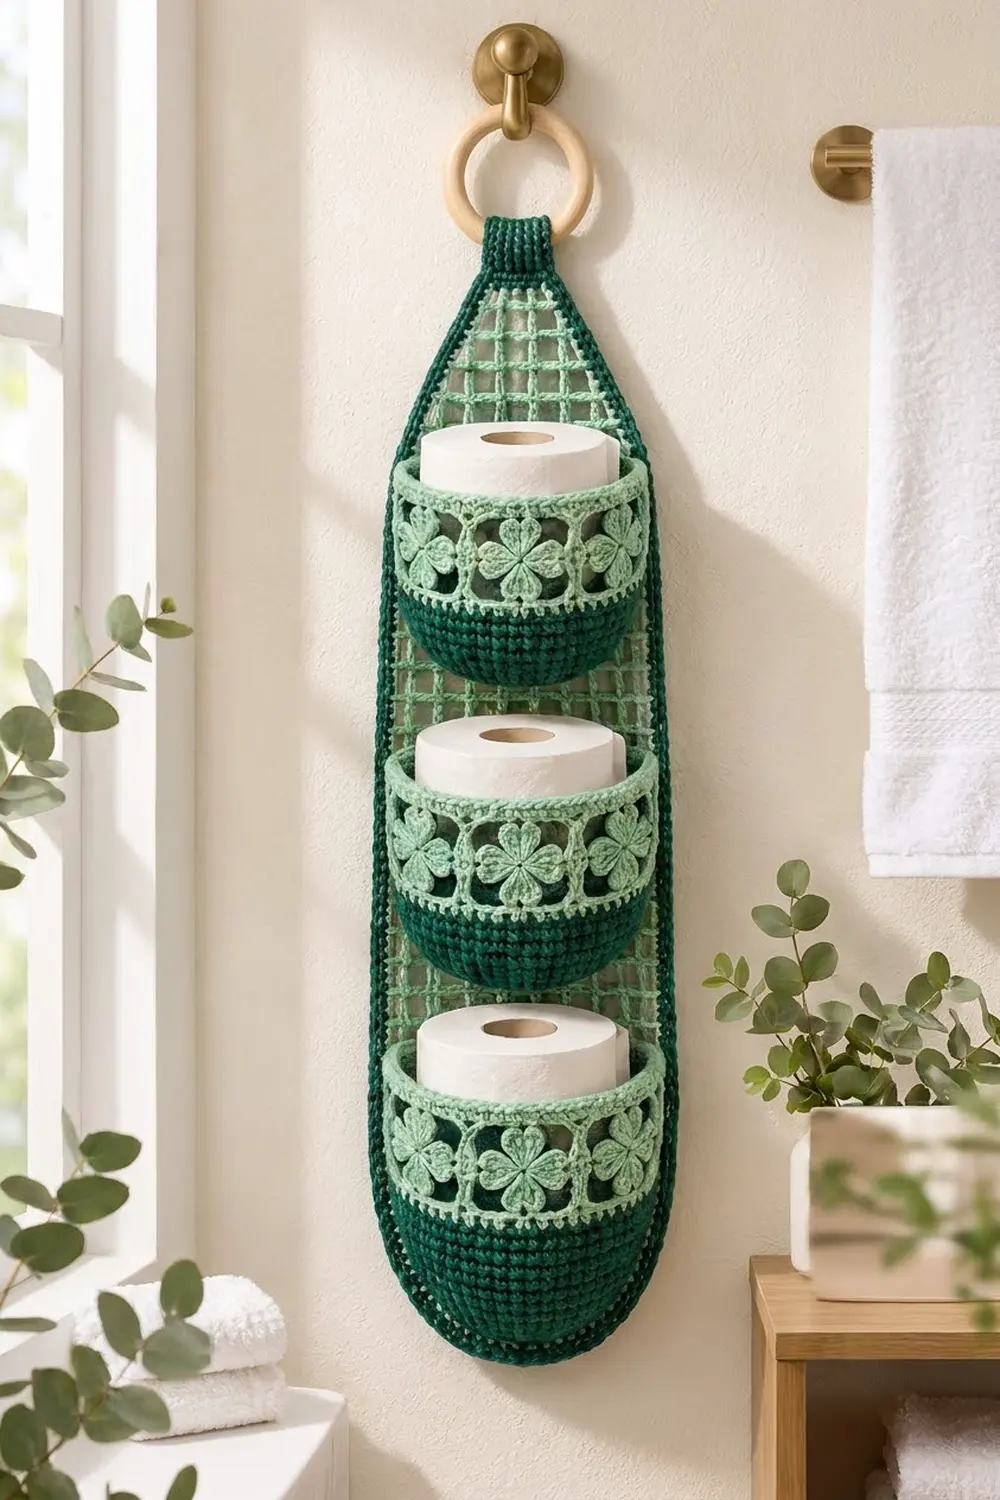
The Shamrock Lattice Hanging Toilet Paper Holder is a tall wall organizer. It has an open mesh backing panel and three rounded pockets, and each pocket holds one standard roll. A wooden ring at the top lets it hang from a simple hook.
Two shades of green are used throughout. Deep forest green covers the solid pocket bases, the rounded foot of the panel, the outer border and the hanging tab. Soft mint is used for the filet mesh grid, the openwork band on each pocket and the small four-leaf clover appliqués set into the windows of that band.
The pattern uses US crochet terms. The bordered panel measures about 8.15 x 26.9 in (20.7 x 68.3 cm). From the bottom edge to the top of the tab fold, the holder measures about 28.4 in (72.1 cm). Each pocket is about 6 in (15.2 cm) wide across the back and 5.5 in (14.0 cm) tall.
Construction is simple. You crochet the panel flat from the bottom up and the pockets in joined rounds. The clovers are tiny separate motifs that you sew into the pocket windows. Next you stitch the pockets to the panel, add a two-round border and work the tab that wraps the ring.
Finished Size and Construction
- Finished size: panel 8.15 x 26.9 in (20.7 x 68.3 cm); total hanging length 28.4 in (72.1 cm) to the tab fold
- Skill level: Intermediate
- Terminology: US
- Yarn weight: worsted (#4), cotton or cotton blend
- Hook: H-8 (5.0 mm)
- Number of pieces: 4 main pieces (1 panel, 3 pockets) plus 15 clover appliqués
- Layout: 3 pockets stacked vertically on 1 panel
- Pocket size: 6 in (15.2 cm) wide x 5.5 in (14.0 cm) tall x about 3 in (7.6 cm) deep
- Panel size before border: 7.25 x 26 in (18.4 x 66.0 cm)
- Border depth: 2 rounds, about 0.45 in (1.1 cm)
Materials
Choose a smooth, firm cotton. It holds the pocket shape, shows the mesh clearly and copes with bathroom humidity. Acrylic also works, but the pockets will feel softer.
- Dark green (A): 275 g, about 470 m
- Mint (B): 200 g, about 340 m
- H-8 (5.0 mm) crochet hook
- 1 wooden ring, 2 in (5.1 cm) across
- 6 stitch markers
- Tapestry needle
- Scissors, measuring tape, rust-proof pins
The quantities include a margin of roughly 10–15% for gauge swatches and differences in tension.
Abbreviations (US Terms)
- ch – chain
- sl st – slip stitch
- sc – single crochet
- dc – double crochet
- dtr – double treble crochet
- st(s) – stitch(es)
- sp – space
- MR – magic ring
- Rnd – round
- FO – fasten off
Special stitch – dtr: yarn over 3 times, insert hook in the stitch, pull up a loop, then (yarn over, pull through 2 loops) 4 times.
Filet mesh: a mesh is 1 dc plus 1 ch, so each mesh is 2 sts wide.
Gauge and Checkpoints
- Solid sc: 16 sts and 18 rows = 4 in (10.2 cm)
- Mesh: 8 meshes and 8 rows = 4 in (10.2 cm), so each mesh square is 0.5 in (1.3 cm)
Make one pocket base before you start anything else. Rnd 6 should measure 2.7 in (6.9 cm) across. If it is bigger, go down half a hook size. If it is smaller, go up half a size. Then check again.
Checkpoints:
– Panel Row 9: 7.25 in (18.4 cm) wide, 2 in (5.1 cm) tall
– Panel Row 45: 20 in (50.8 cm) long
– Panel Row 57: 26 in (66.0 cm) long, 2.25 in (5.7 cm) wide at the top
– Pocket Rnd 13: 64 sts, 16 in (40.6 cm) around
When the mesh rows run tall, the squares turn into rectangles and the panel ends up too long. To fix this, pull each dc’s first loop up a little less.
Backing Panel
Solid Base (A)
The rounded foot is shaped with increases at both ends of each row.
Row 1: Ch 14, sc in 2nd ch from hook and in each ch across, turn. (13 sc) This row is 3.25 in (8.3 cm) wide.
Row 2: Ch 1, 2 sc in each of first 2 sts, sc in next 9 sts, 2 sc in each of last 2 sts, turn. (17 sc)
Row 3: Ch 1, 2 sc in each of first 2 sts, sc in next 13 sts, 2 sc in each of last 2 sts, turn. (21 sc)
Row 4: Ch 1, 2 sc in first st, sc in next 19 sts, 2 sc in last st, turn. (23 sc)
Row 5: Ch 1, 2 sc in first st, sc in next 21 sts, 2 sc in last st, turn. (25 sc)
Row 6: Ch 1, 2 sc in first st, sc in next 23 sts, 2 sc in last st, turn. (27 sc)
Row 7: Ch 1, 2 sc in first st, sc in next 25 sts, 2 sc in last st, turn. (29 sc)
Rows 8–9: Ch 1, sc in each st across, turn. (29 sc)
In the last st of Row 9, change to B. Cut A.
Mesh Body (B)
Row 10: Ch 4 (counts as dc + ch 1), skip next st, dc in next st, ch 1, skip 1, dc in next st across, turn. (15 dc + 14 ch-1 sps = 29 sts, 14 meshes)
Rows 11–45: Ch 4 (counts as dc + ch 1), dc in next dc, ch 1, dc in next dc across, working the last dc in the 3rd ch of the turning ch, turn. (14 meshes)
Your panel now measures 20 in (50.8 cm) from the bottom.
Tapered Top (B)
Decrease row: Sl st in first ch-1 sp and in next dc. Ch 4 (counts as dc + ch 1), dc in next dc. Continue in mesh pattern and stop at the second-to-last dc, leaving the last mesh unworked. Turn. This removes 1 mesh from each side.
Straight row: Work as Row 11.
- Row 46: decrease (12 meshes)
- Row 47: straight (12)
- Row 48: decrease (10)
- Row 49: straight (10)
- Row 50: decrease (8)
- Row 51: straight (8)
- Row 52: decrease (6)
- Row 53: straight (6)
- Row 54: decrease (4)
- Rows 55–57: straight (4 meshes = 5 dc + 4 ch = 9 sts)
FO. The taper is 6 in (15.2 cm) tall, and the panel now measures 7.25 x 26 in (18.4 x 66.0 cm).
Pocket (Make 3)
Every round is joined with a sl st to the first st and starts with ch 1, which does not count as a st, unless the instructions say otherwise. Work the join on the same line every round. Sts 1–24 of every round form the back. Sts 25–64 form the front.
Base and Sides (A)
Rnd 1: 6 sc in MR. (6)
Rnd 2: 2 sc in each st. (12)
Rnd 3: (sc 1, 2 sc in next) 6 times. (18)
Rnd 4: (sc 2, 2 sc in next) 6 times. (24)
Rnd 5: (sc 3, 2 sc in next) 6 times. (30)
Rnd 6: (sc 4, 2 sc in next) 6 times. (36) Checkpoint: 2.7 in (6.9 cm) across.
Rnd 7: (sc 5, 2 sc in next) 6 times. (42)
Rnd 8: (sc 6, 2 sc in next) 6 times. (48)
Rnd 9: Sc in each st. (48)
Rnd 10: (sc 7, 2 sc in next) 6 times. (54)
Rnd 11: Sc in each st. (54)
Rnd 12: (sc 8, 2 sc in next) 6 times. (60)
Rnd 13: (sc 14, 2 sc in next) 4 times. (64) The plain rounds between increases make the base curve up into a rounded bowl.
Rnds 14–20: Sc in each st. (64)
Change to B on the final sl st. Cut A.
Clover Band and Rim (B)
Rnd 21: Sc in each st. (64)
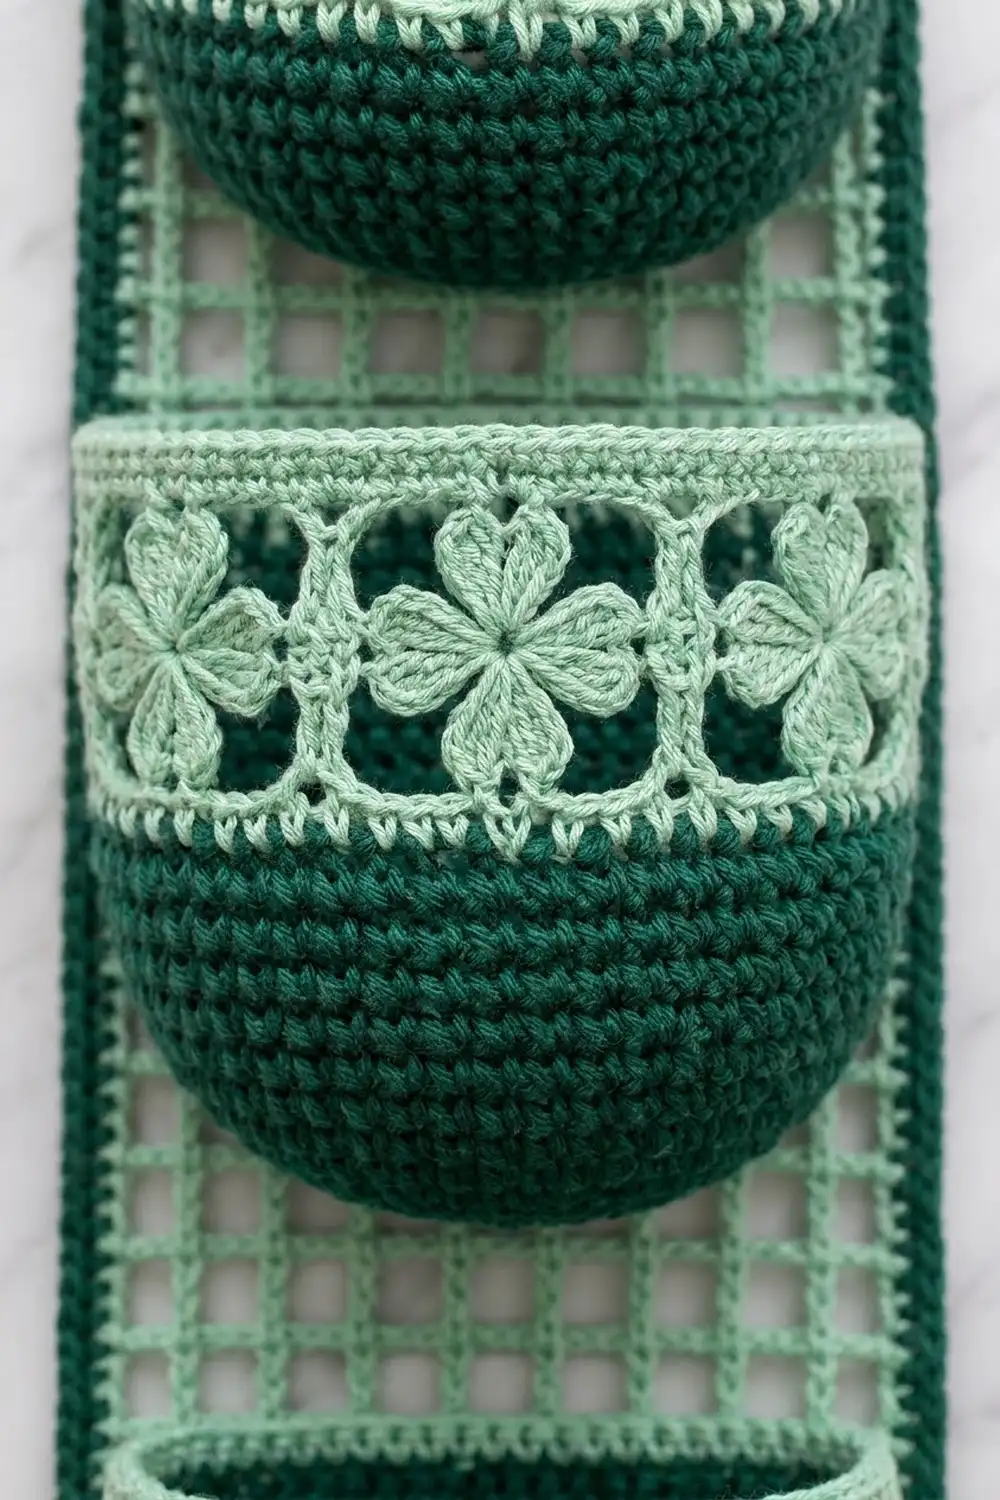
Rnd 22 (windows): Ch 5 (counts as dtr), dtr in next st, ch 6, skip 6, dtr in each of next 2 sts, ch 6, skip 6 7 times, sl st to top of ch-5. (16 dtr + 48 ch = 64 sts, 8 windows)
Each window is about 1.5 in (3.8 cm) wide and 1.25 in (3.2 cm) tall. Windows 1–3 sit on the back and windows 4–8 on the front.
Rnd 23: Sc in each dtr and 6 sc in each ch-6 sp. (16 + 48 = 64 sc)
Rnd 24: Ch 4 (counts as dc + ch 1), skip 1, dc in next st, ch 1, skip 1 31 times, sl st to 3rd ch of ch-4. (32 dc + 32 ch = 64 sts)
Rnd 25: Sc in each dc and each ch-1 sp. (32 + 32 = 64 sc)
Rnd 26: Sc in each st. (64) FO.
Each finished pocket measures 16 in (40.6 cm) around the rim and stands about 5.5 in (14.0 cm) tall.
Clover Appliqué (Make 15, B)
Rnd 1: In MR, ch 3, 2 dc, ch 1, 2 dc, ch 3, sl st in ring 4 times. Pull the ring tight to get 4 heart-shaped leaves.
Stem: Ch 4, sl st in 2nd ch from hook and in next 2 ch, sl st into the center. FO with a 10 in (25.4 cm) tail.
Each clover measures about 1.1 in (2.8 cm) across.
Center 1 clover in each of the 5 front windows of a pocket. Tack each leaf tip to the frame: the top leaf to Rnd 23, the bottom leaf and stem to Rnd 21, and the side leaves to the dtr posts. Leave the 3 back windows open, because they lie flat against the mesh.
Make All Pieces
- Panel: 1 (A base, B mesh)
- Pockets: 3 (A base and sides, B band and rim)
- Clovers: 15 in B
Layout, top to bottom:
[ ring + tab        ]   A
[ tapered mesh      ]   Rows 46–57
[ POCKET 3          ]   rim at Row 44
[ 1 in gap          ]
[ POCKET 2          ]   rim at Row 31
[ 1 in gap          ]
[ POCKET 1          ]   rim at Row 18
[ solid rounded foot]   Rows 1–9
Joining
Lay the panel flat with the right side up. Press each pocket flat so the 24 back sts form a straight line.
Rim seam: Use A and whipstitch the 24 back sts of Rnd 26 to the top of a single mesh row. Skip the outer mesh on each side and sew across the 12 center meshes. Each mesh is 1 dc + 1 ch, so it takes 2 rim sts, and 12 meshes x 2 = 24 sts exactly. Sew the rims to these rows:
- Pocket 3: Row 44, 19.5 in (49.5 cm) from the bottom edge
- Pocket 2: Row 31, 13 in (33.0 cm)
- Pocket 1: Row 18, 6.5 in (16.5 cm)
Base seam: Flatten the back of the dark green section against the panel. Tack the 2 back corners (st 1 and st 24 of Rnd 20) to the panel, then sew a short vertical line from Rnd 20 down to Rnd 13 at the back center. This keeps the pocket from tipping forward.
Keep your tension relaxed so the mesh does not pucker. After the seams are sewn, the panel should still measure 7.25 x 26 in (18.4 x 66.0 cm). Pocket 1 sits 1 in (2.5 cm) above the bottom edge, with 1 in (2.5 cm) gaps between pockets.
Border (A)
Border gauge: work 2 sc per mesh row-end (0.5 in / 1.3 cm) and 1 sc per solid sc row-end.
Join A at the bottom-right corner.
Rnd 1: Sc around as follows:
– Bottom edge (underside of foundation ch): 13 sc
– Each side, solid rows 1–9: 9 sc
– Each side, mesh rows 10–45: 36 row-ends x 2 = 72 sc
– Each side, taper rows 46–57: 12 row-ends x 2 = 24 sc, plus 2 sc across each of the 5 steps = 10 sc, for 34 sc
– Top edge: 9 sc (1 in each dc and each ch-1 sp)
– Corners: 1 extra sc at each of the 4 corner points
Total: 13 + 9 + 2 x (9 + 72 + 34) + 4 = 256 sc. Each long side has 115 sc. Join.
Rnd 2: Ch 1, sc in each st, 2 sc in each corner sc. (256 + 4 = 260 sc) Join and FO.
Why the math works: at 4 sts per inch, 2 sc fill one 0.5 in mesh row exactly, so the long sides lie flat. One sc per solid row is slightly fewer than the width calls for, which lets the border hug the curve of the foot. The pockets are a separate set of pieces sewn onto the panel and are not part of the border edge, so no seam stitches are added.
Tab: With A, join in the first of the 9 top-edge sts of Rnd 2 (not counting the corner sts).
Row 1: Ch 1, sc in each of the 9 sts, turn. (9)
Rows 2–14: Ch 1, sc in each st, turn. (9)
FO with a 12 in (30.5 cm) tail. The tab measures 3.1 in (7.9 cm). Fold it through the ring to the back and sew Row 14 to the base of the tab, which leaves a loop about 1.5 in (3.8 cm) tall.
Final Blocking
- Wet the whole piece or spray it until damp.
- Pin the panel to 8.15 x 26.9 in (20.7 x 68.3 cm), keeping the mesh squares straight.
- Stuff each pocket with a toilet roll wrapped in plastic so it dries round.
- Ease each clover flat inside its window.
- Let everything dry completely before you unpin it.
Final Quality-Control Checklist
- The panel has 14 meshes across the body and 4 at the top.
- Every pocket rim has 64 sts and 8 windows, with 5 clovers on the front.
- Each back rim of 24 sts is sewn across 12 meshes.
- Border Rnd 2 has 260 sts.
- The tab is sewn securely around the ring.
- All tails are woven in on the back.
Troubleshooting
- Panel curls at the foot: you worked the increases too tightly. Block the foot hard, or redo Rows 2–7 with a looser tension.
- Pockets too floppy: go down to a 7 (4.5 mm) hook for Rnds 1–20.
- Windows sag: work the dtr posts more firmly, and tack the clovers to all 4 sides of the frame.
- Border ripples: reduce to 3 sc per 2 mesh rows on the long sides.
- Holder leans forward: add more base tacking along Rnd 13.
Care
Hand wash in cool water and lay flat to dry, with the pockets stuffed so they keep their shape. Do not tumble dry.
Final Notes
The measurements build on each other in a chain. The 16 sc gauge gives 29 sts = 7.25 in (18.4 cm) and 0.5 in (1.3 cm) mesh squares. The 57 rows give a 26 in (66.0 cm) panel, and 2 border rounds bring it to 8.15 x 26.9 in (20.7 x 68.3 cm). Each 64-st pocket has 24 back sts, which match 12 meshes exactly. Check each link as you go, and the finished holder will hang straight and hold three rolls neatly.
Happy crocheting!