

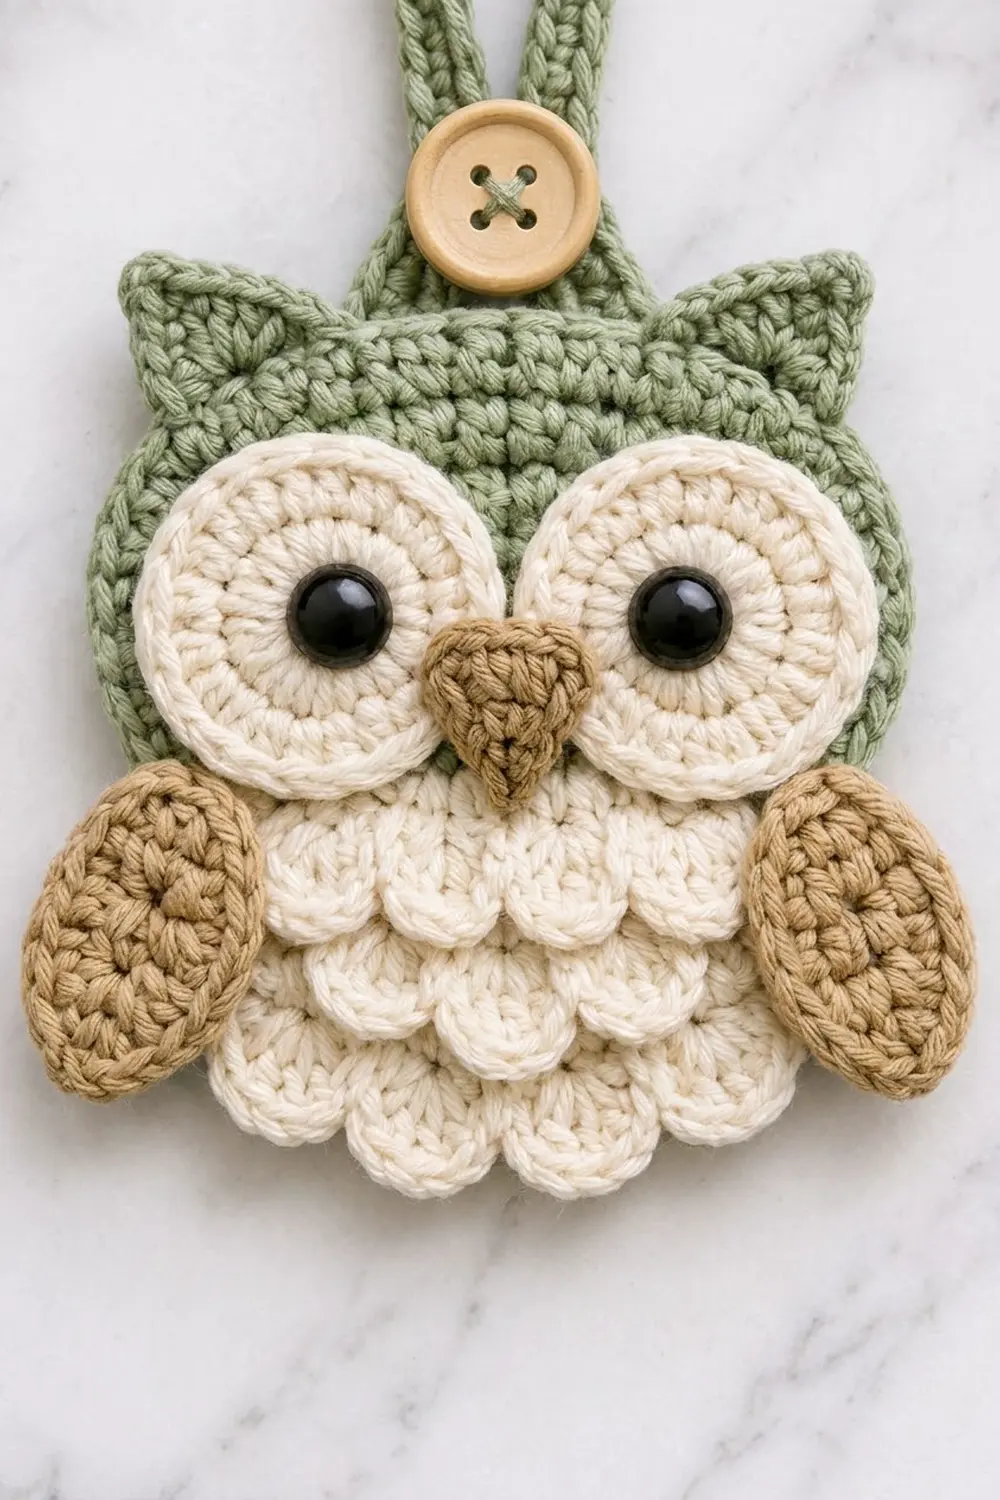
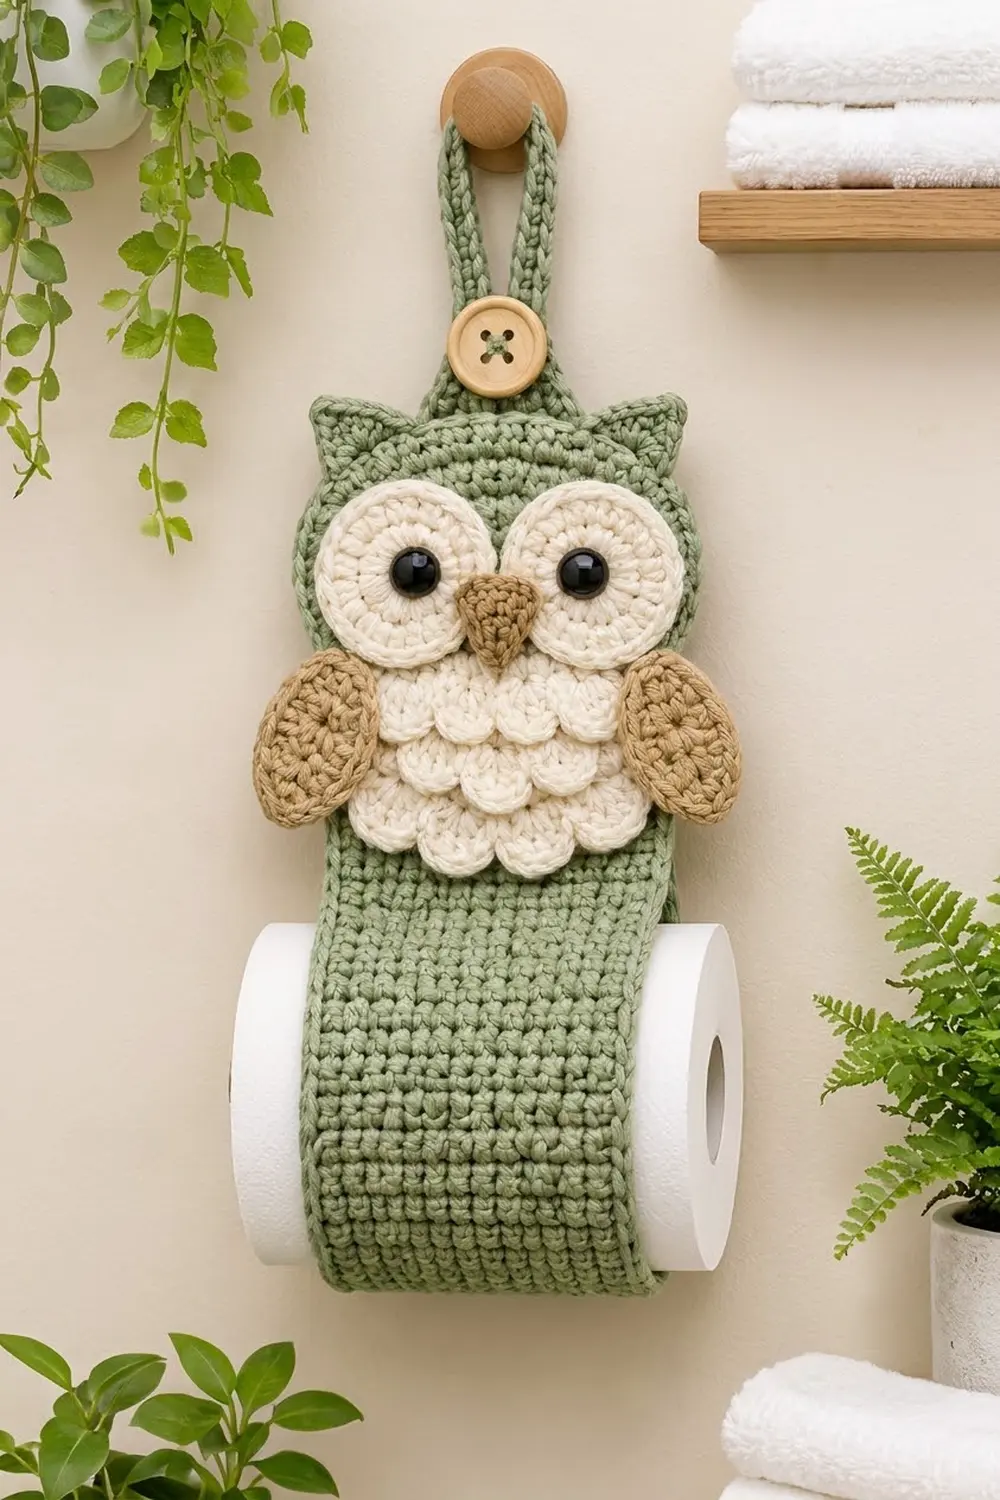
This owl keeps a spare roll of toilet paper close at hand and looks good on a bathroom wall. A long sage-green strap hangs from a peg, and its lower end folds up behind itself to cradle one roll. A friendly owl sits at the top, with big cream eyes, a tan beak, tan wings and a scalloped cream belly.
The palette is soft: sage green, cream and warm tan, plus black safety eyes and a wooden button. The style is cottage-modern. It’s simple enough for a farmhouse bathroom and cute enough for a kids’ bath.
This pattern uses US crochet terms. The finished holder hangs about 21 in (53.3 cm) long from the top of the loop to the bottom of the sling. It is 8 in (20.3 cm) wide across the owl’s wings, and the strap is 5.5 in (14.0 cm) wide.
Construction is straightforward. You crochet a single crochet strap in rows and edge it with one border round. The owl backing is worked in the round, with ears added in short rows. The eyes, beak, wings and belly scallops are made separately and sewn on. You then sew the owl to the strap, fold and stitch the sling, and attach the hanging loop and button.
Finished Size and Construction
- Finished hanging size: 21 in (53.3 cm) tall × 8 in (20.3 cm) wide at the wings
- Skill level: Easy-intermediate
- Terminology: US
- Yarn weight: Worsted (#4), cotton or cotton blend
- Hook: 4.5 mm (US 7)
- Number of pieces: 13 crocheted pieces (1 strap, 1 owl backing, 2 eyes, 1 beak, 2 wings, 4 belly strips, 1 hanging loop), plus 1 button
- Layout: owl centered on the top of the strap; sling folded at the bottom
- Strap size before border: 5 in × 24 in (12.7 cm × 61.0 cm)
- Border depth: 0.25 in (0.6 cm) on every side
- Strap size after border: 5.5 in × 24.5 in (14.0 cm × 62.2 cm)
- Owl panel: 7 in (17.8 cm) wide × 8 in (20.3 cm) tall, including ears
Materials
Choose a smooth, firm worsted cotton. Cotton holds its shape under the weight of a roll and handles bathroom humidity well. Acrylic works too, but the strap may stretch more.
- Sage green: 130 g (220 m)
- Cream: 30 g (50 m)
- Tan: 20 g (35 m)
These quantities include a margin of about 15% for gauge swatches and sewing tails.
Tools:
– 4.5 mm (US 7) crochet hook
– Two 12 mm black safety eyes
– One 1 in (2.5 cm) wooden two-hole button
– Tapestry needle
– Stitch markers
– Straight pins
– Measuring tape
– Scissors
Abbreviations (US Terms)
- ch: chain
- sc: single crochet
- hdc: half double crochet
- dc: double crochet
- sl st: slip stitch
- st(s): stitch(es)
- sk: skip
- sc2tog: single crochet 2 together
- sc3tog: single crochet 3 together
- MR: magic ring
Special stitch: shell. Work 5 dc in the same stitch. Each belly scallop is one shell.
Gauge and Checkpoints
Gauge: 16 sc × 16 rows = 4 in (10.2 cm) in sc worked in rows. That’s 4 sts and 4 rows per inch.
Test the strap first. Work Rows 1–16 and measure. The piece should be 5 in (12.7 cm) wide and 4 in (10.2 cm) tall.
- Too big: go down a hook size, to 4 mm.
- Too small: go up a hook size, to 5 mm.
Checkpoints:
– Strap Row 16: 5 in × 4 in (12.7 cm × 10.2 cm)
– Strap Row 48: 12 in (30.5 cm) long
– Strap Row 96: 24 in (61.0 cm) long
– Owl backing after Rnd 3: 3 in (7.6 cm) across
– Owl backing after Rnd 6: 6 in (15.2 cm) across
– Owl backing after Rnd 8: 7 in (17.8 cm) across
– Each eye: 2.5 in (6.4 cm) across
If the owl backing ruffles, your dc rounds are loose, so use a smaller hook for the backing only. If it cups, go up half a size.
Strap
With sage green:
Row 1: Ch 21, sc in 2nd ch from hook and in each ch across, turn. (20 sc)
Rows 2–96: Ch 1 (does not count as a st), sc in each st across, turn. (20 sc)
Check the size at Rows 16 and 48. At the end of Row 96, the strap measures 5 in × 24 in (12.7 cm × 61.0 cm). Do not fasten off; continue straight into the border (see Border section).
Owl Backing
With sage green. Ch 2 at the start of each dc round does not count as a stitch. Join each round with a sl st to the first st.
- Rnd 1: MR, 12 dc in ring, join. (12 dc)
- Rnd 2: Ch 2, 2 dc in each st around, join. (24 dc)
- Rnd 3: Ch 2, [dc in next st, 2 dc in next st] 12 times, join. (36 dc)
- Rnd 4: Ch 2, [dc in next 2 sts, 2 dc in next st] 12 times, join. (48 dc)
- Rnd 5: Ch 2, [dc in next 3 sts, 2 dc in next st] 12 times, join. (60 dc)
- Rnd 6: Ch 2, [dc in next 4 sts, 2 dc in next st] 12 times, join. (72 dc)
- Rnd 7 (trim round): Ch 1, [sc in next 5 sts, 2 sc in next st] 12 times, join. (72 + 12 = 84 sc) Fasten off.
Ears: Lay the backing flat with the join at the back. Mark the top center stitch. Count 5 sts to the right of the marker, then join yarn in the 6th st.
- Row 1: Ch 1, sc in this st and the next 6 sts, turn. (7 sc)
- Row 2: Ch 1, sc2tog, sc in next 3 sts, sc2tog, turn. (5 sc)
- Row 3: Ch 1, sc2tog, sc in next st, sc2tog, turn. (3 sc)
- Row 4: Ch 1, sc3tog. (1 st, the ear tip) Fasten off.
Repeat on the left side, counting 5 sts left of the marker. This leaves 11 sts between the ears: 5 + the marker st + 5. Each ear is 1 in (2.5 cm) tall.
Rnd 8 (edging): Join sage green at the bottom center and work sc around the whole backing:
– 1 sc in each Rnd 7 st that is not under an ear: 84 − 14 = 70 sc.
– At each ear: 3 sc up the row ends of Rows 1–3, 3 sc in the tip, and 3 sc down the row ends. That’s 9 sc per ear.
Join. (70 + 18 = 88 sc) Fasten off and leave a long tail. The backing is now 7 in (17.8 cm) across and 8 in (20.3 cm) tall at the ear tips.
Eyes (make 2)
With cream:
- Rnd 1: MR, ch 2 (does not count), 12 dc in ring. Pull the ring nearly closed and join. (12 dc)
- Rnd 2: Ch 2, 2 dc in each st around, join. (24 dc)
- Rnd 3 (trim round): Ch 1, [sc in next st, 2 sc in next st] 12 times, join. (24 + 12 = 36 sc)
Fasten off with a long tail. Push a safety eye through the center ring and secure the washer at the back. Each eye is 2.5 in (6.4 cm) across.
Beak
With tan:
- Row 1: Ch 6, sc in 2nd ch from hook and in each ch across, turn. (5 sc)
- Row 2: Ch 1, sc2tog, sc in next st, sc2tog, turn. (3 sc)
- Row 3: Ch 1, sc3tog. (1 st, the tip)
- Edging: Ch 1, then work:
- 3 sc in the tip
- 2 sc down the row ends of Rows 2 and 1
- 3 sc in the first foundation ch
- sc in the next 3 foundation chs
- 3 sc in the last foundation ch
- 2 sc up the row ends
Join. (3 + 2 + 3 + 3 + 3 + 2 = 16 sc)
Fasten off with a tail. The beak is about 1.5 in wide × 1.25 in tall (3.8 cm × 3.2 cm).
Wings (make 2)
With tan:
Rnd 1: Ch 8. Sc in 2nd ch from hook, sc in next 5 chs, 3 sc in last ch. Rotate and work along the underside of the chain: sc in next 5 chs, 2 sc in the same ch as the first sc. Join. (16 sc)
Rnd 2: Ch 1. Work 2 hdc in the first st, hdc in the next 5 sts, 2 hdc in each of the next 3 sts, hdc in the next 5 sts, 2 hdc in each of the last 2 sts. Join. (2 + 5 + 6 + 5 + 4 = 22 hdc)
Rnd 3 (trim round): Ch 1. Work:
– [2 sc in next st, sc in next st] once
– sc in the next 5 sts
– [2 sc in next st, sc in next st] 3 times
– sc in the next 5 sts
– [2 sc in next st, sc in next st] twice
Join. (22 + 6 = 28 sc) Fasten off with a tail.
Each wing is a pointed oval about 3 in × 2 in (7.6 cm × 5.1 cm).
Belly Scallop Strips (make 4)
With cream, make one strip of each size:
| Strip | Chain | Row 1 | Scallops | Row 2 total | Width |
|---|---|---|---|---|---|
| A (top) | 14 | 13 sc | 3 | 19 sts | 3.25 in (8.3 cm) |
| B | 18 | 17 sc | 4 | 25 sts | 4.25 in (10.8 cm) |
| C | 14 | 13 sc | 3 | 19 sts | 3.25 in (8.3 cm) |
| D (bottom) | 10 | 9 sc | 2 | 13 sts | 2.25 in (5.7 cm) |
- Row 1: Ch as listed, sc in 2nd ch from hook and in each ch across, turn.
- Row 2: Ch 1, sc in the first st, [sk 1, shell in next st, sk 1, sc in next st] across.
Each repeat uses 4 sts, so Row 1 always has 4 × (scallops) + 1 sts. Each strip is about 0.75 in (1.9 cm) tall. Fasten off with tails.
Make All Pieces
Use this checklist before you assemble:
- Sage green: 1 strap, 1 owl backing, 1 hanging loop
- Cream: 2 eyes, 4 belly strips
- Tan: 1 beak, 2 wings
Hanging loop (sage green):
– Row 1: Ch 49, sc in 2nd ch from hook and across, turn. (48 sc)
– Row 2: Ch 1, sc in each st across. (48 sc)
Fasten off. The loop is 12 in × 0.5 in (30.5 cm × 1.3 cm).
Owl face layout (top to bottom):
      /\           /\        ears
   [ EYE ]     [ EYE ]       touching at center
           \ v /             beak, tip down
 (W)  ~ ~ ~ A (3) ~ ~ ~  (W)
 (W) ~ ~ ~ B (4) ~ ~ ~ ~ (W) wings over sides
      ~ ~ ~ C (3) ~ ~ ~
         ~ ~ D (2) ~ ~
Joining
Sew everything with whipstitch, using matching yarn tails. Work each stitch through the back loop of the appliqué’s last round and into a stitch of the layer underneath. Keep the tension snug but not puckered, so the appliqué lies flat without dimpling the backing.
- Belly: Pin Strip D so its scallops reach about 0.25 in (0.6 cm) past the bottom edge of the backing. Sew along its Row 1 edge only. Pin Strip C 0.5 in (1.3 cm) higher so its scallops cover D’s sc row, and sew. Add B and then A the same way. The scallops stay free, and each row offsets the one below by half a scallop.
- Eyes: Place the eyes side by side with their edges touching at the center. Their tops sit 1 in (2.5 cm) below the top edge of the backing. Sew around Rnd 3.
- Beak: Sew the beak tip-down between the eyes, overlapping their lower inner edges and the top of Strip A.
- Wings: Angle each wing slightly outward. Sew along the inner half only, letting each wing extend 0.5 in (1.3 cm) past the backing. The panel is now 8 in (20.3 cm) wide.
- Owl to strap: Center the owl on the front of the strap. The bottom of the backing sits 6 in (15.2 cm) below the top edge of the strap, and the ear tips rise 2 in (5.1 cm) above it. Whipstitch all around the backing where it overlaps the strap.
- Hanging loop: Fold the loop in half so the ends meet. Sew the bottom 1.5 in (3.8 cm) of both ends to the back of the strap at the top center. The remaining 4.5 in (11.4 cm) rises behind the owl: 2 in (5.1 cm) is hidden behind the head and 2.5 in (6.4 cm) shows above the ears. Tack the loop to the back of the head.
- Button: Sew the button through the owl backing, between the ears and 1 in (2.5 cm) below the top edge, and through the hanging loop behind it. This reinforces the main load point.
- Sling: Lay the strap face down. Place a marker 16 in (40.6 cm) up from the bottom edge, at about Row 63. Fold the bottom 8 in (20.3 cm) up so the bottom edge lies across the marked row. Whipstitch the full width through both layers, then sew down each side for 0.5 in (1.3 cm).
Size checkpoint: The sling forms a closed loop with a 16 in (40.6 cm) circumference. That’s a comfortable fit for a standard roll, which is about 14 in (35.6 cm) around.
Border
Border gauge: same as the strap, 4 sc per inch.
The border is worked around the strap right after Row 96. Each corner stitch gets 3 sc, and the middle sc of each group is the corner.
Rnd 1: Ch 1. Work 3 sc in the first st, sc in the next 18 sts, 3 sc in the last st. Sc in each row end from Row 95 down to Row 2 (94 sc). Work 3 sc in the first foundation ch, sc in the next 18 foundation chs, 3 sc in the last ch. Sc in each row end from Row 2 up to Row 95 (94 sc). Join.
Per side, counting both corner sts:
– Short sides: 1 + 1 + 18 + 1 + 1 = 22 sc
– Long sides: 1 + 1 + 94 + 1 + 1 = 98 sc
Total: 18 × 2 + 94 × 2 + 3 × 4 = 236 sc. Check: 22 × 2 + 98 × 2 − 4 shared corners = 236.
Why the math works: At 4 sts and 4 rows per inch, sc stitches and sc row ends are the same size. One sc per row end therefore lies flat. Each short side becomes 22 sts, which is 5.5 in (14.0 cm). Each long side becomes 98 sts: 96 rows plus 1 border st at each end, which is 24.5 in (62.2 cm).
Final Blocking
- Before assembling, mist the strap and the owl backing with water.
- Pin the strap to 5.5 in × 24.5 in (14.0 cm × 62.2 cm) on a blocking mat.
- Pin the backing into a 7 in (17.8 cm) circle and pin the ear tips to points.
- Pin the wings into pointed ovals and the beak into a sharp triangle.
- Let everything dry completely.
- After assembly, steam the belly scallops lightly, holding the iron 1 in (2.5 cm) away. This helps them lie down without flattening.
- Push a roll into the sling and let the holder hang overnight so it settles.
Final Quality-Control Checklist
- The strap measures 5.5 in × 24.5 in (14.0 cm × 62.2 cm).
- The border count is 236 sc, with clean corners.
- The owl backing is 7 in (17.8 cm) across, and both ears match.
- The safety eye washers are fully locked.
- The scallop rows overlap with no sc base rows showing.
- The wings are sewn on their inner halves only.
- The button is stitched through the backing and the hanging loop.
- The sling seam is secure across the full width.
- All tails are woven in on the back.
Troubleshooting
- Strap is narrowing: You’re missing the last stitch of each row. Mark the first and last stitches.
- Border waves on the long sides: Your border tension is loose. Redo it with the next smaller hook.
- Owl backing cups: Your dc rounds are too tight. Rework with a larger hook.
- Backing ruffles: You have extra increases. Recount each round against the stitch totals.
- Ears lean: Work the sc2tog decreases evenly at both ends.
- Scallops flip up: Steam them lightly, and tack the center of each shell’s top if needed.
- Roll is too loose: Fold an extra 0.5 in (1.3 cm) into the sling before sewing.
Care
Hand wash in cool water and lay flat to dry. Remove the roll before washing, and don’t tumble dry, because heat can loosen the safety eye washers.
Final Notes
The measurement chain goes like this:
– Gauge of 4 sts and 4 rows per inch
– Strap of 5 in × 24 in (12.7 cm × 61.0 cm)
– Bordered strap of 5.5 in × 24.5 in (14.0 cm × 62.2 cm)
– Owl panel 7 in (17.8 cm) across, or 8 in (20.3 cm) with wings
– Sling with a 16 in (40.6 cm) circumference
– Finished holder 21 in (53.3 cm) tall
If each checkpoint matches, the owl will hang straight and hold a roll securely. Happy crocheting!