

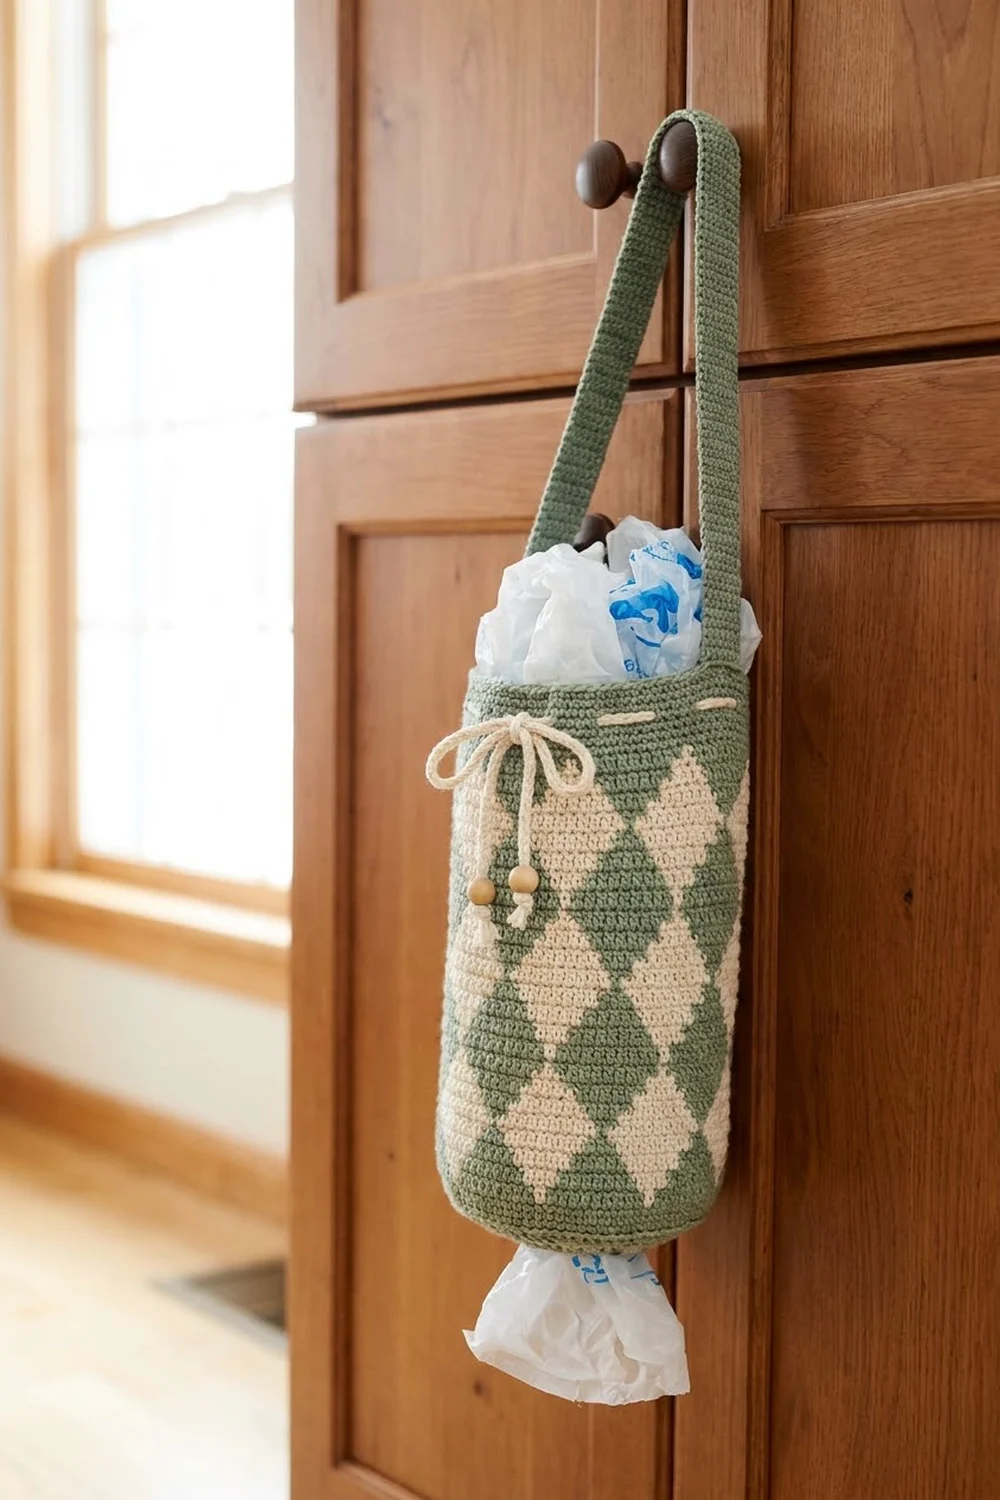
Plastic grocery bags pile up fast. This holder keeps them in one place and lets you pull them out one at a time from the bottom. The Sage Harlequin holder is a tall tube of staggered diamonds in soft sage and cream. It has a sage rim, a cream drawstring with wooden beads, and a sturdy hanging loop.
It’s a calm, farmhouse-style piece that suits a pantry door, a cabinet knob, or a hook by the back door. Two colors give the look a clean, graphic feel without a lot of yarn changes per round.
This pattern uses US crochet terms. The finished body measures 6 in (15.2 cm) wide flat × 15.25 in (38.7 cm) tall, and the whole holder hangs about 20.75 in (52.7 cm) long including the loop.
Construction is simple. You start by crocheting over a plastic ring for the bottom opening, then work upward in rounds of tapestry single crochet. The top band includes an eyelet round for the cord. Then you make a short strap and a chain cord, and attach them.
Finished Size and Construction
- Finished size: 6 in (15.2 cm) flat width × 15.25 in (38.7 cm) body height
- Circumference: 12 in (30.5 cm)
- Skill level: Intermediate (tapestry crochet in the round)
- Terminology: US
- Yarn weight: Worsted (#4), cotton or cotton blend
- Hook: 5.0 mm (H-8)
- Number of pieces: 1 body + 1 strap + 1 cord (one assembled holder)
- Layout: Strap sewn to the back of the rim; cord threaded through 12 eyelets and tied at the front
- Body before the top band: 6 in (15.2 cm) flat × 13.5 in (34.3 cm) tall
- Top band depth: 1.75 in (4.4 cm)
Materials
Cotton is the best choice here. It holds its shape, doesn’t stretch out under the weight of the bags, and shows the diamond edges crisply. The amounts below assume a worsted cotton of about 170 m per 100 g.
- Sage (S): 80 g / 136 m
- Cream (C): 60 g / 102 m
Both quantities include a margin of about 15% for swatching and weaving in.
Tools and notions:
– 5.0 mm (H-8) crochet hook
– Plastic ring, 2.5 in (6.4 cm) outer diameter
– 4 natural wooden beads, 5/8 in (1.6 cm), with holes large enough for the cord
– 2 stitch markers
– Tapestry needle
– Scissors
– Measuring tape
Abbreviations (US Terms)
- ch – chain
- sc – single crochet
- sc2tog – single crochet 2 together
- sl st – slip stitch
- st(s) – stitch(es)
- sk – skip
- sp – space
- rnd(s) – round(s)
- S / C – Sage / Cream
Spike sc: Insert your hook into the stitch two rounds below the next stitch (here, into Rnd 2). Yarn over and pull up a long loop to the height of the current round, then yarn over and pull through both loops. Skip the Rnd 3 stitch hidden behind the spike.
Tapestry sc: Work each sc over the unused color, laying it along the tops of the stitches so it’s carried inside. To change color, complete the last yarn over of the stitch before the color change with the new color.
Gauge and Checkpoints
Gauge: 16 sc and 16 rnds = 4 in (10.2 cm) in tapestry sc worked in the round.
Tapestry crochet usually works up tighter than plain sc, so test with the body itself. Work Rnds 1–12 (the bottom section plus one chart repeat), then lay the tube flat and measure.
Checkpoints:
– After Rnd 12: flat width 6 in (15.2 cm); height above the ring 3 in (7.6 cm)
– After Rnd 18: height 4.5 in (11.4 cm)
– After Rnd 54: height 13.5 in (34.3 cm)
– After Rnd 61: height 15.25 in (38.7 cm)
Too big? Go down one hook size, to 4.5 mm.
Too small? Go up one hook size, to 5.5 mm.
Width matters more than height. If the width is right and the height is slightly off, you can adjust by working one fewer or one extra chart repeat.
Body
Bottom Section
Rnd 1 (C): Attach C to the ring with a sl st. Ch 1 and work 36 sc over the ring. Sl st to the first sc. (36 sts)
Rnd 2 (C): Ch 1, [sc in next 2 sts, 2 sc in next st] 12 times. Sl st to the first sc. (48 sts)
From here on, work in a continuous spiral. Place a marker in the first stitch of each round and move it up as you go.
Rnd 3 (S): Join S. Sc in each st around, carrying C inside. (48 sts)
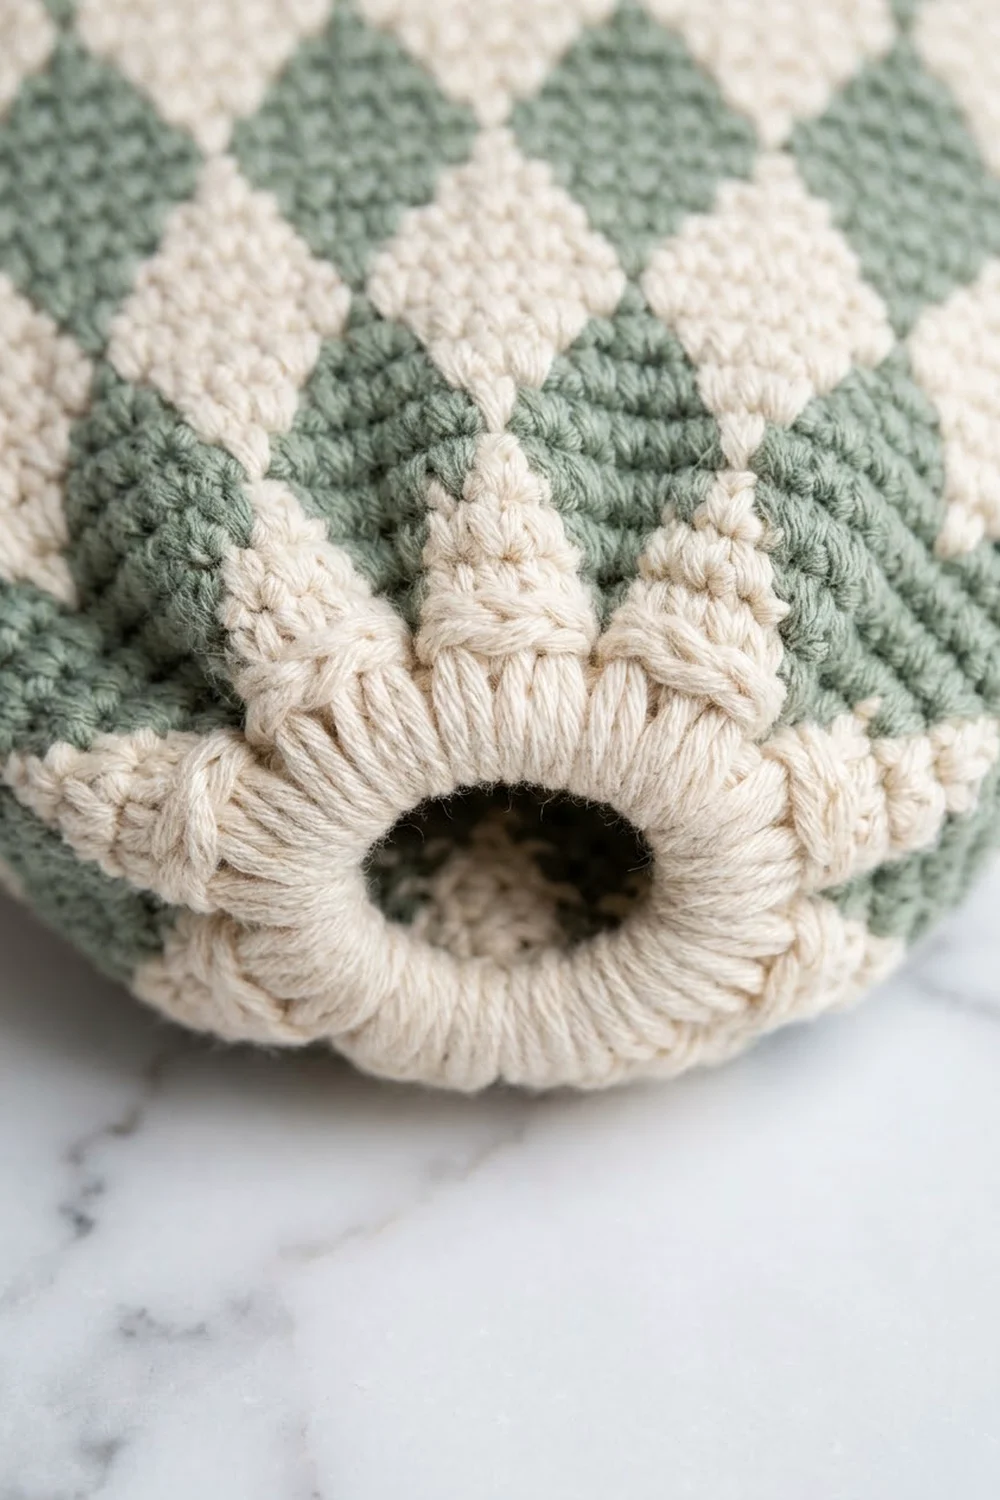
Rnd 4 (C): [Sc in next 3 sts, spike sc into the Rnd 2 st below the next st] 12 times. (36 sc + 12 spike sc = 48 sts)
The cream spikes create the small V-points around the gathered bottom.
Rnd 5 (S): Sc in each st around. (48 sts)
Rnd 6 (S): Sc in each st around. (48 sts)
Harlequin Chart
Each chart row is worked 6 times around: 6 repeats × 8 sts = 48 sts. Read each row from right to left.
- Row 1: C3, S1, C4
- Row 2: C2, S3, C3
- Row 3: C1, S5, C2
- Row 4: S7, C1
- Row 5: C1, S5, C2
- Row 6: C2, S3, C3
The sage diamonds widen 1 → 3 → 5 → 7 sts and then narrow again. The cream fills the opposite pattern, 7 → 5 → 3 → 1 sts, so the cream diamonds form on their own between the sage ones. Every row totals 8 sts.
Rnds 7–54: Work chart Rows 1–6 a total of 8 times, 48 rnds in all. (48 sts every rnd)
Rnd 7 is Row 1 of the first repeat, and Rnd 54 is Row 6 of the eighth repeat. Check your diamonds after every repeat: each one should sit directly above the diamond below it, touching tip to tip.
Cut C after Rnd 54, leaving a 6 in (15.2 cm) tail.
Top Band (Border)
Band gauge: 16 sc = 4 in (10.2 cm), the same as the body. Lay the tube flat and think of it as two sides, front and back, with 24 sts per side.
Rnd 55 (S): Sc in each st. (48 sts: 24 per side)
Rnd 56 (S), eyelet round: [Sc in next 2 sts, ch 2, sk 2 sts] 12 times. (24 sc + 12 ch-2 sps = 48 sts; 6 eyelets per side)
Rnd 57 (S): Sc in each sc and 2 sc in each ch-2 sp. (24 sc + 24 sc in sps = 48 sts: 24 per side)
Rnds 58–60 (S): Sc in each st. (48 sts: 24 per side)
Rnd 61 (S): Sl st loosely in each st around. (48 sl sts)
Fasten off and weave in all ends.
Why the math works: each eyelet repeat uses 4 sts, so 48 ÷ 4 = 12 eyelets, with 6 on each 24-st side. Rnd 57 puts back exactly the 2 sts that each ch-2 skipped, so the count stays at 48 and the band stays the same width as the body. The band’s 7 rnds at 16 rnds per 4 in give 1.75 in (4.4 cm), so the total height is 13.5 + 1.75 = 15.25 in (38.7 cm).
Hanging Strap
Work in rows with S.
Row 1: Ch 9, sc in 2nd ch from hook and in each ch across. (8 sts)
Rows 2–4: Ch 1, turn, sc in each st. (8 sts)
Row 5: Ch 1, turn, sc2tog, sc in next 4 sts, sc2tog. (6 sts)
Row 6: Ch 1, turn, sc2tog, sc in next 2 sts, sc2tog. (4 sts)
Rows 7–38: Ch 1, turn, sc in each st. (4 sts)
Fasten off, leaving a 12 in (30.5 cm) tail.
The strap measures 9.5 in (24.1 cm). The base is 2 in (5.1 cm) wide, and the narrow strap is 1 in (2.5 cm) wide.
Form the loop: Fold Rows 27–38 (3 in / 7.6 cm) down behind the strap. Whipstitch the end of Row 38 across Row 26. This leaves a closed loop about 1.5 in (3.8 cm) tall.
Drawstring Cord
With C: Ch 110. Sl st in the back bump of the 2nd ch from the hook and in each ch across. Fasten off.
The cord measures about 27.5 in (69.9 cm).
Assembly
- Strap: Center the strap base on the back of the band, on the outside. Line up Row 1 with Rnd 57 so that Rows 1–4 cover Rnds 57–60. Whipstitch all the way around the flared base with the S tail. About 5.5 in (14 cm) of strap and loop stand above the rim.
- Cord: Starting at the front center, weave the cord in and out through all 12 eyelets so both ends come out at the front, between two eyelets.
- Beads: Thread 2 beads onto each cord end. Tie an overhand knot below them and trim the ends to 0.5 in (1.3 cm).
- Bow: Draw the cord up gently so the top band just starts to gather, then tie a bow.
Final Blocking
- Lightly mist the body, or soak it in cool water and roll it in a towel to remove excess water.
- Slide the body over a rolled towel or a tall bottle about 3.8 in (9.7 cm) in diameter.
- Ease the diamonds into straight vertical columns and smooth the rows level.
- Make sure the flat width is 6 in (15.2 cm) and the height is 15.25 in (38.7 cm).
- Pin the strap flat on a towel, keeping it straight.
- Let everything dry completely before tying the bow.
Final Quality-Control Checklist
- Every round of the body has 48 sts.
- There are 8 full diamond repeats stacked tip to tip, with no shifting.
- There are 12 cream spike points, evenly spaced around the bottom.
- The ring is fully covered with no plastic showing.
- There are 12 open eyelets, and the cord passes through all of them.
- The strap is centered on the back and sewn securely around its whole base.
- The loop is closed and holds firm when you tug it.
- All ends are woven in on the inside.
Troubleshooting
- Diamonds slant to one side: This is normal in a spiral and usually slight. Blocking will straighten most of it. If the slant is strong, check that you’re working into the correct loops.
- Carried yarn shows through: Keep the strand relaxed and lay it right on top of the stitches. Darker sage behind cream is the most likely to show.
- The tube puckers: The carried strand is too tight. Spread your stitches out on the hook before each color change.
- The bottom ring flares out: Use 34 sc in Rnd 1 instead of 36, then work Rnd 2 as [sc in next 2, 2 sc in next] 10 times, sc in next 4, for 48 sts.
- Bags fall out too easily: Use a slightly smaller ring, 2.25 in (5.7 cm).
Care
Hand wash cold and lay flat to dry, reshaping the tube while it’s damp. Avoid the dryer, which can shrink the cotton and warp the diamonds.
Final Notes
Everything comes back to one measurement chain. At 16 sts per 4 in (10.2 cm), 48 sts make a 12 in (30.5 cm) circumference, or 6 in (15.2 cm) laid flat. At 16 rnds per 4 in, the 54 rnds of the bottom section and chart give 13.5 in (34.3 cm). The 7-rnd top band adds 1.75 in (4.4 cm), for 15.25 in (38.7 cm). The strap brings the hanging length to about 20.75 in (52.7 cm).
Hit your gauge at Rnd 12, and the rest follows on its own. Hang it up, fill it, and enjoy a tidier kitchen.
Happy crocheting!