

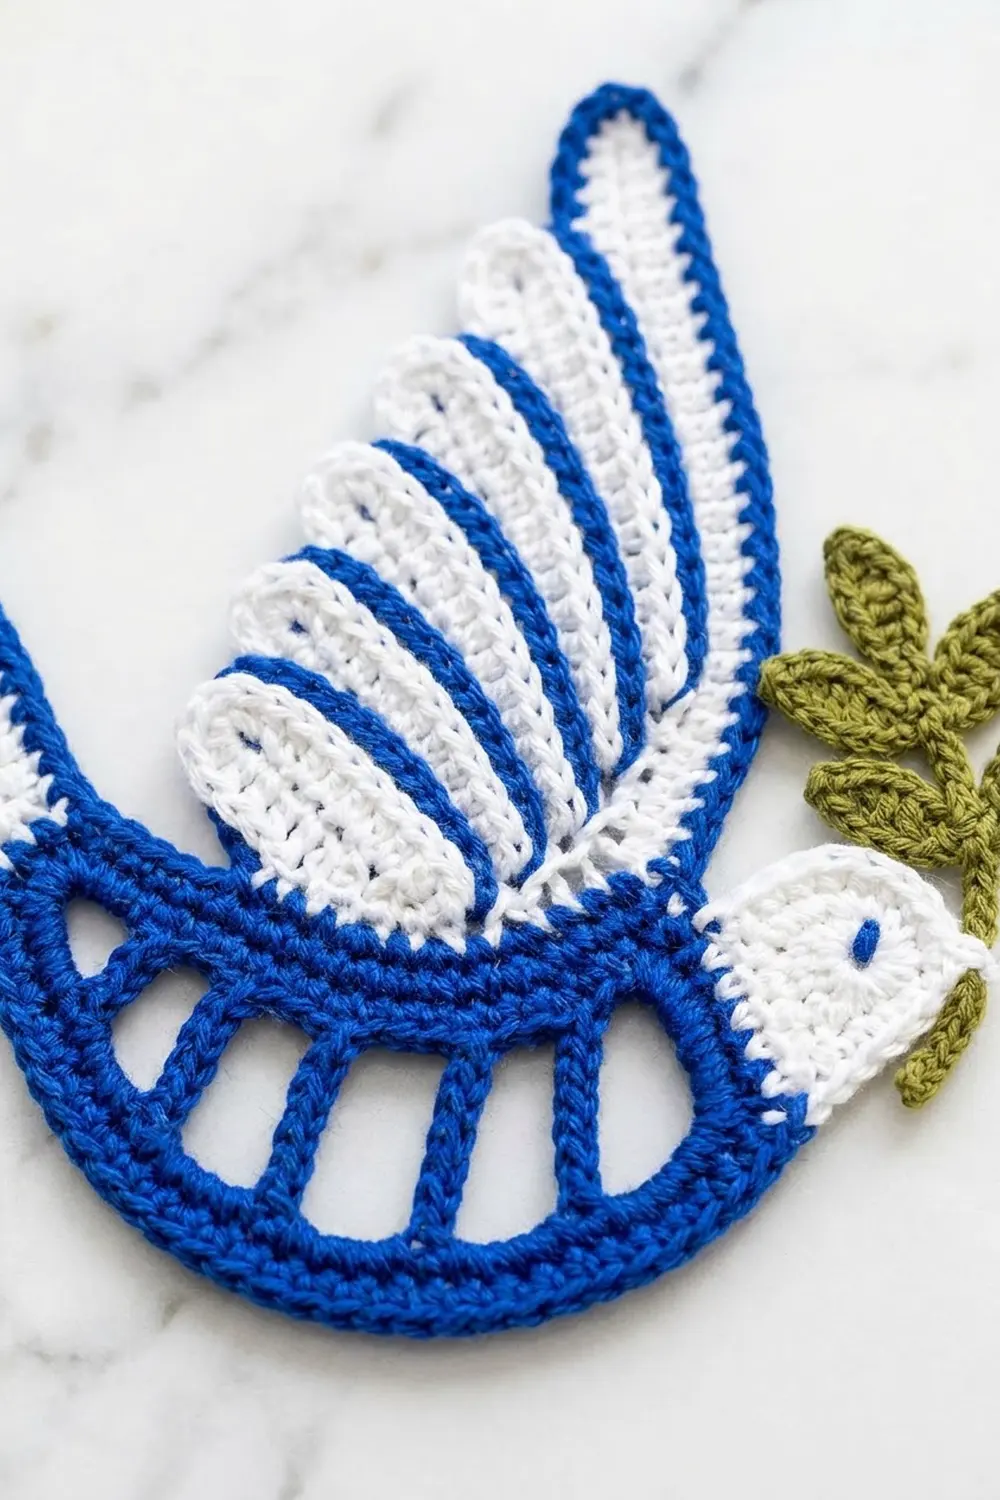
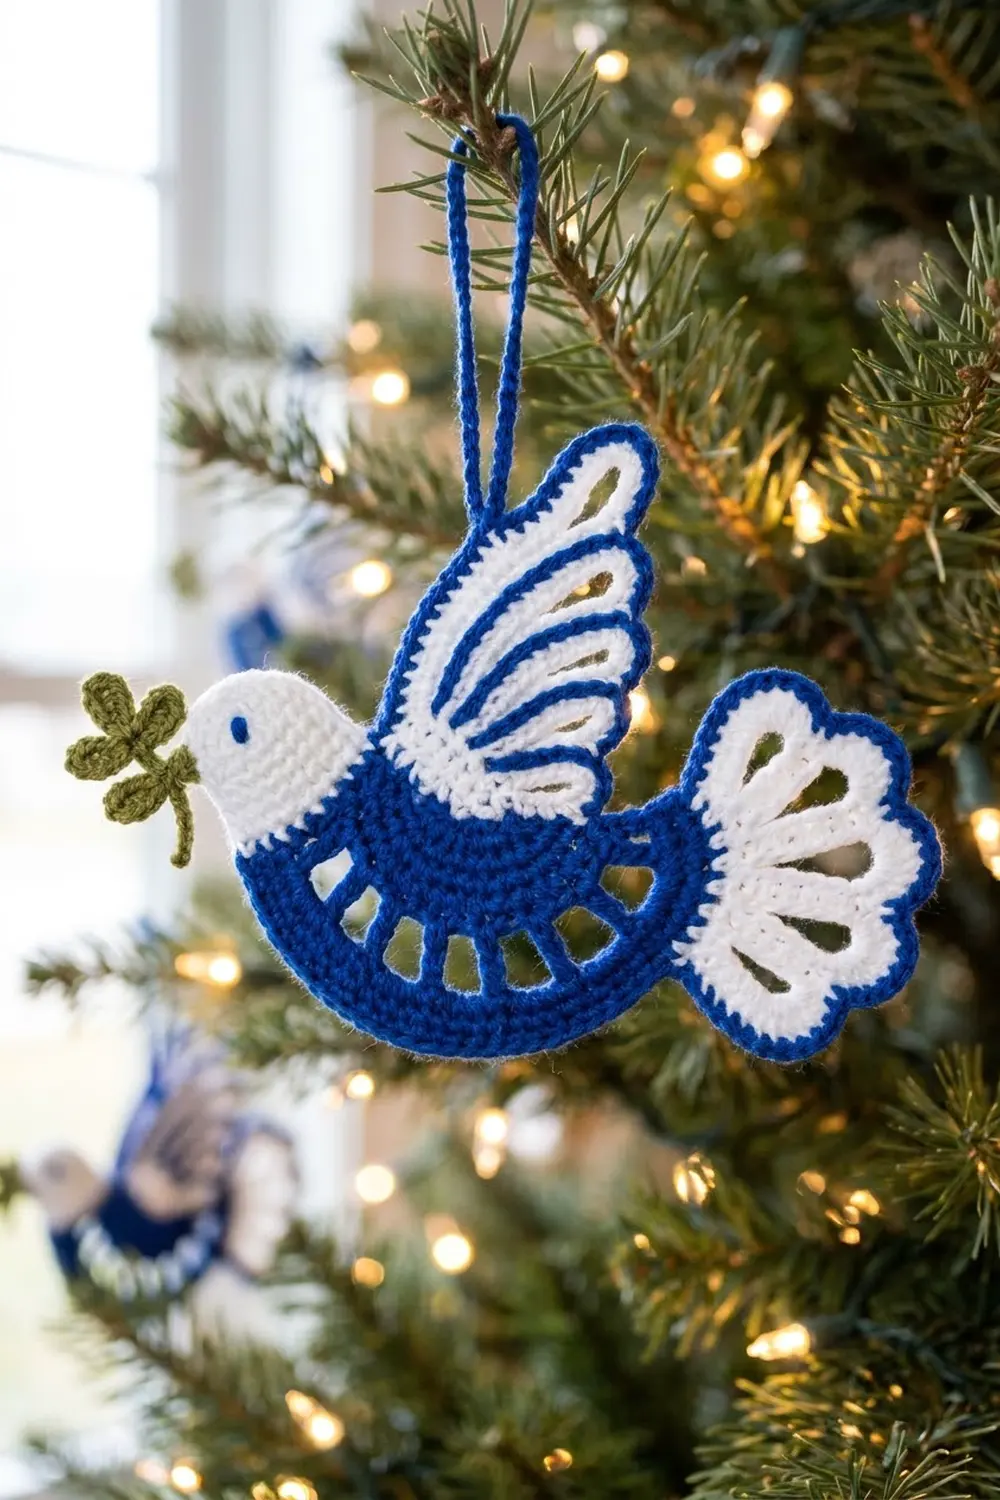
The Blue Harbor Peace Dove is a flat, lacy Christmas ornament with a royal-blue body, a bright white head and wing, and a small olive sprig held in the beak. The open “windows” in the body and the looped feathers catch the light from a tree, so the dove looks delicate even though it is sturdy once blocked.
The palette is classic blue-and-white, and the green sprig adds a small accent. The style sits between Irish-lace appliqué and modern folk ornament: clean outlines, open loops and no stuffing.
This pattern uses US crochet terms. The finished dove measures 4.5 in (11.4 cm) wide by 4 in (10.2 cm) tall, not counting the hanging loop, which adds 2.5 in (6.4 cm).
You crochet five small components (body, head, wing, tail and olive sprig) and then sew them into one ornament. A one-row blue edge finishes the tail scallops and the back feather. A chain cord makes the hanging loop.
Finished Size and Construction
- Finished size: 4.5 in (11.4 cm) wide x 4 in (10.2 cm) tall
- Hanging loop: 2.5 in (6.4 cm) tall
- Skill level: Intermediate (graduated stitch heights, working into chain loops, light assembly)
- Terminology: US
- Yarn weight: Fingering weight / size 3 mercerized cotton thread
- Hook: 2.5 mm
- Number of pieces: 1 finished ornament, made from 5 components and a loop
- Layout: Single dove in flight, facing left
- Body size: 2.75 in (7.0 cm) along the top edge x 0.75 in (1.9 cm) deep at the center
- Size before blue edge: 4.4 in (11.2 cm) x 3.9 in (9.9 cm)
- Edge depth: 0.1 in (0.3 cm), one row of sc
Materials
Use a mercerized cotton in fingering weight or size 3 crochet thread. Mercerized cotton holds crisp loops and blocks flat, which matters for the open feathers. Avoid fuzzy or very stretchy yarns, because the windows and loops will blur.
- Royal blue: 6 g / 20 m (body, inner feather lines, edging, hanging loop, eye)
- White: 5 g / 17 m (head, wing feathers, tail)
- Olive green: 1 g / 3 m (sprig)
These quantities include a margin for a gauge swatch and sewing tails.
Tools:
- 2.5 mm crochet hook
- Tapestry needle with a small eye
- Scissors
- Stitch marker
- Blocking mat or folded towel
- Rustproof pins
- Spray bottle of water
- Optional: liquid fabric stiffener
Abbreviations (US Terms)
- ch: chain
- sl st: slip stitch
- sc: single crochet
- hdc: half double crochet
- dc: double crochet
- tr: treble crochet
- sk: skip
- sp: space
- MR: magic ring
- st(s): stitch(es)
Special stitch – Leaf: Ch 4. Sc in the 2nd ch from the hook, hdc in the next ch, then sc in the last ch (3 sts). This makes a small pointed leaf.
Gauge and Checkpoints
Gauge: 9 sc and 10 sc rows = 1 in (2.5 cm), worked firmly with the 2.5 mm hook.
Make the body first and treat it as your swatch. All the other components are sized to fit it.
Checkpoints:
- Body after Row 1: 2.75 in (7.0 cm) long (25 sc)
- Body after Row 4: 0.75 in (1.9 cm) deep at the center
- Head: 0.9 in (2.3 cm) across, not counting the beak
- Wing: base 1.1 in (2.8 cm); the longest feather reaches 2.5 in (6.4 cm) from the base
- Tail: 1.5 in (3.8 cm) across the scallops and 1.25 in (3.2 cm) long
- Sprig: 1 in (2.5 cm) long
If the body is too big (over 2.9 in / 7.4 cm on Row 1), go down to a 2.25 mm hook or tighten your tension. If it is too small (under 2.6 in / 6.6 cm), go up to a 2.75 mm hook.
Use the same hook for every component so the proportions stay matched.
Body (Royal Blue)
The body is a crescent. Row 1 is the top edge, which sits under the wing. The posts in Row 2 grow from sc at the ends to tr in the middle, so the lower edge bulges downward into a belly curve and the openings between the posts form the windows.
Row 1: Ch 26. Sc in the 2nd ch from the hook and in each ch across. (25 sc)
Row 2 (window row): Ch 1, turn. Work the posts as follows:
- Sc in the first sc.
- Ch 2, sk 2 sc, hdc in the next sc.
- Ch 2, sk 2, dc in the next sc.
- Ch 2, sk 2, tr in the next sc.
- (Ch 2, sk 2, tr in the next sc) 2 times.
- Ch 2, sk 2, dc in the next sc.
- Ch 2, sk 2, hdc in the next sc.
- Ch 2, sk 2, sc in the last sc.
(9 posts and 8 ch-2 sps)
The posts land on sc 1, 4, 7, 10, 13, 16, 19, 22 and 25, in this order: sc, hdc, dc, tr, tr, tr, dc, hdc, sc.
Row 3 (conversion row): Ch 1, turn.
- Sc in the first sc.
- (2 sc in the next ch-2 sp, sc in the next post) 2 times.
- (3 sc in the next ch-2 sp, sc in the next post) 4 times.
- (2 sc in the next ch-2 sp, sc in the next post) 2 times.
The last sc lands in the final post.
Count: 9 sc (1 in each post) + 20 sc (into the spaces: 2 + 2 + 3 + 3 + 3 + 3 + 2 + 2) = 29 sc.
The extra sc in the four deep center spaces lengthen the outer edge so the crescent lies flat instead of cupping.
Row 4: Ch 1, turn. Sc in each sc across. (29 sc)
Fasten off and leave an 8 in (20.3 cm) tail for sewing.
Checkpoint: The body should be 2.75 in (7.0 cm) along Row 1 and 0.75 in (1.9 cm) deep at the center, with 8 clear windows.
Head (White)
Rnd 1: In an MR, ch 2 (does not count as a st), then work 10 dc in the ring. Pull the ring closed and sl st to the first dc. (10 dc)
Rnd 2: Ch 1. Work 2 sc in each dc around. (20 sc)
Beak: Sl st in the next sc. Ch 3, sl st in the 2nd ch from the hook, sc in the next ch, then sl st in the same sc of Rnd 2. This makes a small pointed beak.
Fasten off and leave an 8 in (20.3 cm) tail.
Checkpoint: The head is 0.9 in (2.3 cm) across without the beak.
Wing (Royal Blue and White)
Blue Base and Feather Lines
Row 1 (blue): Ch 11. Sc in the 2nd ch from the hook and in each ch across. (10 sc)
Row 2 (blue loops): Ch 1, turn. Sl st in the first sc. Then work the loops:
- Ch 12, sl st in the same sc.
- Sl st in the next 2 sc, ch 18, sl st in the same sc.
- Sl st in the next 2 sc, ch 24, sl st in the same sc.
- Sl st in the next 2 sc, ch 30, sl st in the same sc.
- Sl st in the next 2 sc, ch 36, sl st in the same sc.
- Sl st in the last sc.
(5 blue ch-loops, anchored on sc 1, 3, 5, 7 and 9)
Fasten off. The ch-12 loop is the front feather (head side) and the ch-36 loop is the back feather.
White Feathers
Row 3 (white): Join white with a sl st in the first st (sc 1). Work around each blue loop, so the blue chain shows as a line inside each white feather and the center of each loop stays open:
- Work 16 sc in the ch-12 loop, then sl st in the next st.
- Work 22 sc in the ch-18 loop, then sl st in the next st.
- Work 28 sc in the ch-24 loop, then sl st in the next st.
- Work 34 sc in the ch-30 loop, then sl st in the next st.
- Work 40 sc in the ch-36 loop, then sl st in the last st.
(16 + 22 + 28 + 34 + 40 = 140 sc across 5 feathers)
Each feather gets 4 more sc than its chain count, which gives enough sc to cover the curved tip without ruffling. Fasten off and leave an 8 in (20.3 cm) white tail.
Checkpoint: The wing base is 1.1 in (2.8 cm). The front feather is about 0.9 in (2.3 cm) long and the back feather about 2.5 in (6.4 cm). Fan the feathers so they nest and graduate in length.
Tail (White)
Row 1: Ch 4 (counts as the first dc). Work (ch 3, dc) 4 times into the 4th ch from the hook. (5 dc and 4 ch-3 sps, fanned)
Row 2: Ch 1, turn. Sc in the first dc, then (ch 7, sc in the next dc) 4 times. (5 sc and 4 ch-7 loops)
Row 3: Ch 1, turn. Sl st in the first sc, then (11 sc in the next ch-7 loop, sl st in the next sc) 4 times. (44 sc and 5 sl st: 4 scallops of 11 sc)
Fasten off and leave an 8 in (20.3 cm) tail.
Checkpoint: The tail is 1.5 in (3.8 cm) across the scallops and 1.25 in (3.2 cm) long.
Olive Sprig (Olive Green)
The leaves are worked along a short chain stem, from the tip back to the base.
- Ch 8. Work 1 Leaf for the tip.
- Sl st in each of the next 2 stem ch, working back toward the start.
- Leaf, sl st in the same stem ch. Leaf, sl st in the same stem ch. This is the first pair.
- Sl st in the next 2 stem ch.
- Leaf, sl st in the same stem ch. Leaf, sl st in the same stem ch. This is the second pair.
- Sl st in the remaining 3 stem ch.
(5 leaves: 1 tip leaf and 2 pairs)
Fasten off and leave a 6 in (15.2 cm) tail.
Checkpoint: The sprig is 1 in (2.5 cm) long.
Assembly
Lightly steam or spritz each component and pin it flat before sewing. Use matching tails and small whipstitches through back loops only, so the stitches stay hidden.
- Head: Lay the body with Row 1 on top. Overlap the head onto the left end of the body by about 0.25 in (0.6 cm), with the beak pointing left. Sew around the overlap.
- Tail: Tuck the base of the tail (Row 1) behind the right end of the body by 0.25 in (0.6 cm), so the scallops fan down and to the right. Sew it from the back.
- Wing: Place the wing’s blue base row along body Row 1, centered over body sts 8 to 18, with the feathers sweeping up and back toward the tail. Sew the base row to Row 1 st by st.
- Sprig: Slip the stem end just under the beak and sew it from the back, angling the sprig downward.
- Eye: With blue, make a French knot on the head, 0.2 in (0.5 cm) behind the base of the beak.
Checkpoint: The assembled dove measures 4.4 in (11.2 cm) x 3.9 in (9.9 cm) before the blue edge.
Blue Edge (Border)
Border gauge: Same as the main gauge, 9 sc = 1 in (2.5 cm). This one row of sc adds 0.1 in (0.3 cm) on the edged sides.
The blue edge goes on the two free white edges that need definition: the tail scallops and the back feather. The head stays white, as in the finished piece.
Tail Edge
Join blue with a sl st in the first sl st of tail Row 3. For each of the 4 scallops:
- Sc in each of the first 5 sc.
- Work 3 sc in the 6th (center) sc.
- Sc in each of the last 5 sc.
- Sl st in the next sl st.
Per scallop: 10 sc (1 per existing st) + 3 sc in the tip = 13 sc.
Total: 4 x 13 = 52 sc and 4 sl st. Fasten off.
Back Feather Edge
Join blue in the first sc of the 40-sc back feather. Then:
- Sc in each of the next 19 sc.
- Work 3 sc in the 20th sc, which is the feather tip.
- Sc in each of the last 20 sc.
Count: 39 sc (1 per existing st) + 3 sc at the tip = 42 sc. Fasten off.
Why the Math Works
Each curved edge keeps one sc per existing st, so the edge matches the white row’s length exactly. The only increase is a 3-sc group at each tip, which adds 2 sts per tip. This gives just enough extra length to turn the point without cupping. With no other increases, the straight sides do not ruffle.
Hanging Loop
With blue, ch 40, then sl st in the back bump of each ch back along the chain. This makes a firm cord about 5 in (12.7 cm) long. Sew both ends to the back of the 3-sc tip of the back feather to form a 2.5 in (6.4 cm) loop.
Final Blocking
- Weave in all remaining ends on the back, through stitches of the same color.
- Spritz the ornament evenly with water until it is damp but not dripping.
- Lay it face down on the mat and smooth the body into a crescent.
- Pin each body window open with a pin through the center of the window.
- Pin each feather loop open and fan the feathers so they nest evenly.
- Pin each tail scallop at its 3-sc tip, spreading the fan to 1.5 in (3.8 cm).
- Check the overall size: 4.5 in (11.4 cm) x 4 in (10.2 cm).
- Optional: brush on diluted fabric stiffener to make a crisper tree ornament.
- Leave the dove to dry completely before unpinning.
Final Quality-Control Checklist
- [ ] The body has 8 open windows, graduated from short at the ends to tall in the middle
- [ ] Body Rows 3 and 4 each have 29 sc
- [ ] The head is round, with a single pointed beak and a blue eye
- [ ] The wing has 5 white feathers, each with a visible blue inner line
- [ ] The back feather has 42 blue edge sc
- [ ] The tail has 4 scallops, each with 13 blue edge sc
- [ ] The sprig has 5 leaves
- [ ] The finished size is 4.5 in (11.4 cm) x 4 in (10.2 cm)
- [ ] The loop is centered so the dove hangs level
- [ ] No ends are visible from the front
Troubleshooting
The body curls instead of lying flat. Check that Row 3 puts 3 sc in each of the four center spaces. Too few sc there tighten the outer edge.
The feathers ruffle. You may have more than 4 sc over the chain count. Pull back and rework to the stated counts.
The feathers look thin or gappy. Push the sc together along each chain loop before moving on, or go down a hook size.
The tail scallops point unevenly. Make sure each ch-7 loop holds exactly 11 sc and that the 3-sc group sits in the 6th sc.
The dove hangs tilted. Move the loop slightly toward the head or tail until the body hangs level.
The blue eye disappears into the stitches. Wrap the French knot 2 times and anchor it through a solid stitch, not a gap.
Care
Hand wash in cool water with mild soap and roll in a towel to remove moisture. Reshape and pin flat to dry, and re-stiffen if needed.
Final Notes
The measurement chain runs like this: the gauge of 9 sc to 1 in (2.5 cm) gives a 2.75 in (7.0 cm) body. The head, wing, tail and sprig are sized to fit it, and assembly gives 4.4 in (11.4 cm) x 3.9 in (9.9 cm). The blue edge adds 0.1 in (0.3 cm), and blocking brings the dove to its finished 4.5 in (11.4 cm) x 4 in (10.2 cm). Check each stage as you go and the dove will come out balanced, flat and ready for the tree.
Happy crocheting!