

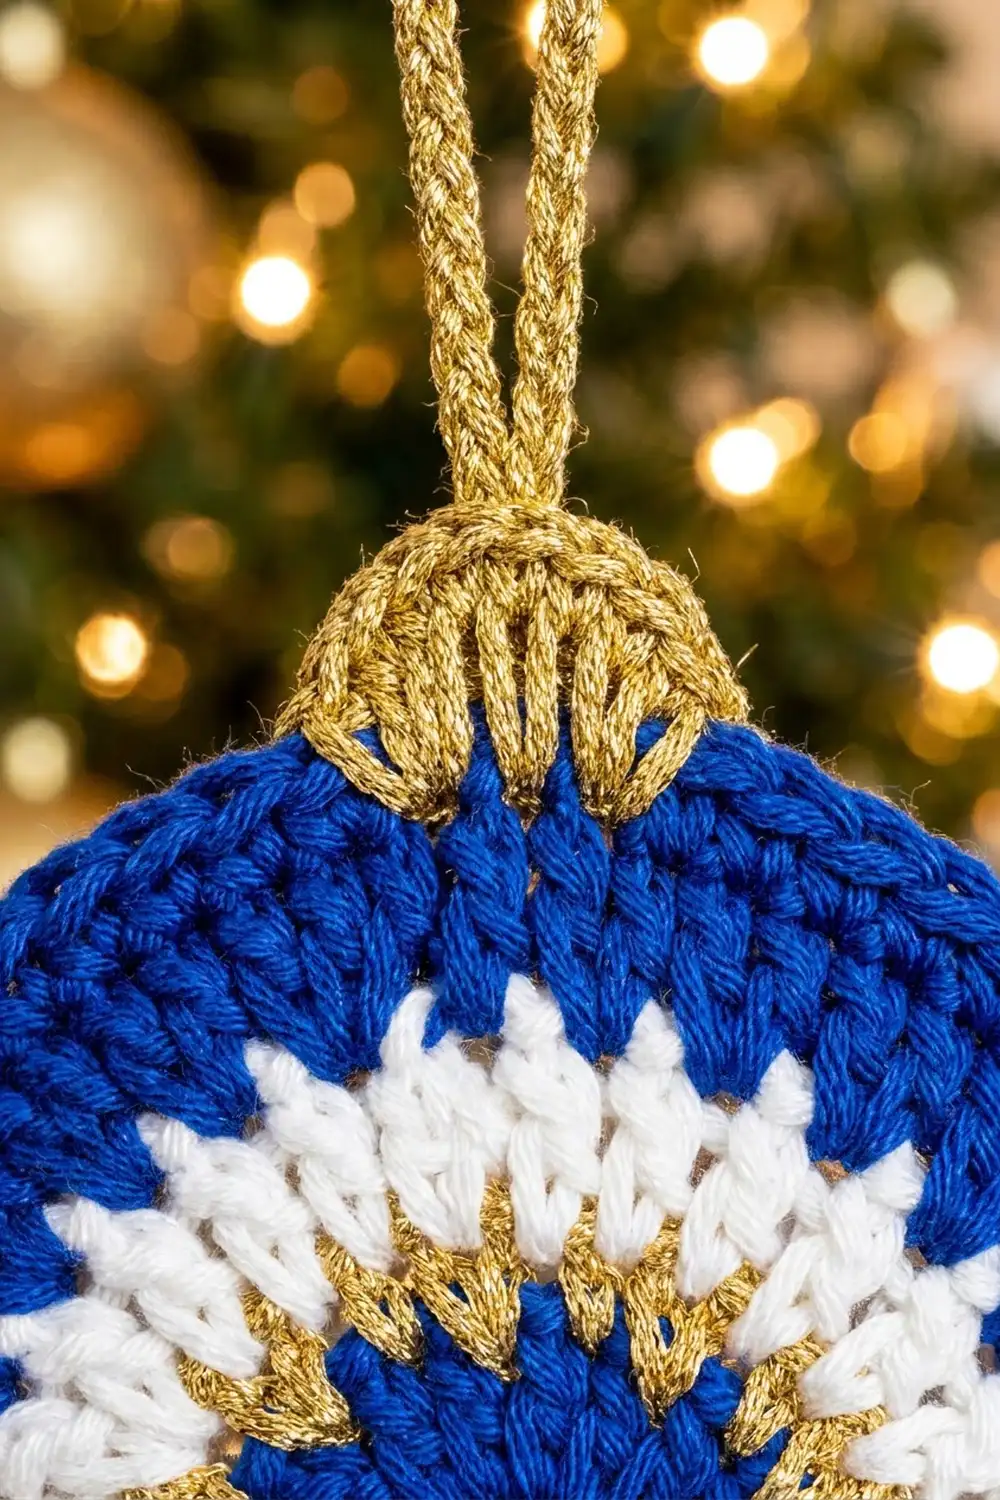
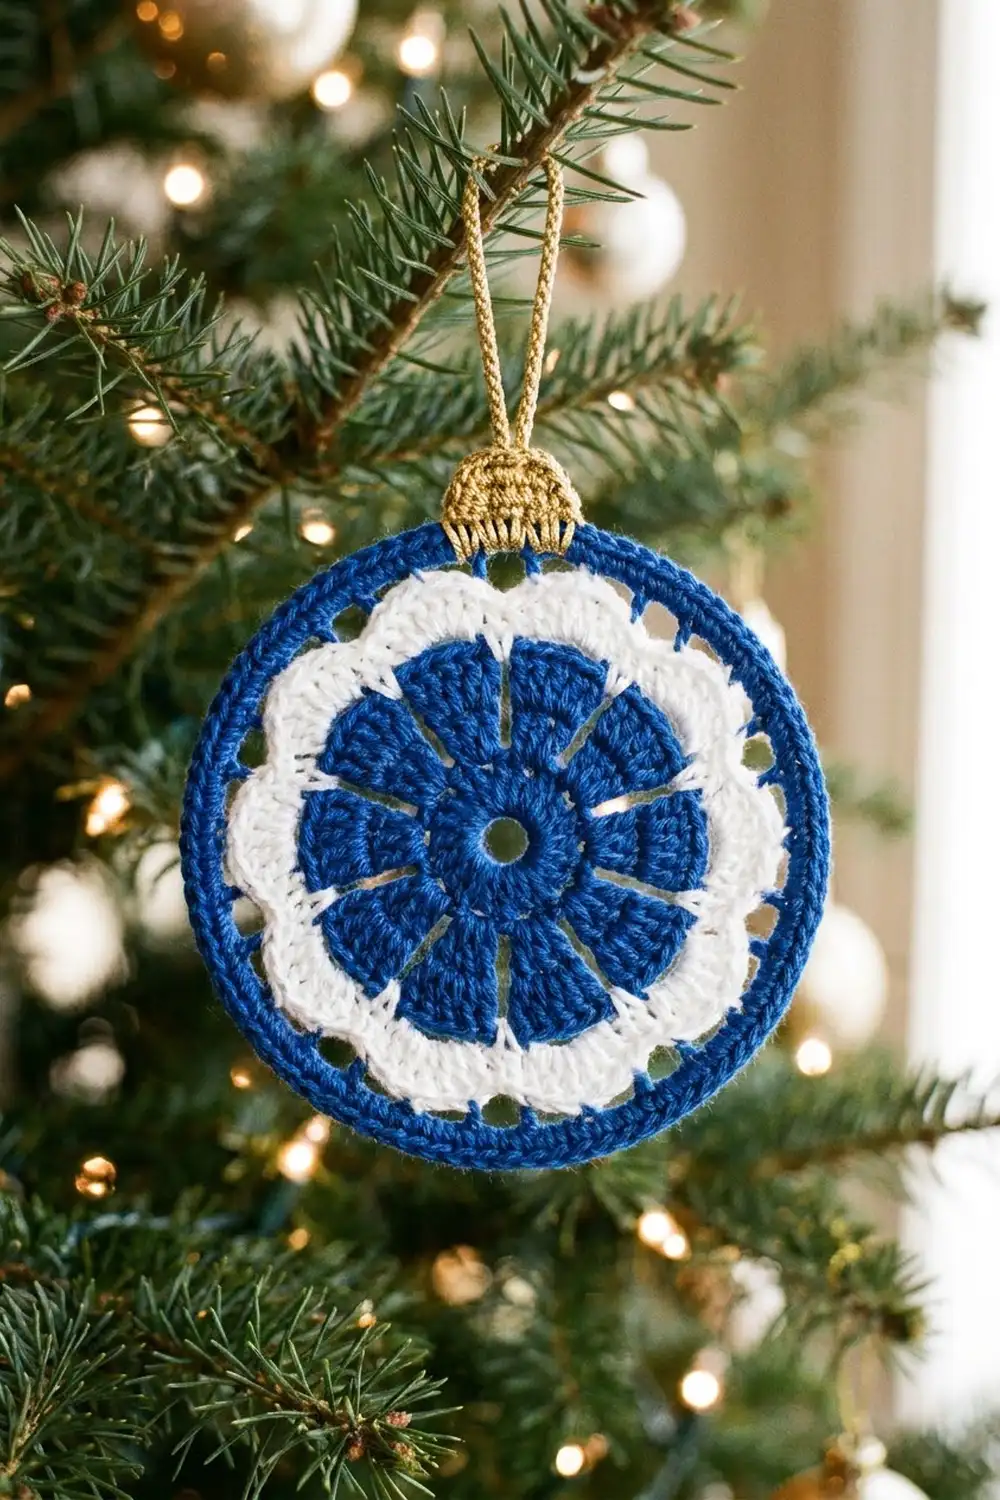
The Delft Blossom Bauble is a flat, lacy Christmas ornament in classic blue and white with a touch of gold. A solid blue ring sits at the center, eight fan-shaped petals open out around it, and a white band of chain scallops circles the flower like lace trim. A smooth blue rim closes the circle, and a small gold cap and hanging loop make it look like a glass bauble.
The palette is inspired by Delft pottery: royal blue, crisp white, and a metallic gold accent. It looks good on a tree, tied to a gift, or hung in a window, and it works up in one evening.
This pattern uses US crochet terms. The finished ornament is 4 in (10.2 cm) across. With the cap and hanging loop it is about 6.1 in (15.5 cm) tall.
Construction is simple and all in one piece. You work the blue center and fans in the round, add two white scallop rounds, and then work a blue rim around them. Last, you crochet the gold cap in short rows straight onto the top of the rim and finish with a corded chain loop.
Finished Size and Construction
- Finished size: 4 in (10.2 cm) diameter; 6.1 in (15.5 cm) tall including cap and loop
- Skill level: Easy–Intermediate
- Terminology: US crochet terms
- Yarn weight: #2 fine / sport-weight mercerized cotton
- Hook: 2.5 mm (US B-1 or C-2)
- Number of pieces: 1 (cap and loop are worked onto the ornament)
- Layout: single round motif
- Piece size: 4 in (10.2 cm) diameter
- Size before border: 3.25 in (8.3 cm) diameter after Round 7
- Border depth: 0.375 in (1.0 cm) per side (Rounds 8–10)
Materials
Use a smooth, mercerized cotton. It gives clear stitch definition, holds the fan shapes well, and blocks flat. For the gold, a metallic sport-weight yarn or a gold cotton blend both work. Choose one with some body so the cap keeps its ribbed look.
Yarn (about 2.5 m per gram):
– Royal blue: 8 g / 20 m
– White: 4 g / 10 m
– Metallic gold: 2 g / 5 m
These quantities include a margin of roughly 20% for gauge swatching and weaving in ends. One 50 g ball of each color will make many ornaments.
Tools:
– 2.5 mm crochet hook
– Tapestry needle
– Scissors
– Stitch marker
– Blocking mat and rustproof pins
– Spray bottle or light fabric stiffener (optional)
Abbreviations (US Terms)
- ch – chain
- sl st – slip stitch
- sc – single crochet
- hdc – half double crochet
- dc – double crochet
- sc2tog – single crochet 2 together
- sp – space
- st(s) – stitch(es)
- rep – repeat
Special stitch – sc2tog: Insert hook in next st, yarn over, pull up a loop. Insert hook in following st, yarn over, pull up a loop. Yarn over and draw through all 3 loops on hook. This decreases by 1 st.
Gauge and Checkpoints
Gauge: 13 sc = 2 in (5.1 cm) worked in rows with blue cotton on a 2.5 mm hook.
Gauge matters less here than on a garment, but it still controls whether the rim lies flat. Make one test ornament first and measure it at each checkpoint below. Measure across the center, with the piece flat and not stretched.
| After | Diameter |
|---|---|
| Round 1 | 0.75 in (1.9 cm) |
| Round 3 | 1.5 in (3.8 cm) |
| Round 5 | 2.5 in (6.4 cm) |
| Round 7 | 3.25 in (8.3 cm) |
| Round 10 | 4 in (10.2 cm) |
If it’s too big: go down to a 2.25 mm hook, or tighten your chains, which tend to grow in lace rounds.
If it’s too small: go up to a 2.75 mm hook. If your ornament is small only at Round 7, add 1 ch to each loop in Rounds 6 and 7.
Pattern
Center Ring (Blue)
Round 1: With blue, ch 8 and sl st into the first ch to form a ring. Ch 1, work 24 sc into the ring, then sl st to the first sc to join. (24 sc)
Pull the sts snugly around the ring so the center hole stays round and about 0.5 in (1.3 cm) across.
Fan Petals (Blue)
Round 2 (conversion round): Ch 3 (counts as dc), dc in next 2 sts, ch 2. Dc in next 3 sts, ch 2; rep from * 6 more times. Join with sl st to top of beginning ch-3.
(24 dc worked 1 per existing st + 8 ch-2 sps added = 8 groups of 3 dc and 8 ch-2 sps)*
Round 3 (growth round): Ch 3 (counts as dc), dc in same st, dc in next st, 2 dc in next st, ch 2, skip ch-2 sp. 2 dc in next st, dc in next st, 2 dc in next st, ch 2, skip ch-2 sp; rep from * 6 more times. Join.
(40 dc total: 8 fans of 5 dc, plus 8 ch-2 sps)*
Round 4 (growth round): Ch 3, dc in same st, dc in next 3 sts, 2 dc in next st, ch 3, skip ch-2 sp. 2 dc in next st, dc in next 3 sts, 2 dc in next st, ch 3, skip ch-2 sp; rep from * 6 more times. Join.
(56 dc total: 8 fans of 7 dc, plus 8 ch-3 sps)*
Round 5 (growth round): Ch 3, dc in same st, dc in next 5 sts, 2 dc in next st, ch 3, skip ch-3 sp. 2 dc in next st, dc in next 5 sts, 2 dc in next st, ch 3, skip ch-3 sp; rep from * 6 more times. Join and fasten off blue.
(72 dc total: 8 fans of 9 dc, plus 8 ch-3 sps)*
Each fan only increases at its two outer stitches, and the chain spaces between fans stay short. That is why the petals stay narrow at the center and widen outward. Check the diameter is 2.5 in (6.4 cm).
White Scallops
Round 6: Join white with sc in the 5th (center) dc of any fan. Ch 5, sc in next ch-3 sp, ch 5. Sc in center dc of next fan, ch 5, sc in next ch-3 sp, ch 5; rep from * 6 more times. Sl st to first sc to join.
(16 sc and 16 ch-5 loops)*
Round 7: Sl st in next 3 ch to reach the middle of the first loop. Ch 1, sc in same loop, ch 6. Sc in next ch-5 loop, ch 6; rep from * 14 more times. Sl st to first sc to join and fasten off white.
(16 sc and 16 ch-6 loops)*
Round 7 sits halfway between the Round 6 loops, so the two white layers overlap and form the double-scalloped look. Check the diameter is 3.25 in (8.3 cm), and lay the piece flat to make sure the loops don’t ripple.
Border (Blue Rim)
Border gauge: the same as the main gauge, 13 sc = 2 in (5.1 cm). The rim is 0.375 in (1.0 cm) deep: Round 8 adds about 0.125 in (0.3 cm) and Rounds 9–10 add about 0.25 in (0.6 cm).
A round piece has no sides, so we count the rim in quarters. Place a marker at the top center before you start the cap, and think of the rim as 4 equal quarters.
Round 8 (open round): Join blue with sc in any ch-6 loop. Ch 4. Sc in next ch-6 loop, ch 4; rep from * 14 more times. Sl st to first sc to join.
(16 sc and 16 ch-4 sps; 4 sc and 4 ch-4 sps per quarter)*
This round gives the small blue openings between the white loops and the solid rim.
Round 9 (conversion round): Ch 1. Sc in next sc, 4 sc in next ch-4 sp; rep from * 15 more times. Sl st to first sc to join.
(16 sc worked 1 per existing sc + 64 sc added in the ch-4 sps = 80 sc; 20 sc per quarter)*
Round 10: Ch 1, sc in each st around. Sl st to first sc to join.
(80 sc worked 1 per existing st + 0 added = 80 sc; 20 sc per quarter)
Do not fasten off yet. Instead, move to the cap as described below, or fasten off and rejoin gold.
Why the math works: 16 loops × 5 sc = 80 sc. At 6.5 sc per inch, 80 sc measures about 12.3 in (31.2 cm) around the middle of the rim. That matches the circumference of a circle a little under 4 in (10.2 cm) across, so the rim lies flat without cupping or ruffling. Because 80 divides into 4 quarters of 20, it’s easy to check that your sts are evenly spread and to find the top center for the cap.
Fasten off blue.
Gold Cap
Find the top center of the rim. It should line up with the center of a fan, which gives the ornament a symmetrical cross-shaped flower under the cap. Count 4 sts to the right of the center.
Row 1: Join gold with sc in back loop of that st. Sc in back loop of next 7 sts. Turn. (8 sc)
Row 2: Ch 2 (does not count as a st), hdc in each st across. Turn. (8 hdc)
Row 3: Ch 2 (does not count), hdc in each st across. Turn. (8 hdc)
Row 4: Ch 1, sc2tog, sc in next 4 sts, sc2tog. (6 sc)
The hdc rows make vertical ribs, and Row 4 pulls the top in slightly, like the metal cap on a glass bauble. The cap is about 1.25 in (3.2 cm) wide at the base and 0.6 in (1.5 cm) tall.
Hanging Loop
At the end of Row 4, ch 20. Sl st into the 3rd sc of Row 4 to form a loop. Sl st into each ch of the loop (20 sl st), then sl st in the next sc of Row 4. Fasten off.
The sl st pass makes the chain look corded and stops it from stretching. The finished loop is about 1.5 in (3.8 cm) tall.
Final Blocking
- Weave in all ends along stitches of the same color: blue ends into the rim, white ends into the white loops, gold ends into the cap.
- Wet the ornament in cool water, or spray it until it’s damp all the way through.
- Press out excess water in a towel. Don’t wring it.
- Lay it on a blocking mat and pin the rim into a 4 in (10.2 cm) circle. Put pins at the 4 quarter points first, then halfway between them.
- Pin out the middle of each white Round 7 loop toward the rim so the scallops are even.
- Use your fingertips to straighten each fan so it sits centered between its chain spaces.
- Shape the cap into a neat rectangle, and pin the hanging loop straight up.
- For a firmer ornament, brush on a light fabric stiffener now.
- Let it dry completely before you unpin it, usually 6–12 hours.
Final Quality-Control Checklist
- Diameter is 4 in (10.2 cm), within 0.125 in (0.3 cm).
- The center ring is round and open, about 0.5 in (1.3 cm) across.
- There are 8 fans, each 9 dc wide at the outer edge, evenly spaced.
- There are 16 white loops in Round 6 and 16 in Round 7, with no twists.
- The rim has 80 sc, 20 per quarter, and lies flat.
- The cap is centered over a fan, has 8 sts at the base and 6 at the top.
- The hanging loop is firm, corded, and secure.
- All ends are woven in and hidden on the back.
Troubleshooting
Fans curl or cup: Your dc tension is tighter than your chains. Loosen the dc, or add 1 ch to the spaces between fans in Rounds 4 and 5.
Center hole closes up: Start with ch 9 instead of 8, and don’t pull the ring tight before Round 1.
White loops ripple: The chains are too loose. Go down a hook size for Rounds 6–7 only.
Rim ruffles: Work Round 10 with a 2.25 mm hook, or replace 4 sc in each ch-4 sp in Round 9 with 3 sc. The second option gives 64 sc, 16 per quarter.
Rim cups or the piece domes: Use a 2.75 mm hook for the border rounds.
Cap sits off-center: Count the rim again from the marker. The cap should cover exactly 8 sts, 4 on each side of the top center.
Gold yarn splits: Use a slightly larger hook for the cap only, and work slowly.
Care
Hand-wash in cool water with mild soap, press out the water in a towel, and lay flat or pin to dry. Store flat in tissue paper so the loops and cap keep their shape.
Final Notes
Here is the full measurement chain. The 24-sc center ring grows into 8 fans of 9 dc (72 dc) at 2.5 in (6.4 cm). Two rounds of 16 white loops bring the piece to 3.25 in (8.3 cm). The 0.375 in (1.0 cm) blue border, with 80 sc and 20 per quarter, finishes the ornament at 4 in (10.2 cm). The 8-st gold cap and corded loop bring the total height to 6.1 in (15.5 cm). If you check those numbers as you go, every bauble will come out the same size.
Happy crocheting!