
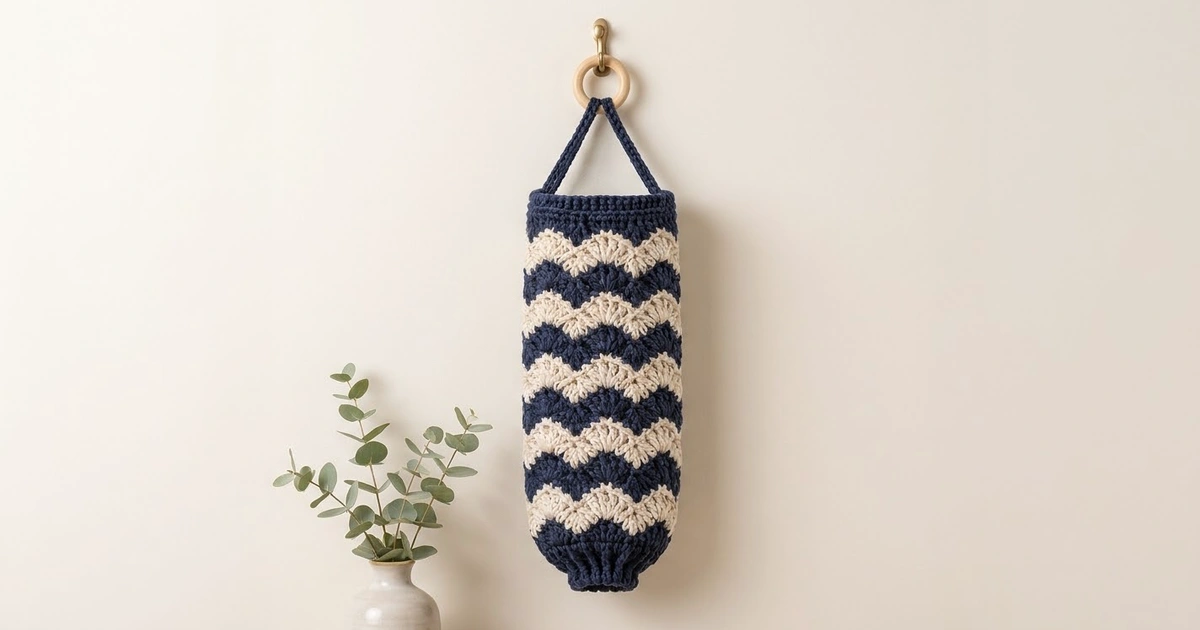
The Harbor Wave Bag Holder is a practical kitchen piece with a coastal look. Rows of shell stitches make wavy stripes around a tall tube. Single rounds of cream fans sit between deeper navy waves, and solid navy bands frame the top and bottom.
You stuff plastic bags in through the open top and pull them out one at a time through a slit in the oval base. Two cord straps meet at a wooden ring so the holder hangs neatly from a hook or a cabinet knob.
This pattern uses US crochet terms. The finished body measures 6 in (15.2 cm) wide when flat and 11.5 in (29.2 cm) tall. With the straps and ring it hangs about 18.5 in (47.0 cm) long.
Construction is simple. You work an oval base around a chain ring, which leaves the dispensing slit. Next you work a tube in joined rounds of shells, then crochet the base to the tube with matching stitch counts. Last, you make two slip-stitch cords and attach the ring.
Finished Size and Construction
- Finished body size: 6 in (15.2 cm) wide flat × 11.5 in (29.2 cm) tall
- Circumference: 12 in (30.5 cm)
- Overall hanging length: about 18.5 in (47.0 cm) including straps and ring
- Skill level: Easy+ (confident beginner)
- Terminology: US crochet terms
- Yarn weight: worsted (#4)
- Hook: US H-8 (5.0 mm)
- Number of pieces: 4 crocheted pieces (1 body, 1 oval base, 2 straps) plus 1 wooden ring
- Layout: the base is joined to the bottom of the tube, and the straps are sewn to the top at the two side folds
- Oval base size: about 5 in × 2.75 in (12.7 × 7.0 cm), 48 sts around
- Body before top rim: 10 in (25.4 cm) tall
- Top rim depth: 1.5 in (3.8 cm)
Materials
Yarn: Use a smooth worsted yarn. Cotton or a cotton blend holds its shape best around bags, and acrylic also works. The amounts below assume about 180 m per 100 g (197 yd per 3.5 oz).
- Navy (Color A): 100 g / 180 m (197 yd)
- Cream (Color B): 40 g / 72 m (79 yd)
These quantities include a margin of about 15% for your gauge swatch and weaving in ends.
Tools:
- US H-8 (5.0 mm) crochet hook
- Wooden ring, 2 in (5.1 cm) across
- Tapestry needle
- 4 locking stitch markers
- Scissors
- Measuring tape
Abbreviations (US Terms)
- ch: chain
- sl st: slip stitch
- sc: single crochet
- hdc: half double crochet
- dc: double crochet
- tr: treble crochet
- sk: skip
- st(s): stitch(es)
- rnd(s): round(s)
- RS: right side
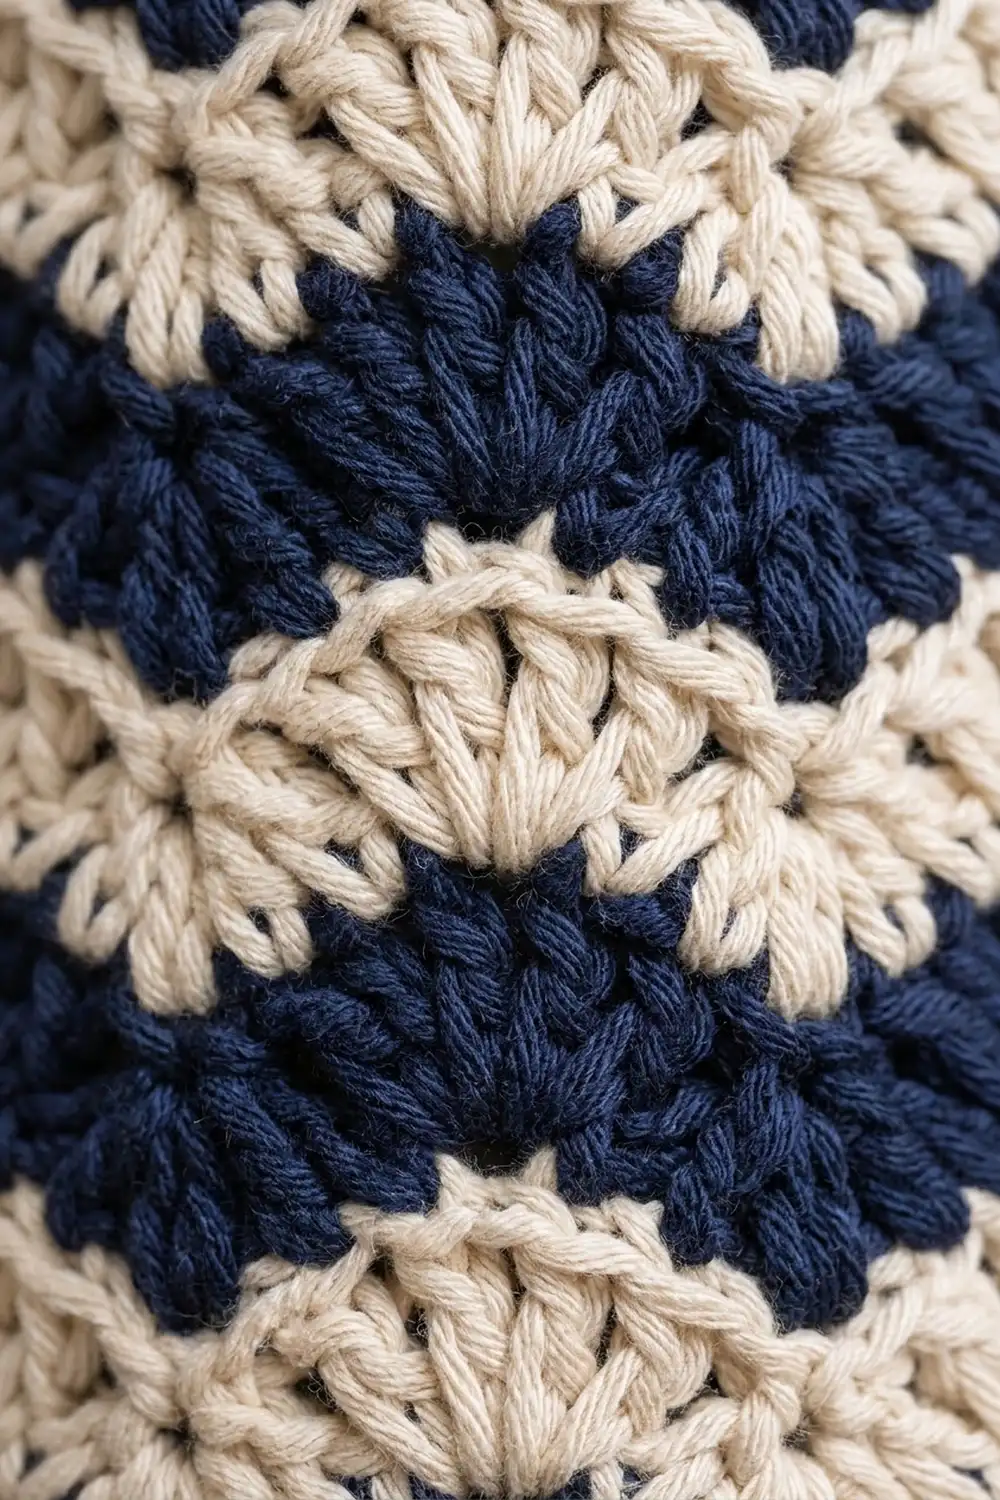
Special stitch: Shell. Work 7 dc in the same stitch.
Center dc: the 4th dc of a 7-dc shell.
Gauge and Checkpoints
- Single crochet in the round: 16 sts × 16 rnds = 4 in (10.2 cm)
- Shell pattern: 2 repeats (16 sts) = 4 in (10.2 cm), and 6 shell rnds = 3 in (7.6 cm)
Test one piece first. Make the oval base before anything else, because it doubles as your gauge swatch. After Rnd 5 it should measure about 5 in × 2.75 in (12.7 × 7.0 cm) and lie flat.
Checkpoints while you work the body:
- Foundation ring: 48 ch, about 12 in (30.5 cm) around without stretching
- After Rnd 4: 1 in (2.5 cm) tall
- After Rnd 10: 4 in (10.2 cm) tall
- After Rnd 22: 10 in (25.4 cm) tall
- After Rnd 27: 11.5 in (29.2 cm) tall and 6 in (15.2 cm) wide flat
If your piece is too big, go down one hook size. If it is too small, go up one size. Do not change the stitch counts, because the base and the body must both have 48 sts.
Oval Base
Use Color A.
Foundation: Ch 20. Sl st in the first ch to form a ring, taking care not to twist. Flatten the ring into a narrow slit, with 1 end ch and 9 side ch on each half. This slit is where the bags come out.
Rnd 1: Ch 1. 3 sc in the end ch, sc in the next 9 ch. Repeat from * once more. Join with a sl st to the first sc. (24 sts)
Rnd 2: Ch 1. 2 sc in each of the next 3 sts, sc in the next 9 sts. Repeat from * once more. Join. (30 sts)
Rnd 3: Ch 1. [Sc in the next st, 2 sc in the next st] 3 times, sc in the next 9 sts. Repeat from * once more. Join. (36 sts)
Rnd 4: Ch 1. [Sc in the next 2 sts, 2 sc in the next st] 3 times, sc in the next 9 sts. Repeat from * once more. Join. (42 sts)
Rnd 5: Ch 1. [Sc in the next 3 sts, 2 sc in the next st] 3 times, sc in the next 9 sts. Repeat from * once more. Join. (48 sts)
Fasten off, leaving a 6 in (15.2 cm) tail. Each half of the oval now has 24 sts. Place a marker in the 1st st of the round and another in the 25th st. These mark the two ends of the oval.
Checkpoint: The base should measure about 5 in × 2.75 in (12.7 × 7.0 cm). The slit stays closed when the base lies flat and stretches open to about 2.5 in (6.4 cm) when you pull on it.
Tube Body
Work in joined rounds with the RS always facing you. Keep the beginning of each round at one side fold of the tube.
Bottom Band
Use Color A.
Foundation: Ch 48. Sl st in the first ch to form a ring without twisting.
Rnd 1: Ch 1, sc in each ch around. Join. (48 sts)
Rnds 2–4: Ch 1, sc in each st around. Join. (48 sts)
Checkpoint: The band is 1 in (2.5 cm) tall and 6 in (15.2 cm) wide when flat.
Wave Shell Section
Stripe sequence: Repeat [2 rnds Color A, 1 rnd Color B] 6 times, which gives 18 rounds (Rnds 5–22).
- Color A rounds: Rnds 5, 6, 8, 9, 11, 12, 14, 15, 17, 18, 20, 21
- Color B (cream) rounds: Rnds 7, 10, 13, 16, 19, 22
Rnd 5 (A): Ch 1, sc in the first st. Sk 3 sts, shell in the next st, sk 3 sts, sc in the next st. Repeat from * 4 more times. Sk 3 sts, shell in the next st, sk 3 sts, and join to the first sc. (6 sc + 6 shells = 48 sts)
Rnd 6 (A): Sl st in each of the next 4 sts, so you land on the center dc of the first shell. Ch 1, sc in the same st. Sk 3 dc, shell in the next sc, sk 3 dc, sc in the center dc of the next shell. Repeat from * 4 more times. Sk 3 dc, shell in the last sc, sk 3 dc, and join to the first sc. (48 sts)
Rnd 7 (B): Fasten off A. Join B in the center dc of any shell. Ch 1, sc in the same st, then repeat Rnd 6 from * to the end. (48 sts)
Rnds 8–22: Keep following the stripe sequence. Every round repeats Rnd 6: a sc in each center dc and a shell in each sc.
- When the color stays the same, sl st across to the next center dc, as in Rnd 6.
- When the color changes, fasten off and join the new color in a center dc, as in Rnd 7.
Every round has 48 sts. Because the shells shift half a repeat each round, the fans stack into waves.
Checkpoint: After Rnd 10 the body is 4 in (10.2 cm) tall. After Rnd 22 it is 10 in (25.4 cm) tall.
Make All Pieces
Pieces by color:
- Color A only: 1 oval base and 2 straps (make the straps after the body)
- Colors A and B: 1 tube body
Assembly layout:
        [ wooden ring ]
         /         \
   strap 1       strap 2
       |            |
 [fold st 1]  [fold st 25]   <- top rim, Rnd 27
 |     wave shell body     |
 |  [bottom band, Rnds 1-4]|
 [====== oval base ======]   <- joined, 48 sts to 48 sts
        (bag slit)
Joining the Base
Method: Single crochet join on the RS. It makes a small ridge that defines the bottom edge.
- Turn the tube so the foundation edge is at the bottom.
- Hold the base against it with wrong sides together and the base on the outside.
- Line up the base’s end markers (sts 1 and 25) with the side folds of the tube.
- Join A through st 1 of both pieces. Ch 1, then sc through both pieces in each st around. Join. (48 sc)
Stitch-to-stitch logic: Each piece has 48 sts, so you work exactly one sc per pair of stitches with no easing. Each half of the base (24 sts) meets one flat side of the tube (24 sts).
Tension advice: Keep your tension firm and even. If you work too tightly, the bottom pulls in. If you work too loosely, the seam rolls outward.
Size check: After the join the tube should still be 6 in (15.2 cm) wide flat. The base should curve slightly to make the rounded bottom.
Border: Top Rim
Border gauge: same as the main sc gauge, 16 sts = 4 in (10.2 cm). The rim is worked in Color A.
Rnd 23 (leveling, A): Join A in the center dc of any shell, then ch 1. Sc in the center dc, sc in the next dc, hdc in the next dc, dc in the next dc, tr in the sc, dc in the next dc, hdc in the next dc, sc in the next dc. Repeat from * 5 more times. Join.
This is a trim round: 48 sts worked one into each existing stitch, + 0 added = 48 sts. The tall stitches fill the valleys of the waves and the short ones sit on the peaks, so the top edge comes out flat.
Rnds 24–27: Ch 1, sc in each st around. Join. (48 sts)
Fasten off and weave in the end.
Counts per side: Flattened, the rim has 24 sts on the front and 24 sts on the back. These counts include the fold stitches. Mark st 1 and st 25 as the side folds.
Why the math works: 48 sts at 4 sts per inch gives a 12 in (30.5 cm) circumference, or 6 in (15.2 cm) across when flat. That matches the bottom band, the base and the shell section, because each shell repeat (1 sc + 7 dc) uses 8 sts, and 6 repeats × 8 sts = 48 sts.
Checkpoint: The rim is 1.5 in (3.8 cm) deep, and the body is 11.5 in (29.2 cm) tall in total.
Straps
Make 2 with Color A.
- Ch 27.
- Sl st in the back bump of the 2nd ch from the hook and in each back bump across. (26 sl sts)
- Fasten off, leaving an 8 in (20.3 cm) tail.
Each strap is a firm cord about 6.5 in (16.5 cm) long.
Attaching the straps:
- Wrap the top 1 in (2.5 cm) of each strap over the wooden ring and sew it to the strap itself.
- Sew the bottom 0.5 in (1.3 cm) of each strap to the inside of the top rim, one at st 1 and one at st 25. Cover Rnds 25–27.
- Check that the visible part of each strap is about 5 in (12.7 cm), so the straps form a balanced V.
Final Blocking
- Weave in all ends along stitches of the same color.
- Lightly mist the holder with water.
- Slide a rolled towel about 3 in (7.6 cm) thick into the tube.
- Shape it to 6 in (15.2 cm) wide flat and 11.5 in (29.2 cm) tall.
- Pat the shells into even waves and line up the side folds.
- Press the oval base gently so it curves smoothly.
- Let it dry fully before you remove the towel.
Final Quality-Control Checklist
- [ ] The base and every body round have 48 sts.
- [ ] Six cream wave rounds are evenly spaced.
- [ ] The beginning-of-round seams line up at one side fold.
- [ ] The top rim is level, with no dips above the wave valleys.
- [ ] The base seam lies flat and the slit opens easily.
- [ ] The straps are the same length and securely sewn at sts 1 and 25.
- [ ] The ring hangs centered.
- [ ] The holder measures 6 in × 11.5 in (15.2 × 29.2 cm).
Troubleshooting
The shells ruffle.
Your dc are too loose. Go down a hook size for the shell rounds only.
The tube narrows as you go.
You are probably skipping too many stitches. Count to 48 every round and check for 6 shells.
The waves look straight instead of staggered.
You may have placed a shell on a shell. Every shell must go into a sc, and every sc into a center dc.
The top edge is wavy.
Redo Rnd 23 and make sure the tr lands exactly in each valley sc.
The base cups or ruffles.
Cupping means your increases are too tight, and ruffling means they are too loose. Adjust your hook size and redo the base. Keep 48 sts.
Bags fall through the slit.
Work Rnd 1 of the base more tightly, or add a sc round around the slit.
The holder leans when hung.
Make sure both straps have the same visible length.
Care
Hand wash or machine wash cold on a gentle cycle, then reshape and dry flat. Avoid hot dryers, which can shrink cotton and distort the waves.

Final Notes
The measurement chain is simple:
- An oval base of 48 sts meets a 48-st tube.
- The tube is 12 in (30.5 cm) around and 6 in (15.2 cm) wide flat.
- The height builds up as 1 in (2.5 cm) for the bottom band, 9 in (22.9 cm) for the wave shells and 1.5 in (3.8 cm) for the top rim, for 11.5 in (29.2 cm) in total.
- Two 6.5 in (16.5 cm) straps and a 2 in (5.1 cm) ring bring the hanging length to about 18.5 in (47.0 cm).
If you keep 48 sts at every stage, everything fits. Happy crocheting!