

The Sunny Bloom Wall Organizer is a five-petal flower that hangs on the wall. Three little cups along its lower edge hold pens, a notepad, and a phone. Each petal ends in a soft heart-shaped notch, and a rolled cord edge outlines the whole bloom.
The palette is simple: pale butter yellow for the petals, cups, and loop, and warm mustard for the round center. The look is cheerful and a little retro, and it suits a desk, an entryway, or a craft corner.
This pattern uses US crochet terms. The finished flower measures about 13.75 in (34.9 cm) across at its widest point. Each cup is about 3 in (7.6 cm) wide and 3.75 in (9.5 cm) tall.
Construction is modular. You crochet one center, five petals worked in rows, three cups, and one hanging strip. A single sc round joins the petals to the center, and a two-round border outlines the flower. Then you sew on the cups and loop.
Finished Size and Construction
- Finished size: about 13.75 in (34.9 cm) across
- Skill level: Intermediate
- Terminology: US
- Yarn weight: Worsted (#4) cotton
- Hook: 4.0 mm (G-6)
- Number of pieces: 10 (1 center, 5 petals, 3 cups, 1 loop)
- Layout: 5 petals around the center, 3 cups across the lower petals, and the loop at the top
- Piece sizes:
- Center: 4.75 in (12.1 cm) after joining
- Petal: 4.25 in (10.8 cm) long by 5 in (12.7 cm) wide
- Cup: 3 in (7.6 cm) wide by 3.75 in (9.5 cm) tall
- Size before border: about 13.25 in (33.7 cm) across
- Border depth: 0.25 in (0.6 cm) on every edge
Materials
Choose a smooth, firm cotton. Cotton holds its shape on the wall and keeps the cups upright. Acrylic also works, but the cups will be softer. The amounts below assume about 1.9 m of yarn per gram.
- Butter yellow: 150 g, about 285 m (petals, cups, loop, border)
- Mustard: 25 g, about 48 m (center)
These quantities include a margin of about 20 percent for swatching and tails.
Tools: 4.0 mm (G-6) hook, tapestry needle, 6 stitch markers, scissors, measuring tape, blocking mat, rust-proof pins, and a spray bottle.
Abbreviations (US Terms)
- ch – chain
- sl st – slip stitch
- sc – single crochet
- hdc – half double crochet
- dc – double crochet
- tr – treble crochet
- sc2tog – single crochet 2 together
- BLO – back loop only
- MR – magic ring
- st(s) – stitch(es)
- RS / WS – right side / wrong side
Special stitch – reverse sc (crab stitch): Work from left to right (if you’re right-handed). Insert the hook into the next st to the right, yarn over, and pull up a loop. Yarn over again and pull through both loops. This stitch makes the rolled cord edge.
Turning chains: A ch 2 before dc never counts as a stitch, and neither does a ch 1 before sc.
Gauge and Checkpoints
- Sc gauge: 16 sts and 18 rows = 4 in (10.2 cm)
- Dc gauge: 16 sts and 8 rows = 4 in (10.2 cm)
Make the center first and use it as your test piece. Then check these measurements as you go:
- Center after Rnd 5: 4.5 in (11.4 cm) across
- Petal after Row 1: 3 in (7.6 cm) wide
- Petal after Row 5: 5 in (12.7 cm) wide
- Petal after Row 7: 3.5 in (8.9 cm) long
- Finished petal: 4.25 in (10.8 cm) long
- Cup base after Rnd 6: 2.9 in (7.4 cm) across
- Cup wall after Rnd 22: about 3.5 in (8.9 cm) tall
If a piece comes out too big, go down a hook size. If it’s too small, go up one. Firm fabric matters most for the cups, so if you’re between sizes, choose the smaller hook.
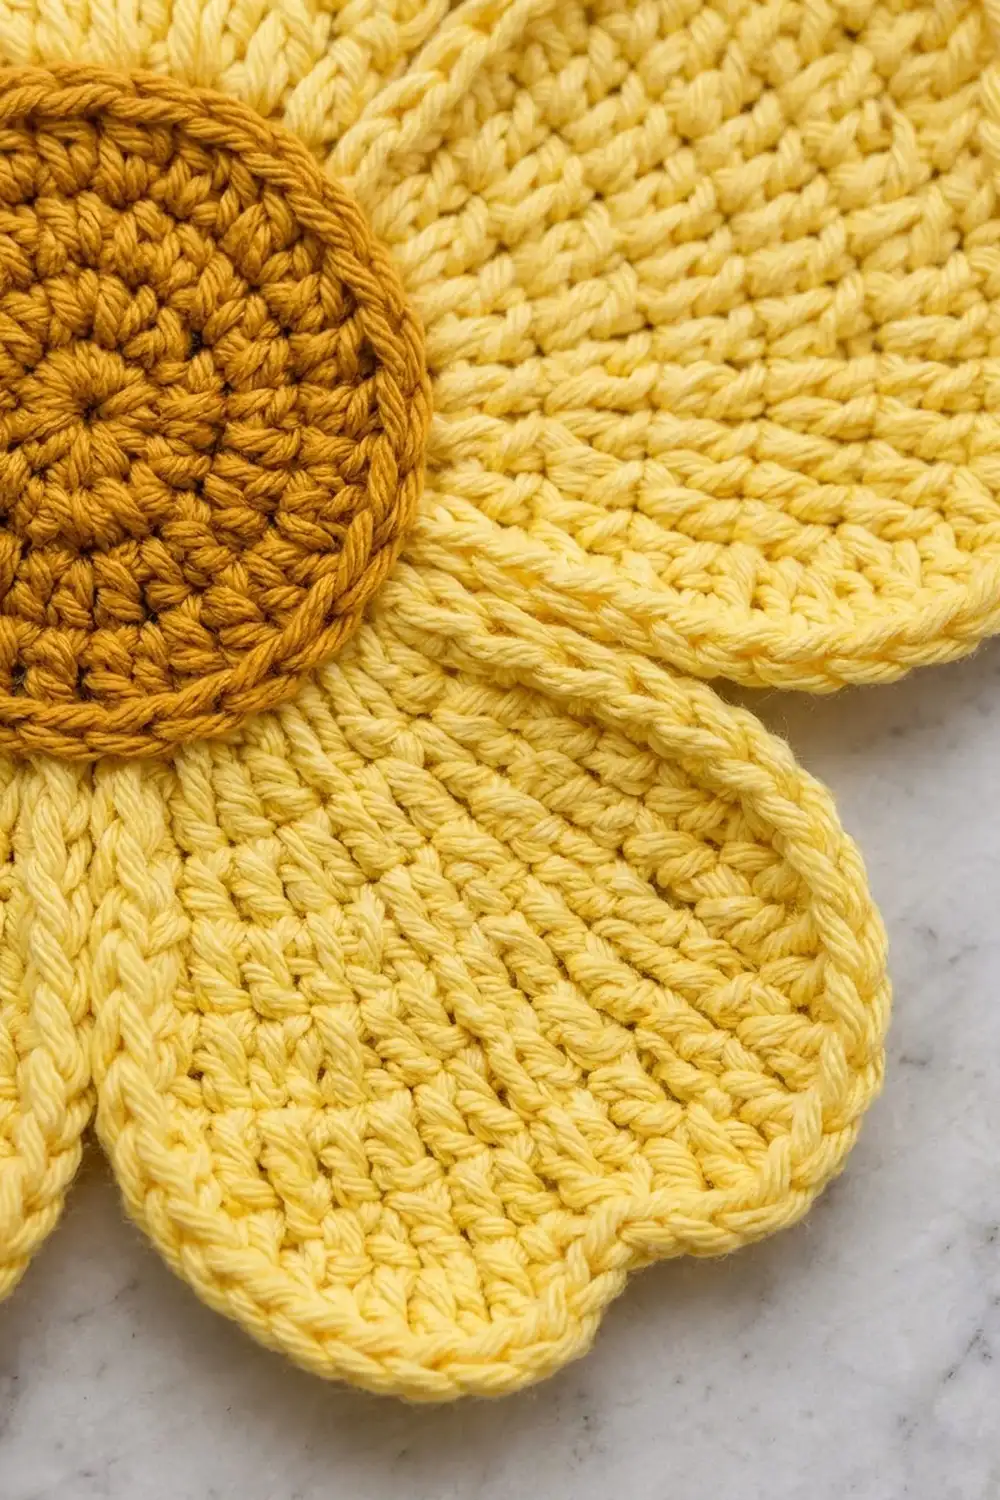
Center (Make 1)
Use mustard. Join each round with a sl st to the first st.
Rnd 1: MR, ch 2, 12 dc in ring. (12 dc)
Rnd 2: Ch 2, 2 dc in each st around. (24 dc)
Rnd 3: Ch 2, *dc in next st, 2 dc in next st; rep from * around. (36 dc)
Rnd 4: Ch 2, *dc in next 2 sts, 2 dc in next st; rep from * around. (48 dc)
Rnd 5: Ch 2, *dc in next 3 sts, 2 dc in next st; rep from * around. (60 dc)
Checkpoint: The disc should lie flat and measure 4.5 in (11.4 cm) across. Fasten off and weave in the ends. Rnd 6 is the joining round, which you’ll work later in butter yellow.
Petals (Make 5)
Use butter yellow. Each petal is worked in rows, from the base outward.
Row 1 (RS): Ch 14, dc in 3rd ch from hook and in each ch across. (12 dc)
Row 2: Ch 2, turn, 2 dc in first st, dc in next 10 sts, 2 dc in last st. (14 dc)
Row 3: Ch 2, turn, 2 dc in first st, dc in next 12 sts, 2 dc in last st. (16 dc)
Row 4: Ch 2, turn, 2 dc in first st, dc in next 14 sts, 2 dc in last st. (18 dc)
Row 5: Ch 2, turn, 2 dc in first st, dc in next 16 sts, 2 dc in last st. (20 dc)
Rows 6–7: Ch 2, turn, dc in each st across. (20 dc)
The petal is now a fan shape, 5 in (12.7 cm) wide and 3.5 in (8.9 cm) long.
Row 8 (heart top): Ch 1, turn.
– First lobe: Sc in first st, hdc in next st, dc in next st, 2 dc in next st, 2 tr in next st, 2 tr in next st, 2 dc in next st, dc in next st, hdc in next st, sl st in next st. (14 sts worked over 10 sts)
– Second lobe: Sl st in next st, hdc in next st, dc in next st, 2 dc in next st, 2 tr in next st, 2 tr in next st, 2 dc in next st, dc in next st, hdc in next st, sc in last st. (14 sts worked over 10 sts)
Row 8 has 28 sts in total. The two side-by-side sl sts form the center notch, and the tr groups round out the lobes. Fasten off and weave in the ends.
Cups (Make 3)
Use butter yellow. Join each round with a sl st to the first st.
Rnd 1: MR, ch 1, 6 sc in ring. (6 sc)
Rnd 2: Ch 1, 2 sc in each st. (12 sc)
Rnd 3: Ch 1, sc in next st, 2 sc in next st; rep from . (18 sc)
Rnd 4: Ch 1, sc in next 2 sts, 2 sc in next st; rep from . (24 sc)
Rnd 5: Ch 1, sc in next 3 sts, 2 sc in next st; rep from . (30 sc)
Rnd 6: Ch 1, sc in next 4 sts, 2 sc in next st; rep from . (36 sc)
Checkpoint: The base should measure 2.9 in (7.4 cm) across.
Rnd 7: Ch 1, sc in BLO of each st. (36 sc) This round makes the base ridge and turns the work upward.
Rnds 8–22: Ch 1, sc in each st. (36 sc)
Rnd 23: Ch 1, reverse sc in each st. (36 + 0 = 36 sts)
Fasten off, leaving a 24 in (61.0 cm) tail for sewing. The finished cup is about 3 in (7.6 cm) wide and 3.75 in (9.5 cm) tall.
Hanging Loop (Make 1)
Use butter yellow.
Row 1: Ch 31, sc in 2nd ch from hook and in each ch across. (30 sc)
Rows 2–4: Ch 1, turn, sc in each st. (30 sc)
The strip measures 7.5 in (19.1 cm) long by 0.9 in (2.3 cm) wide. Fold it in half so the short ends meet. Whipstitch the two layers together across the last 5 sts at the ends, which makes a 1.25 in (3.2 cm) stem. The loop above the stem stands 2.5 in (6.4 cm) tall. Leave a 12 in (30.5 cm) tail.
Make All Pieces
- Mustard: 1 center
- Butter yellow: 5 petals, 3 cups, 1 hanging loop
Layout (front view):
              [ Loop ]
             [ Petal 1 ]
   [ Petal 5 ] [Center] [ Petal 2 ]
     [ Petal 4 ]     [ Petal 3 ]
       [ Cup A ][ Cup B ][ Cup C ]
Petal 1 points straight up. The cups sit on the front, across Petals 3 and 4.
Joining
Step A – Petals to center (Rnd 6). Place the center RS up. Lay the five petals RS up behind it, with each petal’s foundation chain tucked just under the edge of Rnd 5. Each petal base has 12 foundation chains, and the center has 60 sts. Because 5 × 12 = 60, every center stitch matches exactly one petal chain.
Rnd 6: Join butter yellow in any center st and ch 1. Working through the center st and the matching petal chain together, work 12 sc across Petal 1. Repeat for Petals 2–5, working clockwise. Join with a sl st to the first sc. (60 sc: 5 petals × 12 sc)
The petals now touch at their bases and fan outward, with open valleys between them. The center measures 4.75 in (12.1 cm), and the flower is about 13.25 in (33.7 cm) across.
Tension: Keep the joining stitches relaxed and even. Stitches that are too tight make the center cup and bunch up the petal bases. Stitches that are too loose let the petals droop.
You’ll attach the cups (Step B) and the loop (Step C) after the border.
Border
The border uses the same gauge as the cups: 16 sc and 18 rows = 4 in (10.2 cm). Its two rounds add 0.25 in (0.6 cm) to every edge, which brings the flower to 13.75 in (34.9 cm).
Edge of one petal:
– Sides: Each side has 7 dc row-ends (Rows 1–7). At 2 sc per row-end, that gives 14 stitch positions per side.
– Top: Row 8 has 28 sts.
Rnd 1: With RS facing, join butter yellow at the valley between Petals 1 and 2. Then work each petal in turn, going clockwise:
- Valley: Work sc2tog, using the last Row 1 position of the previous petal and the first Row 1 position of this petal. (1 st)
- Up the side: Work 1 sc in the rest of the Row 1 end, then 2 sc in each row-end of Rows 2–7. (13 sts)
- Across the top: 2 sc in the first sc, sc in the next 12 sts, sc2tog over the two sl sts, sc in the next 12 sts, 2 sc in the last sc. (2 + 12 + 1 + 12 + 2 = 29 sts)
- Down the other side: Work 2 sc in each row-end of Rows 7–2, then 1 sc in the Row 1 end. Leave the second position of that Row 1 end for the next valley. (13 sts)
Each petal takes 1 + 13 + 29 + 13 = 56 sts. Join with a sl st to the first st. (280 sts: 5 petals × 56 sts)
Why the math works: If the petals didn’t share valleys, each one would take 14 + 29 + 14 = 57 sts, or 285 sts for all five. Each of the 5 valleys combines two side positions into one sc2tog, which removes 5 sts: 285 − 5 = 280. The sc2tog stitches keep the valleys and notches sharp, and the 2-sc corners help the stitches turn smoothly around the lobes.
Rnd 2: Ch 1, reverse sc in each st around. (280 + 0 = 280 sts) Join with a sl st and fasten off.
Step B – Attach the Cups
Block the flower first and let it dry completely.
- Place Cup B on the center line, with its rim just below the lower edge of the mustard center.
- Place Cups A and C on either side so they touch Cup B. Line up all three bases with the bottom of Petals 3 and 4.
- Sew the back walls: Using each cup’s tail, whipstitch two vertical columns of the back wall (Rnds 7–22) to the flower.
- Tack the bases: Secure each base ridge in 4–5 places.
- Join the cups: Sew neighboring cups together at the rims and at the base ridges.
Step C – Attach the Loop
Center the loop stem on the WS of Petal 1, overlapping the petal by 1.25 in (3.2 cm). Whipstitch around the stem through the back of the petal only, so the stitches don’t show on the front. The loop should rise 2.5 in (6.4 cm) above the notch.
Final Blocking
- Block the flower before you sew on the cups.
- Mist the flower until it is damp but not soaked.
- Lay it RS up on the mat and ease it out to 13.75 in (34.9 cm) across.
- Pin the center into a true circle, 4.75 in (12.1 cm) across.
- Pin the top of each lobe, then pin each notch inward.
- Check that every petal is 4.25 in (10.8 cm) long, not counting the border.
- Let it dry completely, for at least 12 hours.
- For the cups, stuff each one with a rolled towel, mist it, and let it dry upright.
Final Quality-Control Checklist
- The center lies flat and measures 4.75 in (12.1 cm).
- Every petal has 28 sts in Row 8 and a clear notch.
- Rnd 6 has 60 sc, 12 per petal.
- Border Rnd 1 has 280 sts, 56 per petal.
- The flower measures 13.75 in (34.9 cm) across.
- Each cup has 36 sts and stands 3.75 in (9.5 cm) tall.
- The cups are level, touching, and sewn together at the rims.
- The loop is centered and secure.
- All ends are woven in on the WS.
Troubleshooting
- Center ruffles: Your tension is too loose, or there are extra increases. Go down a hook size and recount.
- Center cups: Your tension is too tight. Go up a hook size.
- Petals curl: This is normal before blocking. Wet block and pin them flat.
- Notch is shallow: Check that both middle sts in Row 8 are sl sts, and that the border has a sc2tog there.
- Valleys pucker: Work only one sc2tog per valley.
- Cups lean forward: Add more stitches along the back wall and tack the base ridges more often.
- Flower sags on the wall: Sew felt behind the center and lower petals.
Care
Hand wash in cool water with mild soap. Press out the water in a towel, dry flat, and reshape the cups while they are damp.

Final Notes
Here is the measurement chain from start to finish:
- The center measures 4.5 in (11.4 cm), growing to 4.75 in (12.1 cm) after the 60-stitch joining round.
- Five petals of 4.25 in (10.8 cm) bring the flower to 13.25 in (33.7 cm).
- The 0.25 in (0.6 cm) border finishes it at 13.75 in (34.9 cm).
- Three cups, each 3 in (7.6 cm) wide, sit across the lower petals.
- The 2.5 in (6.4 cm) loop finishes the top.
Check each measurement as you go, and the organizer will come together cleanly.
Happy crocheting!