

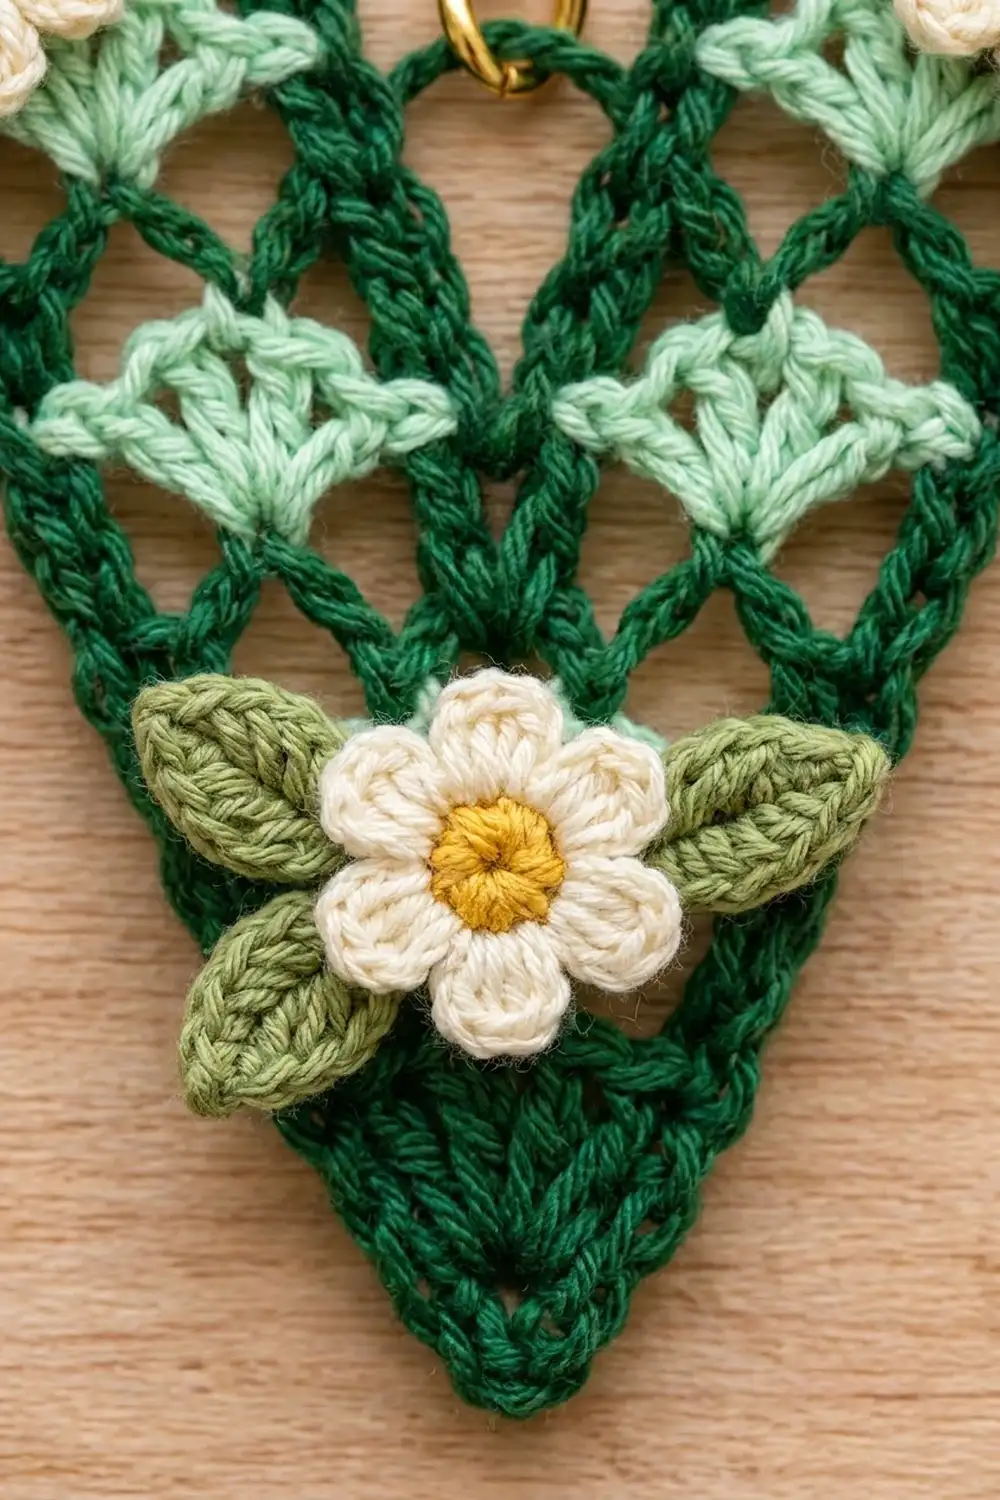
This letter V keychain combines a dark forest green lattice with light mint fans. It is a small lace project that looks lovely clipped to a tote bag, a pencil case or a set of keys. Three tiny cream daisies with golden centers and olive-sage leaves make it look like a little garden.
The style is light, open and a bit vintage. The deep green frame keeps the letter crisp, and the mint fans give the lace a soft, airy look. This pattern uses US crochet terms throughout.
The finished V measures 4 in (10.2 cm) tall and 4 in (10.2 cm) wide, including the border.
You work the letter in one piece from the bottom point upward. A few solid sc rows form the tip. Next comes one center fan, and then the work splits into two arms. Each arm is worked in rows as a slanted column of fans, and each fan is placed a little farther out than the one below it, which is what angles the arms. One round of sc border tidies every edge. Finally, you sew on the flowers and leaves and add the hardware.
Finished Size and Construction
- Finished size: 4 in (10.2 cm) tall × 4 in (10.2 cm) wide
- Skill level: Intermediate (lace rows plus small color changes)
- Terminology: US
- Yarn weight: Sport (#2) cotton
- Hook: 2.75 mm (C-2)
- Number of pieces: 1 letter V, plus 3 flower and 7 leaf appliqués
- Layout: solid point, 1 base fan, then 2 arms with 3 fans each
- Arm width at top: 1.33 in (3.4 cm); gap between the arms at the top: 1.1 in (2.8 cm)
- Size before border: 3.75 in (9.5 cm) tall × 3.75 in (9.5 cm) wide
- Border depth: 1/8 in (0.3 cm) on every side
Materials
Choose a smooth mercerized or matte sport-weight cotton. Cotton holds the lace crisply and won’t pill when it rubs against a bag. The weights below assume about 150 m per 50 g.
- Dark forest green (frame and border): 8 g, 24 m
- Light mint green (fans): 3 g, 9 m
- Cream (petals): 3 g, 9 m
- Golden yellow (flower centers): 1 g, 3 m
- Olive-sage green (leaves): 2 g, 6 m
All quantities include a margin of roughly 25% for tails and gauge swatches.
Tools:
– 2.75 mm (C-2) crochet hook
– Tapestry needle
– Scissors
– 4 locking stitch markers
– Rustproof pins and a foam blocking mat
– Spray starch (optional, for extra crispness)
– Gold hardware: one 0.4 in (1.0 cm) jump ring, about 1.25 in (3.2 cm) of chain, and one 1.2 in (3.0 cm) split key ring
– Two pairs of flat-nose pliers
Abbreviations (US Terms)
- ch – chain
- sl st – slip stitch
- sc – single crochet
- hdc – half double crochet
- dc – double crochet
- sc2tog – single crochet 2 together
- sk – skip
- sp – space
- st(s) – stitch(es)
- RS / WS – right side / wrong side
- rnd – round
Special technique – Mint Fan: With green, make the chains before the fan, but work the last chain with mint: drop green, yarn over with mint and pull through. Using mint, work the stated number of dc into the stated stitch or space. On the last dc, stop when 2 loops remain on the hook. Drop mint, yarn over with green and pull through. Cut mint, leaving a 4 in (10.2 cm) tail. Work over both mint tails in the next row, or weave them in later.
Gauge and Checkpoints
Gauge: 12 sc and 13 sc rows = 2 in (5.1 cm) square. That is 6 sc and 6.5 rows per inch.
Test piece: Work Rows 1–6 first and measure before going any further.
- After Row 4: 9 sc = 1.5 in (3.8 cm) wide; 0.6 in (1.5 cm) tall.
- After Row 6: about 2 in (5.1 cm) wide; 1.35 in (3.4 cm) tall.
- Each arm band (2 rows): 0.75 in (1.9 cm) tall, shifting outward about 0.3 in (0.8 cm).
- After Row 8: 2.1 in (5.3 cm) tall.
- After Row 10: 2.85 in (7.2 cm) tall.
- After Row 12: 3.6 in (9.1 cm) tall.
- After Row 13: 3.75 in (9.5 cm) tall × 3.75 in (9.5 cm) wide.
If the piece is too big, go down to a 2.5 mm hook. If it is too small, go up to a 3.0 mm hook. Lace grows a little during blocking, so being 1/8 in (0.3 cm) small before blocking is fine.
The Point (Dark Green)
Row 1 (RS): Ch 2, 3 sc in 2nd ch from hook. Turn. (3 sc)
Row 2 (WS): Ch 1, 2 sc in first st, sc in next st, 2 sc in last st. Turn. (5 sc)
Row 3: Ch 1, 2 sc in first st, sc in next 3 sts, 2 sc in last st. Turn. (7 sc)
Row 4: Ch 1, 2 sc in first st, sc in next 5 sts, 2 sc in last st. Turn. (9 sc)
Check that the point measures 1.5 in (3.8 cm) across.
The Base Fan
Row 5 (RS): Ch 1, sc in first st, ch 2, sk 3 sts, Mint Fan of 7 dc in next st (the 5th, center st), ch 2, sk 3 sts, sc in last st. Turn.
(2 sc, 2 ch-2 sps, one 7-dc fan)
Row 6 (WS): Ch 3 (counts as dc), dc in first sc, ch 4, sk ch-2 sp and 3 dc, sc in 4th (center) dc of fan, ch 4, sk 3 dc and ch-2 sp, 2 dc in last sc. Turn.
(Two 2-dc edge groups, 2 ch-4 sps, 1 center sc)
Place a marker in the center sc. Both arms grow from this stitch, so it becomes the inner point (crotch) of the V.
First Arm
Each arm band has two rows: a Fan Row and a Net Row. The ch-loops of the Net Row rise up to the fan’s center and meet the chains of the Fan Row below, which outlines each fan in a green diamond. In every Net Row, the inner edge starts one space farther out and the outer edge gains a 3-dc group, so the whole band moves outward.
Row 7 (RS, Fan Row): Ch 1, sc in first dc, ch 1, sk next dc, Mint Fan of 5 dc in ch-4 sp, ch 2, sc in marked center sc. Turn. Leave the rest unworked.
(2 sc, 1 ch-1 sp, 1 ch-2 sp, one 5-dc fan)
Row 8 (WS, Net Row): Sl st in ch-2 sp, ch 5 (counts as dc + ch 2), sc in 3rd (center) dc of fan, ch 3, sk 2 dc and ch-1 sp, 3 dc in last sc. Turn.
(Inner dc, ch-2 sp, center sc, ch-3 sp, 3-dc outer group)
Row 9 (Fan Row): Ch 1, sc in first dc, ch 1, sk next 2 dc, Mint Fan of 5 dc in ch-3 sp, ch 2, sk center sc and ch-2 sp, sc in 3rd ch of turning ch-5. Turn.
(2 sc, 1 ch-1 sp, 1 ch-2 sp, one 5-dc fan)
Row 10: Repeat Row 8.
Row 11: Repeat Row 9.
Row 12: Repeat Row 8.
Row 13 (RS, top): Ch 1, sc in each of 3 dc, 2 sc in ch-3 sp, sc in center sc, sc in ch-2 sp, sc in 3rd ch of turning ch-5. (8 sc) Fasten off.
Second Arm
Row 7 (RS, Fan Row): With RS facing, join green with a sl st in the marked center sc. Ch 1, sc in same sc, ch 2, Mint Fan of 5 dc in ch-4 sp, ch 1, sk next dc, sc in top of turning ch-3. Turn.
(2 sc, 1 ch-2 sp, 1 ch-1 sp, one 5-dc fan)
Row 8 (WS, Net Row): Ch 3 (counts as dc), 2 dc in first sc, ch 3, sk ch-1 sp and 2 dc, sc in 3rd (center) dc of fan, ch 2, sk 2 dc, dc in ch-2 sp. Turn. Leave the inner sc unworked.
(3-dc outer group, ch-3 sp, center sc, ch-2 sp, inner dc)
Row 9 (Fan Row): Ch 1, sc in first dc, ch 2, sk ch-2 sp and center sc, Mint Fan of 5 dc in ch-3 sp, ch 1, sk 2 dc, sc in top of turning ch-3. Turn.
Rows 10–12: Repeat Rows 8, 9 and 8.
Row 13 (RS, top): Ch 1, sc in first dc, sc in ch-2 sp, sc in center sc, 2 sc in ch-3 sp, sc in each of 3 dc. (8 sc) Fasten off.
The finished V now has 7 fans: 1 at the base and 3 on each arm.
Flower Appliqués (Make 3)
Rnd 1: With golden yellow, make a magic ring and work 5 sc into it. Sl st to first sc. (5 sc) Fasten off.
Rnd 2: Join cream in any sc. *(Sl st, ch 2, 2 dc, ch 2, sl st) in the same sc, move to the next sc; repeat from * 4 more times. (5 petals)
Fasten off, leaving a 10 in (25.4 cm) tail. Each flower measures about 0.75 in (1.9 cm) across.
Leaf Appliqués (Make 7)
With olive-sage, ch 6. Sc in 2nd ch from hook, hdc in next ch, dc in next ch, hdc in next ch, (sc, ch 2, sc) in last ch for the tip. Working along the other side of the foundation chain: hdc in next ch, dc in next ch, hdc in next ch, sc in last ch. Sl st to first sc.
(10 sts + ch-2 tip)
Fasten off, leaving an 8 in (20.3 cm) tail. Each leaf is about 0.6 in (1.5 cm) long.
Border
Border gauge: 6 sc = 1 in (2.5 cm) along every edge.
Work the border in dark green with RS facing. Join green at the tip of the point, at the base of Row 1.
Rnd 1:
- Tip: 3 sc into the base of Row 1. (3)
- First outer edge, working upward: 1 sc in the side of each of Rows 1–4, 2 sc in the side of Row 5, 3 sc in the side of Row 6. Then work 2 sc in the side of each Fan Row and 3 sc in the side of each Net Row up to Row 12. (24)
- Top of arm: 3 sc in first sc of Row 13, sc in next 6 sc, 3 sc in last sc. This is 8 sts worked once each, plus 4 extra at the corners. (12)
- Inner edge, working downward: 3 sc in the side of each Net Row and 2 sc in the side of each Fan Row, Rows 12 to 7. (15)
- Crotch: sc2tog, inserting the hook once at the base of this arm’s inner edge and once at the base of the other arm’s inner edge. (1)
- Second inner edge, working upward: 2 sc in the side of each Fan Row and 3 sc in the side of each Net Row, Rows 7 to 12. (15)
- Top of second arm: same as step 3. (12)
- Second outer edge, working downward: reverse step 2. (24)
Sl st to the first sc.
Total: 3 + 24 + 12 + 15 + 1 + 15 + 12 + 24 = 106 sc. Fasten off.
Why the math works:
– Outer edges: each outer edge runs about 4.2 in (10.7 cm) on the diagonal. 24 sc at 6 per inch gives 4 in (10.2 cm), which is just snug enough to keep the long edges straight.
– Inner edges: each inner edge runs about 2.5 in (6.4 cm), and 15 sc gives exactly 2.5 in (6.4 cm).
– Tops: each top keeps 1 sc per existing st. The extra 2 sc at each corner let the corners turn without cupping.
– Size: one round of sc adds 1/8 in (0.3 cm) on each side, so 3.75 in (9.5 cm) becomes 4 in (10.2 cm) in both directions.
Final Blocking
- Weave in all tails, including the 14 mint fan tails. Run each one along the dark green lattice so it stays hidden.
- Mist the V until damp, or soak it briefly and press it in a towel.
- Pin the tip, the four top corners and the crotch onto the foam mat at 4 in (10.2 cm) tall × 4 in (10.2 cm) wide.
- Pin each arm’s outer edge straight. Check that the arm tops measure 1.33 in (3.4 cm) and the gap between them measures 1.1 in (2.8 cm).
- Open every fan with a pin so it spreads upward into a full half-circle.
- Spray lightly with starch if you want a stiffer keychain. Let it dry completely.
- Side flowers: Sew one flower over the outer edge of each arm at the height of that arm’s middle fan (Rows 9–10). Tuck 2 leaves behind each flower so they peek past the border, one pointing up and out and one pointing down and out.
- Bottom flower: Sew the third flower over the base fan, centered just above the tip. Tuck 3 leaves behind it: one to the left, one to the right and one angled down to one side.
- Hardware: Open the jump ring with the two pliers. Thread it through the sc2tog at the crotch and through the Row 6 center sc beneath it, add one end of the chain, then close the ring. Attach the split key ring to the other end of the chain.
Final Quality-Control Checklist
- 7 mint fans, each one framed by a green diamond.
- Arm tops each have 8 sc before the border.
- Border total is 106 sc, with 3 sc at every outer corner.
- Size is 4 in × 4 in (10.2 cm × 10.2 cm) after blocking.
- Both arms angle out evenly and mirror each other.
- No mint tails are visible from the front.
- Flowers and leaves are stitched firmly through the lattice and don’t flap.
- The jump ring is fully closed and the chain hangs straight.
Troubleshooting
- Arms stand straight up instead of angling out: You probably skipped the 3-dc outer group or started a Net Row in the wrong place. Each Net Row must begin in the ch-2 sp, or end there on the Second Arm.
- Fans look crowded: Your ch-3 sps are too tight. Loosen your chains or go up half a hook size.
- Outer edges ripple: Work 2 sc instead of 3 in the side of one or two Net Rows, keeping both outer edges the same.
- Crotch gapes open: Pull the sc2tog firmly and anchor the jump ring through both layers.
- Green shows inside a fan: Make sure the last chain before each fan is worked in mint.
Care
Hand wash in cool water with mild soap, press the water out in a towel, and dry flat. Reshape the fans while the piece is damp, and starch again if needed.

Final Notes
Here is the whole measurement chain in order:
- The point is 1.5 in (3.8 cm) wide at 0.6 in (1.5 cm) tall.
- The base fan brings the height to 1.35 in (3.4 cm).
- The three arm bands add 0.75 in (1.9 cm) each.
- The top row finishes the piece at 3.75 in (9.5 cm) square.
- The 106-st border brings it to 4 in (10.2 cm) square.
If you check each stage against these numbers, your V will come out balanced and ready for its daisies.
Happy crocheting!