
This little stocking is small enough to stand on a mantel, tuck into a gift box, or line up along a windowsill. It is a seamless three-dimensional tube with a closed, flat base, so it stands upright on its own. Every section has texture: knit-look ribbing at the top and bottom and raised horizontal ridges through the middle.
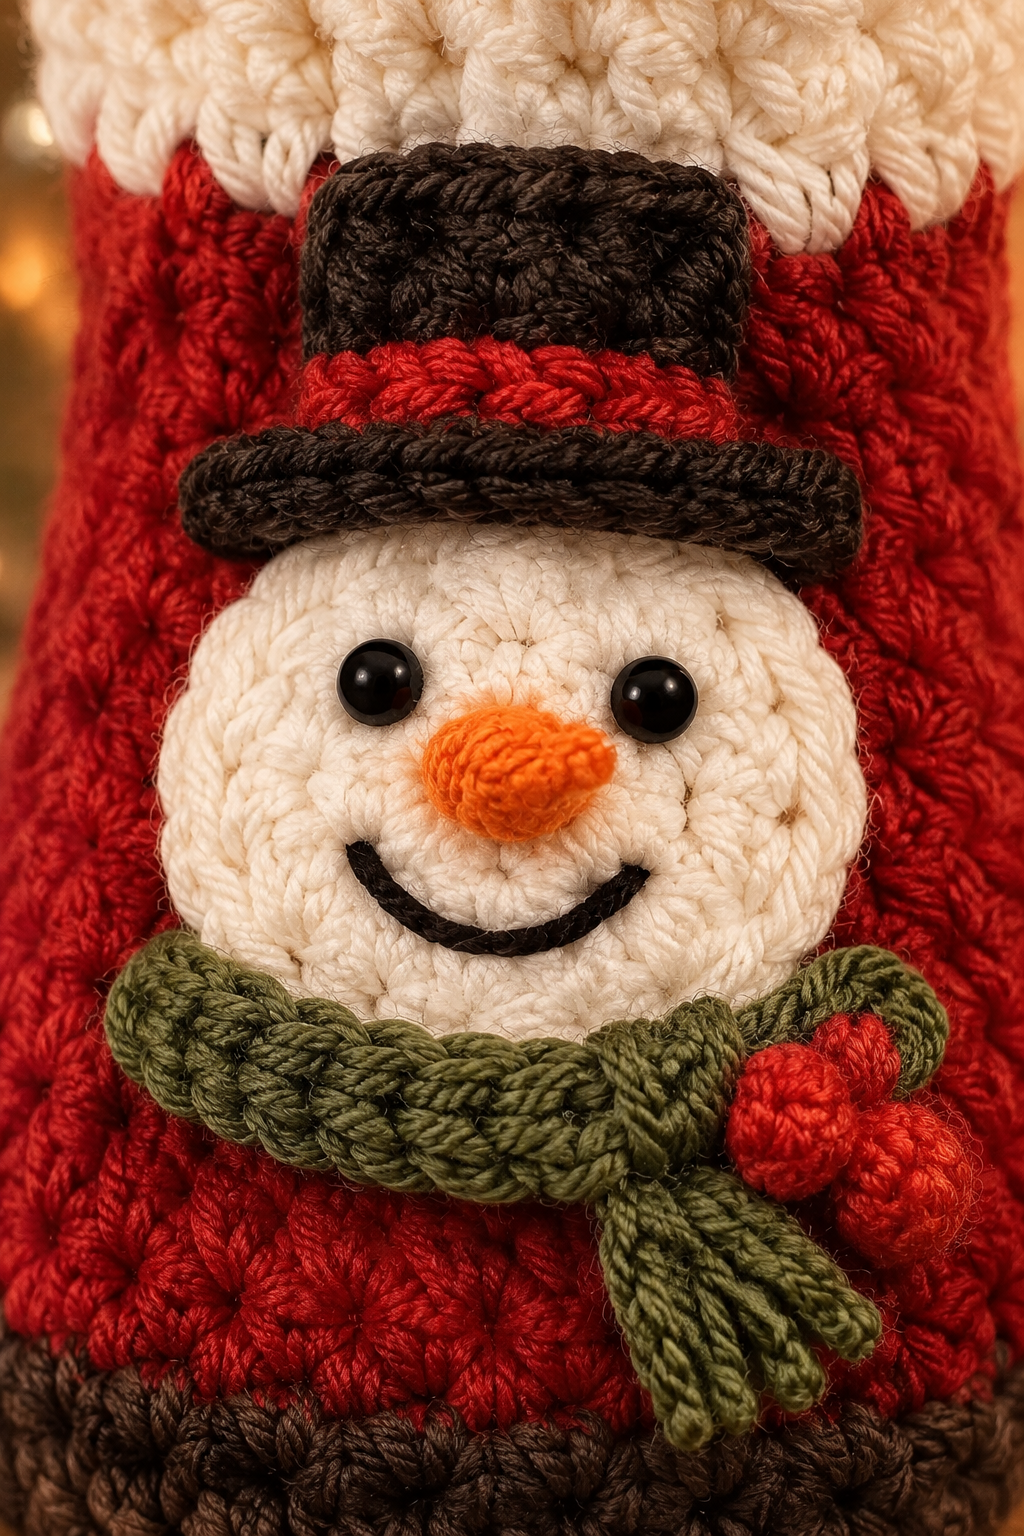
The color story is classic Christmas. A dark brown ribbed band forms the foot and heel area at the bottom. A deep red ridged body fills the middle, and a cream ribbed cuff finishes the top. On the front of the red body sits a snowman face appliqué. It has a softly rounded cream head, two black bead eyes, an orange cone nose, an embroidered black smile, and a small green scarf wrapped at the neck.
The pattern uses US crochet terms. The finished stocking measures 3.75 in (9.5 cm) tall and 2.5 in (6.4 cm) wide when laid flat, with a circumference of 5 in (12.7 cm).
The construction is simple. You crochet a flat circular base, turn the edge upward, and work the tube in joined rounds, changing color for each section. The cream ribbed cuff and a slip stitch edge finish the top. The head, nose, and scarf are made separately and sewn on.
Finished Size and Construction
- Finished size: 3.75 in (9.5 cm) tall x 2.5 in (6.4 cm) wide, laid flat
- Circumference: 5 in (12.7 cm)
- Skill level: Easy-intermediate (front and back post stitches, small amigurumi shaping)
- Terminology: US crochet terms
- Yarn weight: Worsted weight (#4)
- Hooks: 4.0 mm (G-6) for the stocking; 3.25 mm (D-3) for the appliqués
- Number of pieces: 1 finished stocking. The body is one continuous tube, and the head, nose, and scarf are appliquéd onto it.
- Layout: A single upright tube with the snowman centered on the front, opposite the round joins
- Piece size: 2.5 in x 3.75 in (6.4 cm x 9.5 cm), laid flat
- Size before border: 2.5 in x 2.75 in (6.4 cm x 7.0 cm), after the brown and red sections
- Border depth: 1 in (2.5 cm) cream ribbed cuff
Materials
Yarn: Use a smooth worsted weight acrylic or cotton blend. Smooth yarn makes the post stitches easy to see and gives the ribbing crisp definition. Avoid fuzzy or brushed yarn, which blurs the ridges.
- Dark brown: 5 g, about 10 m (base and bottom rib)
- Deep red: 5 g, about 10 m (body)
- Cream: 6 g, about 12 m (cuff and snowman head)
- Orange: 1 g, about 2 m (nose)
- Green: 1 g, about 2 m (scarf)
- Black embroidery floss: 12 in (30.5 cm) for the smile
Tools and notions:
- 4.0 mm (G-6) and 3.25 mm (D-3) crochet hooks
- 2 black beads, 4 mm
- Sewing needle and black thread
- Tapestry needle
- 1 stitch marker
- Small pinch of polyester fiberfill
- Scissors
- Optional: a 1.5 in (3.8 cm) cardboard circle to stiffen the base
All quantities include a small margin for swatching and weaving in ends.
Abbreviations (US Terms)
- ch – chain
- sl st – slip stitch
- sc – single crochet
- hdc – half double crochet
- inc – 2 sc in the same stitch
- dec – sc2tog (invisible decrease recommended)
- MR – magic ring
- BLO – back loop only
- st(s) – stitch(es)
- rnd – round
Special stitches:
- FPdc (front post double crochet): Yarn over. Insert the hook from front to back to front around the post of the stitch below. Complete as a dc.
- BPdc (back post double crochet): Yarn over. Insert the hook from back to front to back around the post of the stitch below. Complete as a dc.
Alternating these two stitches creates the 1×1 knit-look rib.

Gauge and Checkpoints
Gauge matters here because every round uses the same 20-stitch count. Width is controlled entirely by your tension.
Stocking gauge (4.0 mm hook):
- 4 sts = 1 in (2.5 cm) in sc, hdc BLO, and rib
- 4 rnds of hdc BLO = 1.5 in (3.8 cm)
- 2 rnds of FPdc/BPdc rib = 1 in (2.5 cm)
- 1 rnd of sc = 0.25 in (0.6 cm)
Appliqué gauge (3.25 mm hook): 5 sc = 1 in (2.5 cm)
Test piece first: Work the base (Rnds 1–4) and measure it before going further. The base is a quick, built-in gauge swatch.
Checkpoints:
- After Rnd 4: Base diameter is 1.6 in (4.1 cm).
- After Rnd 7: Height from the table is 1.25 in (3.2 cm). Flat width is 2.5 in (6.4 cm).
- After Rnd 11: Height is 2.75 in (7.0 cm).
- After Rnd 14: Height is 3.75 in (9.5 cm).
- Snowman head: About 1.1 in (2.8 cm) across.
If the piece is too big: Go down a hook size, such as 3.75 mm (F-5).
If the piece is too small: Go up a hook size, such as 4.5 mm (7).
Never add or remove stitches to fix size. The ribbing needs an even count, and the 20-stitch tube is planned around that.
Stocking Base (Dark Brown)
Use the 4.0 mm hook. The base is worked in continuous spirals. Mark the first stitch of each round.
- Rnd 1: 6 sc in MR. (6 sts)
- Rnd 2: Inc in each st around. (12 sts)
- Rnd 3: (Sc 1, inc) x 6. (18 sts)
- Rnd 4: (Sc 8, inc) x 2. (20 sts)
Rnd 4 adds only 2 stitches instead of the usual 6. This keeps the base small and holds the stitch count at 20, which divides evenly for the 1×1 rib.
Sl st into the next st to even out the spiral. From here on, every round is joined.
Checkpoint: The base lies flat and measures 1.6 in (4.1 cm) across.
Bottom Rib: Foot and Heel Area (Dark Brown)
Rnd 5 (turning round): Ch 1. Sc in the BLO of each st around. Join with a sl st to the first sc. (20 sts)
This is a conversion round: 20 sts worked one per existing stitch, plus 0 added. The unused front loops form a crisp ridge, and the edge naturally turns upward to start the walls.
Rnd 6: Ch 2 (does not count as a stitch). FPdc around the next st, BPdc around the next st; repeat from * 9 more times. Join to the first FPdc. (20 sts: 10 FPdc + 10 BPdc)
Rnd 7: Ch 2. FPdc around the FPdc, BPdc around the BPdc; repeat from * 9 more times. Join to the first FPdc. (20 sts)
Change to red on the final pull-through of the join.
Checkpoint: The brown section stands 1.25 in (3.2 cm) tall: 0.25 in (0.6 cm) for Rnd 5 plus 1 in (2.5 cm) for the rib. The flat width is 2.5 in (6.4 cm).
Optional: Drop the cardboard circle inside now so it rests on the base.
Red Body
Work Rnds 8–11 as follows, joining each round.
Rnds 8–11: Ch 2 (does not count). Hdc in the BLO of each st around. Join to the first hdc. (20 sts per rnd)
These four rounds keep a steady 20 stitches. Working in the back loop leaves a raised horizontal bar on the outside of every round, which gives the body its textured, ribbed look.
Change to cream on the join of Rnd 11.
Checkpoint: Total height is 2.75 in (7.0 cm). The red section adds 1.5 in (3.8 cm).
Lay the stocking flat with the join line at the center back. The center front, directly opposite, is where the snowman will go.
Snowman Head (Cream)
Use the 3.25 mm hook. Work in continuous spirals.
- Rnd 1: 6 sc in MR. (6 sts)
- Rnd 2: Inc in each st around. (12 sts)
- Rnd 3: (Sc 1, inc) x 6. (18 sts)
- Rnd 4: Sc in each st around. (18 sts)
- Rnd 5: (Sc 1, dec) x 6. (12 sts)
Stuff lightly. The head should be a soft, rounded ball that will press slightly flat against the stocking, not a firm sphere.
- Rnd 6: Dec x 6. (6 sts)
Fasten off, leaving a 6 in (15.2 cm) tail. Thread the tail through the front loops of the last 6 sts and pull closed.
Checkpoint: The head is about 1.1 in (2.8 cm) across.
Nose (Orange)
Use the 3.25 mm hook.
- Rnd 1: 3 sc in MR. Pull the ring tight; this forms the tip. (3 sts)
- Rnd 2: Inc in the first st, sc in the next 2 sts. (4 sts)
Fasten off, leaving a 6 in (15.2 cm) tail. The nose is a small cone about 0.3 in (0.8 cm) long.
Scarf (Green)
Use the 3.25 mm hook.
- Row 1: Ch 16. Sc in the 2nd ch from the hook and in each ch across. (15 sts)
Fasten off, leaving a 6 in (15.2 cm) tail. The strip is 3 in (7.6 cm) long and about 0.25 in (0.6 cm) wide.
Face Details and Assembly
- Eyes: Sew the two 4 mm beads onto the head with black thread. Place them about 0.25 in (0.6 cm) apart, slightly above center. Knot securely inside.
- Nose: Sew the cone just below and between the eyes, wide end against the head, tip pointing outward.
- Smile: Backstitch a gentle curve of 5 small stitches with black floss, below the nose.
- Attach the head: Center it on the front of the red body. The top of the head should sit just under the cream cuff line. Whipstitch around the back edge with the cream tail, catching the red ridges.
- Attach the scarf: Lay the strip along the lower edge of the head, wrapping from one side to the other. Cross the ends at one side and let one end hang down about 0.75 in (1.9 cm) over the top of the brown rib. Tack it down with a few small stitches.
Child safety: Beads are a choking hazard. If the stocking will be handled by a young child, embroider the eyes with black yarn instead.
Border: Ribbed Cream Cuff
The border is the cream cuff plus a slip stitch edge. It is worked directly onto the red body, so there are no seams to join.
Border gauge: 4 sts = 1 in (2.5 cm) in width. 2 rib rnds = 1 in (2.5 cm) in height. This is the same width gauge as the body, so the tube stays straight instead of flaring.
Per-side counts: With the stocking laid flat, each side (front and back) holds 10 of the 20 stitches. The folds at the left and right edges fall within those 10, so nothing is counted twice.
Rnd 12: Ch 2. FPdc around the next hdc, BPdc around the next hdc; repeat from * 9 more times. Join to the first FPdc. (20 sts: 5 FPdc + 5 BPdc per side)
Rnd 13: Ch 2. FPdc around the FPdc, BPdc around the BPdc; repeat from * 9 more times. Join. (20 sts: 10 per side)
Rnd 14 (edge): Sl st loosely in the BLO of each st around. Join to the first sl st. (20 sl sts: 10 per side)
This is a conversion round: 20 sts worked one per existing stitch, plus 0 added. It adds a neat edge without adding measurable height.
Fasten off and weave in all ends on the inside.
Why the math works:
- 20 is even, so the 1×1 rib alternates perfectly and FPdc stacks on FPdc every round.
- 20 ÷ 2 = 10 sts per flat side.
- 10 sts ÷ 4 sts per in = 2.5 in (6.4 cm) of flat width, which matches the body exactly.
- Two rib rounds give the stated 1 in (2.5 cm) cuff depth.
Total height:
| Section | Height |
|---|---|
| Brown (Rnds 5–7) | 1.25 in (3.2 cm) |
| Red (Rnds 8–11) | 1.5 in (3.8 cm) |
| Cream (Rnds 12–14) | 1 in (2.5 cm) |
| Total | 3.75 in (9.5 cm) |
Final Blocking
- Stuff the tube firmly with tissue paper or fiberfill so it holds a round, upright shape.
- Push the base flat from inside and set the stocking upright on a flat surface.
- Hover a steam iron about 1 in (2.5 cm) above the red body. Never press directly on the fabric.
- Steam the ribbed sections only lightly. Too much heat flattens post-stitch texture.
- With your fingers, straighten the rib columns and nudge the snowman so it sits level.
- Let the stocking dry completely, then remove the stuffing.
- Measure: 3.75 in (9.5 cm) tall and 2.5 in (6.4 cm) wide flat.
Final Quality-Control Checklist
- [ ] Every stocking round has exactly 20 sts.
- [ ] FPdc columns line up in both the brown and cream ribs.
- [ ] The base sits flat and the stocking stands upright.
- [ ] Height is 3.75 in (9.5 cm); flat width is 2.5 in (6.4 cm).
- [ ] The round joins run in a straight line up the center back.
- [ ] The head is centered on the front and about 1.1 in (2.8 cm) across.
- [ ] Eyes are level and secure, the nose points outward, and the smile is even.
- [ ] The scarf is tacked down with one end hanging neatly.
- [ ] All ends are woven in on the inside.
Troubleshooting
Base cups instead of lying flat: Your tension is tight. Loosen up or go up a hook size, and redo Rnds 1–4.
Base ruffles: Your tension is loose. Go down a hook size.
Join line drifts sideways: Always join to the first stitch of the round, not the ch-2.
Rib looks messy: Check that each FPdc is worked around the previous FPdc. If you find a misplaced stitch, frog back to it.
Cuff flares outward: Work Rnd 14 a little more firmly, or use a hook one size smaller for that round only.
Head is too big for the red section: Make sure you used the 3.25 mm hook, and stuff it less.
Head looks lumpy: Use invisible decreases and pull the closing tail snug.
Care
Spot clean or hand wash in cool water. Reshape the stocking and dry it flat. Do not machine dry, which can loosen the appliqué and flatten the ribbing.
Final Notes
The whole stocking rests on one fixed number: 20 stitches at 4 stitches per inch. That gives a 5 in (12.7 cm) circumference and a 2.5 in (6.4 cm) flat width. The height then builds in clear stages:
- 1.6 in (4.1 cm) base
- 1.25 in (3.2 cm) brown rib
- 1.5 in (3.8 cm) red body
- 1 in (2.5 cm) cream cuff
- Total height: 3.75 in (9.5 cm)
Check each stage as you go, and the 1.1 in (2.8 cm) snowman head will fit neatly on the front.
Optional: make a second stocking to give as a matching pair.
Happy crocheting!