

The Starlit Crescent is a small, elegant ornament: a cream crescent moon with a textured bobble band and a picot-trimmed edge, plus a little gold star that hangs inside the curve of the moon. On a tree full of gold baubles and warm lights, the cream and metallic gold blend right into the décor.
The look is soft and classic. The moon reads as a clean C-shaped silhouette. A row of bobbles runs along the outer curve, and a row of tiny picots outlines both curved edges. The star is worked in gold glitter or metallic yarn so it catches the light.
This pattern uses US crochet terms. The finished moon measures 3.5 in (8.9 cm) from tip to tip, which is its widest point. The star measures 1.25 in (3.2 cm) across.
The moon is worked flat in three rows on a foundation chain. Graduated stitch heights and increases in Row 2 make the strip curl into a crescent. A two-round border adds the picots. The star is worked in the round from a magic ring and joined to the inner curve with a short chain tether. A chain hanging loop goes at the top tip.
Finished Size and Construction
- Finished size: 3.5 in (8.9 cm) tip to tip; band 1.5 in (3.8 cm) wide at the center
- Skill level: Easy / advanced beginner
- Terminology: US crochet terms
- Yarn weight: Light (DK / #3)
- Hook: 3.0 mm
- Number of pieces: 2 (1 moon, 1 star)
- Layout: Star hangs inside the moon’s inner curve; hanging loop at the top tip
- Piece sizes: Moon 3.5 in (8.9 cm); star 1.25 in (3.2 cm)
- Moon size before border: 3 in (7.6 cm) tip to tip; band 1 in (2.5 cm) wide
- Border depth: 0.25 in (0.6 cm) on each edge
Materials
Yarn advice: Use a smooth DK cotton or cotton blend for the moon so the bobbles and picots show clearly. For the star, use a gold metallic DK yarn, or a gold/tan DK cotton held together with a fine metallic thread for glitter.
- Cream (moon and hanging loop): 6 g, about 14 m (15 yd)
- Gold glitter (star and tether): 2 g, about 5 m (5.5 yd)
Quantities include a margin for your gauge swatch, joining, and weaving in ends.
Tools:
– 3.0 mm crochet hook
– Tapestry needle
– Scissors
– 2 stitch markers
– Blocking foam and rust-proof pins
– Spray bottle
– Optional: fabric stiffener or starch
Abbreviations (US Terms)
- ch – chain
- sl st – slip stitch
- sc – single crochet
- hdc – half double crochet
- dc – double crochet
- st(s) – stitch(es)
- sk – skip
- RS / WS – right side / wrong side
- rep – repeat
Special stitches:
- Bobble: (Yarn over, insert hook in st, pull up a loop, yarn over, pull through 2 loops) 4 times in the same st; 5 loops on hook. Yarn over, pull through all 5 loops. Counts as 1 st.
- Picot: Ch 3, sl st in 3rd ch from hook. Picots are not counted as stitches.
Gauge and Checkpoints
Gauge: 12 sc and 13 rows = 2 in (5.1 cm) with a 3.0 mm hook.
Make one moon first and check it before making more ornaments. Small ornaments magnify small gauge differences.
Checkpoints:
– After Row 1: The strip measures 4.3 in (10.9 cm) long, relaxed and flat.
– After Row 2: The strip curls into a loose arc. The center band is about 0.75 in (1.9 cm) wide.
– After Row 3: Tip to tip is 3 in (7.6 cm). The center band is 1 in (2.5 cm) wide.
– After the border: Tip to tip is 3.5 in (8.9 cm). The center band is 1.5 in (3.8 cm) wide.
– Star: 1.25 in (3.2 cm) from point to opposite notch.
If your moon is too big: go down to a 2.75 mm hook. If too small: go up to a 3.25 mm hook. Do not change the stitch counts. The curve depends on the ratio between the 26-st inner edge and the 33-st outer edge.
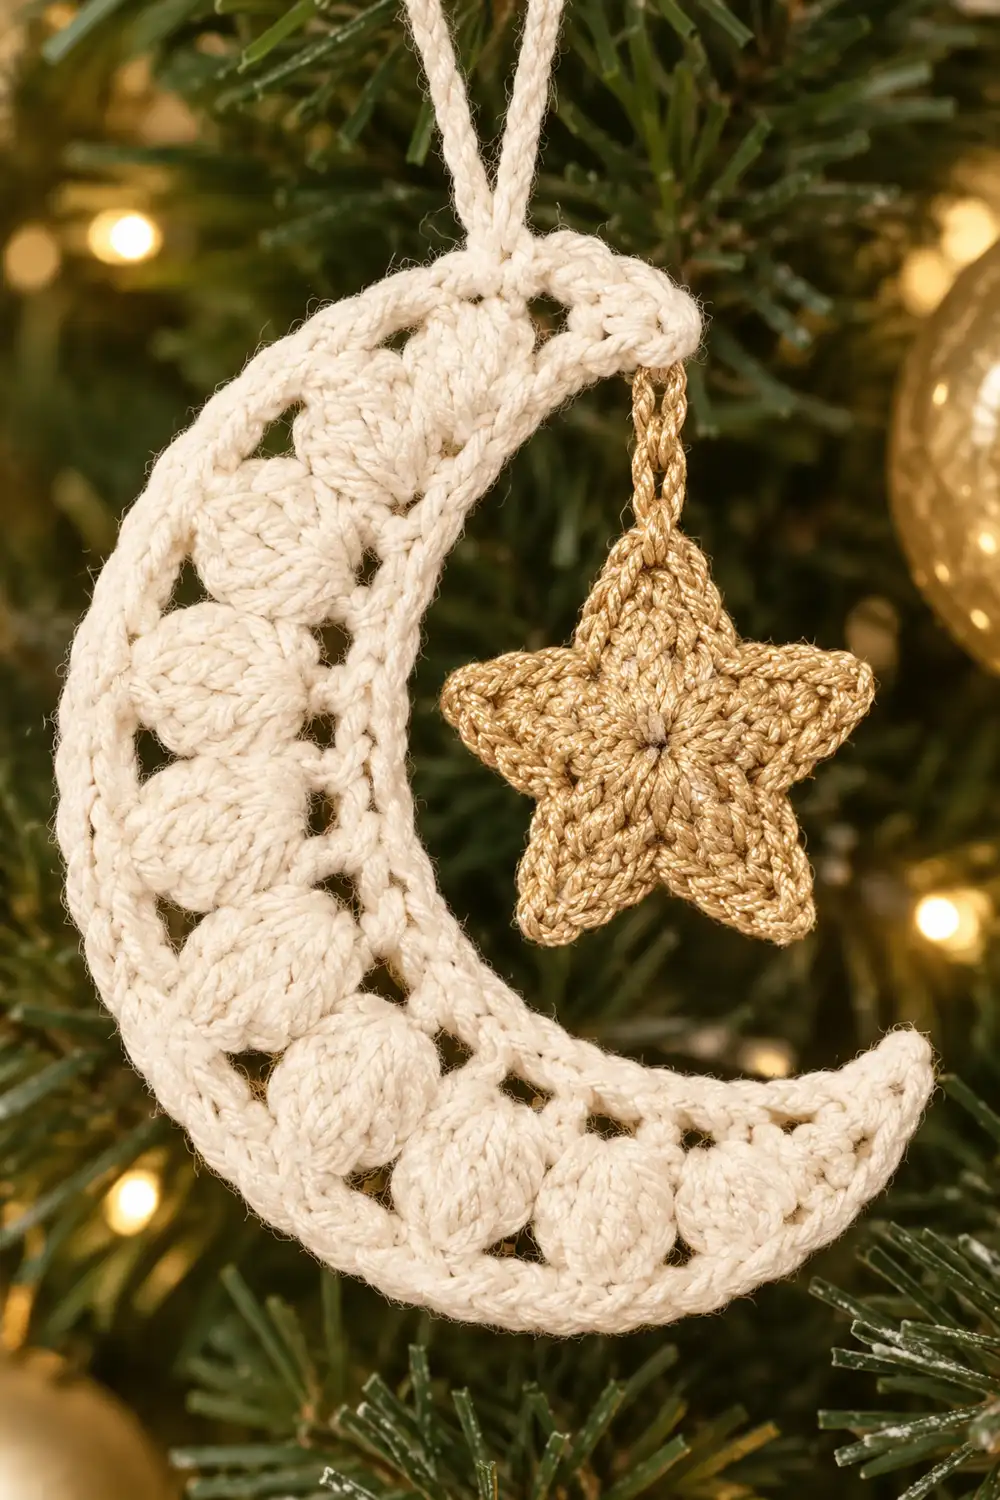
Moon Pattern
With cream, ch 27.
Row 1 (WS): Sc in 2nd ch from hook and in each ch across. Turn. (26 sc)
This row becomes the inner curve. Its unused foundation loops are worked again in the border.
Row 2 (RS): Ch 1 (does not count as a st). Sl st in first 2 sts, sc in next 2 sts, hdc in next 2 sts, (dc in next st, 2 dc in next st) 7 times, hdc in next 2 sts, sc in next 2 sts, sl st in last 2 sts. Turn. (33 sts: 2 sl st, 2 sc, 2 hdc, 21 dc, 2 hdc, 2 sc, 2 sl st)
The 7 increases turn 14 sts into 21 dc. The longer outer edge forces the strip to curl into a C. The short stitches at each end taper the tips.
Row 3 (WS, bobble row): Ch 1. Sl st in first 4 sts, sc in next 2 hdc, sc in next dc, (bobble in next dc, sc in next dc) 10 times, sc in next 2 hdc, sl st in last 4 sts. Turn. (33 sts: 8 sl st, 15 sc, 10 bobbles)
Count check: 4 + 2 + 1 + 20 + 2 + 4 = 33.
Because Row 3 is a WS row, the bobbles pop out toward the RS. Gently push each bobble forward with a fingertip as you go. Do not fasten off; the border begins from here.
Checkpoint: Tip to tip 3 in (7.6 cm), band 1 in (2.5 cm).
Make Both Pieces
This ornament has 2 pieces:
- Cream: 1 moon (plus hanging loop)
- Gold: 1 star (plus tether)
Make the moon through its border before making the star, so you can check the star’s size against the finished hollow.
Layout:
TOP:          CREAM HANGING LOOP
MAIN SHAPE:   CREAM CRESCENT MOON (opening to one side)
INNER CURVE:  GOLD STAR on a GOLD TETHER
Border
Border gauge: The border uses the same gauge as the moon, 6 sc per 1 in (2.5 cm). It is not tighter or looser. Each round works 1 sc per existing st along both curves, so the edges stay flat.
Edges: The moon has 4 edge sections: the outer curve (top of Row 3), Tip A, the inner curve (Row 1’s foundation loops), and Tip B.
Border Round 1 (RS): Ch 1. Working across the top of Row 3:
- Outer curve: Sc in each st across. (33 sc)
- Tip A: Work 1 sc in the end of each of Rows 3, 2, and 1. Place a marker in the middle sc. (3 sc)
- Inner curve: Working in the remaining loops of the foundation chain, sc in each loop across. (26 sc)
- Tip B: Work 1 sc in the end of each of Rows 1, 2, and 3. Place a marker in the middle sc. (3 sc)
Join with a sl st to the first sc. Do not turn.
Round 1 total: (33 + 26 sc worked 1 per existing st) + (6 sc worked into row ends) = 65 sc.
This is a conversion round. It does not add increases to the curves; it simply outlines the edge with sc.
Border Round 2 (RS, picot round): Ch 1.
- Outer curve: (Sc in next 2 sts, sc in next st, picot) 11 times. (33 sc, 11 picots)
- Tip A: Sc in next st, (sc, picot, sc) in the marked st, sc in next st. (4 sc, 1 picot)
- Inner curve: Sc in next st, (sc in next 2 sts, sc in next st, picot) 8 times, sc in next st. (26 sc, 8 picots)
- Tip B: Sc in next st, (sc, picot, sc) in the marked st, sc in next st. (4 sc, 1 picot)
Join with a sl st to the first sc. Fasten off and weave in ends.
Round 2 total: 67 sc and 21 picots.
Why the math works:
– 33 is divisible by 3, so the outer curve takes exactly 11 three-stitch repeats.
– The inner curve has 26 sts: 1 + (8 × 3) + 1 = 26. The single sc at each end gives the picots an even margin.
– Each tip gains exactly 1 sc (3 becomes 4), which keeps the points sharp without ruffling.
– The curves get no added stitches, so the crescent keeps the shape set by Row 2.
Checkpoint: Tip to tip 3.5 in (8.9 cm), band 1.5 in (3.8 cm).
Hanging loop: Choose either tip as the top. Join cream with a sl st into the marked middle sc of that tip, at the base of the picot. Ch 30, sl st in the same st. Fasten off and weave in the ends. The loop hangs about 2 in (5.1 cm) above the tip.
Star Pattern
With gold, make a magic ring.
Round 1: Ch 1, 10 sc in ring. Join with a sl st to the first sc. Pull the ring closed tightly. (10 sc)
Round 2: (Ch 4, sc in 2nd ch from hook, hdc in next ch, dc in next ch, sk next sc, sl st in next sc) 5 times. The last sl st lands in the joining st of Round 1. (5 points)
Each point uses 2 sts of Round 1: 5 × 2 = 10.
Fasten off and weave in ends. Shape each point between your fingers.
Checkpoint: 1.25 in (3.2 cm) across.
Joining
Method: The star is joined to the moon with a short gold chain tether, so it sits inside the inner curve.
Stitch-to-stitch logic:
- Hold the moon RS facing, with the hanging loop at the top.
- On the inner curve, count down from the top tip to the 9th sc of the 26 inner-curve sc. Place a marker. This puts the star about one-third of the way down the hollow.
- Join gold with a sl st at the tip of one star point, in the chain at the very end of the point.
- Ch 6. This tether is about 0.75 in (1.9 cm) long.
- Remove the hook from the loop. Insert the hook from front to back through the marked inner-curve sc. Pick up the dropped loop and pull it through.
- Yarn over and pull through to secure. Fasten off and weave the tail into the back of the moon’s border.
Tension advice: Chain the tether at the same tension as your foundation chain. If it is too tight, the star tilts and sits crooked. If it is too loose, the chain looks stringy.
Size checkpoint: Let the ornament hang from its loop. The star should hang freely inside the hollow, about 0.5 in (1.3 cm) from the inner edge, and should not cross the imaginary line between the two tips. If it hangs too low, redo the tether with ch 4. If it touches the moon, use ch 8.
Final Blocking
- Lightly mist the moon and star with water until damp, not soaked.
- Pin the moon RS up on blocking foam. Pin the two tips first, 3.5 in (8.9 cm) apart.
- Ease the outer curve into a smooth arc. Pin at the center and at each quarter point.
- Pin each outer and inner picot outward so it stands clear of the edge.
- Push each bobble up from behind so it sits rounded on the RS.
- Pin the 5 star points outward to 1.25 in (3.2 cm).
- Optional: brush a thin coat of fabric stiffener on the back for a firm ornament.
- Let everything dry completely, about 12 to 24 hours, before unpinning.
- Lay the hanging loop flat and straight while drying.
Final Quality-Control Checklist
- Moon measures 3.5 in (8.9 cm) tip to tip.
- Center band measures 1.5 in (3.8 cm).
- Row 3 shows 10 bobbles, all on the RS.
- Border Round 2 has 11 outer picots, 8 inner picots, and 1 picot at each tip (21 total).
- Both tips are pointed and lie flat.
- Star has 5 even points and measures 1.25 in (3.2 cm).
- Star is joined at the 9th inner-curve sc from the top tip.
- Star hangs freely inside the inner curve.
- Hanging loop is at the top tip and hangs about 2 in (5.1 cm).
- All ends are woven in on the WS.
Troubleshooting
The moon stays straight instead of curving. Check Row 2. It must have 21 dc in the middle from 7 increases. Missing increases flatten the curve.
The moon ruffles along the outer curve. Your dc may be loose. Try a 2.75 mm hook for Row 2 only, or recount: Row 2 should be exactly 33 sts.
The bobbles are on the wrong side. Row 3 must be worked on the WS. If they popped to the back, simply use that side as your RS for the border.
The tips curl. Block them flat and pinned. A light coat of stiffener on the back also helps.
The inner edge puckers. Make sure you worked exactly 26 sc into the foundation loops, with no extra stitches.
The star’s points are uneven. Check that you skipped exactly 1 sc between each point. Round 1 must have exactly 10 sc.
The star hangs crooked. Re-join the tether at the very tip of a point, not at the side of it.
Care
Spot clean with a damp cloth and cool water, then reshape and dry flat. If you used stiffener, avoid soaking the ornament; store it flat in a box between seasons.

Final Notes
The measurement chain is simple. Row 1 sets the 4.3 in (10.9 cm) inner edge. Row 2’s increases curl the strip into a crescent. Row 3 brings the moon to 3 in (7.6 cm) tip to tip. The two border rounds add 0.25 in (0.6 cm) on each edge, finishing at 3.5 in (8.9 cm). The 1.25 in (3.2 cm) gold star hangs on a 0.75 in (1.9 cm) tether inside the curve.
Check your gauge on the first moon, count your stitches at each checkpoint, and every ornament will match.
Optional: once you have one moon you like, you can make several in different yarn colors to fill a tree.
Happy crocheting!