

This lacy strip has four round, wheel-like medallions in a row. They shrink from large to tiny, left to right, and a slim hanging loop sits at the far left end. Short connecting chains pull the edges in between the circles, so the top and bottom edges form gentle waves.
The sample is worked in cream sport-weight cotton. The open spokes and chain loops look like a frosted mandala or a stylized icicle. A soft off-white or bright white keeps the stitch texture crisp.
This pattern uses US crochet terms. The finished strip measures 6.75 in (17.1 cm) long including the hanging loop. The largest medallion is 2 in (5.1 cm) across and the smallest is 0.5 in (1.3 cm).
The strip is made in one piece with no sewing. You work Medallion 1 from its center out. Then you chain a short connector and form the next medallion’s center ring at the end of it. You repeat this down to the smallest wheel. One round of single crochet then travels around the whole outline. It adds the hanging loop and binds the connectors into the wavy edge.
Finished Size and Construction
- Finished size: 6.75 in (17.1 cm) long × 2 in (5.1 cm) tall at the largest medallion
- Skill level: Easy-intermediate
- Terminology: US crochet terms
- Yarn weight: Sport (CYC 2), cotton
- Hook: 2.75 mm (US C-2)
- Number of pieces: 1 (worked continuously)
- Layout: 4 medallions in one horizontal row, largest at left, smallest at right, hanging loop at far left
- Medallion sizes (finished): 2 in (5.1 cm), 1.5 in (3.8 cm), 1 in (2.5 cm), 0.5 in (1.3 cm)
- Size before border: body 4.75 in (12.1 cm) long × 1.75 in (4.4 cm) tall
- Border depth: 0.125 in (0.3 cm) on every edge
Materials
Yarn: Use a smooth, mercerized sport-weight cotton. Cotton holds the spokes open and blocks flat. Fuzzy acrylic or wool blends will blur the lace.
- Cream (one color): 10 g, about 30 m
Tools:
- 2.75 mm (US C-2) crochet hook
- Tapestry needle
- Scissors
- Rustproof pins and a foam blocking mat
- Spray bottle; optional fabric stiffener or spray starch
- Ruler or tape measure
The quantity includes a generous margin for a gauge swatch and weaving in ends. The strip itself uses less than this.
Abbreviations (US Terms)
- ch – chain
- sl st – slip stitch
- sc – single crochet
- hdc – half double crochet
- dc – double crochet
- sp(s) – space(s)
- rep – repeat
- rnd – round
- beg – beginning
- st(s) – stitch(es)
Special technique – connector ring: Chain the stated number, then sl st in the stated chain from the hook. The chains between the hook and the sl st form the new center ring. The remaining chains form the connector back to the previous medallion. Example: “ch 10, sl st in 5th ch from hook” gives a 5-ch ring on a 5-ch connector.
Clock positions: With the strip lying horizontally, 3 o’clock is the right side of a medallion and 9 o’clock is the left side. Work all rounds counterclockwise, which is standard for right-handed crocheters.
Gauge and Checkpoints
Make Medallion 1 first and treat it as your gauge swatch. Measure it lightly pressed flat, before blocking.
- Chain gauge: 7 ch = 1 in (2.5 cm)
- Medallion 1, after Rnd 1: 0.9 in (2.3 cm)
- Medallion 1, after Rnd 2: 1.5 in (3.8 cm)
- Medallion 1, after Rnd 3: 1.75 in (4.4 cm)
- Medallion 2, after Rnd 1: 0.9 in (2.3 cm)
- Medallion 2, after Rnd 2: 1.25 in (3.2 cm)
- Medallion 3, after Rnd 1: 0.6 in (1.5 cm)
- Medallion 3, after Rnd 2: 0.75 in (1.9 cm)
- Medallion 4, after Rnd 1: 0.25 in (0.6 cm)
- Border gauge: about 5 sc per 1 in (2.5 cm) along the curved outer edge
If Medallion 1 is too big (over 1.75 in / 4.4 cm after Rnd 3), go down to a 2.5 mm hook.
If Medallion 1 is too small (under 1.6 in / 4.1 cm), go up to a 3.0 mm hook.
Stitch counts matter more than exact size. The border math depends on the loop counts, not the inches.
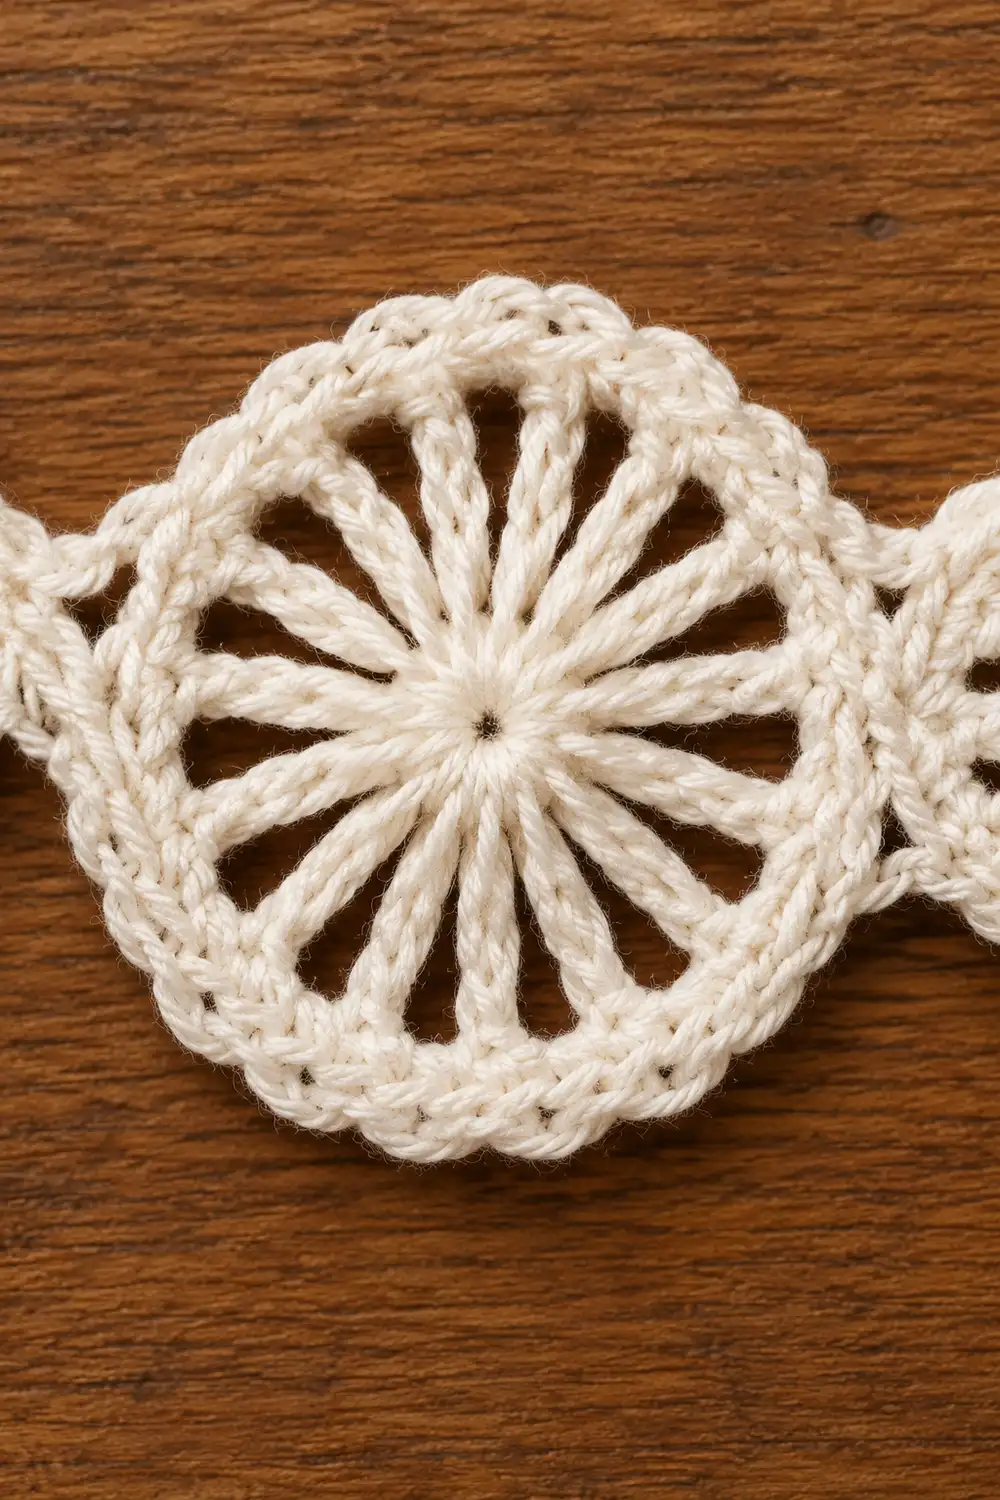
Medallion 1 (Largest)
Ch 5, sl st in first ch to form a ring.
Rnd 1: Ch 3 (counts as dc), 15 dc in ring. Join with sl st to top of beg ch-3. (16 dc)
Rnd 2: Ch 5 (counts as dc + ch 2). Dc in next dc, ch 2. Rep from * 14 more times. Join with sl st to 3rd ch of beg ch-5. (16 dc spokes, 16 ch-2 sps)
Rnd 3: Sl st in first ch-2 sp, ch 1. (Sc, ch 3) in ch-2 sp. Rep from * in each ch-2 sp around. Join with sl st to first sc. (16 sc, 16 ch-3 loops: 1 sc worked into each of the 16 ch-2 sps)
Do not fasten off. Rotate the medallion so the join (first sc) sits at 3 o’clock. Label it in your mind as sc 1. The 9th sc is directly opposite at 9 o’clock. Loops 1–8 make the top half and loops 9–16 make the bottom half.
Checkpoint: 1.75 in (4.4 cm) across.
Medallion 2
Connector and ring: Ch 10, sl st in 5th ch from hook. (5-ch connector, 5-ch ring)
The connector lies at 9 o’clock of the new medallion, pointing back toward Medallion 1.
Rnd 1: Ch 3 (counts as dc), 11 dc in ring. Join with sl st to top of beg ch-3. (12 dc)
Keep the connector flat in the gap between the beg ch-3 and the last dc.
Reposition: Sl st in next 6 dc. You are now on dc 7, directly opposite the connector, at 3 o’clock.
Rnd 2: Ch 1, sc in same dc, ch 3. Sc in next dc, ch 3. Rep from * 10 more times. Join with sl st to first sc. (12 sc, 12 ch-3 loops: 1 sc in each of the 12 dc)
The join sits at 3 o’clock. Loops 1–6 are the top half and loops 7–12 are the bottom half. The 7th sc sits at 9 o’clock, beside the incoming connector.
Checkpoint: 1.25 in (3.2 cm) across.
The visible gap between Medallions 1 and 2 should be about 0.25 in (0.6 cm).
Medallion 3
Connector and ring: Ch 8, sl st in 4th ch from hook. (4-ch connector, 4-ch ring)
Rnd 1: Ch 2 (counts as hdc), 7 hdc in ring. Join with sl st to top of beg ch-2. (8 hdc)
Reposition: Sl st in next 4 hdc. You are now on hdc 5, at 3 o’clock.
Rnd 2: Ch 1, sc in same hdc, ch 2. Sc in next hdc, ch 2. Rep from * 6 more times. Join with sl st to first sc. (8 sc, 8 ch-2 loops: 1 sc in each of the 8 hdc)
Loops 1–4 are the top half and loops 5–8 are the bottom half.
Checkpoint: 0.75 in (1.9 cm) across, with a gap of about 0.25 in (0.6 cm) from Medallion 2.
Medallion 4 (Smallest)
Connector and ring: Ch 5, sl st in 3rd ch from hook. (2-ch connector, 3-ch ring)
Rnd 1: Ch 1, 6 sc in ring. Join with sl st to first sc. (6 sc)
Sc 1 sits at 9 o’clock, next to the connector.
Reposition: Sl st in next 3 sc. You are now on sc 4, at 3 o’clock. This is the right tip of the strip.
Checkpoint: 0.25 in (0.6 cm) across, with a gap of about 0.25 in (0.6 cm) from Medallion 3.
Body checkpoint: The strip should now measure 4.75 in (12.1 cm) from the left edge of Medallion 1 to the right tip of Medallion 4. Do not fasten off.
Border
The border is one round of plain sc. It runs leftward along the top edge, forms the hanging loop, then runs rightward along the bottom edge. Plain sc keeps the outline smooth. The single sc wrapped around each connector pulls the edge inward and creates the waves between the circles.
Border gauge: about 5 sc per 1 in (2.5 cm) on the outer curve. Each medallion’s loops are spaced so that 2 sc per loop lands on this gauge.
Border Rnd (top edge, right to left):
- Medallion 4: Ch 1, 2 sc in sc 4, sc in sc 5, sc in sc 6. (4 sc)
- Connector 3–4: Sc around the connector chain. (1 sc)
- Medallion 3: 2 sc in each of loops 1–4. (8 sc)
- Connector 2–3: Sc around the connector chain. (1 sc)
- Medallion 2: 2 sc in each of loops 1–6. (12 sc)
- Connector 1–2: Sc around the connector chain. (1 sc)
- Medallion 1: 2 sc in each of loops 1–8. (16 sc)
Top edge total: 4 + 1 + 8 + 1 + 12 + 1 + 16 = 43 sc
Hanging loop: Ch 24, sl st in last sc made. The chain measures about 3.5 in (8.9 cm) and folds into a loop about 1.75 in (4.4 cm) long.
Border Rnd (bottom edge, left to right):
- Medallion 1: 2 sc in each of loops 9–16. (16 sc)
- Connector 1–2: Sc around the connector chain, opposite the top sc. (1 sc)
- Medallion 2: 2 sc in each of loops 7–12. (12 sc)
- Connector 2–3: Sc around the connector chain. (1 sc)
- Medallion 3: 2 sc in each of loops 5–8. (8 sc)
- Connector 3–4: Sc around the connector chain. (1 sc)
- Medallion 4: Sc in sc 1, 2 sc in sc 2, sc in sc 3. (4 sc)
Bottom edge total: 16 + 1 + 12 + 1 + 8 + 1 + 4 = 43 sc
Join with sl st to the first sc of the round. Fasten off.
Round total: 43 + 43 = 86 sc, plus the ch-24 hanging loop.
Why the math works: Each medallion’s half-outline after the border is π × finished radius. At 5 sc per inch, that gives:
- Medallion 1: 3.14 in (8.0 cm) ≈ 16 sc
- Medallion 2: 2.36 in (6.0 cm) ≈ 12 sc
- Medallion 3: 1.57 in (4.0 cm) ≈ 8 sc
- Medallion 4: 0.79 in (2.0 cm) ≈ 4 sc
These match the counts above, so the border lies flat without ruffling or cupping.
The border adds 0.125 in (0.3 cm) on every edge. Each 0.25 in (0.6 cm) gap closes as the borders of neighboring medallions meet at the connector sc.
Finished length: 2 + 1.5 + 1 + 0.5 = 5 in (12.7 cm) of medallions, plus the 1.75 in (4.4 cm) loop = 6.75 in (17.1 cm).
Final Blocking
- Weave in both ends along the back of the border sc. Trim close.
- Soak the strip in cool water for 10 minutes. Press out the water in a towel; do not wring.
- Lay it on the blocking mat with the hanging loop at left.
- Pin each medallion to its finished size: 2 in (5.1 cm), 1.5 in (3.8 cm), 1 in (2.5 cm), 0.5 in (1.3 cm).
- Pin the outer loops of Medallions 1 and 2 at even intervals so the spokes radiate straight from the center.
- Pin at each connector sc to set the waist. This creates the wavy top and bottom edges.
- Pin the hanging loop into a smooth oval.
- Check that the total length is 6.75 in (17.1 cm).
- Optional: mist with spray starch or dab on diluted fabric stiffener for a crisp, holiday-ready finish.
- Let it dry completely, then unpin.
Final Quality-Control Checklist
- Medallion 1: 16 dc spokes and 16 outer loops
- Medallion 2: 12 dc and 12 loops
- Medallion 3: 8 hdc and 8 loops
- Medallion 4: 6 sc
- Connectors: 5, 4, and 2 chains, each sitting at 3 o’clock / 9 o’clock between medallions
- Border: 43 sc on top and 43 sc on bottom, 86 sc total
- Hanging loop is ch 24 and sits centered at Medallion 1’s 9 o’clock point
- Finished length is 6.75 in (17.1 cm); largest height is 2 in (5.1 cm)
- Spokes radiate evenly with no twisted or crowded sections
- Edges are smooth and dip gently at each connector
Troubleshooting
Medallion 1 cups like a bowl.
Rnd 1 is too tight for 16 dc. Loosen your dc or go up a hook size.
Medallion 1 ruffles.
Your chains in Rnd 2 are too long. Keep the ch-2 snug, or go down a hook size.
The strip curves up or down.
A connector exits from the wrong spot. Recount the reposition sl sts so each connector sits exactly opposite the previous one.
Large gaps between medallions.
Your chains are loose. Check that 7 ch = 1 in (2.5 cm), or work the connectors 1 chain shorter.
The border ruffles on one medallion.
Check that you worked exactly 2 sc per loop, not 3.
The border pulls tight.
Your border sc are too firm. Loosen your tension rather than adding stitches, so the counts stay balanced.
The hanging loop twists.
Make sure the chain isn’t twisted before you sl st, and block it flat.
Medallion 4 looks lumpy.
Pull the ring chain snug before Rnd 1 and keep its 6 sc even.
Care
Hand wash in cool water with mild soap and dry flat. Reblock and re-starch as needed to restore the crisp shape.

Final Notes
The measurement chain is simple to follow:
- Hit 1.75 in (4.4 cm) on Medallion 1 at 7 ch per inch.
- Keep the 0.25 in (0.6 cm) gaps with 5-, 4-, and 2-chain connectors.
- Reach 4.75 in (12.1 cm) before the border.
- Work the 43 + 43 sc border to add 0.125 in (0.3 cm) on every edge.
- Add the 1.75 in (4.4 cm) loop for a finished strip of 6.75 in (17.1 cm).
Optional: you can make several strips in different colors for a set, but the pattern above describes one strip.
Happy crocheting!