
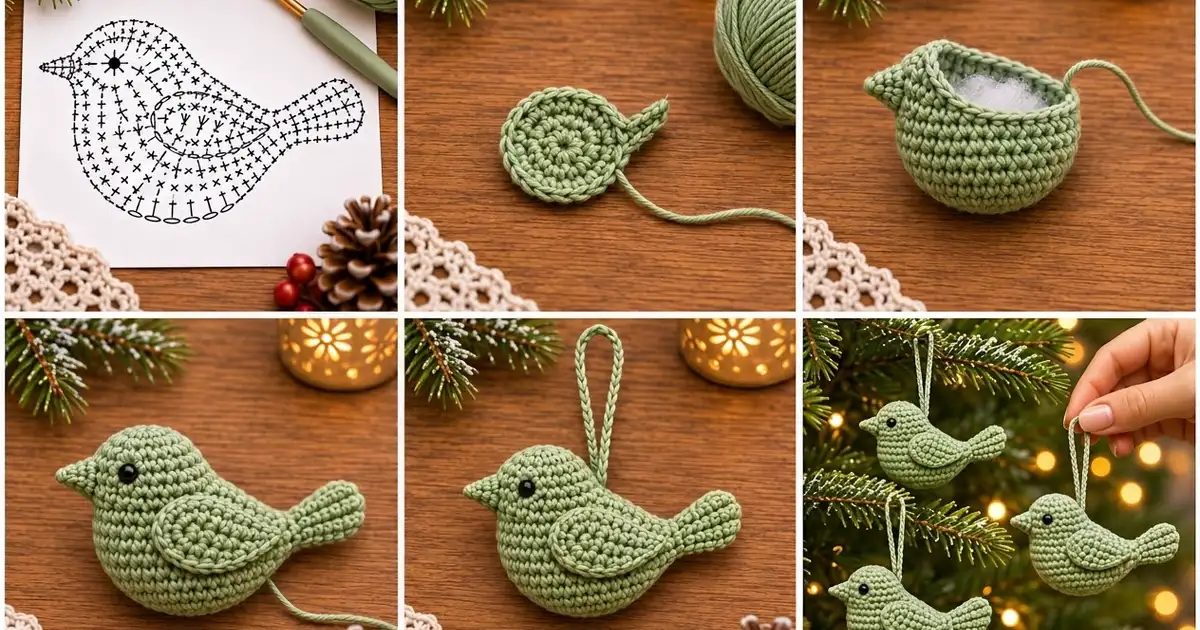
The Sage Songbird is a small, plump amigurumi bird made to hang on the tree. It has a round egg-shaped body, a short pointed beak, a fanned three-lobed tail and a teardrop wing on each side, finished with a slim loop for hanging.
This pattern uses one color only: a soft sage green. Two small black safety eyes give the bird its face. Because the color is so calm, it suits natural, Scandinavian-style decorating and sits nicely next to pine, pinecones and warm candlelight.
The pattern uses US crochet terms. The finished bird is about 4.5 in (11.4 cm) long from beak to tail tip and 2.4 in (6.1 cm) tall, not counting the hanging loop.
You crochet the body in one continuous spiral, from the back of the bird to the front of the head. Then you make a small beak, a flattened tail and two flat wings, and sew everything on. Last comes a slip-stitch hanging loop.
Finished Size and Construction
- Finished size: 4.5 in (11.4 cm) long x 2.4 in (6.1 cm) tall, plus a 3 in (7.6 cm) loop
- Skill level: Easy / Advanced beginner
- Terminology: US crochet terms
- Yarn weight: Worsted weight (#4), cotton or cotton blend
- Hook: 3.5 mm (E-4)
- Number of pieces: 1 finished ornament, made from 6 parts (body, beak, tail, 2 wings, loop)
- Layout: Single item; parts are sewn onto the body, with no joining or grid
- Body size: 3 in (7.6 cm) long x 2.25 in (5.7 cm) diameter
- Wing size before edging: 1.9 in (4.8 cm) x 1.2 in (3.0 cm)
- Wing edging depth: about 1/16 in (0.2 cm) per edge
- Finished wing size: 2 in (5.1 cm) x 1.3 in (3.3 cm)
Materials
Choose a smooth, tightly plied worsted cotton. It shows the stitch texture clearly and doesn’t fuzz, so the outline on the wing stays crisp. Acrylic works too, but the bird will come out a little softer and rounder.
- Sage green, worsted weight: 20 g (about 40 m)
- 3.5 mm (E-4) crochet hook
- 2 black safety eyes, 6 mm
- Polyester fiberfill, about 10 g
- Stitch marker
- Tapestry needle
- Scissors
- Straight pins
The yarn amount includes a margin for your gauge swatch, sewing tails and the hanging loop. One bird uses about 13 g (26 m), so a 50 g ball is enough for three birds.
Abbreviations (US Terms)
- ch – chain
- sc – single crochet
- inc – 2 sc in the same stitch
- dec – invisible decrease: insert hook in the front loop of the next 2 stitches, yarn over, pull through both front loops, yarn over, pull through 2 loops
- sl st – slip stitch
- MR – magic ring
- st(s) – stitch(es)
- sp – space
- ( ) x n – repeat the steps in parentheses n times
Special stitch – tip point (sc, ch 2, sc): Work 1 sc, ch 2, then 1 sc, all in the same stitch or space. This makes the sharp rear point of the wing.
Gauge and Checkpoints
Gauge: 5 sc and 5 rounds = 1 in (2.5 cm) in tight amigurumi tension.
Before you start, work Body Rounds 1–6 as a test. Lay the piece flat. It should measure about 2.25 in (5.7 cm) across. If it does, keep going, because this test piece becomes your body.
Checkpoints:
- Body after Round 3 (18 sts): 1.1 in (2.8 cm) across
- Body after Round 6 (36 sts): 2.25 in (5.7 cm) across
- Body after Round 14, unstuffed: about 2.5 in (6.4 cm) long from the MR, 3.6 in (9.1 cm) wide when pressed flat
- Tail, flattened: 1.2 in (3.0 cm) wide x 1.4 in (3.6 cm) long
- Wing after Round 3: 1.9 in (4.8 cm) x 1.2 in (3.0 cm)
If your circle is too big, go down to a 3.25 mm hook (D-3). If stuffing shows between stitches, your gauge is also too loose.
If your circle is too small, go up to a 3.75 mm hook (F-5). A smaller bird is fine for an ornament, but keep all parts on the same hook so they stay in proportion.

Body
Work in a continuous spiral and do not join rounds. Place a marker in the first stitch of each round and move it up as you go. The body starts at the tail end and finishes at the front of the head.
Round 1: 6 sc in MR. (6)
Round 2: Inc in each st around. (12)
Round 3: (Sc in next st, inc) x 6. (18)
Round 4: (Sc in next 2 sts, inc) x 6. (24)
Round 5: (Sc in next 3 sts, inc) x 6. (30)
Round 6: (Sc in next 4 sts, inc) x 6. (36)
Check: 2.25 in (5.7 cm) across.
Rounds 7–14: Sc in each st around. (36 per round, 8 rounds)
Check: 2.5 in (6.4 cm) long from the MR.
Round 15: (Sc in next 4 sts, dec) x 6. (30)
Insert the eyes: Place the safety eyes between Rounds 15 and 16, with 11 sts between them across the top of the head. Look from the front to make sure they are level, then fasten the backs.
Round 16: (Sc in next 3 sts, dec) x 6. (24)
Round 17: (Sc in next 2 sts, dec) x 6. (18)
Stuff the body firmly. Push stuffing toward the head and the belly so the bird looks full and round.
Round 18: (Sc in next st, dec) x 6. (12)
Add a little more stuffing.
Round 19: Dec x 6. (6)
Fasten off, leaving a 6 in (15.2 cm) tail. Weave the tail through the front loops of the last 6 sts, pull tight to close, and hide the end inside the body.
The finished body is 3 in (7.6 cm) long and 2.25 in (5.7 cm) in diameter.
Beak
Round 1: 4 sc in MR. (4)
Round 2: (Sc in next st, inc) x 2. (6)
Round 3: Sc in each st around. (6)
Sl st in the next st and fasten off, leaving an 8 in (20.3 cm) tail for sewing. Do not stuff. The beak is 0.5 in (1.3 cm) long and 0.4 in (1.0 cm) wide at the base.
Tail
The tail is a small tube, worked from the tip toward the base, then flattened.
Round 1: 6 sc in MR. (6)
Round 2: Inc in each st around. (12)
Rounds 3–4: Sc in each st around. (12 per round, 2 rounds)
Round 5: (Sc in next 2 sts, dec) x 3. (9)
Round 6: Sc in each st around. (9)
Round 7: (Sc in next st, dec) x 3. (6)
Fasten off, leaving a 12 in (30.5 cm) tail. Push a pinch of stuffing (about the size of a pea) into the wide end, then flatten the tail.
Make the three lobes: Thread the long tail onto the needle and bring it out at the tip edge. Wrap it twice around the tip at two points, dividing the 1.2 in (3.0 cm) width into three equal sections. Each wrap runs about 0.4 in (1.0 cm) back from the tip edge. Pull just firmly enough to pinch the edge into three rounded lobes, then bring the yarn out at the base for sewing.
Wings (Make 2)
Each wing is worked in joined rounds around both sides of a foundation chain. One end becomes the rounded front and the other becomes the pointed rear tip.
Foundation: Ch 6.
Round 1: Sc in 2nd ch from hook (rear tip) and next 3 ch (4 sc). Work 3 sc in last ch (front). Turn to work along the underside of the chain and sc in next 3 ch (3 sc). Work 2 sc in the same ch as the first sc. Join with sl st to first sc. (12)
Round 1 sections: rear tip 3, upper edge 3, front 3, lower edge 3.
Round 2: Ch 1. Sc in first st (1), sc in next 3 sts (3), 2 sc in each of next 3 sts (6), sc in next 3 sts (3), sc in next st (1), tip point (sc, ch 2, sc) in last st (2). Join. (16 sc plus ch-2 tip)
Count: 12 sts worked once + 3 extra at the front + 1 extra at the tip = 16.
Round 3: Ch 1. Sc in next 4 sts (4), (sc in next st, inc) x 3 (9), sc in next 4 sts (4), sc in next st (1), tip point (sc, ch 2, sc) in ch-2 sp (2), sc in last st (1). Join. (21 sc plus ch-2 tip)
Count: 16 sts worked once + 3 front increases + 2 new sc in the ch-2 sp = 21.
Check: 1.9 in (4.8 cm) x 1.2 in (3.0 cm). The wing should lie flat, with a rounded front and a clear point at the rear.
Wing Edging (Border)
The edging is a slip-stitch outline that gives the wing its neat raised rim.
Edging gauge: 1 sl st per sc. Work loosely so each sl st is the same width as the sc below it.
After Round 3, the wing has three sections:
- Upper edge: 6 sts (the sc after the ch-2, the sc in the last st, and the first 4 sc)
- Front curve: 9 sts
- Lower edge: 6 sts (4 sc, then 1 sc, then the sc before the ch-2)
6 + 9 + 6 = 21 sts, which matches the Round 3 count.
Round 4: Ch 1. Working in back loops only, sl st in each of the first 4 upper-edge sts, sl st in each of the 9 front-curve sts, sl st in each of the 6 lower-edge sts, 1 sl st in the ch-2 tip sp, then sl st in the 2 remaining upper-edge sts. Join to the first sl st. (22 sl sts: upper 6, front 9, lower 6, tip 1)
Fasten off, leaving a 12 in (30.5 cm) tail for sewing.
Why the math works: One sl st in each sc keeps the edge the same length as the wing’s perimeter, so the edge neither ruffles nor pulls in. The single extra sl st in the ch-2 space sharpens the rear tip without adding bulk. The front curve grows by 3 sts per round (3, 6, 9), which is the rate a flat half circle needs, so the front stays flat.
The finished wing is 2 in (5.1 cm) x 1.3 in (3.3 cm).
Hanging Loop
Ch 36, which should measure about 6 in (15.2 cm). Sl st in the back bump of the 2nd ch from hook and in each ch across. (35 sl sts) Fasten off, leaving 6 in (15.2 cm) tails at both ends.
Assembly
- Beak: Pin the beak to the front of the head, centered between the eyes and 1 round above the closing point of Round 19. Whipstitch around the base.
- Tail: Pin the tail base over the MR at the back, angled upward about 30 degrees. Sew all around the base so the tail stays stiff.
- Wings: Pin one wing on each side, with the rounded front between Rounds 9 and 10, about 3 rounds below the eye line. Point the tip back and slightly up toward the tail. Sew through the back loops of the edging all around, but leave the last 0.4 in (1.0 cm) of the tip unsewn so it lifts slightly.
- Loop: Fold the loop in half. Pull both tails through the top center of the back, at about Round 11, and knot them inside the body. The visible loop is 3 in (7.6 cm) tall.
Final Blocking
- Lightly mist the wings and tail with water.
- Pinch the wing tips into sharp points and smooth the wing edges flat against the body.
- Press the three tail lobes gently with your fingers so they fan out evenly.
- Roll the body between your palms to even out any lumps in the stuffing.
- Let the bird dry fully, lying on its belly, for a few hours.
- Do not iron. Heat can flatten the texture and damage the safety eyes.
Final Quality-Control Checklist
- Body measures 3 in (7.6 cm) long and 2.25 in (5.7 cm) across
- Eyes are level, 11 sts apart, and locked securely
- Beak is centered and points straight forward
- Tail shows three clear lobes and stands at about 30 degrees
- Both wings measure 2 in (5.1 cm) x 1.3 in (3.3 cm), with 22 sl sts in the edging
- Wings are mirrored, with tips pointing toward the tail
- Loop sits at the top center, so the bird hangs level
- No stuffing shows between stitches
- All yarn ends are hidden inside the body
Troubleshooting
Stuffing shows through: Your tension is too loose. Go down a hook size, or stuff a little less firmly.
The body looks lumpy: Add stuffing in small pieces instead of large clumps, and roll the body between your hands.
The wing curls or cups: Check that Round 3 has 21 sc. If it does, your edging is too tight, so redo it with looser slip stitches.
The wing ruffles: You probably worked extra increases on the front curve. It should have exactly 9 sts after Round 3.
The bird tips forward when hanging: Move the loop about 1 round closer to the tail.
The beak droops: Sew it with smaller stitches all around the base, and add a tiny bit of stuffing if needed.
The eyes look uneven: Count the stitches between them across the top. Safety eyes can’t be moved after locking, so check before fastening.
Care
Spot clean with a damp cloth and mild soap, then let air dry. Keep the ornament away from small children and pets, since safety eyes can be a choking hazard.

Final Notes
Everything in this bird follows one simple measurement chain. A gauge of 5 sc and 5 rounds per 1 in (2.5 cm) gives a 2.25 in (5.7 cm) circle at Round 6. Eight even rounds and five decrease rounds turn that into a 3 in (7.6 cm) body. A 1.9 in (4.8 cm) wing grows to 2 in (5.1 cm) with its 22-stitch edging. Add the beak and the 1.4 in (3.6 cm) tail, and you get a 4.5 in (11.4 cm) songbird ready for the tree.
Once you’ve made one, the rest go quickly. A small flock of three looks lovely together.
Happy crocheting!