

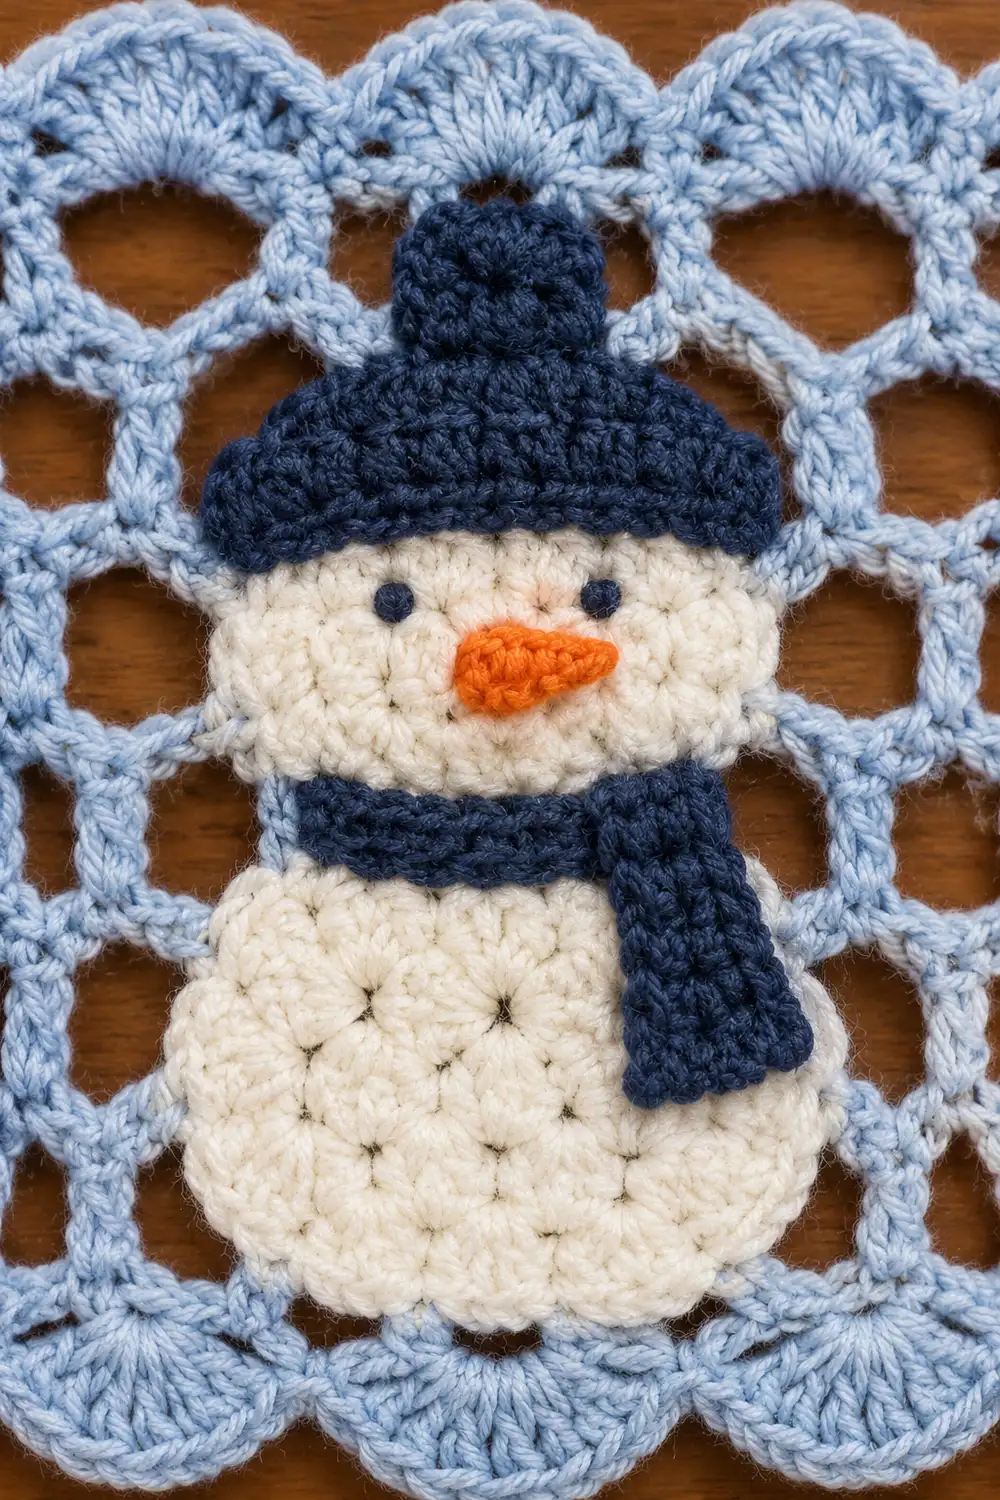
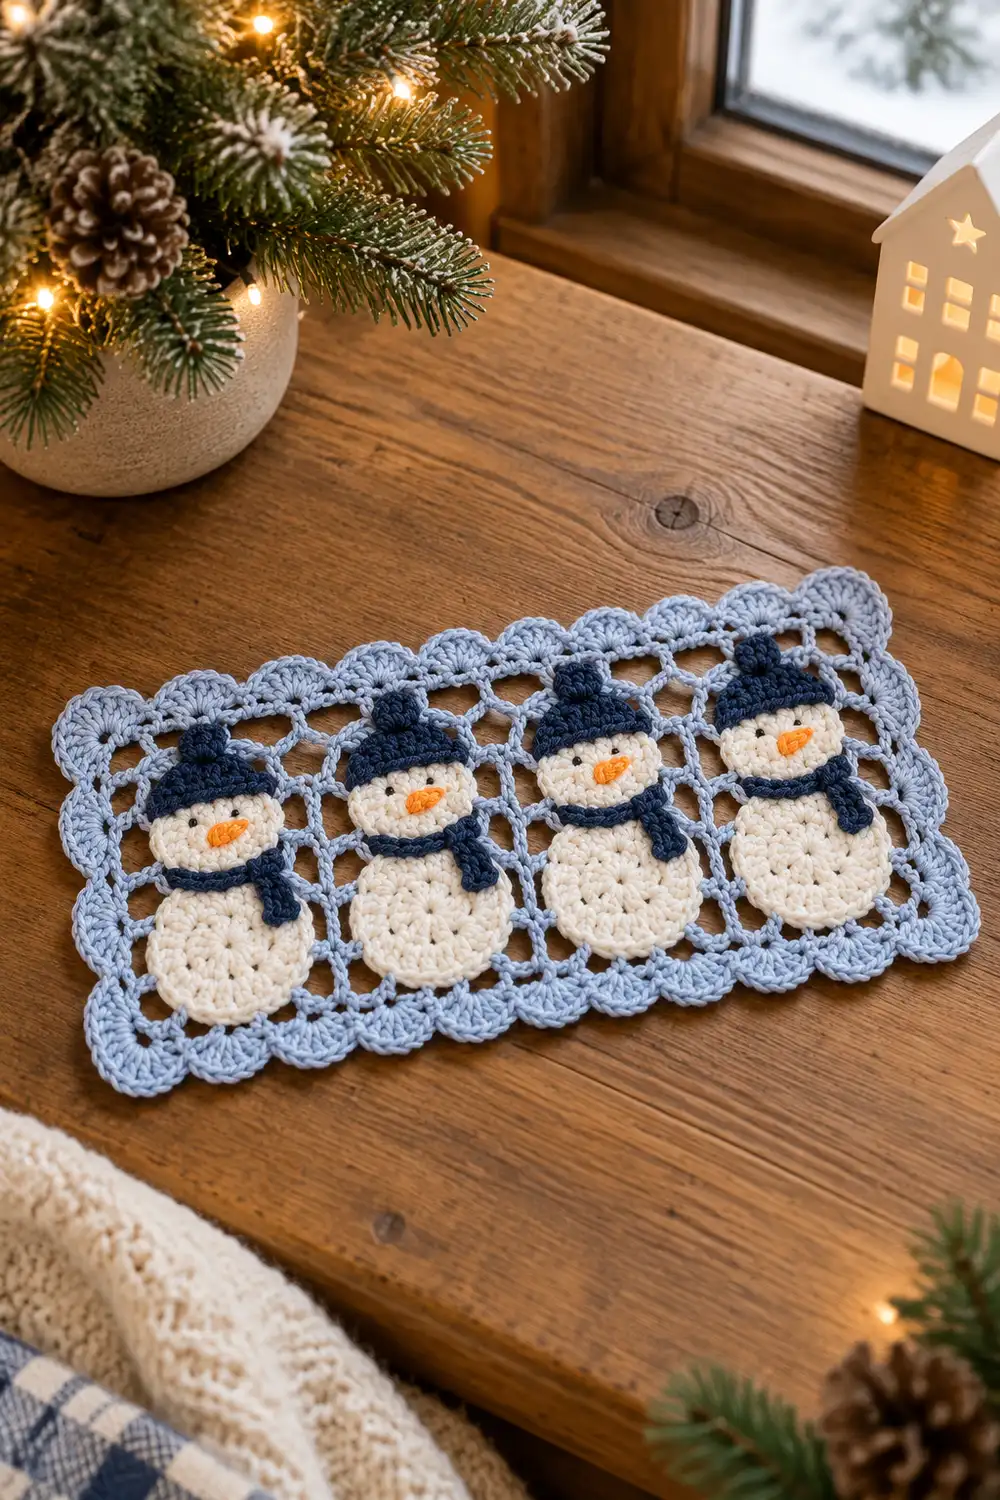
Four cheerful snowmen stand in a neat row on an airy light blue mesh, framed by a scalloped shell border. Each snowman has a textured cream body, a navy knit-look hat with a wide brim, a navy scarf, and a tiny orange carrot nose.
The palette is cream, navy, light blue, and orange. The style is crisp and wintry, with open lacework between the figures so each snowman stands out clearly. The strip works well as a mantel or shelf decoration, a tray topper, or a framed holiday appliqué.
This pattern uses US crochet terms. The finished strip measures about 11.2 in wide x 4.7 in tall (28.4 cm x 11.9 cm) after blocking.
The construction is simple. You crochet one rectangular mesh base, make four identical snowmen from small pieces, sew the snowmen side by side onto the mesh, then work a two-round shell border around all four sides.
Finished Size and Construction
- Finished size: 11.2 in x 4.7 in (28.4 cm x 11.9 cm)
- Skill level: Intermediate (popcorns, filet mesh, simple shaping)
- Terminology: US crochet terms
- Yarn weight: DK (#3), cotton recommended
- Hook: 3.5 mm (E-4)
- Number of pieces: 1 mesh base + 4 snowmen (7 small pieces each)
- Layout: 4 snowmen in 1 row
- Snowman size: about 1.4 in wide x 3.3 in tall (3.6 cm x 8.4 cm)
- Size before border: 10 in x 3.5 in (25.4 cm x 8.9 cm)
- Border depth: 0.6 in (1.5 cm) on each side
Materials
Choose a smooth, mercerized DK cotton. It shows popcorn texture and shell edges clearly and blocks crisply. The amounts below assume about 115 m per 50 g.
- Light blue (mesh and border): 20 g, about 46 m
- Cream (snowman bodies): 10 g, about 23 m
- Navy (hats and scarves): 5 g, about 12 m
- Orange (noses): 2 g, about 5 m
These quantities include a safety margin of roughly 30 percent.
Tools:
- 3.5 mm (E-4) crochet hook
- Tapestry needle
- Stitch markers
- Rust-proof pins
- Blocking mat or folded towel
- Ruler or tape measure
- Scissors
Abbreviations (US Terms)
- ch: chain
- sl st: slip stitch
- sc: single crochet
- dc: double crochet
- sc2tog: single crochet 2 together
- blo: back loop only
- sk: skip
- sp: space
- st(s): stitch(es)
- rnd: round
Special stitches:
- 3-dc popcorn / 4-dc popcorn: Work 3 (or 4) dc into the indicated ring or stitch. Remove the hook from the loop. Insert the hook front to back through the top of the first dc in the group. Pick up the dropped loop and pull it through. The popcorn bulges forward, which creates the dimensional ball texture.
- Shell: 5 dc in the same stitch.
- Corner shell: 7 dc in the same stitch.
Gauge and Checkpoints
Mesh gauge: 13 mesh squares x 4 rows = 5 in x 2 in (12.7 cm x 5.1 cm). One mesh square is one dc plus one ch-1 space.
Test one snowman bottom ball first. It should measure 1.4 in (3.6 cm) across and lie flat. If it does, your tension suits the motifs.
Checkpoints:
- Head: 0.8 in (2.0 cm)
- Middle ball: 1.0 in (2.5 cm)
- Bottom ball: 1.4 in (3.6 cm)
- Mesh after Row 4: 10 in x 2 in (25.4 cm x 5.1 cm)
- Mesh after Row 7: 10 in x 3.5 in (25.4 cm x 8.9 cm)
- After Border Rnd 1: 10.4 in x 3.9 in (26.4 cm x 9.9 cm)
- After Border Rnd 2: 11.2 in x 4.7 in (28.4 cm x 11.9 cm)
If pieces are too big, go down 0.25 mm in hook size. If they are too small, go up 0.25 mm. Adjust the mesh and the motifs separately if needed. The snowmen only need to fit inside a 4-square-wide column.
Mesh Base (Light Blue)
Foundation: Ch 55.
Row 1: Dc in 5th ch from hook. The skipped chs count as dc + ch 1. Ch 1, sk 1 ch, dc in next ch 25 times. Turn.
Count: 26 squares (27 dc posts and 26 ch-1 sps, or 53 sts).
Rows 2–7: Ch 4 (counts as dc + ch 1). Dc in next dc. Ch 1, dc in next dc across, ending with dc in the top of the turning chain. Turn.
Count: 26 squares per row.
Do not fasten off after Row 7 if you prefer to start the border later from this corner. Otherwise, fasten off and weave in the ends.
Checkpoint: 10 in x 3.5 in (25.4 cm x 8.9 cm). The squares should look even and open.
Snowman Pieces
Head (Cream)
Rnd 1: Make a magic ring. Ch 2 (does not count). [3-dc popcorn in ring, ch 1] 5 times. Pull the ring tight. Sl st to the top of the first popcorn.
Count: 5 popcorns and 5 ch-1 sps.
Fasten off, leaving a 10 in (25.4 cm) tail. Diameter: 0.8 in (2.0 cm).
Middle Ball (Cream)
Rnd 1: Make a magic ring. Ch 2 (does not count). [4-dc popcorn in ring, ch 1] 6 times. Pull the ring tight. Sl st to the top of the first popcorn.
Count: 6 popcorns and 6 ch-1 sps.
Fasten off, leaving a tail. Diameter: 1.0 in (2.5 cm).
Bottom Ball (Cream)
Rnd 1: Work as for the Middle Ball.
Count: 6 popcorns and 6 ch-1 sps.
Rnd 2 (trim round): Ch 1. Work 1 sc in the top of each popcorn and 3 sc in each ch-1 sp. Sl st to the first sc.
Count: 6 sc (1 per popcorn) + 18 sc (3 per space) = 24 sc.
Fasten off, leaving a tail. Diameter: 1.4 in (3.6 cm). The ball should lie flat with the popcorns standing out in the center.
Hat (Navy)
The two brim rows are worked through both loops so they stay firm and wide. The crown rows are worked in back loops only, which forms ridges that look like knitting.
Foundation: Ch 7.
Row 1 (brim): Sc in 2nd ch from hook and in each ch across. Turn. (6 sc)
Row 2 (brim): Ch 1. Sc in each st across. Turn. (6 sc)
Row 3: Ch 1. Sc2tog blo, sc blo in next 2 sts, sc2tog blo. Turn. (4 sc)
Row 4: Ch 1. Sc blo in each st across. Turn. (4 sc)
Row 5: Ch 1. [Sc2tog blo] twice. (2 sc)
Fasten off, leaving a tail. The hat measures 1.2 in (3.0 cm) across the brim and about 0.9 in (2.3 cm) tall. The brim is wider than the 0.8 in (2.0 cm) head.
Scarf (Navy)
Band: Ch 8. Sc in 2nd ch from hook and in each ch across. (7 sc, 1.4 in / 3.6 cm)
Tail: Ch 6. Sc in 2nd ch from hook and in each ch across. (5 sc, 1.0 in / 2.5 cm)
Fasten off both pieces, leaving tails.
Nose (Orange)
Ch 3. Sl st in 2nd ch from hook, then sc in the last ch. Fasten off, leaving a tail. The nose is a tiny tapered carrot, about 0.3 in (0.8 cm) long.
Assemble Each Snowman
- Stack the three balls vertically: bottom, middle, then head.
- Overlap each joint by about 0.2 in (0.5 cm). Whipstitch through the back loops with cream so the stitches stay hidden.
- Sew the scarf band across the neck joint. Sew the tail at one end so it hangs down over the middle ball.
- Sew the hat over the top of the head with its brim facing down. The crown should rise about 0.5 in (1.3 cm) above the head.
- Sew the nose to the center of the face, pointing sideways.
Checkpoint: Each snowman measures 1.4 in x 3.3 in (3.6 cm x 8.4 cm).
Make All Pieces
Quantities per color:
- Light blue: 1 mesh base
- Cream: 4 heads, 4 middle balls, 4 bottom balls (12 pieces)
- Navy: 4 hats, 4 scarf bands, 4 scarf tails (12 pieces)
- Orange: 4 noses
Layout grid (by mesh square, left to right):
ROW 1: MESH(1–2) SNOWMAN(3–6) MESH(7–8) SNOWMAN(9–12) MESH(13–14) SNOWMAN(15–18) MESH(19–20) SNOWMAN(21–24) MESH(25–26)
That is 2 + 4 + 2 + 4 + 2 + 4 + 2 + 4 + 2 = 26 squares, which matches the mesh exactly.
Each snowman is centered on a dc post: posts 5, 11, 17, and 23, counted from the left. The snowmen sit 6 squares apart, which is about 2.3 in (5.8 cm).
Joining
Method: Appliqué each snowman to the mesh with a whipstitch, using a matching color for each section. Use cream for the balls and navy for the hat and scarf.
Placement: Pin each snowman upright on its center post. Place the bottom of each bottom ball about 0.1 in (0.3 cm) above the lower edge of the mesh. All four snowmen should sit at the same height.
Stitch-to-stitch logic:
- Tack the outer edge of each ball wherever it crosses a dc post or ch-1 sp.
- On the bottom ball, sew through every second sc of Rnd 2. That gives 12 tacks around the ball.
- On the head and middle ball, tack each ch-1 sp. That gives 5 tacks on the head and 6 on the middle ball.
- Tack the hat brim at both ends and at its center.
Tension: Sew snugly but not tightly. If the mesh squares puckers or pulls into ovals, loosen your stitches. The mesh must stay square for the border math to work.
Size checkpoint: The base should still measure 10 in x 3.5 in (25.4 cm x 8.9 cm), with all 26 squares straight.
Border (Light Blue)
Border gauge: Rnd 1 is worked at 1 sc per mesh st along the top and bottom. That is 53 sc over 10 in, or about 5.3 sc/in. The sides have 17 sc between corner centers over 3.5 in, or about 4.9 sc/in. This small difference is evened out during blocking.
Rnd 1 (sc trim)
- Join yarn in the top-right corner dc.
- Work 3 sc in the corner dc.
- Top: Work 1 sc in each ch-1 sp and each dc across, stopping before the last dc. That is 51 sc.
- Work 3 sc in the corner dc.
- Side: Work 2 sc around each of the 7 row-end posts. Work 1 extra sc in the Row 4 row-end. That is 15 sc.
- Work 3 sc in the first base point for the corner.
- Bottom: Work 1 sc at the base of each dc and in each ch-1 sp. That is 51 sc.
- Work 3 sc in the last base point for the corner.
- Second side: Work 15 sc as before.
- Sl st to the first sc.
Count per side between corner center sc:
- Top and bottom: 51 + 1 + 1 = 53
- Sides: 15 + 1 + 1 = 17
Total: 53 + 53 + 17 + 17 + 4 corner center sc = 144 sc.
Rnd 2 (shells)
- Sl st into the next corner center sc. Ch 3 (counts as dc). Work 6 dc in the same st to make the first corner shell.
- Each side: Sk 2, sc in next st. Sk 2, shell in next st, sk 2, sc in next st. Repeat from * 8 times on the top and bottom, or 2 times on the sides. Sk 2, then work a corner shell in the corner center sc.
- On the final side, omit the last corner shell. Sl st to the top of the beginning ch-3 instead.
Count:
- Top and bottom: 8 shells and 9 sc each
- Sides: 2 shells and 3 sc each
- Corners: 4 corner shells
Total: (20 x 5 dc) + (4 x 7 dc) + 24 sc = 152 sts.
Fasten off and weave in all ends.
Why the Math Works
The shell repeat (sk 2, shell, sk 2, sc) uses 6 sts. Each side also needs a starting “sk 2, sc” (3 sts) and a closing “sk 2” (2 sts). That means each side needs 6k + 5 sts between corner centers.
- Top and bottom: 53 = 6 x 8 + 5, which gives 8 shells.
- Sides: 17 = 6 x 2 + 5, which gives 2 shells.
This is why the mesh is 26 squares wide. Its 53 sts per row produce exactly 53 sts between corner centers along the top and bottom.
Final Blocking
- Lightly mist the strip with water. Avoid soaking it, so the popcorns stay puffy.
- Lay it face up on the blocking mat.
- Pin the four corners to a rectangle measuring 11.2 in x 4.7 in (28.4 cm x 11.9 cm).
- Pin the tip of each shell outward so the scallops are evenly spaced.
- Straighten the mesh lines with your fingers so every square sits square.
- Avoid pinning through the snowmen, and do not flatten the popcorns.
- Let the strip dry completely before you unpin it.
Final Quality-Control Checklist
- The mesh has 26 squares across and 7 rows.
- All four snowmen sit at the same height and are spaced evenly.
- Each bottom ball has 24 sc and lies flat.
- Each hat brim is wider than its head, and each crown shows blo ridges.
- Every scarf has a band and a hanging tail.
- Every nose is secure and centered.
- Border Rnd 1 has 144 sc and Rnd 2 has 152 sts.
- The top and bottom each have 8 shells, and the sides each have 2.
- The strip measures 11.2 in x 4.7 in (28.4 cm x 11.9 cm).
- All ends are woven in invisibly.
Troubleshooting
Bottom ball ruffles: Your tension is loose. Work 2 sc in each ch-1 sp instead of 3 and recount, or go down a hook size.
Bottom ball cups: Your tension is tight. Loosen up, or go up a hook size.
Popcorns sink to the back: You inserted the hook back to front. Always insert it front to back before pulling the dropped loop through.
Mesh is too short: Your dc rows are short. Go up a hook size for the mesh only.
Shells don’t land at the corners: Recount the Rnd 1 sides. You need 53 sc and 17 sc between corner centers.
Mesh puckers behind the snowmen: The appliqué stitches are too tight. Snip them and resew more loosely.
Snowmen don’t fit in the column: Make a slightly smaller bottom ball by working Rnd 2 with a smaller hook.
Care
Hand wash in cool water and lay flat to dry, reshaping the scallops as needed. Do not tumble dry or iron directly over the popcorns.
Final Notes
The measurement chain is straightforward:
- The mesh is 26 squares across, measuring 10 in x 3.5 in (25.4 cm x 8.9 cm).
- Four snowmen at 1.4 in x 3.3 in (3.6 cm x 8.4 cm) fit into 4-square columns, separated by mesh.
- Border Rnd 1 brings the strip to 10.4 in x 3.9 in (26.4 cm x 9.9 cm).
- Border Rnd 2 finishes it at 11.2 in x 4.7 in (28.4 cm x 11.9 cm).
Check each stage against its checkpoint and the shells will land exactly at the corners. Optional: for a wider strip, add 6 mesh squares and one more snowman, which keeps the 6k + 5 border math intact.
Happy crocheting!