

The Frosted Icicle is a slim, tapering piece made of four round motifs. Each motif is smaller than the one before, and a twisted chain links them. Laid flat, it forms a wavy, undulating line that narrows from a 2 in (5.1 cm) circle down to a ½ in (1.3 cm) circle. The result is an elegant icicle silhouette.
The whole piece is worked in one cream or off-white yarn. The fabric is solid and tightly crocheted. Each motif has a dense, flat, pinwheel-like center made of stitches that radiate outward from a small ring. The connectors are thin, and each one spirals slightly thanks to a reverse-wrapped chain.
This pattern uses US crochet terms. The finished piece measures about 8½ in (21.6 cm) long, well inside the 8–10 in (20.3–25.4 cm) range shown in the photo. The largest motif is 2 in (5.1 cm) wide.
Construction is continuous and needs no sewing. You work Motif 1 (largest) in rounds, chain a twisted connector, form a new ring, and work Motif 2. Repeat down to Motif 4 (smallest), then fasten off. The result is a single piece with only two tails to weave in.
Finished Size and Construction
- Finished length: about 8½ in (21.6 cm)
- Motif diameters: 2 in (5.1 cm), 1.4 in (3.6 cm), 0.9 in (2.3 cm), 0.5 in (1.3 cm)
- Connector lengths: 1.5 in (3.8 cm), 1.25 in (3.2 cm), 1 in (2.5 cm)
- Skill level: Advanced beginner
- Terminology: US
- Yarn weight: Sport (#2), mercerized cotton
- Hook: 2.75 mm (C-2)
- Number of pieces: 1 (worked continuously)
- Layout: 4 motifs in a straight line, largest to smallest
- Size before edging (Motif 1): 1.6 in (4.1 cm)
- Edging depth: about 0.2 in (0.5 cm) on Motif 1 and about 0.05 in (0.1 cm) on the slip-stitch edges
The length math is 2 + 1.5 + 1.4 + 1.25 + 0.9 + 1 + 0.5 = 8.55 in, which rounds to about 8½ in (21.6 cm).
Materials
Yarn advice: Choose a smooth, mercerized sport-weight cotton in cream or off-white. Mercerized cotton gives crisp stitch definition, so the radiating spokes show clearly. It also holds a twist well after starching. Avoid fuzzy or very stretchy fibers, because they blur the pinwheel centers.
- Cream: 5 g (about 16 m)
The quantity includes a generous margin for a test motif and for weaving in ends. The finished piece itself uses roughly 3 g.
Tools:
– 2.75 mm (C-2) crochet hook
– Tapestry needle
– Scissors
– Rust-proof pins
– Blocking mat or folded towel
– Spray starch or a stiffener (optional, but recommended)
– Ruler or tape measure
Abbreviations (US Terms)
- ch – chain
- sl st – slip stitch
- sc – single crochet
- hdc – half double crochet
- dc – double crochet
- st(s) – stitch(es)
- rnd – round
- tw-ch – twisted chain (see below)
Special stitch: Twisted chain (tw-ch). Wrap the yarn over the hook in reverse: bring it from front to back over the top of the hook, instead of the usual back to front. Then pull through the loop on the hook. Every stitch in a run of tw-ch adds a small rotation, so the connector naturally spirals. Count tw-ch exactly like regular chains.
Gauge and Checkpoints
Gauge matters here because each motif must step down cleanly in size. Work Motif 1 as a test piece first and measure it before continuing.
Reference gauge:
– Chains: 8 ch = 1 in (2.5 cm)
– Edge sc (Motif 1, Rnd 3): about 7 sc per inch, measured around the middle of the round
Motif 1 checkpoints:
– After Rnd 1: 0.9 in (2.3 cm)
– After Rnd 2: 1.6 in (4.1 cm)
– After Rnd 3: 2 in (5.1 cm)
If your motif is too big: Go down to a 2.5 mm hook, or tighten your tension on the dc rounds.
If your motif is too small: Go up to a 3 mm hook.
If it cups: Your stitches are too tight for the count. Go up a hook size.
If it ruffles: Your stitches are too loose. Go down a hook size.
Once your test motif hits 2 in (5.1 cm) and lies flat, frog it or keep it as a sample. Then start the real piece.
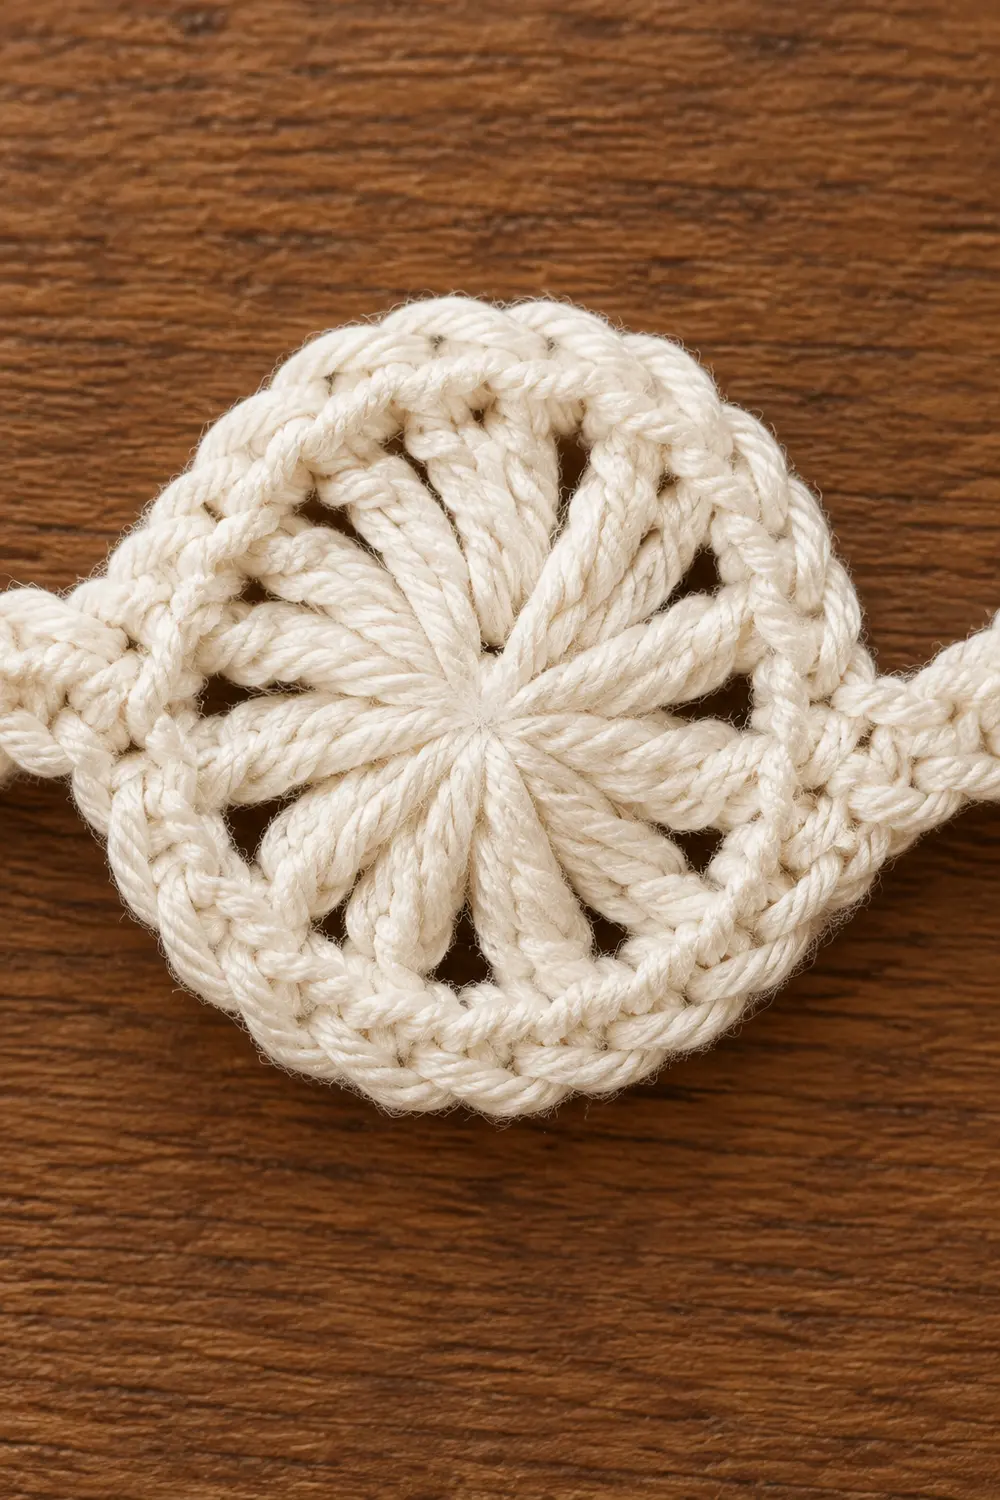
Motif 1 (Largest – 2 in / 5.1 cm)
Ch 5, sl st in first ch to form a ring.
Rnd 1: Ch 3 (counts as dc), 15 dc in ring, sl st to top of ch-3. (16 dc)
The dc radiate out from the ring like spokes. Checkpoint: 0.9 in (2.3 cm).
Rnd 2 (growth round): Ch 3 (counts as dc), dc in same st, 2 dc in each st around, sl st to top of ch-3. (32 dc)
The doubled spokes create the dense pinwheel look. Checkpoint: 1.6 in (4.1 cm).
Rnd 3 (conversion/edging round): Ch 1, sc in same st and next 2 sts, 2 sc in next st. *Sc in next 3 sts, 2 sc in next st; repeat from * 6 more times. Sl st to first sc.
Count: 32 sc (1 per existing dc) + 8 extra sc (1 increase in every 4th st) = 40 sc.
Checkpoint: 2 in (5.1 cm). Do not fasten off.
Connector 1 and Motif 2 (1.4 in / 3.6 cm)
Connector 1: Tw-ch 12 (1.5 in / 3.8 cm).
Form ring: Ch 4, sl st in 4th ch from hook to form a ring. These 4 ch belong to the ring, not to the connector count.
Rnd 1: Ch 3 (counts as dc), 11 dc in ring, sl st to top of ch-3. (12 dc)
Checkpoint: 0.8 in (2.0 cm).
Rnd 2 (growth round): Ch 2 (counts as hdc), hdc in same st, 2 hdc in each st around, sl st to top of ch-2. (24 hdc)
Checkpoint: 1.3 in (3.3 cm).
Rnd 3 (edging round): Sl st in each hdc around.
Count: 24 sl st (1 per existing hdc) + 0 extra = 24 sl st.
Checkpoint: 1.4 in (3.6 cm). Do not fasten off.
Connector 2 and Motif 3 (0.9 in / 2.3 cm)
Connector 2: Tw-ch 10 (1.25 in / 3.2 cm).
Form ring: Ch 3, sl st in 3rd ch from hook to form a ring.
Rnd 1: Ch 3 (counts as dc), 11 dc in ring, sl st to top of ch-3. (12 dc)
The ring is small, so push the stitches together as you go. That crowding is what gives this motif its dense, flat center. Checkpoint: 0.8 in (2.0 cm).
Rnd 2 (edging round): Sl st in each dc around.
Count: 12 sl st (1 per existing dc) + 0 extra = 12 sl st.
Checkpoint: 0.9 in (2.3 cm). Do not fasten off.
Connector 3 and Motif 4 (0.5 in / 1.3 cm)
Connector 3: Tw-ch 8 (1 in / 2.5 cm).
Form ring: Ch 3, sl st in 3rd ch from hook to form a ring.
Rnd 1: Ch 1, 8 sc in ring, sl st to first sc. (8 sc)
Checkpoint: 0.5 in (1.3 cm).
Fasten off, leaving a 6 in (15.2 cm) tail.
Border
On this single piece, the “border” is the final edging round of each motif. That round sets each circle’s outline and keeps it flat.
Border gauge: The Motif 1 sc edge works at about 7 sc per inch, measured around the middle of the round.
The slip-stitch edges on Motifs 2 and 3 add almost no height. Each one is a clean cap rather than a growth round.
Counts per motif, split into quarters for even spacing:
| Motif | Edging stitch | Total | Per quarter |
|---|---|---|---|
| Motif 1 | sc | 40 | 10 |
| Motif 2 | sl st | 24 | 6 |
| Motif 3 | sl st | 12 | 3 |
| Motif 4 | sc (Rnd 1 is its own edge) | 8 | 2 |
Why the math works:
- Motif 1: The sc round sits on a 1.6 in (4.1 cm) circle and adds 0.2 in (0.5 cm) per side. Its midline is therefore about 1.8 in (4.6 cm) across. The circumference is about 1.8 × 3.14 = 5.7 in (14.5 cm), and 5.7 in × 7 sc per inch ≈ 40 sc. Rnd 2 supplies 32 stitches, so 8 increases spaced evenly make up the difference. That gives a flat, smooth edge with no cupping or ruffling.
- Motifs 2 and 3: A slip stitch barely raises the edge, so the circumference barely grows. One sl st per existing stitch is exactly right, and no extras are needed.
- Motif 4: This motif is a single compact round by design. The 8 sc crowd the ring and give a firm, tight tip.
Final Blocking
- Weave in both tails securely. Hide them inside the dc spokes so they stay out of sight.
- Wet the piece in cool water and gently press out the excess in a towel. Do not wring it.
- Lay it flat on a blocking mat. Pin each motif into a true circle at its checkpoint diameter: 2 in (5.1 cm), 1.4 in (3.6 cm), 0.9 in (2.3 cm), and 0.5 in (1.3 cm).
- Check that the spokes in each center radiate evenly. Nudge any crooked ones straight with a pin tip.
- Let each connector keep its natural spiral. If one has untwisted, roll it between your fingers in the direction of the twist, then pin it flat.
- Space the motifs along a straight line so the total length measures about 8½ in (21.6 cm).
- Mist the piece with spray starch, or brush on stiffener, for a crisp finish.
- Let it dry completely before unpinning, usually 6–12 hours.
Final Quality-Control Checklist
- [ ] Four motifs, stepping down in size from largest to smallest
- [ ] Diameters measure 2 in (5.1 cm), 1.4 in (3.6 cm), 0.9 in (2.3 cm), and 0.5 in (1.3 cm)
- [ ] Every motif lies flat, with no cupping or ruffling
- [ ] Spokes radiate evenly from each center
- [ ] Motif 1 edge has exactly 40 sc
- [ ] Motif 2 edge has exactly 24 sl st
- [ ] Motif 3 edge has exactly 12 sl st
- [ ] Motif 4 has exactly 8 sc
- [ ] Connectors have 12, 10, and 8 tw-ch, each with a visible spiral
- [ ] Total length is about 8½ in (21.6 cm)
- [ ] Tails are woven in invisibly
Troubleshooting
The center hole is too big. You may have chained the ring too loosely. Rework the ring with tighter chains, or make the ring 1 ch shorter.
Motif 1 cups. Your sc edging is too tight. Loosen your tension, or use the next hook size up for Rnd 3 only.
Motif 1 ruffles. Your tension is too loose. Go down a hook size, or check that you made exactly 8 increases.
The connectors don’t twist. You are wrapping the yarn the normal way. Make sure every tw-ch uses the reverse wrap.
The connectors twist too much and kink. Relax your tension on the tw-ch, then straighten the cord during blocking.
The motifs aren’t stepping down clearly. Check each one against its checkpoint. Fix a motif that is off before you move on to the next connector.
There’s a gap at the slip-stitch join. Work the joining sl st through both loops of the first stitch, then pull it snug.
Care
Hand wash in cool water and lay flat to dry. If the piece softens over time, re-block it with fresh starch.
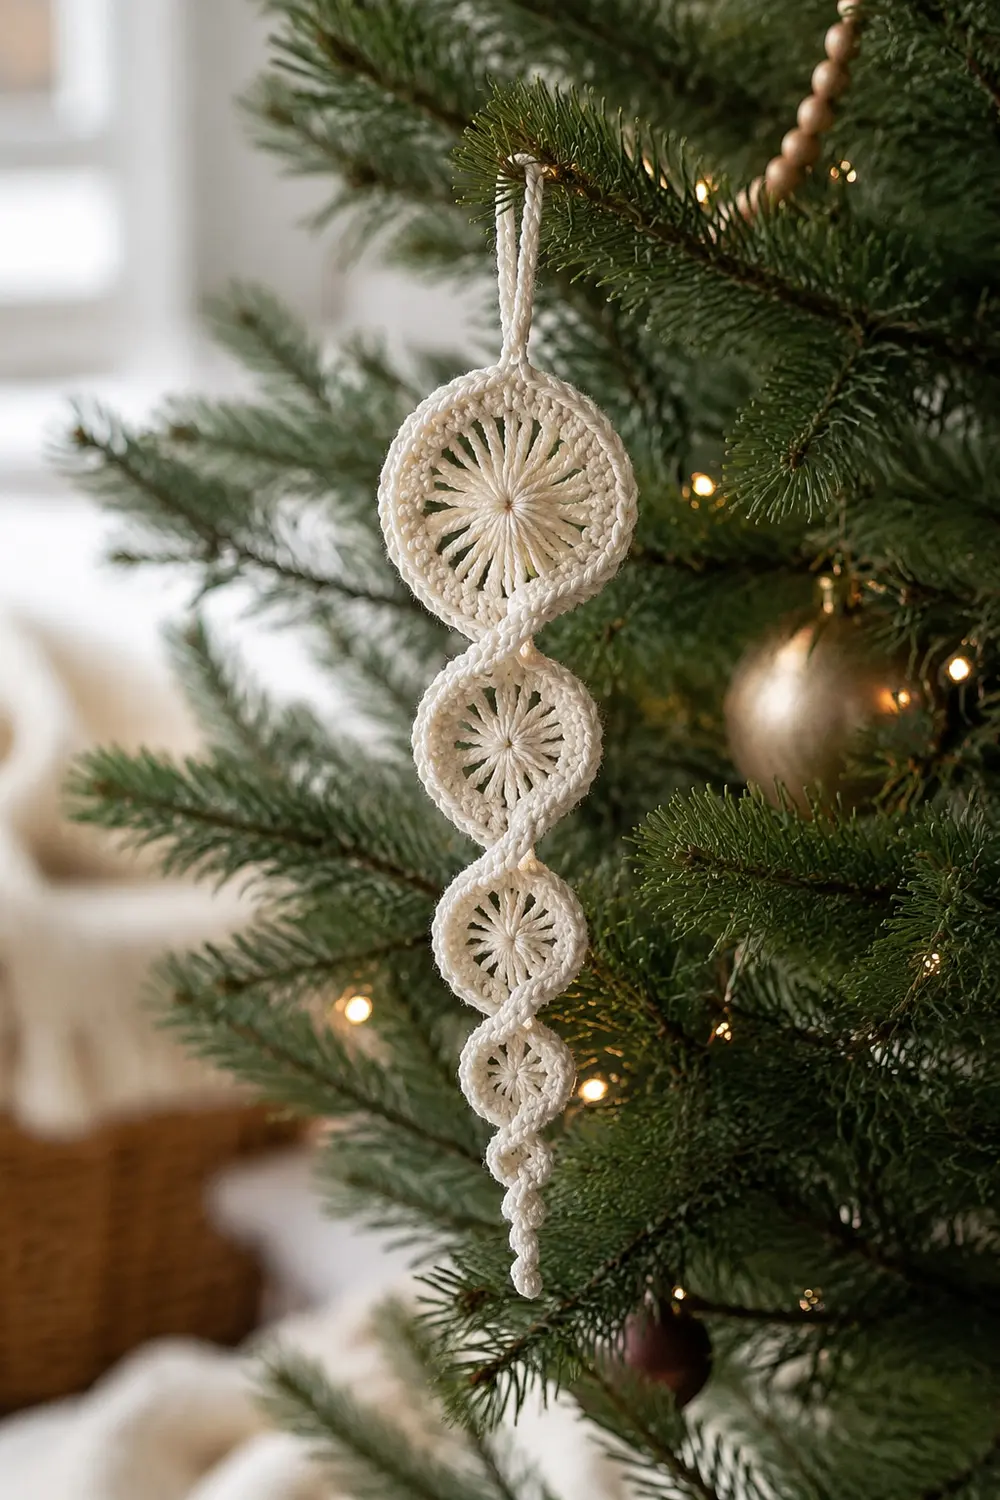
Final Notes
The measurement chain is simple. Motif 1 grows from 0.9 in (2.3 cm) to 1.6 in (4.1 cm) to 2 in (5.1 cm). Motif 2 grows from 0.8 in (2.0 cm) to 1.3 in (3.3 cm) to 1.4 in (3.6 cm). Motif 3 grows from 0.8 in (2.0 cm) to 0.9 in (2.3 cm), and Motif 4 stops at 0.5 in (1.3 cm). The connectors measure 1.5 in (3.8 cm), 1.25 in (3.2 cm), and 1 in (2.5 cm), for a total of about 8½ in (21.6 cm).
If each checkpoint matches, the finished piece will match too. Optional: you can start with a short chain loop at Motif 1 for hanging, but the pattern itself is complete without it.
Happy crocheting!