

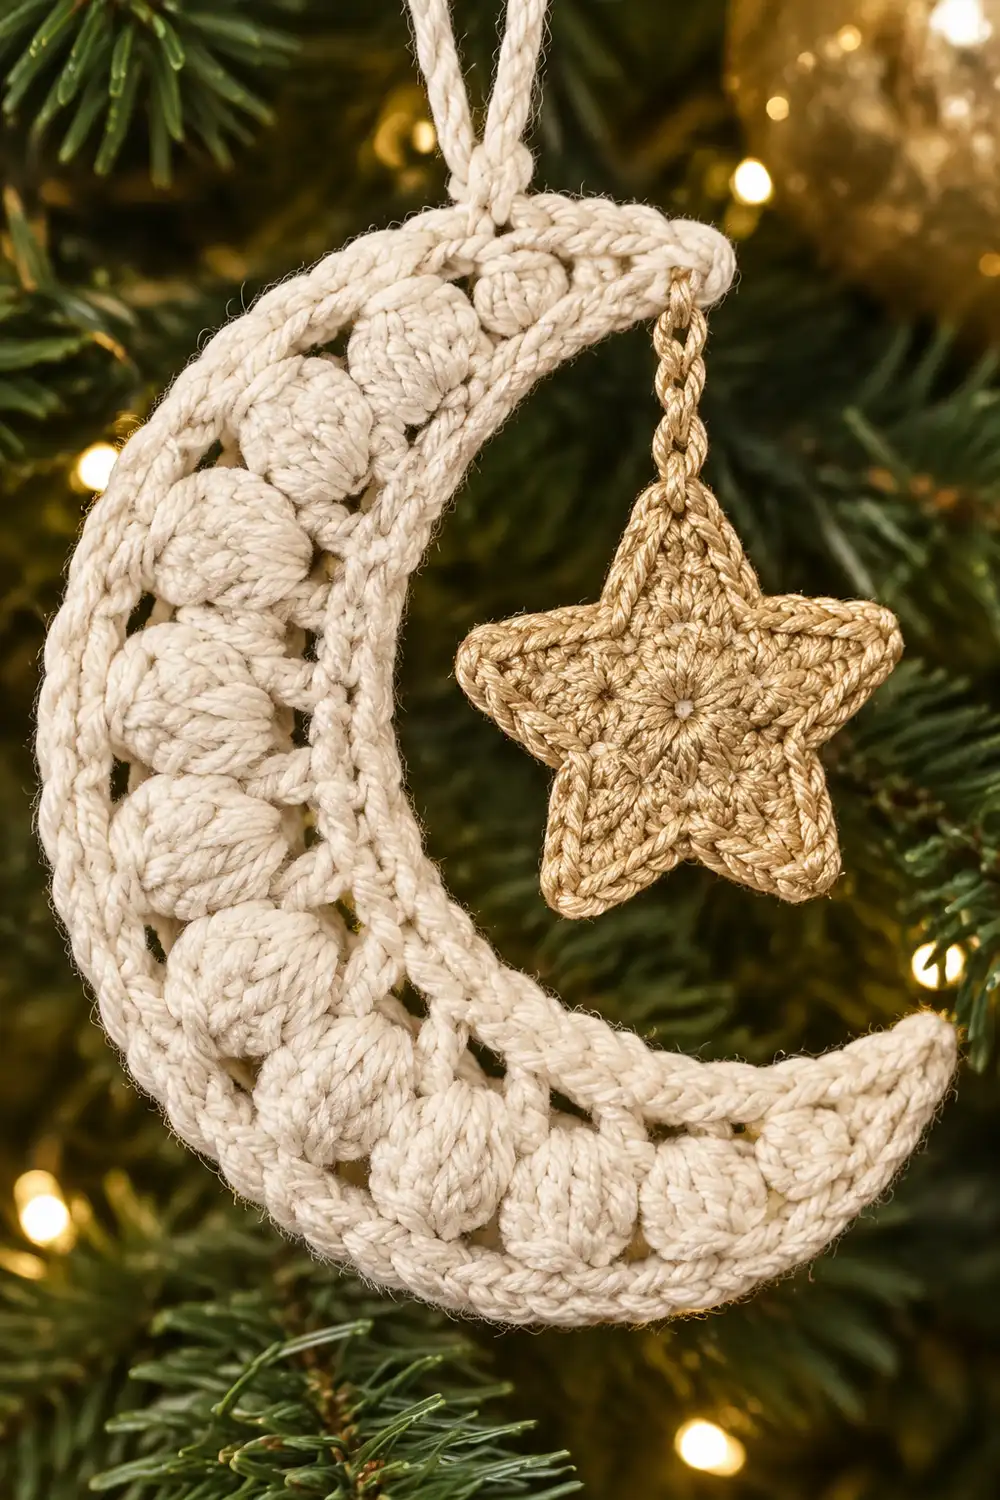
This little ornament is a cream crescent moon with a soft, dimensional surface of bobbles and a small gold star stitched onto the center of the crescent. It is a single hanging piece, finished with a white string loop so it can sit among evergreen branches, metallic baubles, and warm white lights.
The palette is simple: cream or off-white for the moon and gold or champagne for the star. The style is quiet and textured. The moon is densely worked so it holds its shape, and the outer and inner edges are rounded and smooth.
The pattern uses US crochet terms. The finished moon measures 3.5 in (8.9 cm) tip to tip and 1.3 in (3.3 cm) across the band at its widest point. The star measures 1.25 in (3.2 cm) point to point.
Construction is straightforward. You chain a foundation that becomes the inner curve, then work three short rows with graded stitch heights so the ends taper into points. The middle row carries the bobbles. One round of single crochet smooths the whole outline. The star is worked separately in the round and sewn on, and a white string loop is added at the top tip.
Finished Size and Construction
- Finished size: 3.5 in (8.9 cm) tip to tip; band 1.3 in (3.3 cm) at center
- Star size: 1.25 in (3.2 cm) point to point
- Skill level: Advanced beginner
- Terminology: US crochet terms
- Yarn weight: DK / light (3), cotton
- Hook: 3.5 mm (E-4)
- Number of pieces: 1 finished ornament (crescent moon plus star appliqué)
- Layout: Crescent with star stitched at the center of the inner curve; hanging loop at the top tip
- Size before border: 3.1 in (7.9 cm) tip to tip; band 0.9 in (2.3 cm)
- Border depth: 0.2 in (0.5 cm), one round of sc
Materials
Choose a smooth, mercerized or matte cotton in DK weight. Cotton gives crisp bobbles and holds the crescent shape after blocking. Avoid fuzzy or very stretchy yarns, because they blur the texture and let the tips droop.
- Cream / off-white (moon): 6 g, about 14 m
- Gold / champagne (star): 2 g, about 5 m
- White string or cotton thread (hanging loop): one 10 in (25.4 cm) length
Quantities include a margin for your gauge swatch and weaving in ends.
Tools:
– 3.5 mm (E-4) crochet hook
– Tapestry needle
– Scissors
– 2 stitch markers
– Rust-proof pins and a small blocking mat or foam board
– Spray bottle
– Optional: fabric stiffener
Abbreviations (US Terms)
- ch – chain
- sl st – slip stitch
- sc – single crochet
- hdc – half double crochet
- dc – double crochet
- sk – skip
- st(s) – stitch(es)
- RS / WS – right side / wrong side
- bob – bobble (see below)
Special stitch – Bobble (bob): *Yarn over, insert hook in the stitch, yarn over and pull up a loop, yarn over and pull through 2 loops (2 loops remain on hook). Repeat from * 3 more times in the same stitch (5 loops on hook). Yarn over and pull through all 5 loops. One bob counts as 1 stitch.
Bobbles are worked on a WS row, so they pop out toward the RS.
Gauge and Checkpoints
Gauge: 5 sc and 5 rows = 1 in (2.5 cm) in sc with a 3.5 mm hook.
Make one test ornament before committing to a batch. Measure at each stage:
- Foundation: ch 26 measures about 5 in (12.7 cm), unstretched.
- After Row 1: the band is about 0.4 in (1.0 cm) deep at the center, and the strip already curves.
- After Row 3: 3.1 in (7.9 cm) tip to tip; band 0.9 in (2.3 cm) at center.
- After border: 3.5 in (8.9 cm) tip to tip; band 1.3 in (3.3 cm).
If your moon is too big: go down to a 3.25 mm hook, or check that you are not pulling up tall loops on the bobbles.
If your moon is too small: go up to a 3.75 mm hook.
Keep the same hook for the star so the gold stitches match the density of the moon.
Crescent Moon
Work with cream yarn. Place a marker in the first and last stitch of each row if the graded ends are hard to see.
Foundation: Ch 26.
Row 1 (RS): Sl st in 2nd ch from hook, sc in next 2 ch, hdc in next 2 ch, dc in next ch, 2 dc in next ch, (dc in next 3 ch, 2 dc in next ch) 3 times, dc in next ch, hdc in next 2 ch, sc in next 2 ch, sl st in last ch. (29 sts)
The middle section uses 15 chains and holds 4 increases, so it produces 19 dc. The increases sit symmetrically, so the strip curves evenly. The graded stitch heights form the two pointed ends.
Stitch order for reference: 1 sl st, 2 sc, 2 hdc, 19 dc, 2 hdc, 2 sc, 1 sl st.
Row 2 (WS, bobble row): Ch 1 and turn (ch 1 does not count as a st). Sl st in first 3 sts, sc in next 2 sts, sc in next st, (bob in next st, sc in next st) 9 times, sc in next 2 sts, sl st in last 3 sts. (29 sts, including 9 bobbles)
The 19 middle sts are worked as sc, then 9 pairs of bob and sc. This places the bobbles at the even positions 2, 4, 6, and so on up to 18, with a sc at each end of the bobble section. Check that all 9 bobbles bulge toward the RS.
Row 3 (RS): Ch 1 and turn. Sl st in first 2 sts, sc in next 3 sts, then work the middle 19 sts as follows: sc in next 2 sts, 2 sc in next st, sc in next 3 sts, 2 sc in next st, sc in next 5 sts, 2 sc in next st, sc in next 3 sts, 2 sc in next st, sc in next 2 sts. Finish with sc in next 3 sts and sl st in last 2 sts. (33 sts)
The middle 19 sts become 23 sts (19 worked + 4 increases). All 4 increases fall on sc stitches from Row 2 (positions 3, 7, 13, and 17), never on bobbles. Work 1 sc into the top of each bobble, through the closing loop.
Row total: 2 sl st + 3 sc + 23 middle sts + 3 sc + 2 sl st = 33.
Checkpoint: 3.1 in (7.9 cm) tip to tip and 0.9 in (2.3 cm) across the band at center. Do not fasten off.
Star Appliqué
Work with gold yarn.
Round 1: Make a magic ring. Ch 1, work 10 sc in the ring, and pull the ring closed. Join with a sl st to the first sc. (10 sc)
Round 2 (points): Ch 4, sl st in 2nd ch from hook, sc in next ch, hdc in next ch, sk next sc of Round 1, sl st in next sc. Repeat from * to * 4 more times. The final sl st lands in the joining st. (5 points)
Each point uses 2 sc from Round 1, and 5 points × 2 sc = 10 sc, so the star closes evenly.
Fasten off, leaving a 10 in (25.4 cm) tail for sewing. Weave in the starting tail.
Checkpoint: 1.25 in (3.2 cm) point to point.
Border
The border is one round of plain sc in cream. It smooths the outer and inner edges into clean, rounded curves.
Border gauge: 5 sc = 1 in (2.5 cm), the same gauge as the moon. The border is not worked tighter or looser than the body.
You finished Row 3 at the tip where the foundation chain began. Call this Tip B. The other tip is Tip A.
Border Round 1: Ch 1 and do not turn. Rotate the piece so you can work along the inner edge.
- Tip B: 3 sc into the point.
- Inner edge: Working into the remaining loops of the foundation chain, work 1 sc in each of the 25 chains that hold Row 1 stitches. (25 sc)
- Tip A: 3 sc into the point. The unworked turning chain at Tip A is covered by this group.
- Outer edge: 1 sc in each of the 33 sts of Row 3. (33 sc)
- Join with a sl st to the first sc. (64 sts)
Count as a conversion round:
– 58 sts worked 1 per existing stitch (25 on the inner edge + 33 on the outer edge)
– 6 sts added at the tips (3 at each tip)
– 58 + 6 = 64
Why the math works: The long edges get exactly 1 sc per existing stitch, so the border neither ruffles nor pulls.
At 5 sc/in, the outer edge is 33 sts, or 6.6 in (16.8 cm). The inner edge is 25 sts, or 5 in (12.7 cm). The outer edge is longer, and that length difference is what holds the crescent curve.
The 3 sc at each tip act like a corner group: one stitch turns the point and one supports each side. This keeps the tips pointed without blunting them.
Checkpoint: 3.5 in (8.9 cm) tip to tip; band 1.3 in (3.3 cm).
Fasten off and weave in the ends.
Assembly
- Position the star. Place it at the center of the crescent, at the midpoint of the inner curve. One star point should overlap the inner border by about 0.2 in (0.5 cm), so the star sits within the hollow of the moon. Pin it in place.
- Sew the star. Use the gold tail and small, hidden stitches through the back loops of the cream border. Tack the overlapping point and the two neighboring star edges so the star cannot flop.
- Add the hanging loop. Thread the 10 in (25.4 cm) white string through the border at the top tip. Knot the ends to form a loop about 4 in (10.2 cm) long, and trim the tails.
Final Blocking
- Lightly mist the ornament with water until it is damp, not soaked.
- Lay it RS up on the blocking mat.
- Pin each tip so the moon measures 3.5 in (8.9 cm) tip to tip.
- Ease the outer curve into a smooth arc. Pin along the outer edge every 0.5 in (1.3 cm).
- Shape the inner curve with your fingers so it is evenly rounded. Do not flatten the bobbles.
- Optional: brush a thin coat of fabric stiffener onto the back only.
- Let it dry completely, ideally overnight, before unpinning.
Final Quality-Control Checklist
- [ ] Row 1 has 29 sts, Row 2 has 29 sts with 9 bobbles, and Row 3 has 33 sts.
- [ ] All bobbles bulge to the RS.
- [ ] The border has 64 sts: 25 inner, 33 outer, and 3 at each tip.
- [ ] The moon is 3.5 in (8.9 cm) tip to tip and the band is 1.3 in (3.3 cm).
- [ ] The star is 1.25 in (3.2 cm) with 5 even points.
- [ ] The star is centered on the inner curve and firmly tacked.
- [ ] The hanging loop is secure at the top tip.
- [ ] All ends are woven in invisibly.
Troubleshooting
Bobbles are on the back. Row 2 must be worked with the WS facing. Rip back and rework it after turning.
Crescent ruffles. Your increases may be too loose, or you may have added extra stitches. Recount Row 3 (33 sts) and go down a hook size.
Crescent is too straight. Check that you made all 4 increases in Row 1 and all 4 in Row 3. Blocking also deepens the curve.
Tips are blunt. Make sure the rows begin and end with sl sts, and work exactly 3 sc at each tip.
Inner edge puckers. Work into the chain loops loosely, or use a hook 0.5 mm larger for the foundation chain only.
Star curls. Block it flat before sewing, and tack all three contact points.
Size is off by more than 0.25 in (0.6 cm). Recheck your gauge and change hook size, keeping all stitch counts the same.
Care
Hand wash in cool water and press out the excess gently. Reshape and dry flat, pinning the tips again if needed.

Final Notes
The measurement chain runs like this:
- A gauge of 5 sc per 1 in (2.5 cm) gives a 26-chain foundation of about 5 in (12.7 cm).
- Three graded rows build the crescent to 33 outer stitches, measuring 3.1 in (7.9 cm) tip to tip.
- A 64-stitch border adds 0.2 in (0.5 cm) all around, for a finished moon of 3.5 in (8.9 cm).
- A 1.25 in (3.2 cm) gold star, stitched at the center of the inner curve, completes the ornament.
Optional: if you would like a set for the tree, repeat the pattern as many times as you like, keeping the same hook so every moon matches.
Happy crocheting!