

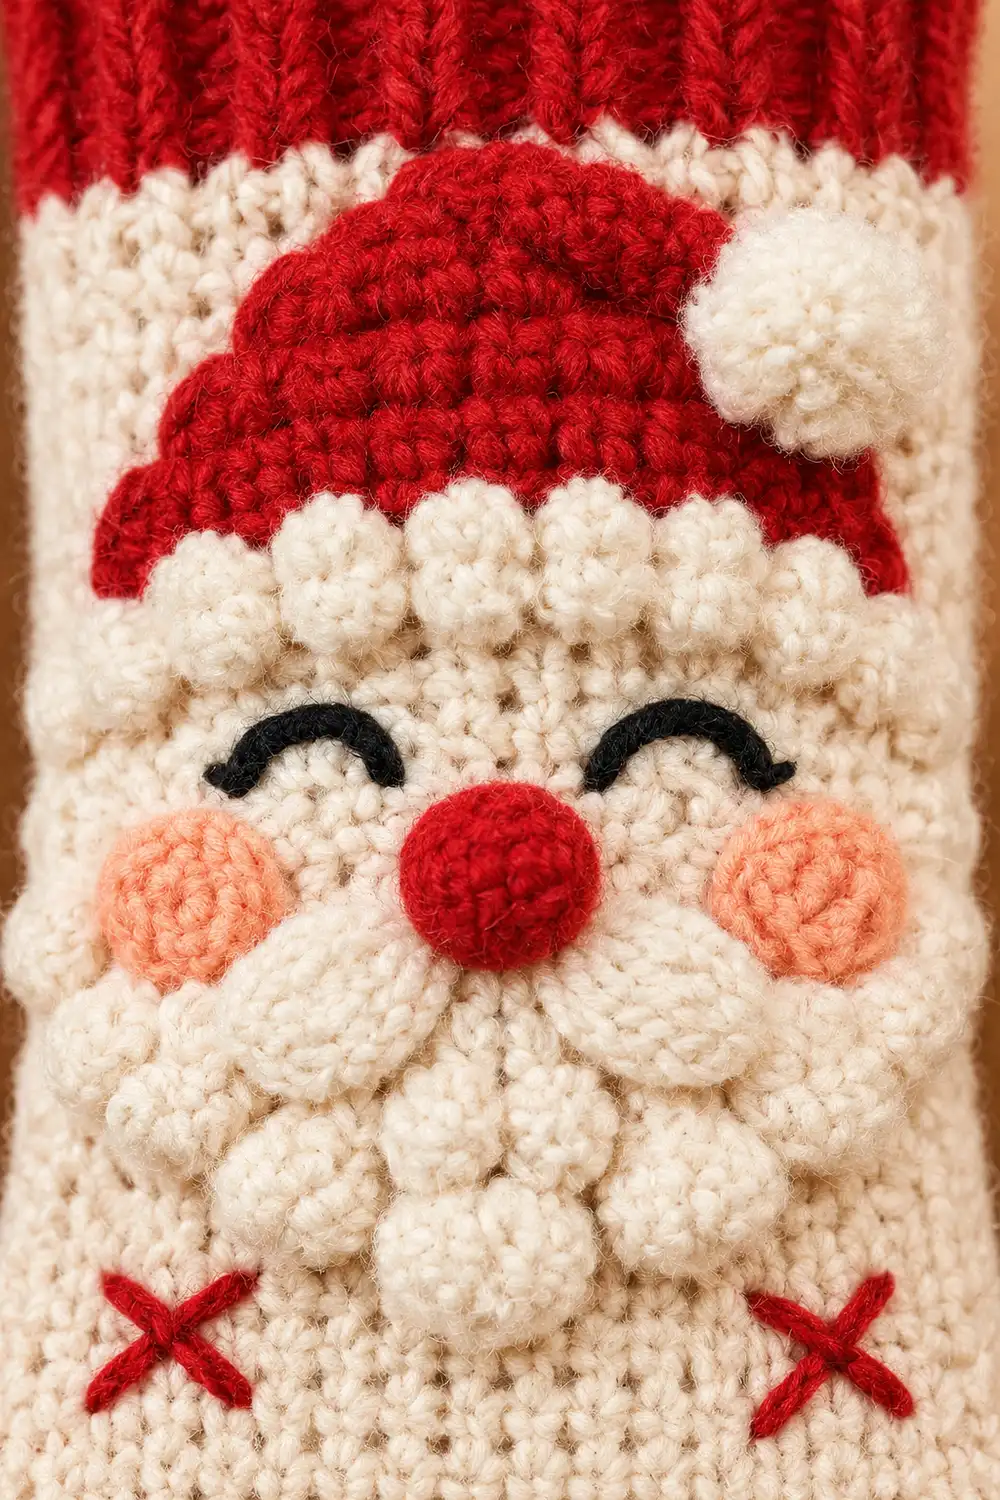
These cozy holiday socks put a cheerful Santa face right on the front of each leg. The design uses a cream body, a red toe and sole section, and a red ribbed cuff. Santa has a rounded dome hat, closed smiling eyes in black embroidery, peach cheeks, a red pom-pom nose, and a puffy cream beard made with bobble stitches. Small red X details decorate the cream foot.
The colors are classic Christmas: red, cream/off-white, peach, and a touch of black. The fabric is dense single crochet, so the socks are warm, snug, and fitted for lounging around the house.
This pattern uses US crochet terms. Each sock measures 9.5 in (24.1 cm) long in the foot, 7.2 in (18.3 cm) around the foot, and 8 in (20.3 cm) tall from the heel opening to the top of the cuff. That makes a mid-calf sock that fits an average adult foot of 8–8.5 in (20.3–21.6 cm) around.
Each sock is worked toe-up in joined rounds. You start with a rounded red toe, switch to cream for the foot, leave a heel opening, work the leg, and finish with a ribbed cuff. The afterthought heel is added last. The Santa face is made from small appliqués that are sewn on, followed by embroidered eyes and X details.
Finished Size and Construction
- Finished size: foot length 9.5 in (24.1 cm); foot circumference 7.2 in (18.3 cm); calf circumference 8 in (20.3 cm); leg height 8 in (20.3 cm)
- Skill level: Intermediate
- Terminology: US crochet terms
- Yarn weight: DK (light worsted, #3)
- Hook: 3.5 mm (E-4)
- Number of pieces: 2 socks (1 pair); each sock has 5 appliqués (hat, hat brim, beard, nose, 2 cheeks counted as one set)
- Layout: Santa centered on the front of the leg; X details on the top of the foot
- Piece size (flat): foot 3.6 in (9.1 cm) wide; upper leg 4 in (10.2 cm) wide
- Size before border (cuff): leg 6 in (15.2 cm) above the heel opening
- Border (cuff) depth: 2 in (5.1 cm)
Materials
Choose a smooth DK yarn with some wool or nylon for durability and stretch. A soft acrylic works too, but wool blends keep their shape better on the foot. Avoid fuzzy yarn, since it hides the bobble texture.
Quantities for the full pair (based on about 230 m per 100 g):
- Cream/off-white: 110 g, 253 m
- Red: 60 g, 138 m
- Peach: 5 g, 12 m
- Black: 2 g, 5 m
These quantities include a margin of about 10% for swatching and gauge differences.
Tools:
- 3.5 mm (E-4) crochet hook
- Tapestry needle
- 4 locking stitch markers
- Scissors
- Measuring tape
- Spray bottle and blocking surface
Abbreviations (US Terms)
- ch – chain
- sc – single crochet
- hdc – half double crochet
- sl st – slip stitch
- inc – 2 sc in the same stitch
- sc2tog – single crochet 2 together
- BLO – back loop only
- fpdc – front post double crochet
- bpdc – back post double crochet
- MR – magic ring
- st(s) – stitch(es)
- rnd(s) – round(s)
Special stitch – Bobble (B): Yarn over, insert hook in the stitch, yarn over, pull up a loop, yarn over, pull through 2 loops. Repeat from * to * 3 more times in the same stitch (5 loops on hook). Yarn over and pull through all 5 loops. Bobbles pop toward the side facing away from you, so they are worked on wrong-side rows.
Gauge and Checkpoints
Gauge: 20 sc and 22 rnds = 4 in (10.2 cm) in sc worked in the round. That is 5 sts and 5.5 rnds per inch.
Make one full sock before starting the second, and check it against each checkpoint:
- After Rnd 6: the toe lies flat at 3.6 in (9.1 cm) across.
- After Rnd 11: the red section is 2 in (5.1 cm) from the toe tip.
- After Rnd 44: the foot is 8 in (20.3 cm) from the toe tip.
- After Rnd 62: the leg lies flat at 4 in (10.2 cm) across.
- After Rnd 77: the leg is 6 in (15.2 cm) above the heel opening.
If your piece is too big (fewer than 5 sts per inch), go down 0.25–0.5 mm in hook size.
If your piece is too small (more than 5 sts per inch), go up 0.25–0.5 mm.
To adjust foot length, add or remove cream rounds between Rnds 12 and 44. Each round is about 0.2 in (0.5 cm).
Toe (Red)
All rounds are joined: ch 1 at the start, then sl st to the first sc at the end. The beginning ch 1 does not count as a stitch. The join line becomes the side of the foot.
Rnd 1: With red, MR, 6 sc in ring. (6)
Rnd 2: Inc in each st around. (12)
Rnd 3: (Sc 1, inc) 6 times. (18)
Rnd 4: (Sc 2, inc) 6 times. (24)
Rnd 5: (Sc 3, inc) 6 times. (30)
Rnd 6: (Sc 4, inc) 6 times. (36)
These evenly spaced increases give the toe its rounded shape.
Rnds 7–11: Sc in BLO in each st around. (36)
The BLO rounds create the ridged red texture of the sole section. Change to cream on the final sl st of Rnd 11.
Foot (Cream)
Flatten the toe with the join line at one side. Sts 1–18 are the instep (top of the foot), and sts 19–36 are the sole.
Rnds 12–44: Sc in each st around. (36)
Checkpoint: the foot measures 8 in (20.3 cm) from the toe tip.
Heel Opening and Leg (Cream)
Rnd 45: Sc 18 across the instep, ch 18, skip the next 18 sts. (18 sc + 18 ch)
Rnd 46: Sc 18, then sc 1 in each of the 18 ch. (36)
Rnds 47–61: Sc in each st around. (36)
Rnd 62: (Inc, sc 16, inc) 2 times. (40)
This round places the increases at the sides, so the front stays centered for Santa. Each half grows from 18 to 20 sts.
Rnds 63–77: Sc in each st around. (40)
Checkpoint: the leg measures 6 in (15.2 cm) above Rnd 45. Change to red on the final sl st of Rnd 77, then continue straight to the Border section.
Afterthought Heel (Red)
Work the heel after the cuff is finished.
Rnd 1: Join red at one corner of the heel opening. Sc 18 into the skipped sole sts, then sc 18 into the underside of the chain loops. (36)
Place a marker at each corner. Each half has 18 sts.
Rnd 2: Sc in each st around. (36)
Rnd 3: (Sc2tog, sc 14, sc2tog) 2 times. (32)
Rnd 4: (Sc2tog, sc 12, sc2tog) 2 times. (28)
Rnd 5: (Sc2tog, sc 10, sc2tog) 2 times. (24)
Rnd 6: (Sc2tog, sc 8, sc2tog) 2 times. (20)
Rnd 7: (Sc2tog, sc 6, sc2tog) 2 times. (16)
Rnd 8: (Sc2tog, sc 4, sc2tog) 2 times. (12)
Flatten the heel so 6 sts face 6 sts. Whipstitch them together. Use the tails to close any small gaps at the corners.
The heel adds 1.5 in (3.8 cm), so the full foot length is 8 + 1.5 = 9.5 in (24.1 cm).
Santa Appliqués (Make 1 Set per Sock)
Hat (red, rounded dome):
Rnds 1–6: Work the same as Toe Rnds 1–6. (36)
Rnd 7: (Sc 5, inc) 6 times. (42)
You now have a flat circle 2.5 in (6.4 cm) across. Fold it in half. Whipstitch the curved edges together, matching 21 sts to 21 sts. The fold becomes the straight bottom edge, and the curve forms a rounded dome 2.5 in (6.4 cm) wide and 1.25 in (3.2 cm) tall.
Hat Brim (cream):
Ch 14.
Row 1: Sc in 2nd ch from hook and in each ch across. (13)
Row 2: Ch 1, turn, sc across. (13)
Fasten off. The brim measures 2.6 in (6.6 cm) wide.
Beard (cream, bobbles):
Ch 14.
Row 1 (RS): Sc in 2nd ch from hook and in each ch across. (13)
Row 2 (WS): Ch 1, turn, sc 1, (B, sc 1) 6 times. (13: 6 B, 7 sc)
Row 3: Ch 1, turn, sc2tog, sc 9, sc2tog. (11)
Row 4: Ch 1, turn, sc 1, (B, sc 1) 5 times. (11)
Row 5: Ch 1, turn, sc2tog, sc 7, sc2tog. (9)
Row 6: Ch 1, turn, sc 1, (B, sc 1) 4 times. (9)
Row 7: Ch 1, turn, sc2tog, sc 5, sc2tog. (7)
Row 8: Ch 1, turn, sc 1, (B, sc 1) 3 times. (7)
Row 9: Ch 1, turn, sc2tog, sc 3, sc2tog. (5)
Edging: Work 1 rnd of sc around the beard: 9 sc down one side (1 per row end), 5 sc across Row 9, 9 sc up the other side, and 13 sc across the foundation chain. (36) Sl st to join.
The beard measures 2.6 in (6.6 cm) wide and 1.75 in (4.4 cm) tall.
Cheeks (peach, make 2): MR, 6 sc, sl st to join. Each cheek is 0.5 in (1.3 cm) across.
Nose (red pom-pom):
Rnd 1: MR, 6 sc. (6)
Rnd 2: (Sc 1, inc) 3 times. (9)
Rnd 3: Sc around. (9)
Rnd 4: (Sc 1, sc2tog) 3 times. (6)
Stuff the nose with yarn tails and close the ring.
Assemble the Face
Center the face on the front 18 sts. Pin each piece in place before sewing:
- Beard: bottom edge at Rnd 51, top edge at about Rnd 61.
- Brim: bottom edge at Rnd 65.
- Hat: fold edge tucked just under the top of the brim, dome reaching about Rnd 74.
Sew around each piece with matching yarn. Keep your stitches small, and do not pull tight enough to pucker the sock.
Eyes: With black, embroider 2 curved smiling arcs at Rnd 63, about 0.75 in (1.9 cm) apart. Use 3 backstitches per eye.
Cheeks and nose: Sew the cheeks just outside and below the eyes. Sew the nose centered at the top of the beard.
X details: With red, embroider cross stitches over 2 sts × 2 rnds on the instep:
- Rnd 22: sts 3–4, 9–10, and 15–16
- Rnd 30: sts 9–10
- Rnd 38: sts 3–4 and 15–16
Make the second sock exactly the same way.
Border: Ribbed Cuff (Red)
Border gauge: 5 sts per inch in width (the same as the leg) and 3 rnds per inch in height.
Rnd 78 (conversion round): Ch 2 (does not count as a stitch). Hdc in each sc around. Count: 40 worked 1-per-existing-st + 0 extra = 40. That gives 20 sts on the front and 20 on the back. Sl st to join.
Rnds 79–83: Ch 2. (Fpdc, bpdc) 20 times. (40: 20 front, 20 back) Sl st to join.
Why the math works: The 1×1 rib needs an even count. Since 40 ÷ 2 = 20 repeats, the ribs line up perfectly every round. There are no increases, so the cuff matches the 8 in (20.3 cm) calf and hugs gently.
The cuff is 6 rnds ÷ 3 rnds per inch = 2 in (5.1 cm) deep. Total leg height is 6 + 2 = 8 in (20.3 cm).
Final Blocking
- Weave in all ends on the inside of the sock.
- Lightly mist each sock until damp, not soaked.
- Lay each sock flat with the heel folded in its natural position.
- Pat the foot to 3.6 in (9.1 cm) wide and 9.5 in (24.1 cm) long.
- Pat the upper leg to 4 in (10.2 cm) wide.
- Shape the hat dome and puff up the bobbles with your fingers. Do not press them flat.
- Let the socks dry completely before wearing.
Final Quality-Control Checklist
- Each sock has 36 sts in the foot and 40 sts in the upper leg.
- The foot is 9.5 in (24.1 cm) long including the heel.
- The leg is 8 in (20.3 cm) tall including the cuff.
- The cuff ribs line up in all 5 rib rounds.
- The heel corners have no holes.
- Both Santa faces sit at the same rounds and are centered.
- The X details match on both socks.
- All ends are secure on the inside.
Troubleshooting
- Seam line drifts: Make sure you work the first sc into the same st as the join.
- Bobbles on the wrong side: Work bobbles only on WS rows.
- Holes at the heel corners: Close them with the tails, or pick up 1 extra st in the gap and sc2tog it on Rnd 2.
- Cuff too loose: Work the rib rounds with a 3.25 mm hook.
- Appliqué puckers the sock: Re-sew with looser stitches while the sock is stretched over your hand.
- Hat looks flat: Make sure the fold sits at the bottom so the curve forms the dome.
Care
Hand wash in cool water and lay flat to dry. Turn the socks inside out to protect the bobbles and embroidery.

Final Notes
The measurement chain is simple:
- Gauge of 5 sts and 5.5 rnds per inch
- Toe of 36 sts at 3.6 in (9.1 cm) flat
- Foot of 8 in (20.3 cm), plus a 1.5 in (3.8 cm) heel, for 9.5 in (24.1 cm) total
- Leg of 40 sts and 6 in (15.2 cm)
- Cuff of 2 in (5.1 cm), for 8 in (20.3 cm) total leg height
Check each stage before moving on, and both socks will match. Happy crocheting!