

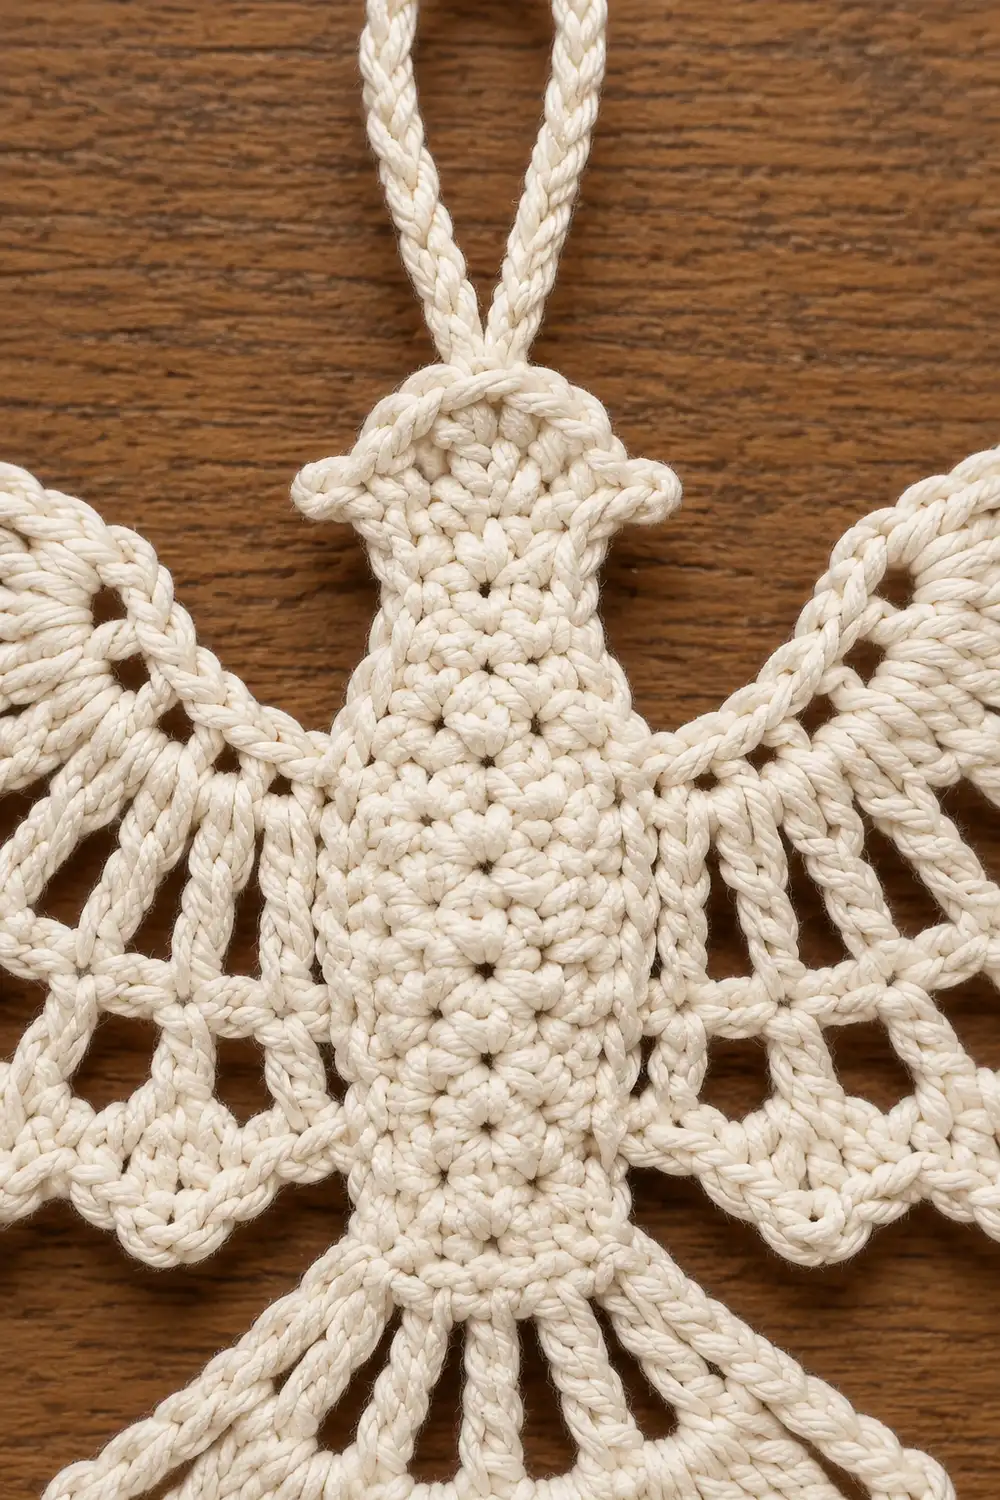
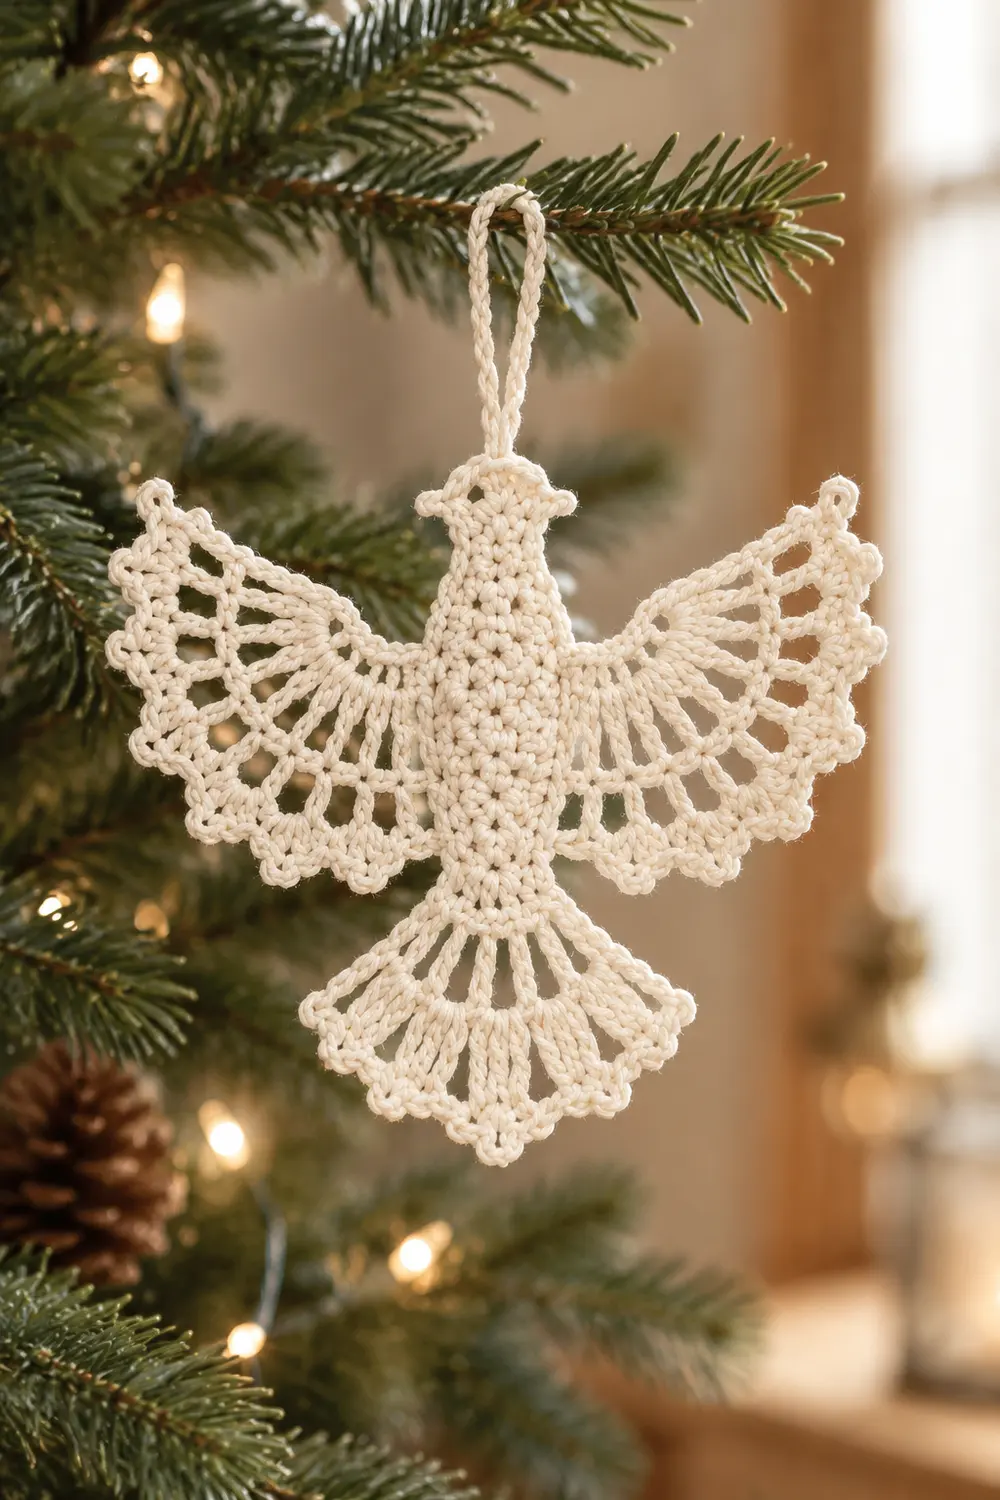
The Snowlace Angel is a small, lacy ornament worked in a single cream or off-white yarn. It has a compact, textured body packed with bobbles, two symmetrical open wings built from shell-stitch fans, and a matching fan skirt at the bottom center. The outer edges of the wings and skirt finish in neat picot points, and a twisted cord loop at the top lets it hang from a tree branch, window latch, or gift bow.
The style is classic and quiet. The dense bobble torso contrasts with the airy fans, so the angel reads clearly even in one color. Cream cotton gives crisp stitch definition and blocks flat.
This pattern uses US crochet terms. The finished angel measures 4.75 in (12.1 cm) wide and 5.5 in (14.0 cm) tall including the hanging loop. Without the loop it is 4.25 in (10.8 cm) tall.
The angel is worked in one piece. You crochet the bobble body flat in rows from bottom to top. Then you work each wing directly into the side edges of the body, and the skirt into the foundation chain. A picot border finishes each fan. Last, you attach a twisted cord loop to the head.
Finished Size and Construction
- Finished size: 4.75 in (12.1 cm) wide x 5.5 in (14.0 cm) tall including loop
- Height without loop: 4.25 in (10.8 cm)
- Skill level: Intermediate
- Terminology: US crochet terms
- Yarn weight: Fingering / #1 cotton
- Hook: 2.25 mm (US B-1)
- Number of pieces: 1 crocheted piece, plus a twisted cord loop added at the end
- Layout: Single ornament. The body is at the center, with one wing on each side and the skirt below.
- Body size: 1.25 in (3.2 cm) wide x 2.5 in (6.4 cm) tall
- Size before border: 4.25 in (10.8 cm) wide x 4.0 in (10.2 cm) tall, not including the loop
- Border depth: 0.25 in (0.6 cm) on each wing and on the skirt
Materials
Choose a smooth, mercerized or combed cotton in fingering weight. Cotton holds the bobbles firmly and keeps the picots sharp after blocking. Avoid fuzzy or very stretchy yarns, because they blur the lace and make the fans droop.
Yarn:
– Cream / off-white: 15 g (about 55 m / 60 yd)
The angel uses roughly 10 g. The quantity above includes a margin for your gauge swatch, the twisted cord, and weaving in ends.
Tools:
– 2.25 mm (US B-1) crochet hook
– Tapestry needle
– Scissors
– Blocking mat or foam board
– Rust-proof pins
– Spray bottle
– Optional: fabric stiffener or spray starch
Abbreviations (US Terms)
- ch – chain
- sl st – slip stitch
- sc – single crochet
- sc2tog – single crochet 2 together
- dc – double crochet
- tr – treble crochet
- sp – space
- st(s) – stitch(es)
- RS / WS – right side / wrong side
Special stitches:
- Bobble (bob): This is a 4-dc bobble. Yarn over, insert hook in st, pull up a loop, yarn over, pull through 2 loops. Repeat from * to * 3 more times in the same st, for 5 loops on the hook. Yarn over and pull through all 5 loops. Bobbles are worked on WS rows so they pop out on the RS.
- V-st: Work (tr, ch 1, tr) in the same st.
- Shell: In the same st or sp, work (2 dc, ch 2, 2 dc) on the first shell row, and (3 dc, ch 2, 3 dc) on the second shell row.
- Picot: Ch 3, then sl st in the first ch.
Turning chains: Ch 1 does not count as a stitch. Ch 3 counts as 1 dc. Ch 5 counts as 1 tr plus ch 1.
Gauge and Checkpoints
Gauge: 9 sc and 10 rows = 1 in (2.5 cm) in plain sc rows.
The whole ornament is the gauge test, so make the body first and measure before you add any fans.
Checkpoints:
1. After Row 7: The body is 11 sc wide and measures 1.25 in (3.2 cm) across.
2. After Row 21: The body is 2.5 in (6.4 cm) tall from the foundation to the head top. The bobble rows add a little extra height compared to plain sc.
3. After each wing’s Row 4: The wing projects 1.5 in (3.8 cm) from the body edge. Its outer curve measures about 5.3 in (13.5 cm) when gently flattened.
4. After the borders: The ornament is 4.75 in (12.1 cm) wide and 4.25 in (10.8 cm) tall without the loop.
If your body is too big, go down to a 2.0 mm hook. If it is too small, go up to a 2.5 mm hook. Change the hook by one size and remake the body. Don’t try to correct size with the fans, because the fan stitch counts are fixed.
Body
Ch 6.
Row 1 (RS): Sc in 2nd ch from hook and in each ch across. Turn. (5 sc)
Row 2 (WS): Ch 1, sc in first st, bob in next st, sc in next st, bob in next st, sc in last st. Turn. (5 sts: 2 bob, 3 sc)
Row 3: Ch 1, 2 sc in first st, sc in next 3 sts, 2 sc in last st. Turn. (7 sc)
Row 4: Ch 1, sc in first st, (bob in next st, sc in next st) 3 times. Turn. (7 sts: 3 bob, 4 sc)
Row 5: Ch 1, 2 sc in first st, sc in next 5 sts, 2 sc in last st. Turn. (9 sc)
Row 6: Ch 1, sc in first st, (bob, sc) 4 times. Turn. (9 sts: 4 bob, 5 sc)
Row 7: Ch 1, 2 sc in first st, sc in next 7 sts, 2 sc in last st. Turn. (11 sc)
Row 8: Ch 1, sc in first st, (bob, sc) 5 times. Turn. (11 sts: 5 bob, 6 sc)
Row 9: Ch 1, sc in each st across. Turn. (11 sc)
Rows 10–12: Repeat Rows 8, 9, and 8. (11 sts each)
Row 13: Ch 1, sc2tog, sc in next 7 sts, sc2tog. Turn. (9 sc)
Row 14: Ch 1, sc in first st, (bob, sc) 4 times. Turn. (9 sts: 4 bob, 5 sc)
Row 15: Ch 1, sc2tog, sc in next 5 sts, sc2tog. Turn. (7 sc)
Row 16 (neck): Ch 1, sc2tog, sc in next 3 sts, sc2tog. Turn. (5 sc)
Row 17 (head): Ch 1, 2 sc in first st, sc in next 3 sts, 2 sc in last st. Turn. (7 sc)
Rows 18–19: Ch 1, sc in each st across. Turn. (7 sc)
The head should be about 0.75 in (1.9 cm) wide.
Row 20: Ch 1, sc2tog, sc in next 3 sts, sc2tog. Turn. (5 sc)
Row 21: Ch 1, sc2tog, sc in next st, sc2tog. (3 sc)
Fasten off and weave in the end. Check Checkpoint 2.
The body has 7 bobble rows (Rows 2, 4, 6, 8, 10, 12, 14), so the RS is fully textured from hip to shoulder.
Wings
Both wings are worked into the row ends of Rows 6–14 along the body sides. That gives 9 row ends per side. Work 1 sc into each row end.
First wing: Hold the body with the RS facing you and the head pointing up. Join the yarn with a sl st in the Row 14 end on the right-hand edge. You will work down toward Row 6.
Row 1 (RS): Ch 1, sc in each of the 9 row ends (Rows 14 down to 6). Turn. (9 sc)
Row 2 (WS): Ch 5 (counts as tr + ch 1), tr in first sc. [Ch 2, skip 1 sc, V-st in next sc] 4 times. Turn.
(5 V-sts = 10 tr, 5 ch-1 sps, 4 ch-2 sps)
The V-sts land on sc 1, 3, 5, 7, and 9. This uses all 9 sc exactly.
Row 3 (RS): Sl st in first ch-1 sp. Ch 3 (counts as dc), then work (dc, ch 2, 2 dc) in the same sp. [Ch 3, (2 dc, ch 2, 2 dc) in next ch-1 sp] 4 times. Turn.
(5 shells = 20 dc, 4 ch-3 sps)
Row 4 (WS): Sl st in next dc and into the first ch-2 sp. Ch 3, then work (2 dc, ch 2, 3 dc) in the same sp. [Ch 4, (3 dc, ch 2, 3 dc) in next ch-2 sp] 4 times. Turn.
(5 shells = 30 dc, 4 ch-4 sps)
Do not fasten off. Continue straight into the Border section for this wing. Check Checkpoint 3.
Second wing: With the RS facing, join the yarn with a sl st in the Row 6 end on the left-hand edge. You will work up toward Row 14. Repeat Wing Rows 1–4.
Working the second wing in the opposite direction keeps both wings mirror-symmetrical, with RS rows on the same face.
Skirt
With the RS facing and the body upside down, join the yarn in the first free loop of the foundation chain. There are 5 loops.
Row 1 (RS): Ch 1, 2 sc in each of the first 4 loops, then 1 sc in the last loop. Turn. (9 sc)
Rows 2–4: Work as Wing Rows 2–4.
(Row 2: 5 V-sts. Row 3: 5 shells, 20 dc. Row 4: 5 shells, 30 dc, 4 ch-4 sps)
The skirt starts from the same 9 sc as each wing, so it is an exact match. It projects 1.5 in (3.8 cm) below the body before the border.
Border
Work this border along the outer curve of each wing and of the skirt, right after its Row 4. That makes 3 borders in total. The straight side edges of each fan stay plain.
Border gauge: The border uses the same 9 sc per inch as the body. No separate border gauge is needed.
Border Row (RS): Ch 1, sc in each of the first 3 dc, and work (sc, picot, sc) in the ch-2 sp. Sc in the next 3 dc. Then repeat the following 4 times:
– (sc, picot, sc) in the next ch-4 sp
– sc in the next 3 dc
– (sc, picot, sc) in the next ch-2 sp
– sc in the next 3 dc
The last “3 dc” includes the top of the beginning ch-3. Fasten off.
Count for each fan:
– 30 sc worked 1 into each existing dc
– 10 extra sc from 2 in each of the 5 ch-2 sps
– 8 extra sc from 2 in each of the 4 ch-4 sps
– Total: 30 + 18 = 48 sc and 9 picots
Why the math works: The Row 4 outer curve measures about 5.3 in (13.5 cm). At 9 sc/in, 48 sc covers 5.33 in, so the border lies flat without ruffling or cupping. The picots are worked on top of the sc. They add points without adding edge length.
There are 5 picots at the shell tips and 4 in the valleys between shells. This creates the pointed, lacy outline. Each border adds 0.25 in (0.6 cm), which brings each wing and the skirt to 1.75 in (4.4 cm). The total width is 1.25 + 1.75 + 1.75 = 4.75 in (12.1 cm). The height without the loop is 2.5 + 1.75 = 4.25 in (10.8 cm).
Twisted Cord Hanging Loop
- Cut one 16 in (40.6 cm) strand and fold it in half. You now have a doubled 8 in (20.3 cm) length.
- Anchor the fold on a hook or doorknob. Twist the cut ends tightly in one direction until the strand starts to kink.
- Bring the ends to the fold, keeping the cord taut, and let it twist back on itself. You should get a firm cord about 3.5 in (8.9 cm) long.
- Knot the ends together 0.5 in (1.3 cm) from the tails to make a ring. Trim the tails.
- Push one end of the ring through the center stitch of Row 21 from front to back. Pass the knotted end through the ring to form a lark’s head knot. Pull it snug.
The finished loop stands about 1.25 in (3.2 cm) above the head. Rotate the knot to the back.
Final Blocking
- Weave in all ends along the body sides, not through the lace.
- Soak the ornament in cool water for 5 minutes. Press out the water in a towel without wringing.
- Lay it RS up on the blocking mat. Pin the center line of the body straight.
- Pin each wing out to 1.75 in (4.4 cm) from the body edge. Fan the shells evenly.
- Pin the skirt down to 1.75 in (4.4 cm) below the body.
- Pin each of the 9 picots per fan into a point.
- Check the overall size: 4.75 in (12.1 cm) wide and 4.25 in (10.8 cm) tall without the loop.
- Optional: mist with starch or brush on stiffener for a crisper hang.
- Let it dry completely before unpinning.
Final Quality-Control Checklist
- Body is 1.25 in (3.2 cm) wide and 2.5 in (6.4 cm) tall.
- All 7 bobble rows show on the RS.
- Each wing and the skirt has 5 shells and 4 ch-4 sps in Row 4.
- Each border has 48 sc and 9 picots.
- Both wings are mirror-symmetrical and the same size.
- Finished size is 4.75 in (12.1 cm) x 5.5 in (14.0 cm) including the loop.
- The loop is centered and the knot sits on the back.
- No visible ends or loose tails.
Troubleshooting
Bobbles appear on the wrong face: Bobbles must be worked on WS (even) rows. Check that Row 1 is a RS row.
Body edges are wavy: Your increases or decreases are probably in the wrong place. Recount against the stated totals.
Wing has the wrong number of shells: Make sure Row 1 has exactly 9 sc, one per row end from Row 6 to Row 14.
Fans curl or cup: Your tension may be too tight on the tr and dc rows. Relax your grip or block firmly.
Border ruffles: You may have added extra sc in the spaces. Keep it to 2 sc per space.
Wings are different sizes: Recount Row 4 on both wings. Then block both to 1.75 in (4.4 cm).
Cord untwists: Knot it firmly before attaching it to the head.
Care
Hand wash in cool water with mild soap, then reshape and dry flat. Re-starch if needed, and store flat between tissue paper.
Final Notes
The measurement chain is simple to follow. The body is 1.25 in (3.2 cm) wide and 2.5 in (6.4 cm) tall. Each wing and the skirt grow 1.5 in (3.8 cm) in shell rows, plus a 0.25 in (0.6 cm) picot border. That gives a finished angel of 4.75 in (12.1 cm) by 4.25 in (10.8 cm), or 5.5 in (14.0 cm) tall with its 1.25 in (3.2 cm) twisted loop.
Optional: work several angels to hang together on a tree or gift table.
Happy crocheting!