

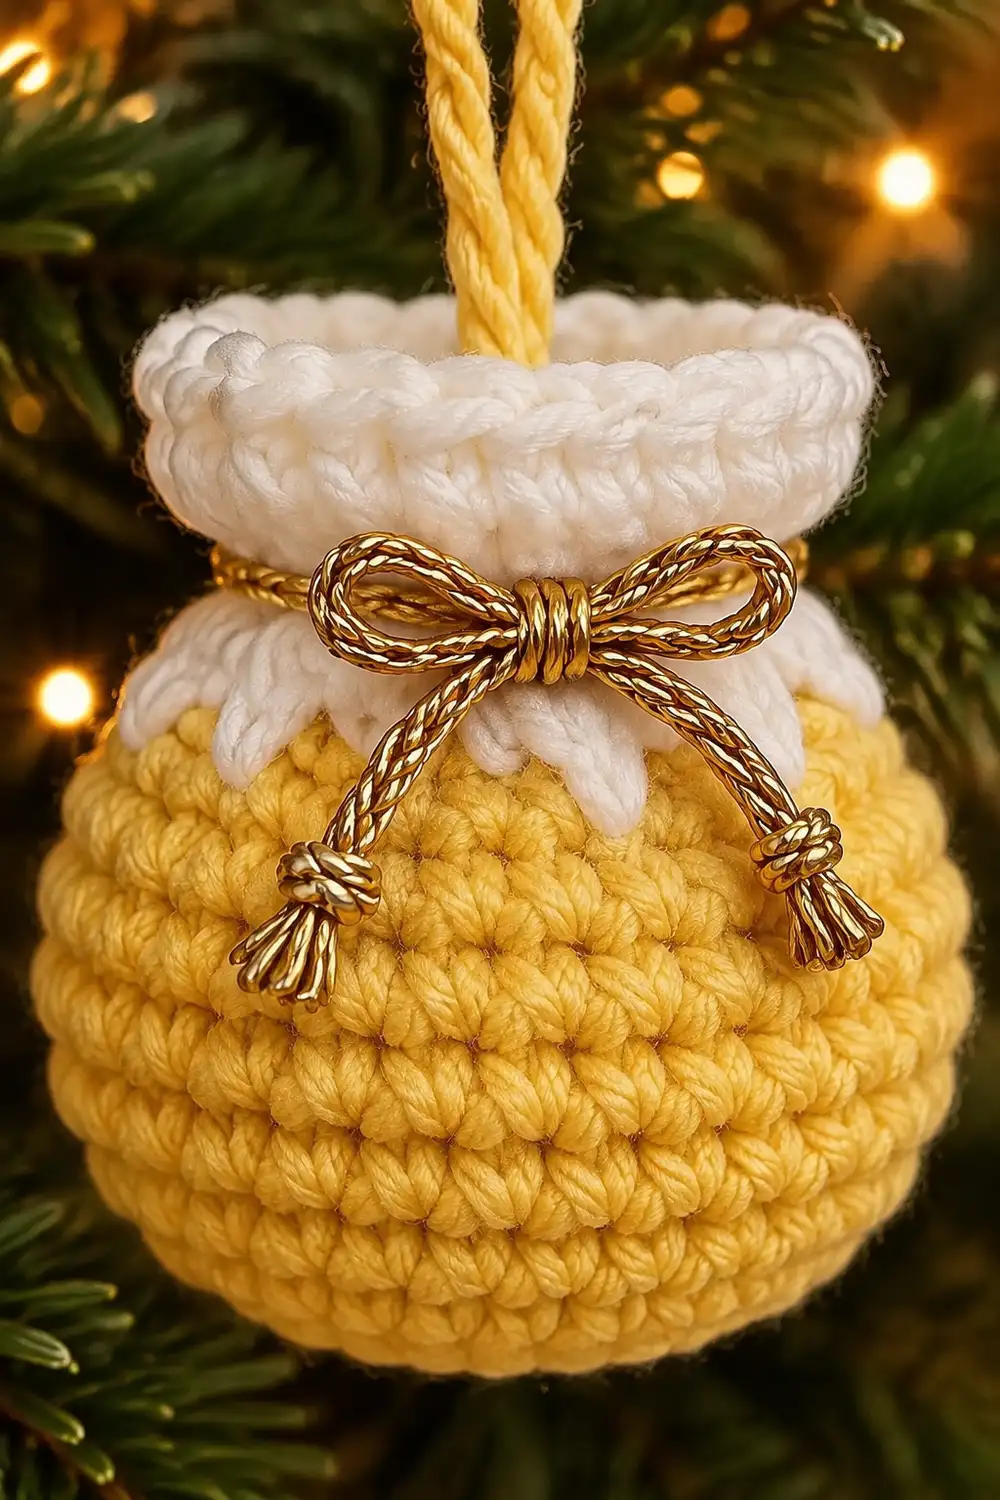
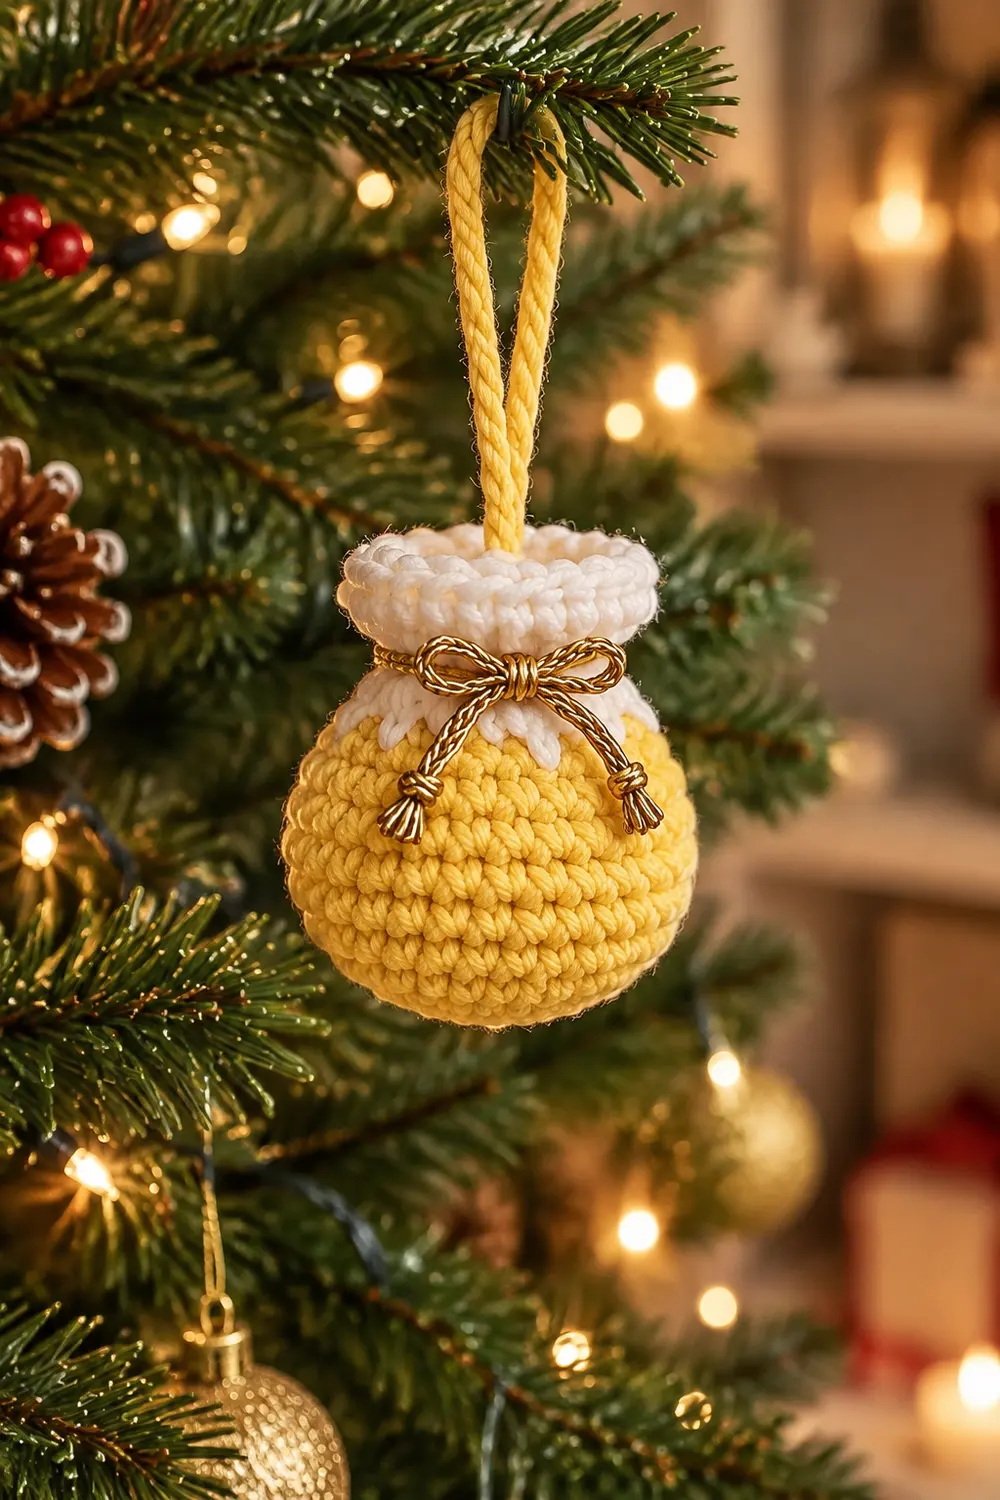
This little ornament looks like a tiny gift sack. It has a plump, rounded golden yellow body, a soft cream top section, and a shiny twisted gold bow tied around the narrow waist. A twisted yellow loop rises from the top so it can hang straight from a branch.
The two-tone color block is simple: golden yellow for the base and main body, cream for the rounded top. Tight single crochet worked in a spiral gives the piece a smooth, dense fabric that holds its rounded shape. It looks especially warm against evergreen branches and white fairy lights.
This pattern uses US crochet terms. The finished ornament measures about 2 in (5.1 cm) tall and 2 in (5.1 cm) wide at its widest point. It sits on a flat circular base about 1.5 in (3.8 cm) across.
The ornament has two crocheted pieces. You make a flat circular base, then a rounded pouch body worked in a spiral, with a color change to cream near the top. The base is joined to the body’s bottom opening with a single crochet seam. A cream rim edging finishes the top. A metallic gold bow and a twisted yellow hanging loop complete it.
Finished Size and Construction
- Finished size: about 2 in (5.1 cm) tall × 2 in (5.1 cm) wide
- Skill level: Easy / advanced beginner
- Terminology: US crochet terms
- Yarn weight: DK / light worsted (weight 3)
- Hook: 3.25 mm (US D/3)
- Number of pieces: 2 (flat circular base + rounded pouch body)
- Layout: base at the bottom, pouch body above it, cream top section at the upper edge
- Piece sizes: base 1.5 in (3.8 cm) diameter; body 2 in (5.1 cm) tall × 2 in (5.1 cm) wide
- Body height before border: 1.8 in (4.6 cm)
- Border depth: 0.2 in (0.5 cm), one sc round plus one sl st round
Materials
Choose a smooth, tightly plied DK yarn. Cotton or a cotton-acrylic blend gives crisp stitch definition. Avoid fuzzy or very splitty yarn, because the stitches need to stay tight.
- Golden yellow (Color A): 6 g / 14 m, for the base, body, seam, and hanging loop
- Cream / off-white (Color B): 2 g / 5 m, for the top section and rim edging
- Metallic gold yarn or thread: 1 g / 1 m, for the twisted bow
These quantities include a margin of about 25%, so you won’t run short.
Tools:
- 3.25 mm (US D/3) crochet hook
- Stitch marker
- Tapestry needle
- Scissors
- Small pinch of polyester fiberfill (optional)
- Ruler or tape measure
Abbreviations (US Terms)
- MR – magic ring
- ch – chain
- sc – single crochet
- inc – 2 sc in the same stitch
- dec – invisible decrease (see below)
- sl st – slip stitch
- st(s) – stitch(es)
- Rnd – round
- FO – fasten off
- ( ) ×N – repeat the sequence in parentheses N times
Invisible decrease (dec): Insert the hook into the front loop only of the next stitch, then into the front loop only of the following stitch. Yarn over and pull through both front loops (2 loops on hook). Yarn over and pull through both loops. This closes the gap better than a standard sc2tog.
Twisted cord: Fold a strand of yarn in half. Anchor the fold and twist the two loose ends together tightly in one direction until the strand kinks. Bring the ends together and let the cord twist back on itself. Knot the ends.
Gauge and Checkpoints
Gauge: 5 sc and 6 rounds = 1 in (2.5 cm) in tight spiral single crochet.
Make the base first and use it as your gauge test. It is small, quick, and you need it anyway.
Checkpoints:
- Base after Rnd 4 (24 sts): 1.5 in (3.8 cm) across, lying flat
- Body after Rnd 2 (30 sts): circumference 6 in (15.2 cm)
- Body after Rnd 7: about 1.2 in (3.0 cm) tall
- Waist after Rnd 9 (18 sts): circumference 3.6 in (9.1 cm)
- Body after Rnd 11: 1.8 in (4.6 cm) tall
- After the border: 2 in (5.1 cm) tall
If your base is too big (over 1.6 in / 4.1 cm), go down to a 3.0 mm hook or tighten your tension. If it is too small (under 1.4 in / 3.6 cm), go up to a 3.5 mm hook. Keep the fabric firm either way. You should not see the fiberfill or your fingertip through the stitches.
Piece 1: Flat Circular Base (Color A)
Work in continuous spiral rounds. Do not join. Place a stitch marker in the first stitch of each round and move it up as you go.
- Rnd 1: In MR, 6 sc. (6 sts)
- Rnd 2: Inc in each st around. (12 sts)
- Rnd 3: (1 sc, inc) ×6. (18 sts)
- Rnd 4: (1 sc, inc, 1 sc) ×6. (24 sts)
Staggering the increase in Rnd 4 keeps the circle round instead of hexagonal.
Sl st into the next st to smooth the step. FO, leaving a short tail to weave in. Check that the base measures 1.5 in (3.8 cm) across and lies flat.
Piece 2: Rounded Pouch Body (Color A, then Color B)
The body begins with a chain ring. The free loops of this chain become the bottom opening that joins to the base.
Foundation: With Color A, ch 24. Join with a sl st into the first ch to form a ring, taking care not to twist the chain.
- Rnd 1: Sc in each ch around. (24 sts) Place your marker and work in a spiral from here.
- Rnd 2: (3 sc, inc) ×6. (30 sts) This is the widest point.
- Rnds 3–7: Sc in each st around. (30 sts each round, 5 rounds)
Checkpoint: the body should now be about 1.2 in (3.0 cm) tall, with a 6 in (15.2 cm) circumference.
- Rnd 8: (3 sc, dec) ×6. (24 sts)
- Rnd 9: (2 sc, dec) ×6. (18 sts) This round forms the waist.
On the last stitch of Rnd 9, change to Color B on the final yarn over. Cut Color A, leaving a 4 in (10.2 cm) tail.
- Rnd 10 (Color B): (2 sc, inc) ×6. (24 sts) The cream section flares out from the waist.
- Rnd 11: Sc in each st around. (24 sts)
Checkpoint: the body is now 1.8 in (4.6 cm) tall. Do not fasten off. Continue straight into the border.
Make All Pieces
For one ornament you need:
- Color A (golden yellow): 1 flat circular base and the lower body (Rnds 1–9)
- Color B (cream): the top section (Rnds 10–11) and the rim border
Layout (top to bottom):
TOP:     CREAM TOP SECTION + RIM BORDER
MIDDLE:  YELLOW POUCH BODY (gold bow at the waist)
BOTTOM:  YELLOW FLAT CIRCULAR BASE
Joining
Join the base to the body’s bottom opening with a single crochet seam. This leaves a neat ridge that matches the round texture.
Stitch-to-stitch logic: The base ends with 24 sts in Rnd 4. The body’s foundation chain has 24 free loops. Join them 1:1, so the seam is exactly 24 sc.
- Turn the body upside down so the foundation chain faces you.
- Place the base over the opening, wrong sides together, right side of the base facing out.
- Join Color A in any stitch. Insert the hook through one base stitch and the matching free chain loop, then sc. Repeat around. (24 sc)
- Before the last 6 sts, add a small pinch of fiberfill to the lower body if you want a firmer, fuller round shape. This step is optional.
- Sl st to the first seam sc. FO and weave in the end.
Tension: Keep the seam stitches the same tension as the body. Tight seam stitches pucker the base. Loose ones leave gaps.
Checkpoint: The ornament should sit level on its base. The base still measures 1.5 in (3.8 cm), and the body is 2 in (5.1 cm) wide at Rnds 2–7.
Border (Cream Rim Edging)
Border gauge: The border is worked at the same gauge as the body, 5 sc per in (2.5 cm). Nothing tightens or loosens it.
- Border Rnd 1: Continuing in Color B, sc in each st around. That is 24 sts worked 1 per existing stitch, plus 0 extra stitches. (24 sts)
- Border Rnd 2: Sl st loosely in each st around. That is 24 sl sts worked 1 per existing stitch, plus 0 extra stitches. (24 sts) Sl st into the first sl st to join, FO, and weave in the end.
Why the math works: This is a round piece with no corners, so no corner stitches are added. The rim stays at 24 sts, the same count as Rnds 10–11. At 5 sts per in, 24 sts give a rim circumference of 4.8 in (12.2 cm). That makes the rim narrower than the 6 in (15.2 cm) body, so the top keeps its rounded, gathered pouch look. Border Rnd 1 adds 0.2 in (0.5 cm) of height. Together with the 1.8 in (4.6 cm) body, that brings the total to 2 in (5.1 cm). The slip stitch round adds almost no height. It just smooths and firms the edge.
Hanging Loop and Bow
Hanging loop (Color A): Cut a 36 in (91.4 cm) strand of yellow and make a twisted cord about 8 in (20.3 cm) long. Trim it to about 6.5 in (16.5 cm). Sew one end inside the rim, just below Border Rnd 2, then sew the other end directly opposite. The loop should arch about 2 in (5.1 cm) above the rim. Secure both ends with several small stitches.
Gold bow: Cut a 36 in (91.4 cm) strand of metallic gold and make a twisted cord about 12 in (30.5 cm) long. Wrap it twice around the waist at Rnd 9 and pull gently to cinch it. Tie a small bow at the front. Knot each tail about 0.25 in (0.6 cm) from the end and fluff the tips into tiny tassels.
Final Blocking
- Hold a steam iron about 1 in (2.5 cm) above the ornament. Do not let it touch, especially if you used acrylic.
- Steam lightly for 2–3 seconds.
- While the ornament is warm, roll the yellow body between your palms to round it out.
- Press the base flat against a table so the ornament stands level.
- Gently roll the cream rim outward with your fingertips.
- Let it cool and dry completely before tying the bow, or retie the bow afterward.
- Recheck the measurements: 2 in (5.1 cm) tall and 2 in (5.1 cm) wide.
Final Quality-Control Checklist
- Base is 1.5 in (3.8 cm) across and flat, with 24 sts
- Body has 30 sts at its widest and is 2 in (5.1 cm) wide
- Waist is 18 sts and clearly narrower than the body
- Cream section and rim are 24 sts
- Seam has 24 sc with no gaps or puckers
- Color change jog is turned to the back
- Hanging loop is centered, secure, and arches about 2 in (5.1 cm) high
- Gold bow sits at the front of the waist and is knotted firmly
- All ends are woven in and hidden
Troubleshooting
- Holes at increases or decreases: Go down a hook size, and use the invisible decrease.
- Base cups or ruffles: Recount Rnds 3–4. Cupping means too few sts, and ruffling means too many.
- Body looks tall and narrow: Your row gauge is loose. Tighten your tension or drop to a 3.0 mm hook.
- Visible color jog: On the first Color B stitch, pull the old Color A tail snug from the inside, then turn the jog to the back.
- Ornament leans: The seam tension is uneven. Re-steam it and press the base flat.
- Bow slides down: Wrap the cord over a slightly tighter waist, or tack it at the back with one stitch of gold thread.
- Loop twists or untwists: Knot the cord ends firmly before sewing, and add a tiny dab of fabric glue if needed.
Care
Spot clean with a damp cloth and mild soap, then reshape and air dry. Store flat in a small box so the rounded body and the bow keep their shape.
Final Notes
Here is the full measurement chain in one place. The 24-st base measures 1.5 in (3.8 cm). The body widens to 30 sts and 2 in (5.1 cm), then narrows to an 18-st waist. The cream section flares back to 24 sts and reaches 1.8 in (4.6 cm). One border round adds 0.2 in (0.5 cm), for a finished height of 2 in (5.1 cm). The 24:24 seam keeps the base and body perfectly matched. If your base checkpoint is right, every later stage will fall into place.
Optional: you can make several of these in alternating yellow and cream as a matching set for your tree.
Happy crocheting!