

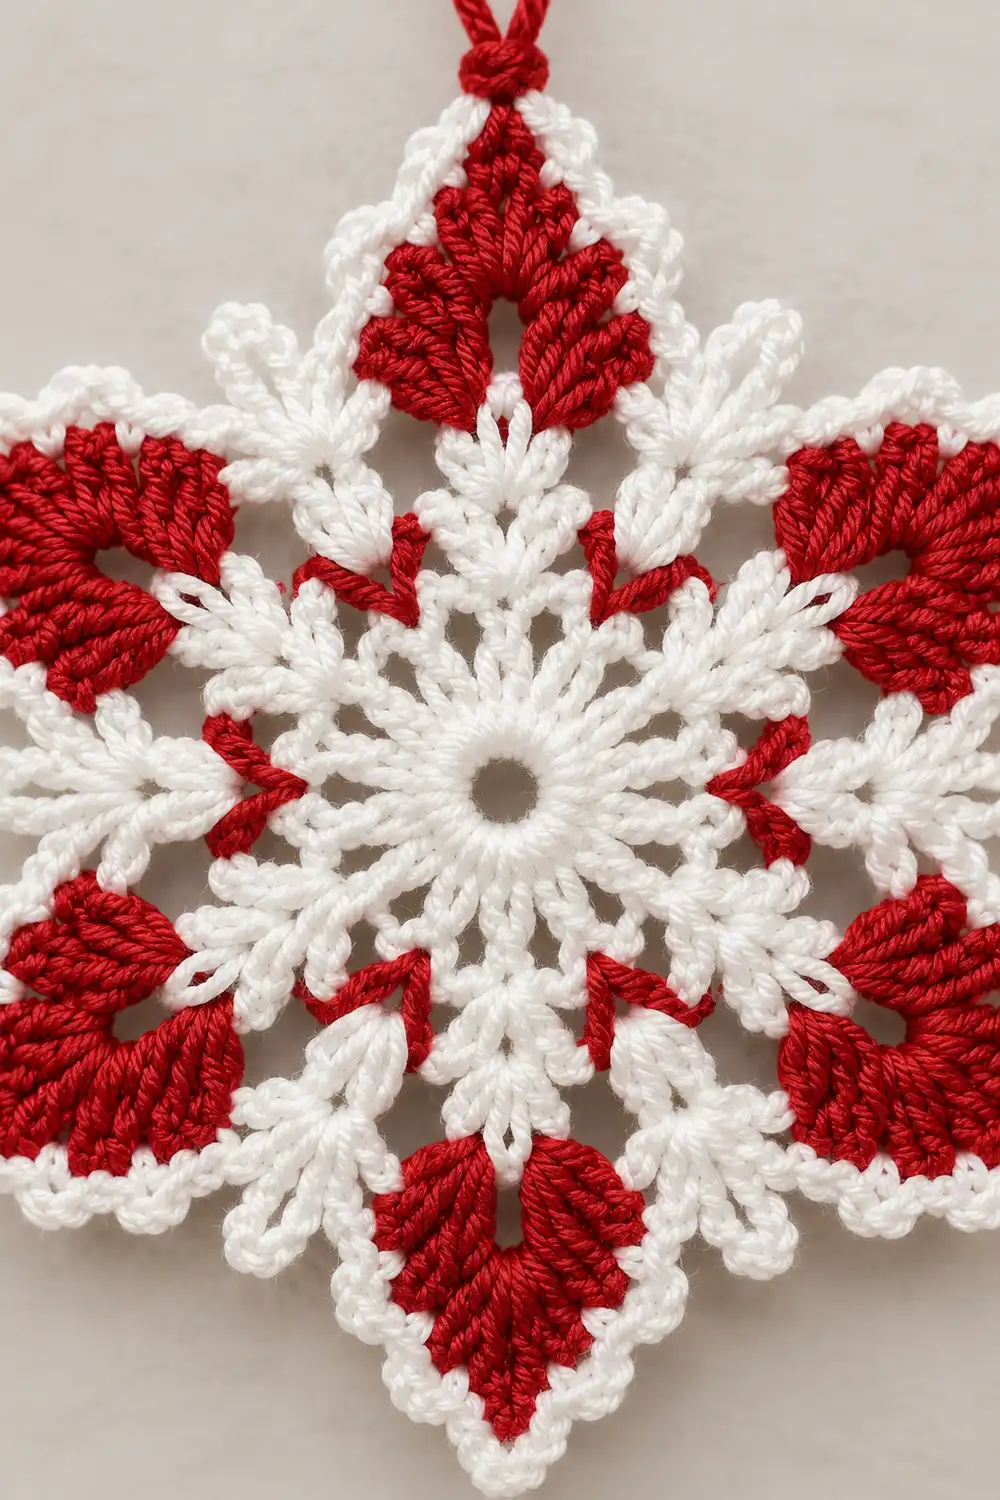
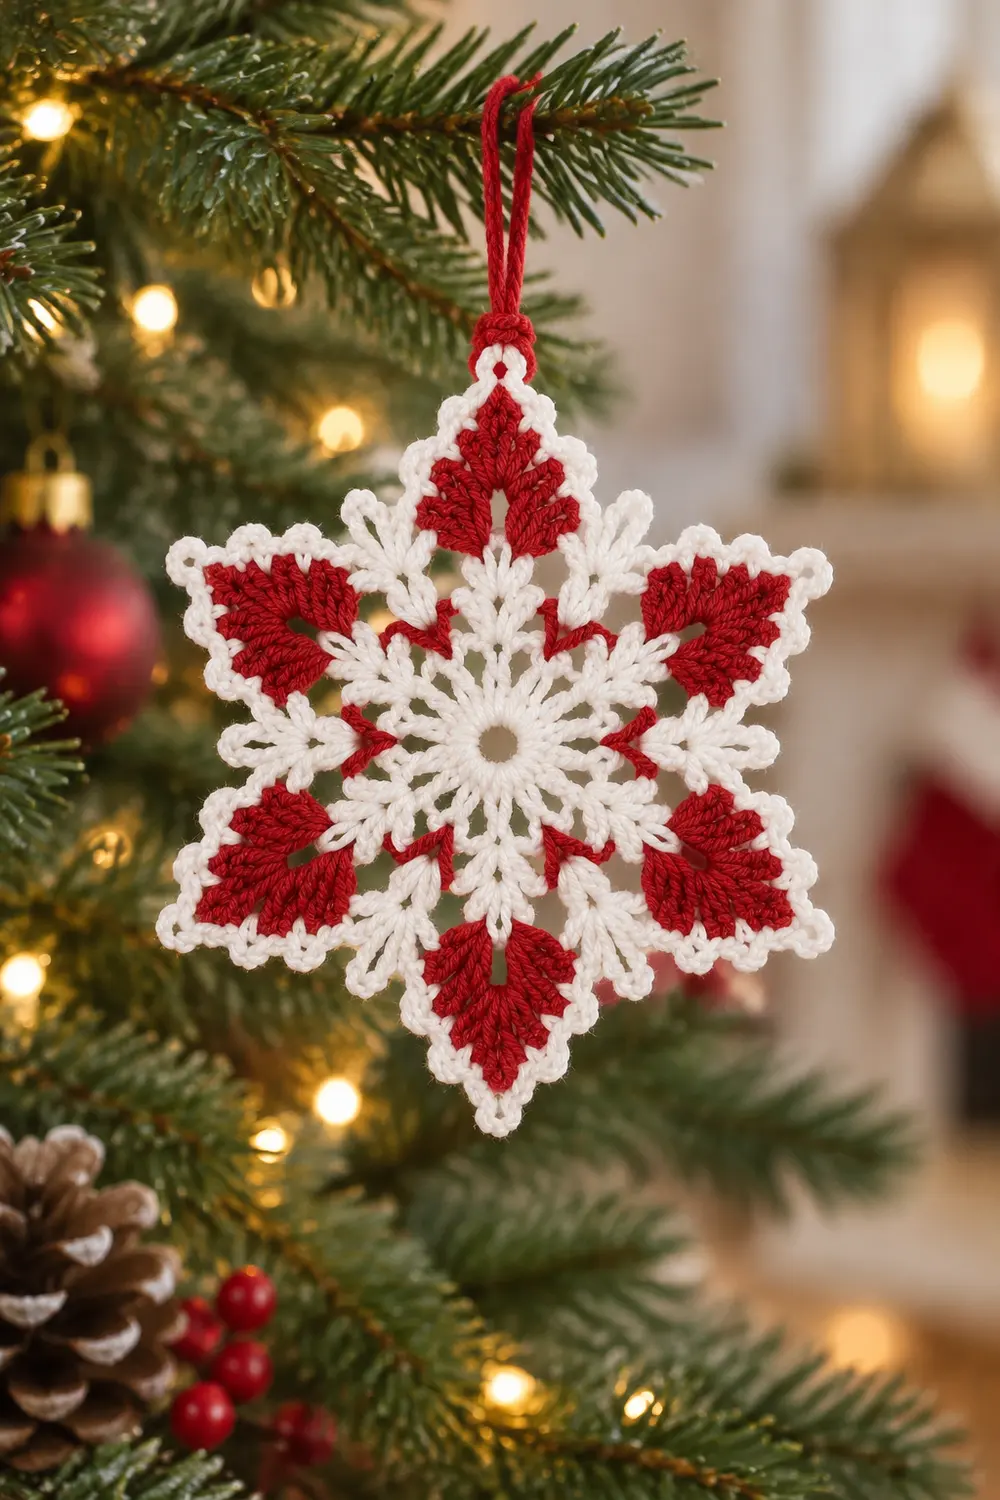
The Peppermint Frost Snowflake is a small, six-pointed ornament in classic red and white. A solid white center ring sits inside a lacy white star of V-stitches and chain spaces. Six dense red fans spread into the points, and a crisp white picot edge outlines the whole shape.
The look is traditional and graphic. The red fans give each point weight and color, and the white open-work between them keeps the snowflake light. A red hanging loop at the top tip lets it hang freely on a tree, in a window, or on a gift.
This pattern uses US crochet terms. The finished snowflake measures 3.5 in (8.9 cm) from point to point after blocking.
The snowflake is one single piece worked in the round from the center out. Rounds 1–3 are white, Round 4 is red, and Rounds 5–6 form the white border. You add a red hanging loop at the end, then block and lightly stiffen the piece.
Finished Size and Construction
- Finished size: 3.5 in (8.9 cm) point to point
- Skill level: Intermediate (simple stitches, careful counting)
- Terminology: US crochet terms
- Yarn weight: Fingering / super fine (#1) mercerized cotton
- Hook: 2.25 mm (US B-1)
- Number of pieces: 1
- Layout: Single six-pointed motif worked in the round
- Piece size: 3.5 in (8.9 cm) point to point
- Size before border (after Round 4): 3 in (7.6 cm) point to point
- Border depth: 0.25 in (0.6 cm) on each side, from Rounds 5–6
Materials
Yarn advice: Choose a smooth, mercerized cotton in fingering weight. Cotton gives clear stitch definition, holds the picots well, and takes starch evenly. Avoid fuzzy or very stretchy yarns, because the fans will blur and the points will curl.
- White (Color A): 5 g, about 18 m
- Red (Color B): 3 g, about 11 m
These quantities include a margin for your gauge swatch and weaving in ends.
Tools:
- 2.25 mm (US B-1) crochet hook, plus 2.0 mm in case you need to adjust gauge
- Tapestry needle
- Small scissors
- Stitch marker
- Blocking mat or foam board
- Rust-proof pins
- Spray bottle
- Fabric stiffener or spray starch (optional, for a firmer ornament)
- Ruler or tape measure
Abbreviations (US Terms)
- ch – chain
- sl st – slip stitch
- sc – single crochet
- dc – double crochet
- sc2tog – single crochet 2 together
- sk – skip
- sp(s) – space(s)
- st(s) – stitch(es)
- beg – beginning
- rep – repeat
Special stitches:
- V-st: (dc, ch 2, dc) in the same stitch.
- Small shell: (3 dc, ch 2, 3 dc) in the same space.
- Fan: (5 dc, ch 3, 5 dc) in the same space.
- Picot: ch 3, sl st in 3rd ch from hook.
- sc2tog: Insert hook in next st, yarn over, pull up a loop. Insert hook in following st, yarn over, pull up a loop. Yarn over and pull through all 3 loops on hook.
Gauge and Checkpoints
Gauge for a lace motif is measured round by round. Work Rounds 1–3 once as a test before committing to the full snowflake.
Base gauge: Round 1 = 0.75 in (1.9 cm) in diameter.
Checkpoints (point to point, lightly pressed flat):
- After Round 1: 0.75 in (1.9 cm) diameter
- After Round 2: 1.5 in (3.8 cm)
- After Round 3: 2.25 in (5.7 cm)
- After Round 4: 3 in (7.6 cm)
- After Round 5: 3.25 in (8.3 cm)
- After Round 6: 3.5 in (8.9 cm)
If your piece is too big: Change to a 2.0 mm hook, or tighten your chains. Loose chains in Rounds 2–4 are the most common cause of oversizing.
If your piece is too small: Change to a 2.5 mm hook, or pull up your dc loops slightly taller. Keep the chain spaces open so the lace can spread.
A difference of up to 0.125 in (0.3 cm) at any checkpoint is fine and will block out.
Pattern
Round 1 – Center Ring (White)
With White, ch 6 and sl st to the first ch to form a ring.
Ch 3 (counts as dc), work 17 dc into the ring. Sl st to the top of beg ch-3.
Count: 18 dc.
The ring should lie flat with a small, neat hole in the center. Checkpoint: 0.75 in (1.9 cm).
Round 2 – Lacy V-Stitches (White)
Ch 5 (counts as dc + ch 2), dc in the same st as the join. This is the first V-st. Ch 1, sk next 2 dc.
V-st in next dc, ch 1, sk next 2 dc. Rep from * 4 more times. Sl st to the 3rd ch of beg ch-5.
Each repeat uses 3 dc from Round 1, so 6 repeats use all 18 dc.
Count: 6 V-sts (12 dc), 6 ch-2 sps, 6 ch-1 sps.
Checkpoint: 1.5 in (3.8 cm).
Round 3 – Small Shells (White)
Sl st in the next ch-2 sp. Ch 3 (counts as dc), (2 dc, ch 2, 3 dc) in the same sp. This is the first small shell. Ch 2, sc in next ch-1 sp, ch 2.
Small shell in next ch-2 sp, ch 2, sc in next ch-1 sp, ch 2. Rep from * 4 more times. Sl st to the top of beg ch-3.
Count: 6 small shells (36 dc), 6 tip ch-2 sps, 6 sc, 12 ch-2 sps.
The ch-2 sps and sc between the shells form the white open-work. Fasten off White and weave in the end on the back.
Checkpoint: 2.25 in (5.7 cm). The six shells should point clearly outward.
Round 4 – Red Fans (Red)
Join Red with a sl st in any tip ch-2 sp of a small shell.
Ch 3 (counts as dc), (4 dc, ch 3, 5 dc) in the same sp. This is the first fan. Ch 4, sc in next sc, ch 4.
Fan in next tip ch-2 sp, ch 4, sc in next sc, ch 4. Rep from * 4 more times. Sl st to the top of beg ch-3.
Count: 6 fans (60 dc), 6 tip ch-3 sps, 6 sc, 12 ch-4 sps.
Each fan has 5 dc on each side of its tip. The ch-3 at the tip splits the fan into two red lobes with a small gap down the center of the point. The ch-4 bridges carry red strands across the white lace between the points.
Fasten off Red and weave in the end.
Checkpoint: 3 in (7.6 cm). This is the size before the border.
Border
The border is two white rounds. Round 5 is a smooth sc framing round that outlines each point. Round 6 adds the scalloped picot trim.
Border gauge: About 10 sc = 1 in (2.5 cm) along the edge, worked firmly.
“Per side” here means one point: from the tip of one point, down into the valley, and up to the tip of the next point.
Round 5 – Framing Round (White)
Join White with a sl st in any tip ch-3 sp of a fan.
Ch 1, (sc, ch 3, sc) in the same sp. Sc in each of next 5 dc. Work 4 sc in next ch-4 sp. Sk the red sc in the valley. Work 4 sc in next ch-4 sp. Sc in each of next 5 dc.
(Sc, ch 3, sc) in next tip ch-3 sp, sc in each of next 5 dc, 4 sc in next ch-4 sp, sk next sc, 4 sc in next ch-4 sp, sc in each of next 5 dc. Rep from * 4 more times. Sl st to the first sc.
This is a conversion round, not a growth round. It works 1 sc into each existing dc, places sc into the chain spaces, and adds sc only at the tips.
Count per point:
- 1 sc after the tip ch-3
- 5 sc in the fan dc (1 sc per existing dc)
- 4 sc in the first ch-4 sp
- 4 sc in the second ch-4 sp
- 5 sc in the fan dc (1 sc per existing dc)
- 1 sc before the next tip ch-3
That is 1 + 5 + 4 + 4 + 5 + 1 = 20 sc per point.
Count for the round: 6 points × 20 sc = 120 sc, plus 6 tip ch-3 sps.
Skipping the valley sc pulls the edge inward, which deepens the star shape. Do not fasten off.
Checkpoint: 3.25 in (8.3 cm).
Round 6 – Picot Scallop Edge (White)
Sl st in the next tip ch-3 sp. Ch 1.
Work (2 sc, ch 3, 2 sc) in the tip ch-3 sp. [Sc in next 2 sc, picot] 4 times. Sc in next sc, sc2tog over next 2 sc, sc in next sc. [Picot, sc in next 2 sc] 4 times. Rep from * 5 more times. Sl st to the first sc.
The sc2tog sits exactly at the valley, over the 4th sc of the first ch-4 group and the 1st sc of the second ch-4 group.
Stitches used per point from Round 5: 8 + 1 + 2 + 1 + 8 = 20 sc. This matches the 20 sc per point from Round 5.
Count per point: 4 tip sc + 18 sc + 1 sc2tog = 23 sts, 8 picots, 1 tip ch-3.
Count for the round: 132 sc, 6 sc2tog, 48 picots, 6 tip ch-3 loops.
The picots are placed symmetrically: 4 on the edge going down into each valley and 4 on the edge coming back up. The sc2tog keeps the valley crisp instead of letting it bulge.
Fasten off and weave in the end. Checkpoint: 3.5 in (8.9 cm).
Why the Math Works
Each fan has 5 dc per side, and Round 5 places exactly 1 sc in each of those dc. Each ch-4 bridge holds 4 sc, so it lies flat without ruffling. One sc at each side of every tip gives 20 sc per point, and 6 points give 120 sc.
Each point has two edges of about 1 in (2.5 cm), and each edge holds 10 sc. At the border gauge of 10 sc per 1 in (2.5 cm), the edge lies flat. Round 6 uses all 20 sc per point and removes only 1 st at the valley, which keeps the inward curve of the star outline.
Hanging Loop (Red)
Choose one tip as the top. Join Red with a sl st in that tip’s ch-3 loop from Round 6.
Ch 15, sl st in the same ch-3 loop. Leave a 6 in (15.2 cm) tail.
Wrap the tail 3–4 times around the base of the loop to form a small knot shape. Thread the tail through the wraps with a tapestry needle, then weave it into the back of the point.
The loop stands about 0.75 in (1.9 cm) above the tip.
Final Blocking
- On paper, draw a circle 3.5 in (8.9 cm) in diameter. Mark 6 evenly spaced points on it, 60 degrees apart. Place the paper under clear plastic on your blocking mat.
- Spray the snowflake until it is evenly damp, not dripping.
- Lay it face up in the center of the circle.
- Pin the 6 tip ch-3 loops to the 6 marks.
- Pin each valley gently toward the center so all valleys sit at the same depth.
- Open each picot with a pin tip, and pin any picots that turn under.
- Check that the center ring is round and the red fans are symmetrical.
- For a firmer ornament, brush or spray on fabric stiffener now.
- Let it dry completely, at least 12 hours, before unpinning.
Final Quality-Control Checklist
- Point-to-point measurement is 3.5 in (8.9 cm), within 0.125 in (0.3 cm).
- All 6 points are the same length.
- Each fan has 5 dc on each side of the tip.
- Each point has 8 picots and a tip ch-3 loop.
- All 6 valleys are the same depth.
- The center ring is round, with no gaps at the join.
- Red strands cross the white lace evenly.
- All ends are woven in on the back.
- The hanging loop is secure and centered on the top tip.
- The snowflake hangs straight without tilting.
Troubleshooting
Center cups or ruffles: Your Round 1 is too loose or too tight. Remake it with a hook one size up or down.
Points twist to one side: You may have missed a ch-1 sp in Round 2. Count 6 V-sts and 6 ch-1 sps before you start Round 3.
Red fans look uneven: Check that each fan has exactly 5 dc on each side of the ch-3.
Valleys bulge outward: Make sure you skipped the valley sc in Round 5 and worked the sc2tog in Round 6.
Edge ruffles: Your border is looser than 10 sc per 1 in (2.5 cm). Rework Rounds 5–6 with a 2.0 mm hook.
Edge pulls and puckers: Your border is too tight. Rework Rounds 5–6 with a 2.5 mm hook.
Picots disappear: Pin each picot open during blocking, and use stiffener.
Snowflake hangs crooked: Move the hanging loop to the exact tip ch-3 loop, not beside it.
Care
Hand wash in cool water with a mild soap and lay flat to dry. If you used stiffener, reshape and re-stiffen after washing.
Final Notes
The measurement chain is simple to follow. Round 1 is 0.75 in (1.9 cm), Round 2 is 1.5 in (3.8 cm), and Round 3 is 2.25 in (5.7 cm). The red fans in Round 4 bring the snowflake to 3 in (7.6 cm). Round 5 converts each point to 20 sc and reaches 3.25 in (8.3 cm), and the picot edge in Round 6 finishes at 3.5 in (8.9 cm).
Check your counts at each round, block to the drawn circle, and add a little stiffener. The result is a crisp, balanced red and white ornament that hangs beautifully on its own.
Optional: Make several in different color pairs for a matching set of tree ornaments.
Happy crocheting!