

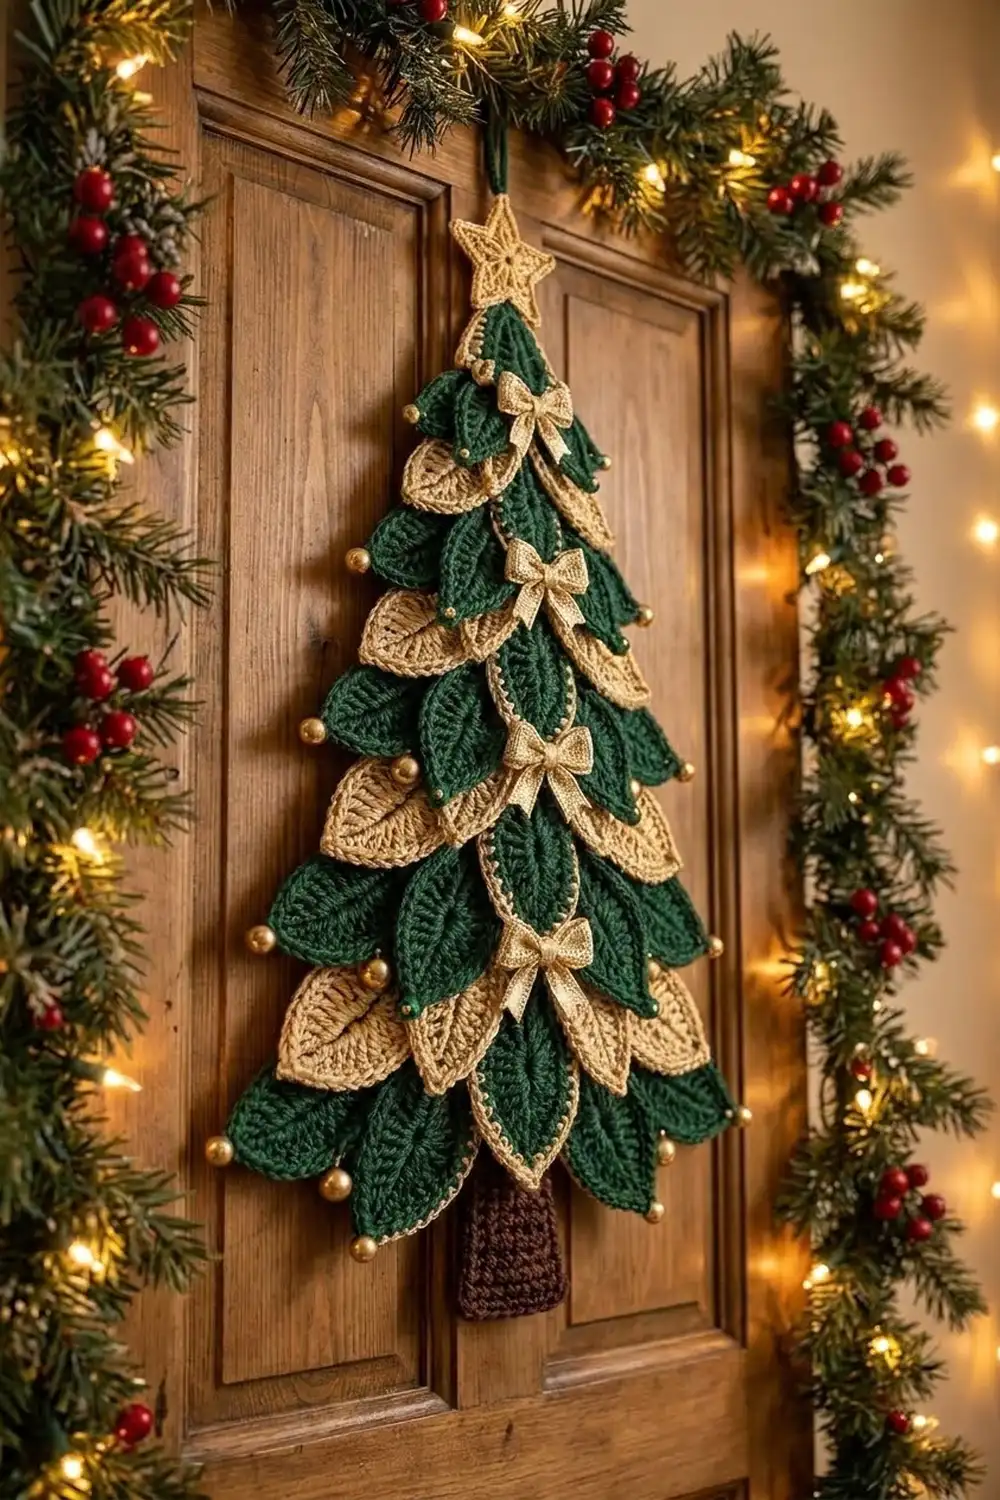
This little tree is made from small crocheted leaves layered into tiers. Dark forest green leaves alternate with cream/gold leaves, row by row, until they form a classic tree silhouette. A gold star sits at the top, cream/gold bows run down the center between the tiers, and a dark green trunk anchors the base.
Each leaf is teardrop-shaped, with a ridged surface, a raised center vein, and a cream picot trim around the dark green leaves. The finished tree hangs flat on a door or wall. The cream picots and gold accents catch warm holiday light.
The pattern uses US crochet terms. The finished tree measures 8.5 in (21.6 cm) tall and 5.8 in (14.7 cm) wide at its widest row.
Construction is simple. You crochet every leaf in the round around a short foundation chain. You add a surface slip-stitch vein, and the green leaves get a picot trim. Then you make a small trunk, star, and bows, and tack everything together in overlapping rows from the bottom up.
Finished Size and Construction
- Finished size: 8.5 in (21.6 cm) tall x 5.8 in (14.7 cm) wide
- Skill level: Intermediate
- Terminology: US crochet terms
- Yarn weight: Super fine (#1) fingering-weight cotton or size 3 crochet thread
- Hook: 2.25 mm (B-1)
- Number of pieces: 31 crocheted components (13 green leaves, 12 cream leaves, 1 trunk, 1 star, 4 bows) plus a hanging loop
- Layout: 5 leaf rows of 1, 3, 5, 7, and 9 leaves, alternating green and cream
- Piece size (green leaf, finished): 1.75 in (4.4 cm) long x 1.25 in (3.2 cm) wide
- Size before border: 1.5 in (3.8 cm) x 1 in (2.5 cm). Cream leaves stay at this size.
- Border depth: 0.125 in (0.3 cm) on every edge of each green leaf
Materials
Choose a smooth, mercerized cotton. It gives crisp picots and a clean vein. Avoid fuzzy or splitty fibers because the stitches are small. The quantities below assume about 3.4 m per gram (roughly 170 m per 50 g).
- Color A, dark forest green: 13 g / 45 m (leaves, veins, trunk, hanging loop, sewing)
- Color B, cream/gold: 16 g / 55 m (cream leaves, picot trim, bows)
- Color C, gold: 2 g / 5 m (star)
All quantities include a margin of about 15% for swatching and sewing.
Tools:
– 2.25 mm (B-1) crochet hook
– Tapestry needle with a small eye
– Locking stitch markers
– Rustproof pins and a foam blocking mat
– Spray bottle
– Ruler or tape measure
– Paper and pencil for the layout template
Abbreviations (US Terms)
- ch – chain
- sl st – slip stitch
- sc – single crochet
- hdc – half double crochet
- dc – double crochet
- BLO – back loop only
- st(s) – stitch(es)
- sp – space
- rep – repeat
Special stitches:
- Picot: Ch 3, sl st in 3rd ch from hook. The picot sits on top of the sc just made.
- Surface sl st: Hold the yarn behind the work. Insert the hook from front to back, pull up a loop, and draw it through the loop on the hook.
Gauge and Checkpoints
Gauge: 16 sc x 16 rows = 2 in (5.1 cm) in a flat sc swatch.
Make one green leaf completely, trim included, before starting the rest. Measure it at each stage:
- After Rnd 1: 1.25 in (3.2 cm) long x 0.6 in (1.5 cm) wide
- After Rnd 2: 1.5 in (3.8 cm) long x 1 in (2.5 cm) wide
- After Rnd 3 (trim): 1.75 in (4.4 cm) long x 1.25 in (3.2 cm) wide
Too big? Go down 0.25 mm in hook size or tighten your tension.
Too small? Go up 0.25 mm in hook size.
Small differences add up across 5 rows. A leaf that is 0.125 in (0.3 cm) too long will make the tree about 0.6 in (1.5 cm) too tall.
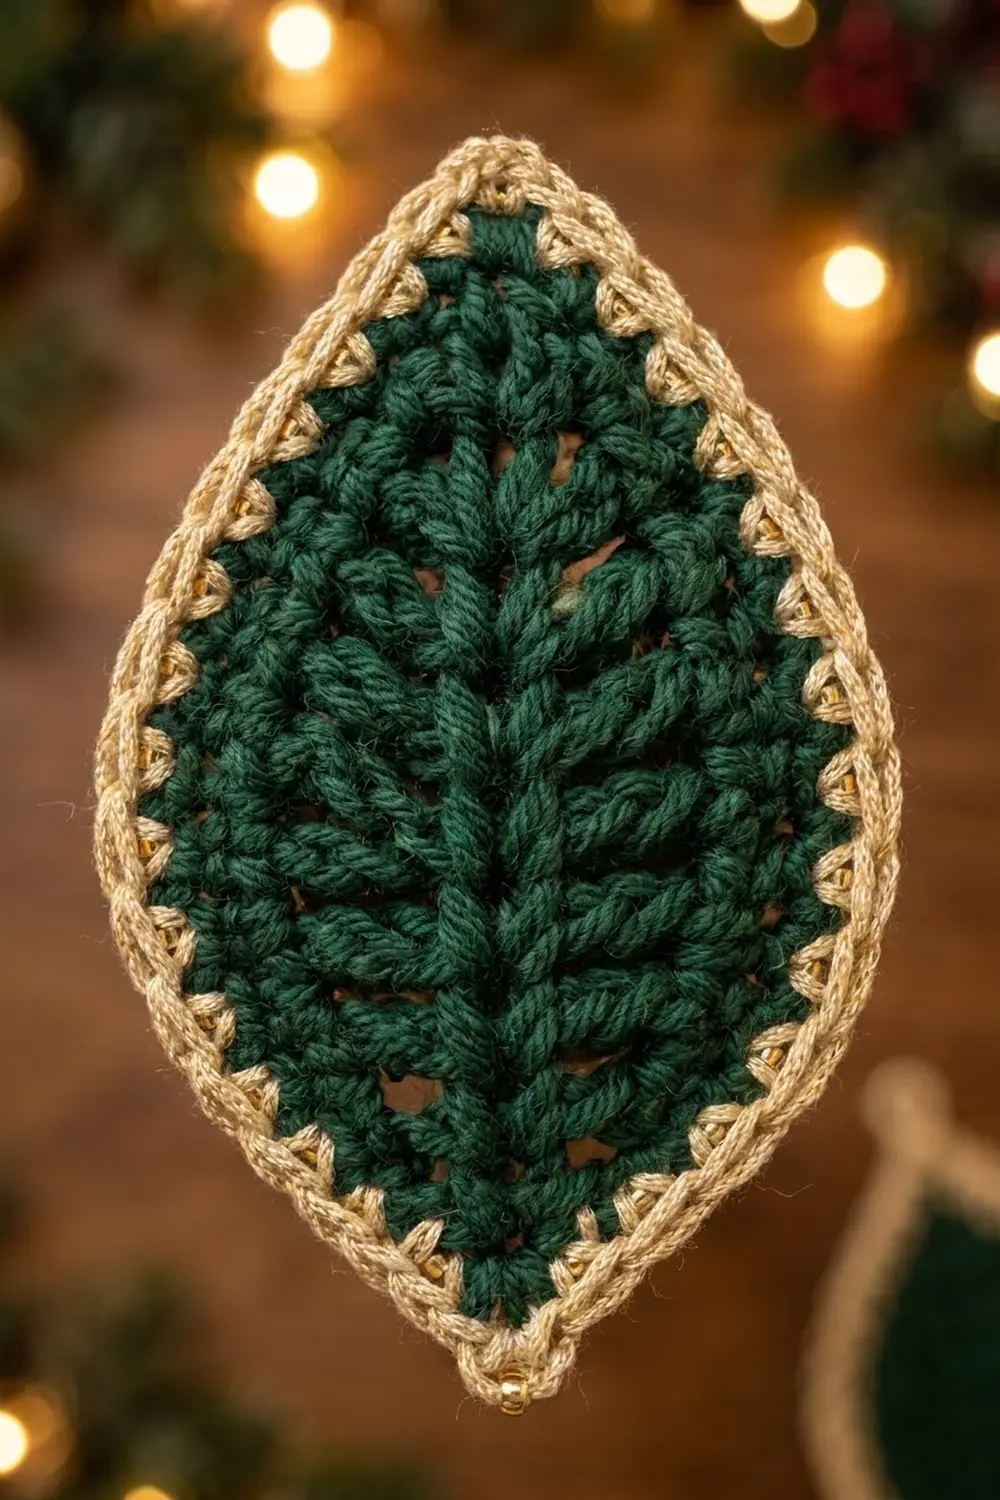
Leaf Pattern (Make 13 in A, 12 in B)
Each leaf is worked in rounds around the foundation chain. The skipped chain becomes the pointed tip, and the 3-sc end becomes the rounded base.
Ch 11.
Rnd 1:
1. Sc in 2nd ch from hook, hdc in next ch, dc in next 6 ch, hdc in next ch, 3 sc in last ch.
2. Working in the opposite side of the foundation, hdc in next ch, dc in next 6 ch, hdc in next ch, sc in last ch.
3. Ch 2 for the tip, then sl st to the first sc.
(21 sts: 9 per side + 3 at the base, plus the ch-2 tip)
Rnd 2 (worked in BLO):
1. Sl st into the ch-2 tip sp. Ch 1, then (sc, ch 2, sc) in the same sp.
2. Side A: Sc in next 2 sts, hdc in next 2 sts, dc in next 4 sts, hdc in next st.
3. Base: 2 sc in each of next 3 sts.
4. Side B: Hdc in next st, dc in next 4 sts, hdc in next 2 sts, sc in next 2 sts.
5. Sl st to the first sc.
(26 sts: 2 tip sc + 9 + 6 + 9, plus the ch-2 tip sp)
This is a growth round. Its complete count is 26. Working in the BLO leaves a ridge on the front for the textured surface.
Number the Rnd 2 stitches starting from the tip, going toward Side A:
– Second tip sc = st 1
– Side A = sts 2–10
– Base = sts 11–16
– Side B = sts 17–25
– First tip sc = st 26
Each half of the leaf is therefore 13 sts (sts 1–13 and sts 14–26).
Vein:
1. Using the same color, join at the base end of the foundation chain.
2. Surface sl st up the center chain to the tip.
3. Fasten off and weave in the ends.
This raised line is the defined center vein.
Cream leaves end here. Block them to 1.5 in (3.8 cm) x 1 in (2.5 cm).
Border: Cream Picot Trim (Green Leaves Only)
Border gauge: The trim is worked as 1 sc into each Rnd 2 stitch. It keeps the leaf’s own gauge of 8 sc per in (8 sc per 2.5 cm) and adds 0.125 in (0.3 cm) on every edge.
Rnd 3 (with B):
1. Tip: Join B with a sl st in the Rnd 2 tip ch-2 sp. Ch 1, then (sc, picot, sc) in the same sp.
2. Side A (sts 1–13): Sc in next 2 sts, picot 6 times, then sc in next st.
(13 sc, 6 picots, sitting on sts 2, 4, 6, 8, 10, 12)
3. Side B (sts 14–26): Sc in next st, then sc in next st, picot, sc in next st 6 times.
(13 sc, 6 picots, sitting on sts 15, 17, 19, 21, 23, 25)
4. Sl st to the first sc. Fasten off.
Round total: 26 sc worked 1-per-existing-stitch, plus 2 tip sc, for 28 sc. There are 12 side picots plus 1 tip picot, for 13 picots.
Why the math works:
– 13 sts per half splits evenly into 6 pairs with 1 stitch left over.
– Each half places that leftover stitch at the base (sts 13 and 14).
– The picot positions mirror each other exactly: st 2 matches st 25, and st 12 matches st 15.
– The two plain stitches at the base center leave a smooth spot. That end tucks under the row above without a picot poking out.
Trunk (Make 1, A)
Ch 11.
Row 1: Sc in 2nd ch from hook and in each ch across. (10 sc)
Rows 2–12: Ch 1, turn. Sc in BLO of each st across. (10 sc)
Fasten off. The trunk should measure 1.25 in (3.2 cm) wide x 1.5 in (3.8 cm) tall. The BLO rows create ridges for a bark texture.
Star (Make 1, C)
Rnd 1: Make a magic ring. Work 10 sc in the ring and sl st to the first sc. (10 sc)
Rnd 2: Ch 4, sl st in 2nd ch from hook, sc in next ch, hdc in next ch, skip next sc, sl st in next sc. Rep from * 4 more times. (5 points)
Fasten off, leaving a 10 in (25.4 cm) tail for sewing. The star measures 1.25 in (3.2 cm) across.
Bows (Make 4, B)
Body:
1. Ch 11.
2. Sc in 2nd ch from hook and across. (10 sc)
3. Work 2 more rows of 10 sc.
4. Fasten off, leaving a 12 in (30.5 cm) tail.
5. Wrap the tail tightly around the center 5 times to cinch, then secure it.
The finished bow measures 1.25 in (3.2 cm) x 0.375 in (1.0 cm).
Tails:
1. Ch 9 and fasten off.
2. Fold into an upside-down V.
3. Sew the fold behind the cinch.
Make All Pieces
- Color A: 13 leaves (with B trim), 1 trunk
- Color B: 12 leaves, 4 bows
- Color C: 1 star
Layout grid (top to bottom):
ROW 1: GREEN
ROW 2: GREEN CREAM GREEN
ROW 3: CREAM GREEN CREAM GREEN CREAM
ROW 4: GREEN CREAM GREEN CREAM GREEN CREAM GREEN
ROW 5: CREAM GREEN CREAM GREEN CREAM GREEN CREAM GREEN CREAM
Check the totals:
– Green: 1 + 2 + 2 + 4 + 4 = 13
– Cream: 0 + 1 + 3 + 3 + 5 = 12
All leaves hang tip down.
Joining
Set up a template. Draw a vertical center line on paper. Mark each row’s top edge 1.25 in (3.2 cm) apart. Within each row, space leaf centers 0.6 in (1.5 cm) apart.
Placement rules:
– Green leaves sit in front, and cream leaves sit behind them.
– Each row’s rounded base tucks 0.5 in (1.3 cm) under the row above, because 1.75 in leaf length minus 1.25 in step leaves 0.5 in of overlap.
– Pin everything before you sew anything.
Method: Tack with A on a tapestry needle, catching only the back loops so nothing shows on the front.
- Trunk: Pin the top 0.5 in (1.3 cm) of the trunk behind the center of Row 5. Tack it across all 10 sts of its top row into the backs of the leaves it touches.
- Within each row: Tack each green leaf to the cream leaf behind it at 2 points along the overlap, at about sts 7 and 20 of the green leaf’s Rnd 2.
- Between rows: Tack the plain base stitches of each lower leaf to the back of the leaf above it. Use sts 13–14 on green leaves and sts 13–14 on cream leaves.
- Order: Work from Row 5 upward, so each new row covers the previous row’s seams.
- Bows: Sew one bow at the center where each pair of rows meets: Rows 1/2, 2/3, 3/4, and 4/5.
- Star: Sew the star so it overlaps the base of the Row 1 leaf by 0.5 in (1.3 cm).
- Hanging loop: With A, ch 20, fold it into a loop, and sew it behind the star.
Tension: Each tack should hold firmly but never dimple the front. If a leaf cups, loosen that stitch and re-tack.
Size checkpoint:
– Leaves alone: 6.75 in (17.1 cm) from the top of Row 1 to the Row 5 tips
– Star adds 0.75 in (1.9 cm) above
– Trunk extends to 7.75 in (19.7 cm) below the top of Row 1
– Total: 8.5 in (21.6 cm) tall
– Width at Row 5: 0.5 in + 8 x 0.6 in + 0.5 in = 5.8 in (14.7 cm)
Final Blocking
- Lay the tree face down on the blocking mat.
- Mist it evenly until damp, not soaked.
- Turn it face up. Pin the outline to 8.5 in (21.6 cm) x 5.8 in (14.7 cm), using the center line from your template to keep it straight.
- Pin each leaf tip to a sharp point.
- Open each picot with a pin tip.
- Fluff the bow loops, and pin the star points flat.
- Let it dry completely, usually 12–24 hours.
- Unpin and check that it hangs flat from the loop.
Final Quality-Control Checklist
- Each green leaf has 28 sc and 13 picots in Rnd 3.
- All 25 leaves have a visible raised vein.
- Leaf tips point straight down and line up row to row.
- Green and cream alternate exactly as shown in the grid.
- No tacking thread shows on the front.
- The 4 bows are centered, and the star is upright.
- The tree measures 8.5 in (21.6 cm) x 5.8 in (14.7 cm).
- All ends are woven in and the hanging loop is secure.
Troubleshooting
- Leaf cups or curls: The tension is too tight in Rnd 2. Go up one hook size and block it firmly.
- Leaf twists: The foundation chain was twisted. Restart it and keep the chain’s front facing you.
- Picots flop: Make the ch 3 snugger, then block with a pin through each picot.
- Lopsided trim: Recount the halves. Each side must use exactly 13 sts.
- Tree leans: One row was placed off center. Re-pin it against the template’s center line.
- Gaps between leaves: Reduce the center spacing slightly. Do not add extra leaves.
- Star curls: Steam it lightly and pin it flat while it dries.
Care
Spot clean with cool water and mild soap, then lay flat to dry. Store the tree flat in a box between seasons so the picots and bows keep their shape.
Optional: For a larger tree, use heavier yarn and a bigger hook with the same counts. The proportions stay the same.
Final Notes
Everything rests on one measurement chain:
- Gauge of 16 sc = 2 in (5.1 cm)
- Leaf Rnd 1: 1.25 in (3.2 cm)
- Leaf Rnd 2: 1.5 in x 1 in (3.8 cm x 2.5 cm)
- Trimmed green leaf: 1.75 in x 1.25 in (4.4 cm x 3.2 cm)
- Rows stepped 1.25 in (3.2 cm) apart
- Finished tree: 8.5 in x 5.8 in (21.6 cm x 14.7 cm)
Check each link before moving to the next, and the tree will come together cleanly. Happy crocheting!