

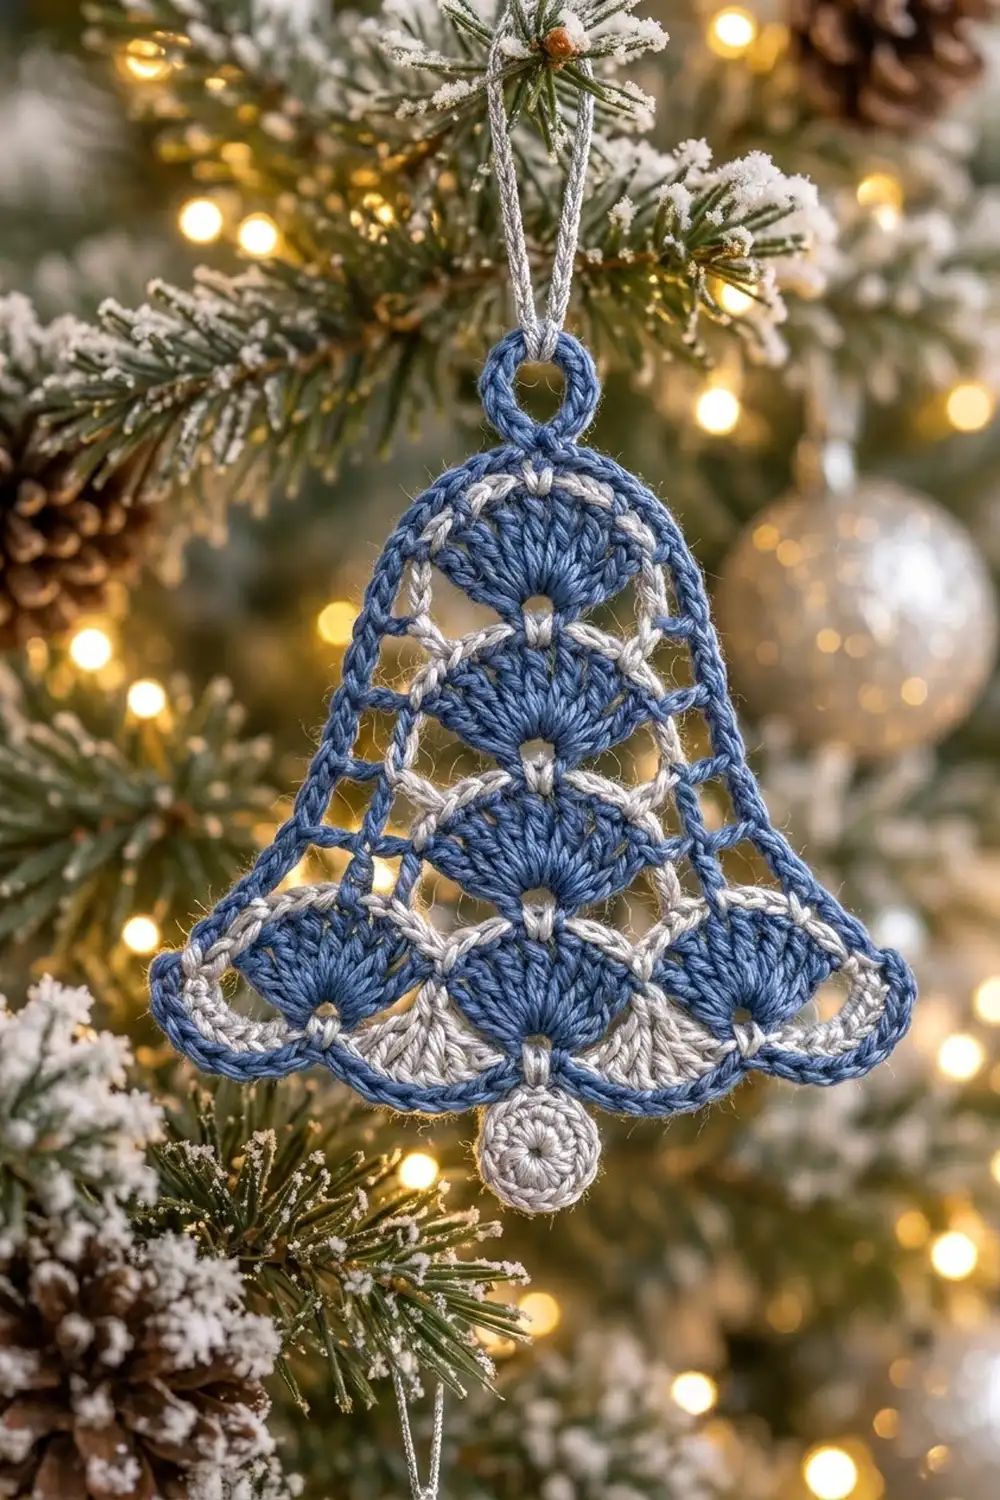
The Frosted Bluebell is a flat, lacy bell ornament. It has stacked shell fans in denim blue and fine silver-gray arches over each fan. A column of four blue fans runs up the center, and the bottom widens to three fans side by side. Open lattice fills the sides, and a solid blue outline turns it all into a clean bell shape.
The look is wintry and a little vintage, like frosted blue china. Small silver fans peek out between the bottom scallops, and a round silver clapper hangs from the center. It looks good on a tree, tied to a gift, or hung in a window.
The pattern uses US crochet terms. The finished bell measures 3.5 in (8.9 cm) wide by 3.5 in (8.9 cm) tall. With the hanging loop and clapper, it hangs about 5.25 in (13.3 cm) long.
You work the bell flat, from the bottom up, in short rows that alternate colors. Blue rows make the fans and lattice bars. Silver rows make the arches and cross bars. Then you add a silver trim along the bottom edge and two rounds of blue outline. Last, you make a small clapper and attach it.
Finished Size and Construction
- Finished size: 3.5 in × 3.5 in (8.9 × 8.9 cm) body. Total hanging length is 5.25 in (13.3 cm).
- Skill level: Intermediate
- Terminology: US crochet terms
- Yarn weight: Sport-weight (#2) cotton
- Hook: 3.25 mm (US D-3)
- Number of pieces: 1 bell body plus 1 small clapper, assembled into one ornament
- Layout: Center column of 4 fans, with 3 fans across the bottom tier
- Piece size before border: 3 in × 3 in (7.6 × 7.6 cm)
- Border depth: 2 rounds, about 0.25 in (0.6 cm) total
Materials
Use a smooth, mercerized sport-weight cotton. It shows the fan stitches clearly and blocks crisply. Fuzzy or very soft yarn will blur the lattice.
- Color A (Denim Blue): 5 g, about 10 m
- Color B (Silver Gray): 3 g, about 6 m
These amounts include a margin for tails and a test swatch.
Tools:
– 3.25 mm (US D-3) crochet hook
– Tapestry needle
– Scissors
– Rust-proof pins and a foam blocking mat
– Spray bottle
– Optional: fabric stiffener
– Silver cord, 8 in (20.3 cm), for hanging
Abbreviations (US Terms)
- ch – chain
- sl st – slip stitch
- sc – single crochet
- dc – double crochet
- tr – treble crochet
- sk – skip
- sp – space
- st(s) – stitch(es)
- RS / WS – right side / wrong side
Special stitch – Fan: 7 dc worked into the same stitch. The center (4th) dc is the fan’s top center point.
Mini fan: 5 dc worked into the same stitch.
Gauge and Checkpoints
The bell is a single piece, so your first bell is also your gauge test. Measure it at each checkpoint below before moving on.
Base gauge: One fan worked over 6 foundation chains measures 1 in (2.5 cm) wide at its widest point.
Checkpoints:
– After Row 2: 3 in (7.6 cm) across the three bottom fans.
– After Row 4: 1.5 in (3.8 cm) tall.
– After Row 9: 3 in × 3 in (7.6 × 7.6 cm).
– After Round 10: 3.25 in × 3.25 in (8.3 × 8.3 cm).
– After Round 11: 3.5 in × 3.5 in (8.9 × 8.9 cm).
Too big? Go down one hook size to 3.0 mm, or tighten your chains.
Too small? Go up to 3.5 mm (US E-4).
The proportions stay the same at any gauge. Only the finished size changes.
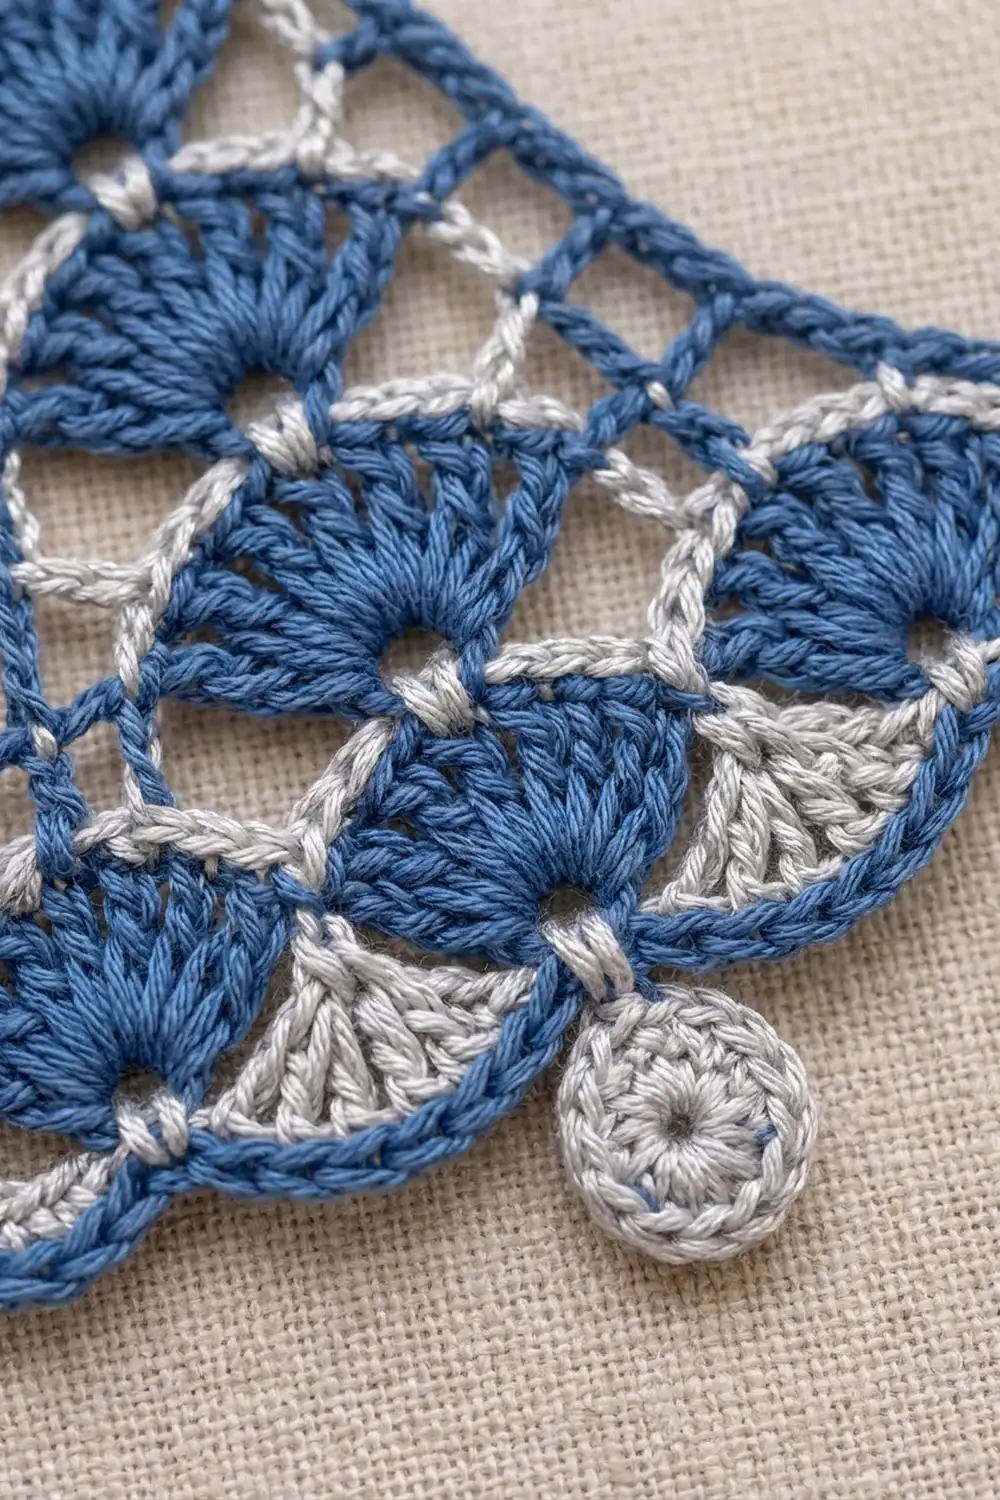
Bell Body Pattern
Color changes: Fasten off at the end of every row, leaving 4 in (10.2 cm) tails. Join the next color with a sl st where the row tells you to. RS rows are odd-numbered and WS rows are even-numbered. Hide all tails later under the border.
Row 1 (A, RS) – Bottom Fans
Ch 20. Sc in 2nd ch from hook.
Sk 2 ch, Fan in next ch, sk 2 ch, sc in next ch. Repeat from * 2 more times.
Count: 3 fans; 4 sc + 21 dc = 25 sts.
For reference, number the 19 foundation chains you worked into F1–F19. The sc sit in F1, F7, F13 and F19. The fans sit in F4, F10 and F16.
Row 2 (B, WS) – Bottom Arches
Join B in the last sc of Row 1. Ch 1, sc in same sc.
Ch 3, sk 3 dc, sc in center dc of Fan, ch 3, sk 3 dc, sc in next sc. Repeat from * 2 more times.
Count: 7 sc, 6 ch-3 sps.
Label these sc S1–S7. The odd-numbered ones (S1, S3, S5, S7) sit low, between the fans. S2, S4 and S6 sit high, at the fan tops.
Row 3 (A, RS) – Second Fan and Two Lattice Openings Each Side
Join A in S1.
- Ch 4 (counts as tr), ch 2, dc in S2, ch 2, tr in S3.
- Ch 1, Fan in S4, ch 1.
- Tr in S5, ch 2, dc in S6, ch 2, tr in S7.
You use tr in the low points and dc in the high points, so the tops of the bars come out level.
Count: 4 tr + 2 dc bars + 7 dc Fan = 13 sts; 4 ch-2 sps, 2 ch-1 sps.
Row 4 (B, WS) – Arch and Cross Bars
Join B in the last tr.
- Ch 1, sc in same st. Then [ch 2, sc in next bar] 2 times.
- Ch 3, sk ch-1 and 3 dc, sc in center dc of Fan, ch 3, sk 3 dc and ch-1.
- Sc in next bar. Then [ch 2, sc in next bar] 2 times, ending with the last sc in the top of the ch-4.
Count: 7 sc (V1–V7), 4 ch-2 sps, 2 ch-3 sps.
Row 5 (A, RS) – Third Fan, One Lattice Opening Each Side
Join A in V2. V1 and V7 stay unworked, which narrows the bell by one opening on each side.
- Ch 4 (counts as tr), ch 2, tr in V3.
- Ch 1, Fan in V4, ch 1.
- Tr in V5, ch 2, tr in V6.
Count: 4 tr + 7 dc = 11 sts; 2 ch-2 sps, 2 ch-1 sps.
Row 6 (B, WS)
Join B in the last tr.
- Ch 1, sc in same st, ch 2, sc in next tr.
- Ch 3, sk ch-1 and 3 dc, sc in center dc, ch 3, sk 3 dc and ch-1.
- Sc in next tr, ch 2, sc in top of ch-4.
Count: 5 sc (W1–W5), 2 ch-2 sps, 2 ch-3 sps.
Row 7 (A, RS) – Top Fan
Join A in W2. W1 and W5 stay unworked.
Ch 1, sc in W2, ch 1, Fan in W3, ch 1, sc in W4.
Count: 2 sc + 7 dc = 9 sts; 2 ch-1 sps.
Row 8 (B, WS) – Top Arch
Join B in the last sc.
Ch 1, sc in same sc, ch 3, sk ch-1 and 3 dc, sc in center dc, ch 3, sk 3 dc and ch-1, sc in last sc.
Count: 3 sc (X1–X3), 2 ch-3 sps.
Row 9 (B, RS) – Silver Mini Fans
Turn the bell upside down and work into the free loops of the foundation chain.
- Join B in F1. Ch 1, sc in F1.
- Ch 2, sk F2–F3, sc in F4.
- Sk F5–F6, Mini fan in F7.
- Sk F8–F9, sc in F10.
- Sk F11–F12, Mini fan in F13.
- Sk F14–F15, sc in F16.
- Ch 2, sk F17–F18, sc in F19.
Count: 5 sc + 10 dc = 15 sts; 2 ch-2 sps.
The two mini fans point downward between the blue fan bases. Check that the body measures 3 in × 3 in (7.6 × 7.6 cm).
Border
Border gauge: Each sc round adds about 1/8 in (0.3 cm) all around.
Round 10 (A) – Outline
Join A in X2 (the top center). Ch 1, sc in X2. This is the first sc.
Side 1, top to bottom:
1. 4 sc in ch-3 sp, sc in X3.
2. Ch 4, sc in W5.
3. Ch 5, sc in V7.
4. Work 4 sc down the post of the Row 3 edge tr.
5. Sc in the side of S7, then 2 sc down the side of Row 1.
Corner: 3 sc in the end sc of Row 9.
Bottom edge:
1. 3 sc in ch-2 sp, sc in F16 sc.
2. Over the mini fan, work sc in the first 2 dc, 3 sc in the center dc, and sc in the last 2 dc.
3. Sc in F10 sc.
4. Repeat the mini-fan sequence over the second mini fan.
5. Sc in F4 sc, 3 sc in ch-2 sp.
Corner: 3 sc in the first sc of Row 9.
Side 2, bottom to top:
1. 2 sc up the side of Row 1, sc in the side of S1.
2. 4 sc up the post of the Row 3 edge tr, sc in V1.
3. Ch 5, sc in W1.
4. Ch 4, sc in X1.
5. 4 sc in ch-3 sp.
Top: Sc in X2 again. Then ch 12 and sl st in the first sc to close the hanging loop.
Counts per section:
– Top: 12 sc, plus the ch-12 loop
– Each side: 9 sc, 1 ch-4 sp and 1 ch-5 sp
– Each corner: 3 sc
– Bottom: 23 sc
Total: 12 + 9 + 9 + 3 + 3 + 23 = 59 sc.
The chain spans make the straight, slanted sides of the bell. The two 3-sc corners let the bottom flare.
Round 11 (A) – Solid Outline
Ch 1, then work around:
- Sc in each sc.
- 3 sc in the center sc of each corner.
- 5 sc in each ch-4 sp.
- 6 sc in each ch-5 sp.
- 20 sc in the ch-12 loop.
Sl st to the first sc and fasten off.
This round has no growth label. Its count is 59 sc worked one per existing sc, plus 46 extra sc:
- 4 for the two corners (2 extra each)
- 22 for the chain spaces (5 + 5 + 6 + 6)
- 20 for the loop
Total: 59 + 46 = 105 sc.
Counts per section:
– Top: 12 + 20 = 32
– Each side: 9 + 5 + 6 = 20
– Each corner: 5
– Bottom: 23
Check: 32 + 20 + 20 + 5 + 5 + 23 = 105.
Why the math works: Every row is symmetrical around the center fan, so Side 1 and Side 2 always match: 9 sc in Round 10 and 20 sc in Round 11. The corners have an odd count (3, then 5), which keeps a single center stitch at each point, so the flare stays sharp. The bottom keeps 23 sc in both rounds because the mini fans already have their own 3-sc tips.
Clapper
With B, make a magic ring.
Rnd 1: Ch 3 (counts as dc), 11 dc in ring. Sl st to the top of the ch-3. Count: 12 dc.
Rnd 2: Ch 1, 2 sc in each st around. Sl st to the first sc. Count: 24 sc. Fasten off.
The clapper should measure 0.75 in (1.9 cm) across.
Attach: Join A in any sc of Rnd 2. Ch 3, then sl st into the Round 11 sc directly below F10, at the bottom center of the bell. Fasten off. The link adds about 0.25 in (0.6 cm).
Final Blocking
- Weave in all tails under the blue outline, through matching colors.
- Spritz the bell until it is damp, but not dripping.
- Pin the top loop and the bottom center first, 3.5 in (8.9 cm) apart.
- Pin the two bottom corners 3.5 in (8.9 cm) apart.
- Pin each side straight from the loop down to its corner.
- Pin each fan’s top center so the silver arches sit smooth and round.
- Open the lattice holes with a pin tip.
- If you want a stiff ornament, brush on fabric stiffener now.
- Let it dry completely, then unpin.
Final Quality-Control Checklist
- [ ] There are 4 blue fans in the center column and 3 across the bottom.
- [ ] Every fan has a silver arch over it.
- [ ] There are 2 lattice openings on each side at tier 2 and 1 at tier 3.
- [ ] Both silver mini fans point downward.
- [ ] Round 11 totals 105 sc, with 20 sc on each side.
- [ ] The body measures 3.5 in × 3.5 in (8.9 × 8.9 cm).
- [ ] The clapper is centered and hangs straight.
- [ ] The hanging loop is round and firm.
Troubleshooting
- Fans ruffle: Your dc are too loose. Go down one hook size, or check that you skipped 2 stitches on each side of every fan.
- Lattice tops are uneven: Use tr in the low points and dc in the high points, exactly as written.
- Sides bow inward: Your chain spans in Round 10 are too tight. Chain a little more loosely.
- Bottom corners curl: Check that each corner has a full 3 sc, then 5 sc. Block the corners firmly.
- Clapper hangs crooked: Re-attach it to the exact center sc below F10.
Care
Hand wash in cool water with mild soap. Press out the water in a towel and lay the bell flat, pinned to shape, to dry. If you used stiffener, spot clean only.
Final Notes
Here is the full measurement chain:
- One fan is 1 in (2.5 cm) wide.
- Three fans make the 3 in (7.6 cm) bottom tier.
- Eight rows plus the mini-fan trim make a 3 in × 3 in (7.6 × 7.6 cm) body.
- Two rounds of outline (59 sc, then 105 sc) bring it to 3.5 in × 3.5 in (8.9 × 8.9 cm).
- The loop and clapper bring the total hanging length to 5.25 in (13.3 cm).
Check each stage, and your bell will match the design.
Happy crocheting!